How to enable System UI tuner on Pixel

By default hidden system UI tuner in your pixel and pixel XL phone. In this tutorial, I will show you step by step process to enable System UI tuner on pixel & pixel XL 7.1.2 device. This System UI tuner feature includes status bar, do not disturb (DND mode) and other settings. If you want to display battery percentage on pixel XL & pixel phone, first of all find hidden System UI tuner.

In your pixel and pixel XL device, you can see other hidden options such as developer mode, Night Light mode etc. Sometimes various users facing problem to access System UI tuner on Nougat 7.1.2. When this type of issue occurs, make sure enable developer mode in your pixel device. Let see below given steps to enable System UI tuner on Pixel and Pixel XL.

Don’t Miss:

How to change status bar on OnePlus 7 Pro

How to activate system UI tuner on Google Pixel 2 & Pixel 2 XL

Enable Night Light mode on Pixel & Pixel XL

How to enable System UI tuner on Pixel & Pixel XL 7.1.2

Check out each one listed below steps to enable System UI tuner.

Tap settings gear icon few second to enable hidden system UI tuner in pixel

Step 1: Scroll down notification bar from any screen and tap & hold settings gear icon few seconds (5-7)

enable System UI tuner on Pixel phone

You can show above message: Congrats! System UI tuner has been added to settings

Step 2: Go to settings in your pixel & pixel XL

Tap on System UI tuner under system settings in pixel

Step 3: Under System section, tap on “System UI tuner

It’s quite easy to enable System UI tuner on Pixel 7.1.2. You can see below given three options.

  1. Status bar

Here you can enable / disable various status bar icon from your pixel & pixel device.

Using this option, you can enable battery percentage in pixel 7.1.2 device using below settings. By default set show percentage when charging pixel & pixel XL phone.

Display battery percentage in your Google Pixel device

Settings > System > System UI tuner > Status bar > Battery > Always show percentage

Also set time as hours, minutes and seconds in your pixel devices. By default set time as hours and minutes in your pixel phone.

Settings > System > System UI tuner > Status bar > time > Show hours, minutes and seconds

  1. Do not disturb (DND)

Do not disturb option in System UI tuner pixel phone

Here you can see volume controls and volume button shortcuts. Enable volume controls to control using this DND mode in pixel 7.1.2.

  1. Other

Power notification control in pixel phone

This option includes power notification controls options. You can enable power notification controls to set different level (0 to 5) for app’s notification in your Google pixel and pixel XL device. It will useful to prevent full screen interruption and mute sound & vibration of app notification.

That’s it. I hope this little tip helpful to enable System UI tuner on pixel and pixel XL. Did you found above steps helpful? Let us know your thoughts related this hidden System UI tuner feature. We are waiting for your reply.

How to Show Battery Percentage on Google Pixel and Pixel XL

How to hide or show battery percentage on Google Pixel and Pixel XL status bar. You can enable battery percentage on Google Pixel and Pixel XL using battery settings. After enabling it, you can see the battery percentage in the battery icon on the notification bar. This battery percentage indicates the remaining battery power. Also, automatically turn on battery saver on your Pixel when reaching the battery at 15% charging only.

Related:

How to Enable Battery Percentage on Google Pixel and Pixel XL

Check out the below-given settings to enable or disable battery percentage on Google Pixel and Pixel XL running Android 10.

How to Display Battery Percentage on Google Pixel and Pixel XL running Android 10

Step 1: Go to “Settings“.

How to Display Battery Percentage on Google Pixel

Step 2: Tap on “Battery“.

How to Show Battery Percentage on Google Pixel and Pixel XL

Step 3: Toggle on “Battery percentage“.

You can see the remaining battery percentage at the top right corner of the screen (Show above screenshot).

Step 4: Toggle off “Battery percentage” if you want to hide the battery percentage in the status bar.

How to Enable Battery Saver on Google Pixel (Android 10)

Enable Battery Saver on Google Pixel Running Android 10

Settings > Battery > Battery saver > Turn on now

How to Turn On System UI Tuner on Google Pixel & Pixel XL (Android Nougat 7.1.2)

Tap settings gear icon to enable hidden system UI tuner in pixel

Step 1: Scroll down the notification bar from any screen and tap & hold settings gear icon 5-7  seconds.

Enable hidden system UI tuner in pixel XL phone 

You can see the above screen with this message: Congrats! System UI tuner has been added to settings

Step 2: Now Go to Settings > System > System UI tuner

If can not enable System UI tuner in Pixel & Nexus and other devices, make sure to enable developer mode in the Pixel device. Let see steps to display battery percentage on Pixel & Pixel XL (7.1.2). After enabled system UI tuner, follow the below-given steps.

How to Enable Battery Percentage on Google Pixel and Pixel XL

Step 1: Go to “Settings” in your Pixel & Pixel XL phone.

System UI tuner under system settings in pixel

Step 2: Tap on “System UI Tuner” under the system section.

Here you can see the status bar, do not disturb (DND), and other options.

Tap on status bar under system UI tuner in pixel

Step 3: Select “Status bar”.

Battery option under system UI tuner on pixel phone

Step 4: Scroll down and tap on “Battery”.

By default set “show percentage when charging” your Pixel & Pixel XL device. Two options include Always show percentage/Don’t show this icon.

enable battery percentage Google Pixel phone

Step 5: Tap on “Always show percentage”.

Display battery percentage on pixel XL & pixel

Now, you can see the battery percentage in the status bar on Google Pixel and Pixel XL.

How to Set Time as Hours and Minutes on Pixel and Pixel XL (Android Nougat 7.1)

Settings > System > System UI tuner > Status bar > Time > Show hours, minutes and seconds

That’s all. Did you found the above steps helpful to enable battery percentage Google Pixel and Pixel XL? Let us know in below comment box. For more latest Android tips and tricks ideas visit wordpress-221392-673273.cloudwaysapps.com

How to Backup Data on Google Pixel 6 Pro and Pixel 6

Do you want to automatically backup data on Google Pixel 6 Pro and Pixel 6? Here’s how to back up and restore data on Google Pixel devices including Pixel 6 Pro, Pixel 6, Pixel 5, Pixel 5a 5G, Pixel 4a 5G, Pixel 4 XL, and Pixel 4. You can restore from Google backup including text messages, calendar, contacts, docs, drive, Gmail, photos, videos, etc. Also, enable automatically sync app data to back up app data automatically on your Pixels. You can back up & sync photos and videos from your Google account to other devices. Remember your Google account and password to back up all data to any devices even lost your data or factory reset your Pixels.

Read Also:

How to Backup and Restore Data on Pixel 6 and Pixel 6 Pro – Google Backup

You can move everything from one Google Pixel to another using your Gmail account backup. Follow the below step-by-step process to back up all your Pixel data so easily restore anytime and any device using your Gmail account.

Compatible Pixel Devices:

  • Google Pixel 5 5G
  • Google Pixel 5a 5G
  • Google Pixel 4a 5G
  • Google Pixel 4a
  • Google Pixel 4 XL
  • Google Pixel 4

How to Restore from Google Backup on Pixel 6 Pro and Pixel 6 (Android 12)

Step 1: Swipe down the notification panel and tap on the Settings icon.

Step 2: Scroll down and tap on System.

How to Backup and Restore Data on Pixel 6

Step 3: Tap on Backup.

Restore from Google Backup on Pixel 6 Pro

Step 4: Tap on Account storage.

You can see a list of backup details including apps, photos & videos, text messages, call history, device settings, and Google account data.

Move everything from one Google Pixel to anohter using your Gmail Account on Pixels

Step 5: Choose a Backup account (Gmail account).

How to Backup Data on Google Pixel 6 Pro and Pixel 6

Step 6: Tap on the Back up now button.

How to Manually Backup a Pixel 6 Pro & Pixel 6 Using Account Sync Settings

Step 1: Go to Phone settings.

Step 2: Scroll down and tap on Passwords & accounts.

Back up a data using Google account on your Pixels

Step 3: Tap on your Google account (Gmail) you want to backup data.

How to Restore from Google Backup on Pixel 6 Pro

Step 4: Tap on Account sync.

You can enable or disable sync individually here for phone contacts, drive, docs, Google calendar, Google news, etc.

Account sync settings to backup Pixel 6 Pro data

Step 5: Tap on Three vertical dots (More) at the upper right corner.

Manualy Backup a Pixel 6 Pro & Pixel 6 Using Account Sync Settings

Step 6: Tap on Sync now.

It will automatically sync all data that enabled sync on your Google Pixels.

How to Google Pixel Backup to PC/Laptop using USB Cable

Step 1: Unlock your Pixel and connect your Pixel to your PC using a USB cable.

Step 2: Tap on Notification at the status bar.

Step 3: Make sure to select file transfer under USB configuration or Go to Settings > System > Developer options > USB preferences > Choose File transfer or Android auto.

Step 4: You can see your phone name on the computer drives list.

Step 5: Copy the data and paste it to a computer.

How do I View my Google Backup on Pixels? 

Settings > System > Back up > Google Account data > You can see last updated date & time

How to Back Up Data Using Mobile Data on Pixel 6 Pro/Pixel 6

How to Back Up Data Using Mobile Data on Pixel 6 Pro

Settings > System > Backup > Toggle on Back up using mobile data at the end of the page

How to Back Up App Data Automatically on Google Pixels (Android 12)

Settings > Passwords & accounts > Toggle on Automatically sync app data at the end of the page

How to Back Up & Sync Photos and Videos on Pixel 6 Pro and other Pixels (Running Android 12)

Step 1: Open the Google photos app in your Pixels.

Step 2: Tap on the Profile icon at the top right corner.

Automatically backup Google photos and videos on Pixels

Step 3: Tap on Photos settings.

Backup and sync photos and videos on Google Pixels

Step 4: Tap on backup & sync.

Back Up & Sync Photos and Videos on Pixel 6 Pro

Step 5: Make sure toggle on Back up & sync to automatically backup Google photos and videos.

How to Backup a Google Pixel Using Google Account (Android 11/Android 10)

Step 1: Go to Settings.

Step 2: Scroll down and tap on System.

Backup and Restore Data on Google Pixel and Pixel XL Device

Step 3: Tap on Backup.

Step 4: Toggle on Back up to Google Drive (Show the below-given screenshot).

How to Backup and Restore Google Pixel Data

Step 5: Tap on the Back up now button to back up the latest data.

How to Back Up App Data, SMS Text Messages, Call History, and Contacts on Google Pixel (Android 10)

Backup Data on Google Pixel & Pixel XL Using Google Account

Settings > System > Backup > Pixel backup > View the last back up

To back up the latest data: Settings > System > Backup > Tap on “Back up now” button

How to Restore Backup from Google Drive on Google Pixel and Pixel XL (Android Nougat 7.1)

In this method, enable auto-backup data for Google Pixel devices using the below steps.

Step 1: Go to “Settings” in your Pixel & Pixel XL.

Tap on Backup & reset data in pixel phone

Step 2: Under the personal section, tap on “Backup & reset”.

tap backup to restore data on pixel XL

Step 3: Tap “Backup”.

backup and restore data on Google Pixel phone

Step 4: Make sure toggle on “Back up to Google Drive”.

Here you can show content that backup includes apps, call history, Google calendar, device settings, Google contacts, photos & videos, and SMS.

Backup photos & videos on Pixel phone

Step 5: Tap “Photos & videos” to back up photos & videos on Pixel phone in Google account

Google Pixel & Pixel XL phone is unlimited free storage for photos and videos.

Backup & Sync photos and videos pixel phone

Step 6: Enable back up & sync of photos & videos.

This method is easy to backup Google Pixel data.

How to Use Android or Google Pixel Data Recovery Tool to Backup Data on Google Pixel XL & Pixel

Using this android data recovery tool, you can restore lost data from Pixel phones and transfer it to desktop PC or laptop devices. First of all download and install the below-given android data recovery tool on your device.

For Windows – Download

For Mac – Download

Step 1: Connect your Google pixel phone to the PC via USB.

If USB debugging is not enabled, enable USB debugging on the Pixel phone.

After turning on USB debugging on the pixel, you can view contacts & messages, media, and other options.

Step 2: Choose wants to back up data on Pixel & tap on Next to start scanning.

Step 3: Choose the content and press the Recover button.

Now selected data is transferred to your laptop or desktop PC. This is one of the best Android data recovery tools to back up all your pixel phone data at the same time.

We hope this article makes clear how to backup and restore data on Google Pixel and Pixel XL phones. Do let us know you liked this tutorial or not. Stay connected with us for more latest Google Pixel devices tips and tricks.

How to Fix Google Pixel Unresponsive or Not Responding

Annoying by Google Pixel & Pixel XL not responding? Here’s how to fix Google Pixel unresponsive or freezes. When your Google Pixel is slow, it’s irritated to operate phones such as open apps or search in the browser and other device related works. One of the simple solutions is to reboot your Pixel and check to fix the Google Pixel issue. Using this tutorial, you can also solve other Pixel problems such as Ok Google isn’t working on Pixel, touch screen not working Pixel, Ok Google voice command not working on Pixel, black screen problem on Pixel, and more.

Related Tricks:

4 Ways to Fix Google Pixel Not Responding

fix Google pixel not responding      

Restart your Pixel & Pixel XL

Press & hold the power button and tap on “Restart” to reboot your device. After restart Pixel, check the fix issue.

Check System Software Update

It will fix critical bugs and improve your Pixel performance. Try to download the update using Wi-Fi, so easily update your Pixel device.

Settings > System > About phone > System updates > check for update

Settings > System > Advanced > System update > Check for update

Enable Safe Mode to Fix Google Pixel Unresponsive Issue

To check any downloaded apps causing this issue, first of all, turn on safe mode on Pixel & Pixel XL device.

Step 1: Press and hold the power button on your Pixel.

Step 2: Tap & hold the “Power off” button until show “Reboot to safe mode”.

Step 3: Press “OK” to reboot safe mode on Pixel & Pixel XL.

Turn on Safe mode Google pixel & pixel XL device

Step 4: View the “Safe mode” symbol on the bottom left side corner.

Now check your Google Pixel phone is working. If not found any issue, it means any third party apps causing this issue. Now, exit safe mode to restart your phone and remove one by one recently downloaded third-party apps and check the fix issue. After find that app, re-install other apps. If you still facing issues in safe mode, it means hardware or OS related issues.

Factory Reset your Google Pixel & Pixel XL

It will delete all your phone information, music, photos, accounts, downloaded apps, etc. Before resetting your Google Pixel device, back up you Pixel phone data.

Step 1: Go to “Settings”.

Step 2: Under the personal section, tap on “Backup & reset”.

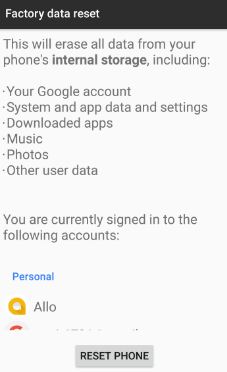
Step 3: Tap on “Factory data reset”.

Step 4: Select “Reset Phone”.

Factory reset your Google pixel & pixel XL

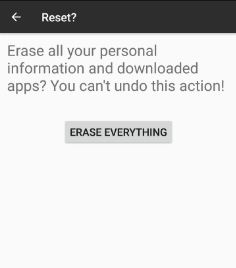
Step 5: Select “Erase everything

Alternative Way: Settings > System > Advanced > Reset options > Erase all data (Factory reset) > Erase all data > Confirm your screen lock > Erase all data

End the list of possible solutions to fix Google pixel not responding. If you have known other trick, please share with us in below comment section. Don’t forget to mention which method worked for you?

How to Fix Google Pixel Call Waiting Not Working: Pixel 7 Pro, 7, 6 Pro, 6

Are you facing the issue of Google Pixel call waiting not working after the system Update? While receiving an incoming call, do not disturb icon appears on the Google Pixel. Make sure to turn on the call waiting on your Google Pixel 7 Pro, Pixel 7, Pixel 7a, Pixel 6 Pro, Pixel 6, and other Pixel devices. Also, check any third-party apps causing this call waiting and notification issue. This Google Pixel 7 call waiting feature helps get details about incoming calls while busy with another call. You can turn the call waiting on or off on Pixel devices.

Read More:

5 Ways to Fix Google Pixel Call Waiting Not Working

Fix Google pixel call waiting not working after update

Check out each one listed below methods to fix call waiting is not working on Pixel XL & Pixel Devices.

1. Turn Off Do Not Disturb on Google Pixel

Disable do not disturb mode in pixel phone

Swipe down the notification panel at the top and tap on Do Not Disturb to turn it on/off.

2. Ensure to Activate Call Waiting Pixel 7 Pro and Other Pixel Devices

Step 1: Open the Phone app on your Pixel.

Step 2: Tap the More (Three Vertical Dots) at the top right corner.

Step 3: Tap the Settings.

Step 4: Tap Calls.

Step 5: Tap Additional Settings.

Ensure to Activate Call Waiting on your Google Pixel

Step 6: Make sure to toggle on Call waiting.

3. Enable Override Do Not Disturb (Older Android Version)

Step 1: Go to Settings.

Step 2: Under the device, tap on Notifications.

You can show a list of installed apps on your device.

Step 3: Tap on Phone.

Enable override do not disturb in Google pixel & pixel XL

Step 4: Enable Override Do Not Disturb.

I hope this solution fixes your Pixel phone issue.

4. Enable Safe Mode on Pixel to Fix Google Pixel Call Waiting Not Working

Step 1: Press and hold the power button on your Google Pixel.

Step 2: Touch and hold the Power off button until view Reboot to safe mode.

Step 3: Press OK to reboot safe mode on Google Pixel and Pixel XL.

It will take 30-50 seconds to reboot your device.

Safe mode enable on pixel & pixel XL phone

Step 4: See the Safe mode symbol below the left-side corner.

Now, check the call waiting to work in your Pixel. If your Pixel has no problem, it means any third-party apps are causing the issue. Remove one-by-one third-party apps until fixing the issue. After finding that app, re-install other apps. If you still get the error in safe mode, check for OS or hardware issues. To remove safe mode on Pixel, restart your phone.

If you still face an issue, try clearing the cache partition on Google Pixel and Pixel XL.

5. Factory Reset Your Google Pixel

It will delete all your personal data, accounts, photos, music, and downloaded apps. Before resetting the Google Pixel device, back up your phone data.

Step 1: Go to Settings.

Step 2: Scroll down and tap the System.

Step 3: At the end, tap the Reset options.

Step 4: Tap the Erase all data (Factory Reset).

Step 5: Tap the Erase all data button.

Step 6: If you set a pattern lock/PIN/Password, draw the pattern to unlock your Google Pixel and Pixel XL phone.

Factory data reset pixel & pixel XL device

Step 7: Tap on Erase all data or Erase everything.

Which of the above-given methods worked for you to fix the Google Pixel call waiting not working problem? Let us know in the comment box below.

Read Also:

How to Add Ringtones to Google Pixel XL and Pixel

Want to set a song as a ringtone on Google Pixel and Pixel XL? You can add ringtones to Google Pixel XL and Pixel and set a custom ringtone. There are two ways to change the ringtone on Google Pixel. You can individually set a ringtone to particular contact so without viewing the call, you can know the person who called you. To set a song as a ringtone, first of all, download a ringtone in your Pixel phone. In Pixel device supported MP3, WAV, OGG, and other formats. To add a new ringtone, you can use any file manager app if you can’t find direct settings in your Android or Samsung Galaxy devices.

Read Also: 

How to Set or Change Ringtone on Google Pixel & Pixel XL

Try below given various tricks to set individual ringtones on Google Pixel & Pixel XL.

How to Add Ringtones to Google Pixel and Pixel XL running Android 10

If you have the latest updated Pixel devices, you don’t need to install the file manager app to set a song or third party app to ringtone list. You can set any audio file using below given settings.

Step 1: Go to Settings.

Step 2: Tap on Sound.

Set phone ringtone on Google Pixel and Pixel XL

Step 3: Scroll down and tap on the Phone ringtone.

You can see different categories of sounds.

Set a Song as Ringtone in Google Pixel

Step 4: Tap on My sound to set a song as ringtone or add a downloaded ringtone.

How to Add Ringtones to Google Pixel XL and Pixel

Step 5: Tap on + icon at the bottom right corner.

Set Custom Ringtone on Google Pixel XL

Step 6: Browse the audio file and select it.

Change Ringtone on Google Pixel & Pixel XL Device

Step 7: Choose the ringtone and tap on Save at the top right corner.

How to Set Custom Ringtone For Contacts on Google Pixel & Pixel XL (Android 10)

You can set specific ringtones for contacts on Google Pixel & Pixel XL phone.

Step 1: Open the “Contacts app” in your Google Pixel & Pixel XL.

Step 2: Tap on the Contact name want to set a ringtone.

Open contact & tap more

Step 3: Tap “More or Three vertical dots” at the top right corner.

Set ringtone on Google pixel & pixel XL

Step 4: Select “Set ringtone”.

change ringtone on Google Pixel phone

Step 5: Choose a ringtone from the list & tap “OK”.

Now set a ringtone to specific contacts in your pixel devices.

Change Ringtone on Google Pixel & Pixel XL Using Sound Settings

Step 1: Go to “Settings” in your Pixel & Pixel XL.

Step 2: Under the device section, tap on “Sound”.

Set Phone ringtone in Google pixel & pixel XL

Step 3: Tap “Phone ringtone”.

Set phone ringtone in Pixel XL phone

Step 4: Choose from the list to set ringtone in pixel & tap on “OK”.

In this sound setting, you can also change the default notification ringtone and default alarm ringtone in your pixel and pixel XL device. It’s quite simple to change ringtone in pixel XL & pixel.

How to Set a Song as Ringtone in Google Pixel & Pixel XL Using File Manager

You can download the ringtone and set it in your Pixel XL device. After completing download follow below-given steps to set a third-party ringtone to Pixel and other Android phones.

In the download folder, you can view downloaded music files or songs.

Step 1: First of all download any file manager app from the play store.

Set downloaded ringtone in Google pixel

Step 2: Open File manager > Music > Download > Select ringtones want to add > More > Move to > Internal storage > Ringtones > OK

Now go to Settings > Sound > Phone ringtone > Select the ringtone you added > OK

That’s all about how to set or change the ringtone on Google Pixel & Pixel XL phone. Also useful for a set song as ringtone in Pixel XL device.

Do let us know you liked this tutorial or not. If you have any problem implementing this, don’t hesitate to let me know in below comment box.