Fix Samsung Galaxy S7 Keeps Restarting and Overheating

Samsung Galaxy S7 and Galaxy S7 edge keep restarting itself.  When open any apps or games in my galaxy S7 edge, Suddenly restart my device. Random reboots is sign of need firmware update or faulty battery on your Galaxy S7 phone. Also, check any third party app causing this problem. Check out each listed method below given to fix the Samsung Galaxy S7 Edge restart problem.

Sometimes reboot Galaxy S7 randomly even if not touching the home or lock screen. Also facing a problem of Galaxy S7 & Galaxy S7 edge freezing or unresponsive. I have no idea what happened with my device. I search the solutions online and found below given troubleshooting steps to fix Samsung Galaxy S7 keeps restarting itself. I hope one of these methods fixes your issue.

Read Also:

How to Fix Samsung Galaxy S7 keep Freezing and Restarting Issue
fix Samsung galaxy S7 keeps restarting itself

Check system software updates

Check system software updates are available for your Samsung Galaxy S7 & S7 edge device, it will fix critical bugs & improves device performance and stability of your galaxy S7 phone.

Settings > System > about phone > System updates > Check for update

Use safe mode to fix Samsung Galaxy S7 keeps restarting itself

Step 1: Turn off your Galaxy S7 device.

Step 2: Press & hold the power button on your Galaxy S7 screen.

Step 3: While the Samsung logo appears on screen, press & hold the volume down button until see “safe mode” in your galaxy S7 screen.

Safe mode will display on the bottom left side of the screen. If your galaxy S7 device running normally in safe mode, it means any third party downloaded apps causing the issue. Find that app and delete it from your galaxy S7 device.

Factory Reset Samsung Galaxy S7 & S7 edge using Hardware key

It will delete all your phone information including your Google accounts, downloaded apps, photos, videos, music, and other media files. Before resetting your Galaxy S7 device, back up & restore your Samsung Galaxy S7 & S7 edge data.

Step 1: Turn off your Samsung Galaxy S7 & S7 edge phone.

Step 2: Press & hold the volume up button, home button, and power button at the same time until the Galaxy S7 turns on.

You can see the Android system recovery option on your device screen. By default “Start” button view on your phone.

Step 3: Press the volume down button until you see the recovery mode.

Step 4: Press the power button to restart in recovery mode.

You can view a screen of the android robot with a red exclamation mark on the screen. Tap & hold the power button and press the volume up button one time only. Now, you can see the S7 recovery mode screen.

Step 5: Press volume buttons to scroll to wipe data/factory reset, press the power button to select it.

You can show this message: Wipe cache?

Step 6: To confirm, use volume buttons to scroll to Yes and press the power button to select it.

Clearing the cache data may take a few minutes.

Step 7: Use the volume buttons to scroll to reboot system now, press the power button to select it.

If you found the above-given methods did not fix Samsung galaxy S7 & galaxy S7 edge rebooting issue, clear system cache partition on Galaxy S7 edge.

That’s it. We hope this makes clear how to fix Samsung Galaxy S7 keeps restarting issue. Do you know some other methods to fix this issue? Let us know in below comment box.

How to Fix Samsung Galaxy S7 Freezing Issue

Annoying of Samsung Galaxy S7 and Galaxy S7 edge freezing after the software update? There are various reasons for freezing or crashing Samsung Galaxy S7, such as entire phone space, unnecessary background apps, more than one app used at a time, etc. Sometimes any recently downloaded app also causes this issue. You can quickly fix the Samsung Galaxy S7 freezing or unresponsive problem.

You can clear cache & data or factory data reset your Samsung Galaxy S7 and Galaxy S7 edge device. This issue irritates more while updating or downloading apps or games from the play store and suddenly stops it. Follow the below-given various methods to fix Samsung Galaxy S7 freezing or unresponsive after the update.

Don’t miss this: How to fix Samsung Galaxy S7 Edge Overheating Issue

How to fix Freezing Issue on Samsung Galaxy S7

Fix Samsung galaxy S7 freezing after nougat update

Try each one listed below methods to fix freezing and crashing Galaxy S7 and Galaxy S7 edge.

Check System Software Update on Galaxy S7

Check system software updates are available for your Samsung Galaxy S7 device. It will fix critical bugs and improves the performance of your Galaxy S7 & S7 edge device.

Settings > System > About phone > System updates > Check for update

Clear App Cache on Samsung Galaxy S7 Edge

Settings > App > Select the App > Clear cache

Enable Safe Mode to fix Samsung Galaxy S7 Freezing/Crashing

Step 1: Press and hold the power button on your Galaxy S7 edge.

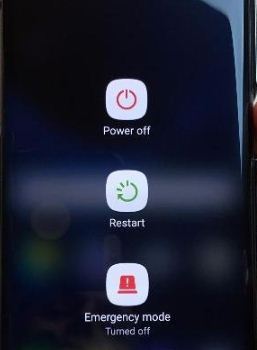
Step 2: Touch and hold the “Power off” button until you view “Reboot to safe mode”.

Step 3: Press “OK” to reboot safe mode on Galaxy S7.

It will take 30-50 seconds to reboot your device.

Step 4: View the “Safe mode” symbol below on the left side screen.

Check whether your Samsung Galaxy S7 device is working perfectly or not. Delete one by one recently downloaded app and find the app that is causing problems. If not found any problem, it means any third-party apps are causing issues.

Factory Reset Samsung Galaxy S7 Edge

It will delete all your phone information, including your Google accounts, downloaded apps, photos, videos, music, and other media files. Before resetting your Galaxy S7 device, back up & restore your Samsung Galaxy S7 & S7 edge data.

Step 1: Go to Settings.

Step 2: Under the personal section, tap on Backup & reset.

Step 3: Tap on Factory data reset.

Step 4: Tap on Reset Phone.

If you set Pattern lock/PIN/Password/Fingerprint, draw it to unlock your Samsung Galaxy S7 & S7 edge phone.

Step 5: Tap on Erase everything.

If you found the above-given methods do not fix Galaxy S7 & Galaxy S7 edge freezing issue, clear the system cache partition on the Galaxy S7 edge.

End the list of possible solutions to fix Samsung Galaxy S7 freezing or unresponsive. Do you know some other tricks to fix this issue? Please share with us in below comment box.

How to Fix Google Pixel XL Unresponsive Touch Screen

Annoying by Google Pixel unresponsive touch screen issue? Here’s the possible solutions to fix Google Pixel XL touch screen problem. To fix this issue, you can check for screen damaged, third party app issue, hardware or OS related issue, etc. Also, sometimes Pixel screen not turning on because of battery damage or power outlet problem.

Read Also:

How to Fix Pixel and Pixel XL Screen is Not Responding Issue

fix Pixel XL screen is not working

Restart your Pixel

Long press the power button and tap Restart to reboot your Pixel. After that check the issue.

Enable Safe Mode in Pixel & Pixel XL

To find apps that causing this problem, enable safe mode on Pixel XL using the below steps.

Step 1: Press and hold the power button on your Pixel device.

Step 2: Touch and hold the Power off button until show Reboot to safe mode.

Step 3: Press OK to reboot safe mode on Google pixel.

It will take 30-40 seconds to reboot your device.

Step 4: View “Safe mode” symbol on the left side below the screen.

Now check your Pixel touch screen works. If not found any problem, it means any third party apps causing this issue. Restart your Pixel to disable safe mode. Now, delete one by one downloaded apps until fix issue. After that re-install other apps. If you have still facing issue in safe mode, check for hardware or OS issue.

Factory Reset Using Power & Volume Button to Fix Google Pixel XL Unresponsive Touch Screen

Make sure backed up your important data before perforing below settings. It will delete all your Pixel phone data including photos, videos, internal storage, Google accounts, etc.

Step 1: Turn off your Google Pixel & Pixel XL.

Step 2: Press & hold the volume down button and the power button at the same time until the phone vibrates.

You can view the Android system recovery screen on Google pixel. By default start button show on Google Pixel & Pixel XL

Step 3: Press the volume down button until view Recovery mode.

Step 4: Press the power button to restart into recovery mode.

You can see the screen of Android robot exclamation mark with a red triangle icon on your Pixel.

Step 5: Press & hold the power button and volume up button one time & releae it to view recovery menu.

Step 6: Press the volume down button until select the Wipe data/Factory reset?

Step 7: Press the Power button to apply.

This message show on Pixel screen: Wipe all user data?

Step 8: To confirm, press the volume down buttons to select Yes and press the power button to apply it.

Step 9: Press the volume down buttons to highlight to reboot system now, press the power button to select it.

End the list of possible solutions to fix the Pixel XL screen is not responding problem. Do you have any alternative methods? Share it with us in below comment box.

How to Set Parental Controls on Google Pixel and Pixel XL

How to set parental controls on Google Pixel and Pixel XL. When first times enable parental controls on your Pixel phone, you need to enter a PIN to change settings of parental controls. You can safe your Google Pixel and other devices from your kids using this parental control. Also, set restrictions on different types of content such as apps & games, music, films that purchase from Google play store in your device. Also, use parental control apps for Pixel and Pixel devices to secure play store purchasing. Use fingerprint authentication for purchases from Google Play in your Google Pixel device.

Read Also:

How to Enable Parental Controls on Google Pixel and Pixel XL

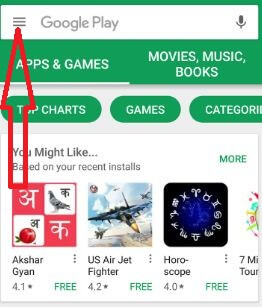
Step 1: Open “Play Store” in your Pixel and Pixel XL phone.

Tap on menu icon in play store

Step 2: Tap on “Three horizontal lines” from the top left corner.

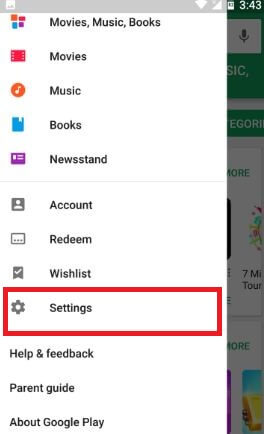
List of Play Store options view.

Tap on settings in Google play store

Step 3: Scroll down and tap on “Settings”.

Disable parental controls on Pixel XL phone

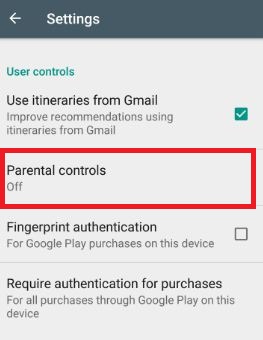
Step 4: Under user controls, tap on “Parental controls”.

By default disabled parental controls on Pixel and Pixel XL phone.

Step 5: Enable parental controls on Google Pixel XL and Pixel phone.

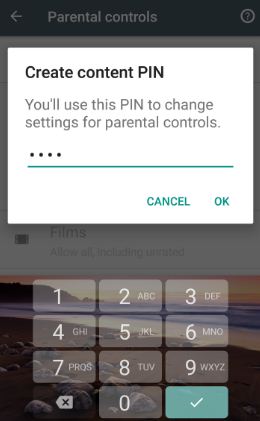
Change parental controls settings on Google Pixel

Step 6: Enter PIN to change settings of parental controls & tap on “OK”.

Now Enter again PIN to confirm it.

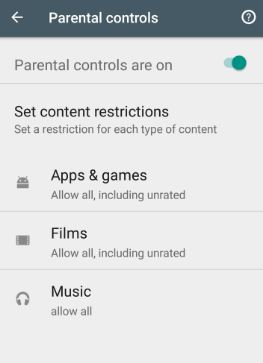
enable parental controls on Google Pixel phone

Now turned on parental controls in your Google Pixel XL devices. You can restrict the below-given content in your Pixel phone.

Apps & Games:

Set up parental control on Google Pixel XL phone

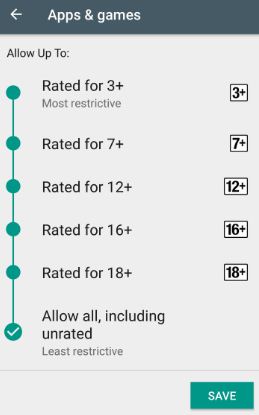
You can restrict apps & games of different rated such as rated for 3+/rated for 7+/12+/16+/18+ in your Pixel device. It restricts downloads or purchases from Google play store. Apps and games already installed will still be visible on devices.

Films:

Parental controls restrict purchases or playback of movies from Google Play.

Music:

Here you can restrict music and also block explicit songs in radio in Google play music settings online or on a device.

Alternative Ways: Settings > Digital Wellbeing & parental controls > Set up parental controls > Choose Child or teen/Parent > Follow on screen instruction – (Google Pixel running Android 10)

That’s all. Did you find the above steps helpful to set parental controls on Google Pixel and Pixel XL? Let us know in below comment box. Don’t forget to share it with others. Stay connected with us for the latest Google Pixel and Pixel XL tricks.
How to Fix Sound Not Working on Google Pixel and Pixel XL

According to users, Google Pixel and Pixel XL phones have audio distortion problems occur. You can fix the sound not working on Google Pixel XL using the next patch update. Several users reported popping and explosive sounds when listening to songs in your Pixel device. This problem affected users are reporting that after installing the OTA security patch update in Feb 2017, audio problems solved.

Pixel owners on Reddit and Google+ Pixel User Community said Google Pixel and Pixel XL affected on the audio problem. Google has informed Pixel users that “this audio issue resolves in the upcoming update. Until getting update does not play your Pixel phone at maximum volume. Follow below given a complete guide to fix the audio issue on Google Pixel and Pixel XL.

Read Also: Ok Google voice command not working on Google Pixel and Pixel XL

How to Fix Audio Issue on Google Pixel and Pixel XL

fix audio issue on Google Pixel phone

If not fix the issue after tried OTA security patch update in your Google pixel, try below given possible solutions to fix Pixel XL audio issue.

Restart your Pixel phone

Tap & hold the power button until the screen appears and after that tap on “Restart”. Check Bluetooth works or not.

Turn Off Bluetooth

Settings > Connected devices > Connection preferences > Bluetooth > Toggle off “Off”

Remove screen protector & cases

Remove case to fix Pixel XL audio problem

Remove your Google Pixel cases, screen protector, or other accessories.

Use Safe Mode to Fix Audio Issue on Google Pixel and Pixel

Step 1: Press and hold the power button on your Google Pixel and Pixel XL device.

You can see the below screen on your device.

Step 2: Touch and hold the “Power off” button until view “Reboot to safe mode”.

Reboot to safe mode Google pixel to fix audio problem

Step 3: Press “OK” to reboot safe mode on Google Pixel.

It will take 30-50 seconds to reboot your device.

Turn on safe mode to fix Google Pixel audio issue

Step 4: View “Safe mode” symbol on below of the left side screen

Check your Google Pixel XL device audio working perfectly If not any issue, it means any third party apps causing issues. Delete one by one recently downloaded app and find an app that causing a problem. To exit safe mode on Google Pixel devices, just restart your phone.

If none of the above-given solutions fix the audio issue on Pixel and Pixel XL, clear cache partition on Google Pixel and Pixel XL.

Is your Google Pixel phone affected? Did this solution fix audio issue on Google Pixel and Pixel XL phone? Tell us in the below comment box. For more great ideas visit wordpress-221392-673273.cloudwaysapps.com

How to Fix Bluetooth Problem on Google Pixel and Pixel XL

Here’s the list of solutions to fix Bluetooth problem on Google Pixel XL and Pixel. Some of the users reported Pixel and Pixel XL Bluetooth pairing or Bluetooth not finding devices issue. Due to this reason, you can’t connect your Bluetooth device when try to Bluetooth pairing with Car or other Bluetooth accessories and various cars including BMW, Audi, Tesla, Mercedes Benz, Volvo, etc.

Read Also:

How to Fix Google Pixel Bluetooth Pairing Issue

First of all turn Bluetooth off and then turn on again. After that search other device Bluetooth name and try to connect with your Pixel. If you still facing issue, apply below given troubleshooting methods.

Restart Your Pixel

Tap & hold the power button and tap on Restart. After restart, try to connect your Pixel to other device’s Bluetooth.

Check System Update

Check system software updates is available for your Pixel device, it will fixes critical bugs and improves the performance of your Google Pixel.

Settings > System > Advanced > System update > Check for update

Clear the Bluetooth Cache to Fix Bluetooth Problem on Google Pixel XL and Pixel

Step 1: Go to Settings.

Step 2: Tap Apps & notifications.

Step 3: Tap See all apps.

Find Bluetooth in Pixel to Fix Bluetooth issue

Step 4: Tap on More (Three vertical dots) at the top right corner.

Show system to find Bluetooth in Google Pixel XL

Step 5: Select Show system.

Google Pixel Bluetooth Issue

Step 6: Scroll down and tap on Bluetooth.

Clear Bluetooth cache to fix Google Pixel Bluetooth Pairing Issue

Step 7: Tap on Storage and cache.

How to Fix Bluetooth Problem on Google Pixel and Pixel XL

Step 8: Tap on Clear cache.

Remove All Bletooth Paired (Phone & Speaker) and Connect Again

Step 1: Go to Settings.

Step 2: Tap Connected devices.

Remove All Bletooth Paired to Fix Pixel Bluetooth Problem

Step 3: Tap Settings ger icon of connected device.

Fix Google Pixel Bluetooth Pairing

Step 4: Tap Forget.

Step 5: Tap Forget device.

Restart your phone and re-connect again to go Settings > Connected devices > Pair new device > Tap your device name

Google Pixel Can’t Pair With Car’s Bluetooth

Delete all paired devices from your car’s Bluetooth list. Now, search your Pixel’s Bluetooth and try to connect it.

End the list of troubleshooting methods. Did you find the above tricks helpful to fix Bluetooth problem on Pixel XL and Pixel phone? What other fixes do you know to fix this issue? Let us know in below comment box.