How to Show Calendar Events On Android Phone

Are you using a calendar app on your Android Nougat 7.1.2 and Marshmallow 6.0 device? Using this calendar app, you can create events and set reminders for an upcoming birthday, important meetings or days and more events show. This Google calendars save all your events and secure it. You can easily sync and access it from any desktop or laptop device using your Google account. It’s easy to find calendar events android nougat 7.0 & 7.1.

You can review existing events, control notifications for calendar events and create & manage events in android phone or tablet device. But in this tutorial, I will show you a complete guide of how to find calendar events android nougat 7.0 and marshmallow device.

Read Also:

How to Add Event to Calendar Android Nougat 7.0 & 7.1

When you set up any events on your device, you” ll see in your device status bar. Just swipe the status bar and tap the notification to see event information. Also, check upcoming events under the calendar app.

Check Events on the Calendar in Android

Step 1: Open calendar app.

Step 2: Touch month’s name.

How to find calendar events android phone

Step 3: Tap on the date to see created events.

It’s quite simple to find calendar events android phone or tablet devices.

Change the Event Schedule Android

Step 1: Open the Calendar app.

Step 2: Touch “Three horizontal lines

Step 3: Tap Schedule.

Set schedule time on android nougat

You can see a day, 3 days, week or month-wise options to set schedule. You can also read or edit event details, add calendar events and search in your android device.

How to Control Notifications for Calendar Events in Android 7.0 (Moto G4 plus) Nougat

Step 1: Open the “Calendar app”.

Tap menu in calendar settings

Step 2: Tap “Menu” from the top left side.

settings in calendar event in android

Step 3: Touch “Settings”.

General settings in calendar app

Step 4: Tap “General”.

control notifications for calendar events in android

Here you can see various calendar event settings such as the start of the week, alternate calendar, show week number & declined events, calendar notifications tone, vibrate calendar notifications and more event settings.

How to create calendar event on android nougat

When you create events in the calendar, enter title, time, places and name of that person or group, add location, add the attachment and add note also.

Did you find the above steps helpful to find calendar events android phones or tablets? If you have any kind of problem, let us know on below comment box. It would be a pleasure to help you.

How to Set a Ringtone on Android for Specific Contacts

Do you want to set specific ringtones for contacts on Android devices? In this tutorial, I’ll show you the steps to set a ringtone on Android for specific contacts. You can set or make a custom ringtone on Android for one person to quickly identify calls without checking the caller’s name. Also, add a download ringtone to your phone ringtone and set a custom ringtone for a specific contact on your phone. This change ringtone Android for a person does not change your phone ringtone. You can individually set the Message notification sound also.

Read More: How to Change Notification Sound on Google Messages Android

How to Set A Ringtone on Android for One Person (Specific Person)

Note: The steps may vary slightly depending on the specific version of Android running on your phone.

How to Set a Ringtone on Android for Specific Contacts – Android 13, Android 12, Android 11

Step 1: Open the Contact app or Phone app on your phone.

Step 2: Select the Contact you want to set a custom ringtone.

How to Set A Ringtone on Android for One Person

Step 3: Tap on Three vertical dots in the upper right corner.

How to Set a Ringtone on Android for Specific Contacts

Step 4: Select Set ringtone.

How to Assign a Ringtone to Specific Contacts Android

Step 5: Tap on Default category sound or My sounds to add a custom ringtone.

Add a download ringtone to your phone ringtone

Step 6: Tap the + icon at the bottom right to add a downloaded ringtone from your phone.

Set specific ringtones for contacts on Android

Step 7: Choose a ringtone and tap Save at the top right corner.

How to Set Specific Ringtones for One Person on Android 10 and Android 9 (Pie)

Open App drawer > Phone app > Contacts tab at the bottom right > Select any contact > Three vertical dots at the top right > Set ringtone > My sounds > Tap + icon at the bottom right > Select the ringtone from your phone (Songs or music file) > Choose a ringtone > Save at the upper right corner

Read More: How to Set Custom Ringtone on Android

How to Assign a Ringtone to Specific Contacts Android 7.1.2 (Nougat) and Android 6.1 (Marshmallow)

Step 1: Open the Contacts app on your Android.

List of contacts seen on your device screen.

Step 2: Tap the contact’s name wants to set a ringtone.

Tap pencil icon of contact want to set ringtone

Step 3: Touch the Pencil icon at the top right.

Tap more to set ringtone on android phone

Step 4: Tap Three vertical dots.

set ringtone android phone 7.0 nougat

Step 5: Tap the Set ringtone.

By default, set the default ringtone on your device. If you want to add new downloaded ringtones or songs, copy that ringtone or music to the ringtone folder of your device’s internal storage.

Copy and paste songs to ringtone directory in android

File manager > Local > Ringtones > Paste ringtone or song

set individual ringtone for contacts on android 7.0 Nougat


Step 6: Choose a ringtone from the list.

Step 7: Tap OK to set the individual ringtone for a specific contact.

It’s easy to set individual ringtones for contacts on an Android phone or tablet device.

How to Set a Custom Ringtone for Messages App

Step 1: Go to Settings.

Step 2: Tap Apps.

Step 3: Tap See all apps.

Step 4: Scroll down and tap Messages.

Step 5: Tap Notifications.

Set a Custom Ringtone for Messages App

Step 6: Tap Incoming messages.

How to Set a Custom Ringtone for Messages App

Step 7: Tap Sound.

Select from the default sounds or add custom sounds.

Step 8: Choose a Sound you want to set and tap Save at the top right corner.

How to Set Custom Ringtone on Android

Step 1: Open the app drawer and tap on Settings app.

Step 2: Scroll down and tap the Sound & vibration.

Step 3: Tap the Phone ringtone.

Step 4: Tap on My sounds.

How to Set Custom Ringtone on Android Devices


Step 5: Tap the + icon at the bottom right corner.

Step 6: Select the Ringtone from your phone (Downloaded songs or mp3 files).

Step 7: Select a ringtone and tap Save at the top right corner.

How to Set a Custom Ringtone for Specific Contact on Samsung Galaxy (One UI 5.1)

Step 1: Open the Contacts app on your phone.

Step 2: Select any contact.

Step 3: Click on Edit (Pencil icon) at the bottom.

Step 4: Tap on View More.

Step 5: Scroll down at the bottom and Tap on Ringtone.

Step 6: Tap on the + icon in the upper right corner.

Step 7: Select a Ringtone from your device.

Step 8: Choose a Ringtone and click Done at the top right corner.

Did you find the above-given method helpful to set individual ringtones for contacts on Android? Please let us know in the comment box if you have any problems. It would be a pleasure to help you. Please stay connected with us for daily android tips.

Related:

Android Split Screen Not Working issues

Here’s how to fix Split screen not working issue on Android Nougat 7.1.2 devices including Google Pixel, Pixel XL, Moto G4 Plus, etc. In split-screen mode, two apps run side by side or one above the other at the same time. When Android phone is in multi-window mode, some of the features are disabled such as System UI, certain apps and more. Not all apps supported this split-screen mode.

Have you ever use split-screen on android nougat 7.1.2 and marshmallow 6.0 device? We already know how to enable split-screen mode android nougat 7.0 devices. Using this split-screen or multi-window mode on Android, you can use two apps at the same time on your device screen side by side. Also, disable multi-window display on your android device so only full screen available. It’s easy to fix the Android multi-Window not working.

Read this:

How to Fix Split Screen Not Working Android Nougat 7.0 & Marshmallow 6.0

split screen not working android nougat 7.0

1st Way: Reboot your Android

One of the simple solutions to all android device problems. Reboot your device and after few seconds again switch on. Sometimes this restarts your devices fix your android device issue.

2nd Way: Check the latest system update available

Check any latest update available for your android phone or tablet device. If update available then update your device. Now restart your device and check split-screen mode is working in your device.

system software update available in nougat

Settings > System > about phone > System updates

3rd Way: Factory Reset your Android phone

 Step 1: Go to “Settings”.

A various section is available on-screen.

Step 2: Under the personal section, tap “Backup & reset”.

Step 3: Tap “Factory data reset”.

Reset android phone fix split screen mode error

Step 4: Tap “Reset phone”.

If set any pattern lock or password & other security to unlock your device, draw pattern to unlock your device.

Step 5: Tap “Erase everything”.

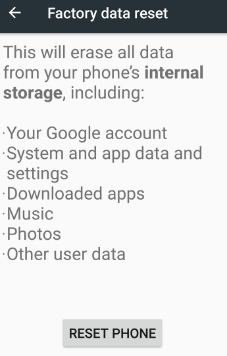
This factory reset will delete all your device’s internal storage data including photos, downloaded apps, your Google account, and other personal data.

It none of the above-given methods worked for you to fix the android split screen is not working then you should try the below-given method in your android nougat and marshmallow device.

4th Way: Wipe Cache Partition Nougat 7.0 to fix split screen not working android

Step 1: Turn on your android phone and other device.

Step 2: Press & hold the volume down button and power button at the same time until the device turn on.

Start button see when android phone is recovery mode

You can view the Android system recovery screen on your phone. By default “start” button on android phone.

Recovery mode on android nougat 7.0 device

Step 3: Press the volume down button until see recovery mode.

Step 4: Press the power button to restart into recovery mode.

Android red exclamation mark symbol

You can see the screen of “android robot with red exclamation mark icon” on the android phone.

how to clear cache partition on android 7.0 phone

Step 5: Press volume buttons to scroll to “wipe cache partition”, press the power button to select it.

This message view on the phone screen: Wipe cache?

Wipe cache partition in android 7.0 nougat device

Step 6: Tap volume buttons to scroll to Yes and press the power button to select it.

Clearing the cache may take 2-3 minutes.

Reboot system now to fix split screen error

Step 7: Use the volume buttons to scroll to “reboot system now”, press the power button to select it.

That’s all. Now check multi-window mode working on your android device.

I hope above given method fix split screen not working android nougat problem. If you have found any other solution to fix this, please share with us below comment box. Share this article with your friends.

How to Fix Error 905 on Google Play Store

Here’s how to fix play store error 905 code. While trying to updating or installing apps/games from the play store, seen error code 905. This error message show: update for “Facebook” could not be downloaded due to an error. (905) In your android device, when downloading a large number of apps or games from the play store, it will see error code on the android device. It’s easy to fix Google play store error 905 in android.

Other possible reasons for occurring this play store 905 error is law RAM issue or high memory use by apps in your android phone or tablet device. Sometimes after updated your android device, you can see this error 905 Google play store. There is not any fix solution for this play store error. But in this tutorial, I will show you step by step guide to fix error 905 in play store android phone or tablet device.

Related:

3 Methods to Fix Google Play Store Error 905 While Installing or Update Apps

Fix Google play store error 905 in android

1st Method: Clear the cache & data of Google Play Store

Step 1: Go to “Settings”.

Step 2: Open “Apps” under the device section.

You can see installed apps on your android device.

Step 3: Scroll down until you find “Google Play Store” & Tap on it.

tap storage in Google play store app

Step 4: Tap “Storage

How to clear cache and data of play store to fix error 905

Step 5: Tap “Clear cache” & “Clear data”.

2nd Method: Set screen time-out as maximum

Set the highest screen time out in your android device, so when updating or installing app then the screen is on.

Step 1: Go to “Settings”.

Step 2: Tap “Display” under the device section.

Step 3: Touch “Sleep”.

Set screen time out to fix error 905 in play store

Step 4: Choose “30 minutes”.

Now try to download the app from play store and install it.

3rd Method: Uninstall Google Play store updates to fix Google play store error 905

If your device recently updated OS, it may be a cause of error 905 while installing or downloading apps.

Step 1: Go to “Settings”.

Step 2: Tap “Apps” under device section.

List of installed apps seen on your android device.

Step 3: Scroll down until find “Google Play Store” & open it.

Tap more to uninstall play store update

Step 4: Tap “Three vertical dots” from top of the right side corner.

Uninstall updates of Google Play Store in android

Step 5: Touch “Uninstall updates”.

See this message: Replace this app with the factory version? All data will be removed.

Step 6: Tap “OK” to uninstall play store updates.

Now try to install app in your device. When Wi-Fi or mobile data network available on your device, it will automatically update Google play store. Another solution you should try to fix this error 905 is a stopped app that uses higher RAM or close unnecessary background application from your android device. That’s all.

Try above-given solutions to fix Google play store error 905 in android while installing app or games. Don’t forget to mention which method worked for you to fix error 905 in play store? Do you have any alternative methods, please share with us.

Fix Google Assistant Not Working

Recently in my Android Nougat device, Google assistant is not working. Some of the users reporting the issue of OK Google not working on Google assistant after updates android nougat 7.1.1. Before a few days, my moto G4 plus device updated android nougat 7.0 OS. After got this update, first of all, enable Google assistant on my nougat 7.0 (Moto G4 plus) device. We already discussed the 7 best Google assistant tricks and tips that useful for every user.

In android phones, after turn off the Google Assistant, you can use “OK Google” to search for information. To find your android device screen info, turn on Google Assistant again in your device. Below you can see various methods to fix Google Assistant not working after hard reset or update.

Related Article: 

How to Fix Google Assistant Not Responding on Moto G4 Plus

Try below given possible solutions to fix Google Assistant not working issue on when the screen on-off.

1st Way: Make sure Google Assistant is enabled

If you want to fix OK Google not working, first of all, check turned on Google assistant in your device. Touch and hold the home button to launch Google Assistant. Below screen seen on your device when turning off Google assistant in your device.

Turn off Google Assistant on nougat

You can enable/disable Google assistant using the below settings in your Nougat 7.1.2 and Marshmallow 6.0 device.

Step 1: Launch the Google Assistant (Touch & hold home button).

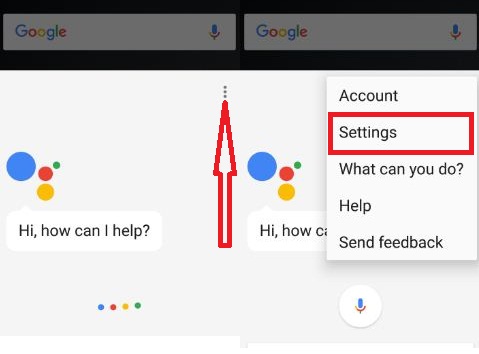
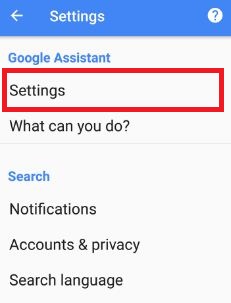
Step 2: Tap “Three vertical dots” & Touch “Settings”.

Fix Google Assistant not working

Step 3: Under adjust settings for this device, turn on/turn off Google Assistant.

2nd Way: Enable OK Google

Step 1: Touch & hold the home button to launch Google assistant.

Step 2: Tap “three vertical dots” from the top right.

Tap settings in Google Assistant launch

Step 3: Tap “Settings”.

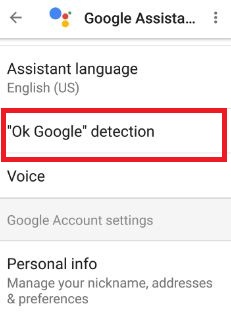
Enable or disable OK Google detection in moto G4 plus

Step 4: Tap “OK Google” detection.

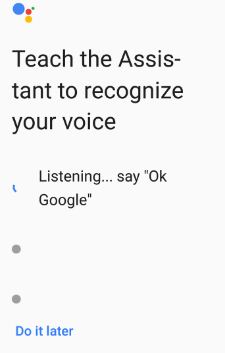
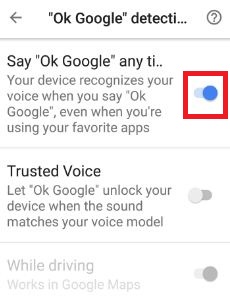
Enable say OK Google any time in Google Assistant

By default disable say “OK Google” any time in nougat.

Step 5: Enable “Say OK Google

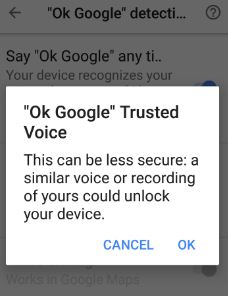
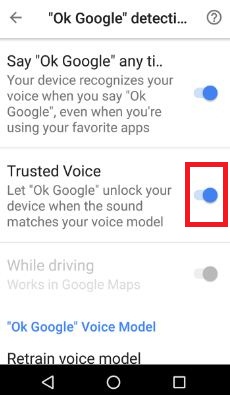
Also, enable trusted voice to automatically unlock your device when OK Google listen your voice.

3rd Way: Check the latest Google app version to fix Google Assistant not working

If your android phone Google app is not updated on the latest version, it may because of OK Google not working issue.

Step 1: Open the “Google app” in your nougat 7.0 (Moto G4 plus) and another device.

Step 2: Tap “Menu”.

Step 3: Touch “Settings”.

Tap about in Google app in nougat

Step 4: Under the search section, tap “About”.

Google App version check

Step 5: Check the Google app version.

If a version is below 6.13 then update it from the Google app page.

Related:

4th Way: Uninstall Google Play Services Updates

Uninstall Google Play Services udpate

Settings > Device > Apps > Google Play Services > More > Uninstall updates

If none of the above methods worked for you to fix the Google assistant problem or Google Assistant voice won’t work then try the below-given method.

5th Way: Factory Reset Android Nougat 7.0

Step 1:  Go to “Settings”.

Step 2: Tap “Backup & reset” under the personal section.

Step 3: Tap “Factory data reset”.

Reset phone to erase all android phone data

Step 4: Touch “Reset phone”.

If set pattern lock or other security to unlock your device, confirm your lock screen pattern.

Factory data reset android nougat 7.0 device

Step 5: Tap “Erase everything”.

It will delete all your device internal storage including photos, music, downloaded apps, your Google account and more.

End the list of all troubleshooting steps to fix Google Assistant not working android nougat and marshmallow. If you have known other trick to fix Google Assistant problem, please share with us. If you found this article helpful, share it with others.

How to Watch YouTube While Using Other Apps Android

Have you ever try to watch YouTube videos while using other apps on your Android devices? Here’s how to play YouTube in Background Android phone or tablet. It is possible using Floating for YouTube extension in your chrome browser. Using this extension, you can easily watch YouTube videos while browsing in android. After installing this Floating for YouTube extension, you can see YouTube videos while web browsing. It will look like playing YouTube videos in the background on android or PC. When you minimize YouTube videos, you can easily minimize or maximize the playing video in your device.

People love to watch all entertainment and other videos on YouTube. We daily search for various videos and watch those videos on Android phones or desktop. Also, watch offline YouTube videos in android. In this tutorial, I will show you step by step guide to watch YouTube videos while browsing in Android or Chrome browser.

Read Also:

How to Play YouTube Video in Background Android phone or Tablet

Follow below-given methods to search YouTube videos and watch YouTube videos on the same page on desktop or phone.

How to Play YouTube Videos While Using Other Apps Android

How to Watch YouTube While Using Other Apps Android

Step 1: Open Browser in your device and navigate to YouTube.com.

Step 2: Search Video you want to view and open it on your device.

Step 3: Tap Three vertical dots.

The different browser has slightly different settings to change over to the desktop version on your android devices.

Step 4: Check the box Desktop site.

Step 5: Start video on your phone.

Step 6: Press the home button.

Now, you can see play YouTube videos in the background on your Android devices.

How to Watch a YouTube Video While Browsing in Android 

To use this trick, first of all, download floating for YouTube chrome extension in your desktop or laptop devices.

Step 1: Click here to download floating for YouTube extension.

Step 2: Tap the “Add to chrome” button from the top right side.

You can see below the screen in your chrome browser.

Add app to floating for YouTube

Step 3: Tap “Add app”.

Step 4: Touch “Launch app”.

watch YouTube videos while browsing in android

You can see the one window with a screen that will ask you to paste any YouTube URL to a window you want to watch.

Step 5: Copy and paste the link of that YouTube URL in that window.

watch YouTube videos while browsing in chrome browser

Now automatically play YouTube video in your chrome browser or android device after paste link. You can enjoy your favorite video or movies on YouTube as floating windows in the chrome browser. Easily watch YouTube videos while browsing in an android device.

If you have not more needed this floating for YouTube chrome extension, you can easily remove the extension from the Google Chrome browser.

Close YouTube video from floating view

Step 6: Tap “Cross icon” to close that video.

How to Remove Extension on Chrome browser

Step 1: Open the “Chrome browser” on your PC or laptop.

Step 2: Tap “Settings” from the list.

Tap extension from left side menu

Step 3: Tap “Extension” from the left side menu.

You can view a list of installed extensions on your Google Chrome browser. Tap the trash icon of extension you want to delete.

Remove extension from chrome browser

Step 4: Click the “Trash” icon of floating for YouTube.

You can see confirm removal screen on your Google Chrome or another web browser.

Step 5: Tap “Remove” to delete from your web browser.

Now uninstall extension on chrome browser.

That’s all about watch YouTube while you browse other videos. I hope you will enjoy viewing the above ways to watch YouTube videos while browsing in an android or chrome browser. If you have any kind of problem, let us know below comment box. Please share this article if you find it helpful.