Galaxy S7 Edge Not Receiving Texts Messages or Group Texts

Problems with receive text messages on Samsung Galaxy S7 Edge and S7? Here’s how to fix Galaxy S7 Edge Not Receiving Texts or MMS issues. This Samsung Galaxy S7 not receiving text issue occurs on most of all carries such as T-mobile, SPRINT, Verizon, AT& T and more.

The SMS is one type of text messaging that connected with the cellular networks to send or receive text messages to others. If you recently switched from iPhone to Samsung Galaxy S7 edge device and forgot to deactivate iMessage then no longer send or receive SMS or MMS. You can switch texting from iMessage to android using this. If you no longer use the iPhone, you just need to enter your phone number to deregister from iMessage.  Try below given possible solutions to fix Samsung Galaxy S7 not receiving texts from iPhone issue.

Don’t miss this:

How to fix Sound issues on Galaxy S7 Edge & S7

Improve battery life on galaxy S7 & galaxy S7 edge

Fix Samsung Galaxy S7 & Galaxy S7 edge overheating issue

How Galaxy S7 Edge Not Receiving Texts Messages or MMS

Having issues receiving texts from both iOS and Android phones on your Samsung Galaxy S7 Edge and Galaxy S7? Check out the below methods to fix the issue.

Fix Galaxy S7 edge not receiving texts SMS

Trying to reinstall Textra

If you are using the Textra messenger app in your device, uninstall it and it will everything went back to normal for you. Also, use Signal SMS app in your Samsung. Try using Google’s Android Messages instead of the default Samsung messaging app on your Galaxy S7 & S7 edge device. If you have used a third-party app, switched back to the Samsung stock messaging app and it seems to be working again.

Swap SIM card or Remove & re-insert SIM card to fix Galaxy S7 not receiving all text messages

You will try to swap sim cards and you can to send and receive SMS again. If you still facing the issue, remove the SIM card and restart your phone and re-insert SIM again and check to send or receive text messages on Samsung Galaxy S7 edge and Galaxy S7. Also, get your sim replaced if found SIM issue.

Turning off Wi-Fi calling

If you enable Wi-FI calling on your phone, disable it using connection settings in your device.

Turn Aeroplane mode on or off

Turn on Aeroplane mode on your phone and then turn off again. The poor signal bar is the also issue of not receive text messages on Galaxy S7 edge device.

Swipe down the notification bar from any screen in your galaxy S7 > Aeroplane mode

Switched from iPhone, still not receiving texts from iPhone users

Did you turn off iMessage AND FaceTime on your iPhone? You need to deregister your phone number with Apple/iMessage. Also, sign out of the cloud on the old device.

Use safe mode to fix Galaxy S7 edge not receiving texts SMS

First of all, turn off your Galaxy S7 and Galaxy S7 edge devices.

Step 1: Press and hold the power button until the galaxy S7 edge screen appears

Step 2: Press and hold the volume down button until view “Reboot to safe mode” then release

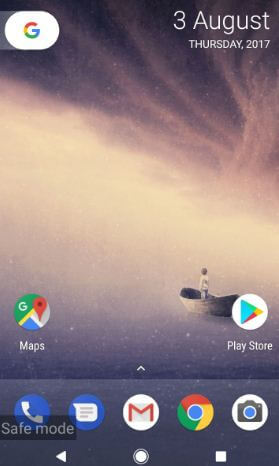
It will take 20-30 seconds to reboot your device. You can view “Safe modesymbol on below of the left side corner screen

Now check your galaxy S7 edge phone send or receive text messages or not. If not found any problem, it means any third party downloaded apps causing these issues. Remove one by one recently downloaded app and find the app that causing the issue and delete it from your device.

Factory reset Samsung Galaxy S7 edge

First of all, Turn off your Galaxy S7 edge device. It will delete all your galaxy S7 edge information including your Samsung account, Google accounts, downloaded apps, photos, videos, and other media files. Before resetting your Galaxy S7 device, back up & restore android phone data.

Step 1: Press and hold the power button, home and volume button at the same time

Step 2: When Samsung logo appears on the screen, holding the home & volume up button until appear “Android system recovery” screen

Step 3: Press volume down button until “Wipe data/factory reset” and press the power button to select it

Step 4: Press volume buttons to scroll to “Yes – delete all user data” and press the power button to select it.

Clearing the cache data may take 2-5 minutes.

Step 5: Use the volume buttons to scroll to “Reboot system now”, press the power button to select it

Check to fix Galaxy S7 edge not receiving text messages or MMS problems.

Factory data reset Galaxy S7 edge when turning on your phone

Step 1: Go to “Settings

Step 2: Under the personal section, tap on “Backup & reset

Step 3: Tap on “Factory data reset

Step 4: Tap on “Reset Phone

If set Pattern lock / PIN / Password / Fingerprint, draw it to unlock your Galaxy S7 phone.

Step 5: Tap on “Erase everything

That’s all. Is your Samsung Galaxy S7 edge affected with this problem? Did you found the above methods helpful to fix Galaxy S7 edge not receiving texts problem? What other fixes do you know? Share with us in below comment box.

How to Fix WiFi Issue on Google Pixel and Pixel XL

Annoying of Google Pixel and Pixel XL won’t connect to Wi-Fi? You can easily fix the Wifi issue on Google Pixel and Pixel XL. Users facing Google Pixel WiFi authentication problem or WiFi saved not connected also. There are several reasons for Pixel not connecting to WiFi like poor internet connection, router or modem issues, server not responding, authentication problem, etc. Also, the Wi-Fi authentication issue while connecting to the WiFi hotspot on Pixel and Pixel XL. Follow the below-given troubleshooting methods to fix Google Pixel not connecting to Wifi problem.

Read Also:

How to Fix Google Pixel Not Connecting to WiFi

fix Google Pixel not connecting to Wifi issue

Sometimes you’re Pixel and Pixel XL phone connected to Wi-Fi network but not access the Internet or automatically disconnect Wi-Fi at regular intervals also. Check out each one listed below various ways to fix Wifi problem on Pixel and Pixel XL phone.

Restart your Google Pixel

Switch off your Pixel phone and then switch on again after few seconds. This is one of the easiest ways to fix issues on all Android devices.

Check WiFi password

Make sure the WiFi password you entered correctly on your Pixel phone.

Check If Device/Network problem

If your Google Pixel phone does not connect with WiFi then try connecting your Wi-Fi with another smartphone. If other devices connected with your Wi-Fi network, the problem is on your Pixel phone.

Use other Wi-Fi networks on your Pixel & Pixel XL phone. If it connects with this network, the network may be causing an error on your phone.

Turn on Airplane Mode If Poor Network Signal

Turn on Airplane mode on your Pixel phone and then turn off again.

Restart/Reset Router to Fix Google Pixel WiFi Issue

Unplug the router and modem for few seconds and plug it again. Also, check wall outlet power is working or not.

Remove Connected WiFi network From Pixel

Delete connected WiFi and again add a Wi-Fi network on your Pixel phone.

Delete Wi-Fi Network on Pixel

Settings > Wi-Fi > Tap Wi-Fi network name > Forgot

Alternative Way: Settings > Network & internet > WiFi > Settings gear icon of connected network > Forget (Pixel running Android 10)

Add Wi-Fi Network on Google Pixel

To add a new Wi-Fi network on your Pixel device, you can fix Google Pixel Wi-Fi authentication problem issues sometimes.

Settings > Wi-Fi > Tap Wi-Fi Network name > Add network > Enter SSID & other details > Save

Alternative Way: Settings > Network & internet > Add network > Enter network name, Security, and other details > Save (Pixel running Android 10)

Read This: Fix error transfer data Android to Pixel Phone

Use Safe Mode to Fix Google Pixel Not Connecting to WiFi

Step 1: Turn off your Google Pixel device.

Step 2: Press & hold the power button until the Google logo appears on the screen.

Step 3: While Google logo on screen, press & hold the volume down button until see “safe mode” in your Google pixel screen.

If your Pixel phone running absolutely fine in safe mode, it means any third party apps causing the issue. Remove one by one recently downloaded third party app. Find that particular app and remove it from your device. To exit safe mode on Google Pixel, press the power button, and tap restart.

Reset Network Settings on Google Pixel

Step 1: Go to Settings.

Step 2: Under the personal section, tap on Backup & reset.

Step 3: Tap on Network settings reset.

Step 4: Tap on Reset settings.

If set pattern lock or Password or fingerprint on your device, confirm it.

Step 6: Again touch Reset settings.

It will reset all network settings from your Pixel and Pixel XL phone including Wi-Fi, Bluetooth, and cellular data. Check the Wi-Fi connection issue.

Alternative Way: Settings > System > Advanced > Reset options > Reset Wi-Fi, mobile & Buetooth > Reset settings > Confirm your screen lock > Reset settings (Google Pixel Running Android 10)

And that’s all. End the list of possible solutions to fix the Google Pixel WiFi issue. Do you have any alternative methods? Share it with us in below comment box.

Fix Google Play store error 941 on galaxy S8

In your android or Samsung galaxy device, you can download apps or games from Google play store. Recently in my Samsung galaxy S8 and galaxy S8 plus when install or update apps, show error message: app could not be downloaded due to an error. (941) Check date and time in your Samsung galaxy S8 and set if not correct. You can easily fix Google Play store error 941 on galaxy S8 and galaxy S8 plus.

You can’t update any existing apps or games until not fix error 941 in Samsung galaxy S8 and galaxy S8 plus. To fix this issue clear the cache and data of play store or uninstall updates of play store in your galaxy S8 device. Follow below given steps to fix Google Play store error 941 on galaxy S8 and galaxy S8 plus.

Read This: Fix low call volume on Samsung galaxy S8 & galaxy S8 plus

How to fix Google Play store error 941 on galaxy S8 and galaxy S8 plus

fix Google Play store error 941 on galaxy S8 plus phone

Annoying of not install or update apps from play store in your Samsung galaxy S8 plus devices? Check out each one listed methods to fix error 941 in galaxy S8 plus phone.

1st Method: Restart your galaxy S8 and galaxy S8 plus

Turn off your galaxy S8 and then turn on again. This is the easiest way to fix error in your Samsung galaxy S8 and galaxy S8 plus.

2nd Method: Clear the Play store cache to fix Google Play store error 941 on galaxy S8

Step 1: Go to Settings in your android device

Step 2: Under device section, tap on Apps

Step 3: Scroll down to Google Play store and tap on it

Step 4: Tap on Storage

Step 5: Tap on Clear cache

Check fix play store error or not in your galaxy S8 device.

3rd Method: Uninstall Google play store updates

Step 1: Go to “Settings

Step 2: Under device section, touch “Apps

Step 3: Scroll down until see “Google play store” and tap on it

Step 4: Tap “More

Step 5: Touch “Uninstall updates

Step 6: Click “OK

Try to install or update apps from Google play store.

4th Method: Remove your Google account to fix Google Play store error 941 on galaxy S8

Step 1: Go to “Settings

Step 2: Under Personal section, tap “Accounts

Step 3: Tap “Google” account

Step 4: Tap “More

Step 5: Touch “Remove account

Step 6: Again touch “Remove account

After remove your Google account, restart your device and again sign in with your Google account and try to install or update app from play store.

If none of the above given method fix error 941 on Samsung galaxy S8 and galaxy S8 plus, clear system cache on galaxy S8 phone.

That’s it. End the list of possible solutions to fix Google Play store error 941 on galaxy S8 plus. What other fixes do you know to fix this error 941? Tell us in the below comment box. Stay connected with us for latest Samsung galaxy S8 tricks.

How to factory reset Samsung galaxy S7

Samsung galaxy S7 and galaxy S7 edge won’t turn on or freezing after nougat update. Also facing issue of app crashing or slow your galaxy S7 edge device. This all problems has one solutions is factory reset Samsung galaxy S7 and S7 edge if none of the other tricks worked. It will delete all your phone data such as personal data, Samsung account, Google account, photos, videos etc.

Also apply this method to other galaxy S7 problems such as galaxy S7 touch screen not working or black screen, low call volume on galaxy S7 edge, Samsung galaxy S7 overheat or warm and other related issues. Follow below given two methods to factory reset Samsung galaxy S7 and galaxy S7 edge and fix all your S7 problems.

Read: Unlock Galaxy S7 and Galaxy S7 edge if forgot password

Two tricky methods to factory reset Samsung galaxy S7 and galaxy S7 edge

factory reset Samsung galaxy S7 phone

Before apply these two tricks, back up and restore data your galaxy S7 and galaxy S7 edge devices. It will delete all your data.

1st Way: Factory reset Galaxy S7 when phone won’t turn on

First of all Turn off your Samsung galaxy S7 and galaxy S7 edge device.

Step 1: Press and hold the power button, home and volume button at same time

Step 2: When Samsung logo appears on screen, holding the home & volume up button until appear “Android system recovery” screen

Step 3: Press volume down button until “Wipe data / factory reset” and press power button to select it

Step 4: Press volume buttons to scroll to “Yes – delete all user data” and press the power button to select it.

Clearing the cache data may take 2-5 minutes.

Step 5: Use the volume buttons to scroll to “Reboot system now”, press the power button to select it

All data of your galaxy S7 and galaxy S7 edge deleted. Your device looks like a new.

2nd Way: Factory reset Samsung galaxy S7 using phone settings

Step 1: Go to “Settings

Step 2: Under personal section, tap on “Backup & reset

Here you can back up your data using your Google account.

Step 3: Tap on “Factory data reset

Step 4: Tap on “Reset Phone

If set Pattern lock / PIN / Password / Fingerprint, draw it to unlock your galaxy S7 edge phone.

Step 5: Tap on “Erase everything

It will erase all your galaxy S7 device data including created accounts, photos & videos etc.

Is your Samsung galaxy S7 phone affected? Check out each one listed above methods to factory reset Samsung galaxy S7 and galaxy S7 edge. Share your thoughts in below comment box.

How To Unlock Samsung S7 Forgot Password without losing data

Forgotten Lock Screen Pattern or PIN lock on Galaxy S7 edge and S7? You can Unlock Samsung S7 Forgot Password without losing data using find my mobile on your phone if you have a Samsung account. To Bypass lock screen password on Samsung Galaxy S7 edge, you’ll use the android device manager to temporarily unlock your Samsung phone. If none of the solutions worked for you, perform a wipe cache partition/factory reset to unlock the password protected Samsung Galaxy S7 Edge & S7. It will remove all your phone data from your device including Google account, Samsung Account, third party apps, Photos, Videos, and more.

Forgot screen lock PIN, Pattern on Password on Samsung Galaxy? You can use find my mobile to unlock galaxy S7 edge forgot password or find the lost or stolen phone also. Apply below given possible methods to reset forgot screen lock password on Galaxy S7 and Galaxy S7 edge.

Read Also:

How To Unlock Samsung S7 Forgot Password without losing data

reset forgot screen lock password on galaxy S7 edge phone

Check out each one listed below methods to unlock galaxy S7 if forgot Password or PIN or Pattern lock.

Unlock Galaxy S7 forgot password without losing data using Samsung Find my mobile 

Step 1: First of all Sign in to Samsung Find my mobile service, if not then create a new Samsung account

Follow the on-screen instruction to create your Samsung account.

Step 2: Tap on Unlock my screen from the left sidebar

Step 3: Tap on Unlock

By default view, your device screen is already unlocked.

Step 4: Set a new password in your galaxy S7 device

You can easily reset forgot screen lock password on galaxy S7 edge using this method.

Use Android device manager to Unlock Samsung S7 Forgot Password

Using the Android device manager, you can erase all data, lock the screen and change the screen lock in your Samsung Galaxy S7 edge device. You can find android device manager settings in your S7 device using the below steps.

Settings > Personal > Security > Device administrations > Device administrators > Android device manager > Activate this device administrator

Step 1: Go to Android device manager in your desktop PC or laptop

Step 2: log in with your Gmail account

You can show your android devices list on the desktop or laptop.

Step 3: Tap on “Enable lock & erase” to reset pattern lock

Three options view on the screen.

Unlock Samsung Galaxy S7 if forgot password

Lock: Lock device and display message or phone number

Play sound: Your device will ring for 5 minutes, even if set to silent

Erase: Erase all content from the device. You will no longer be able to locate it

Step 4: Tap on “Lock

Step 5: Enter password & again enter to confirm it

Also, add recovery message and phone number so anyone finds your Samsung Galaxy S7 and Galaxy S7 edge device, they will reach by you using this added phone number.

Factory reset Galaxy S7 to reset forgot screen lock password on Galaxy S7

First of all, Turn off your Samsung Galaxy S7 and Galaxy S7 edge device. Make sure backed up all your important data, it will remove all your phone data.

Step 1: Press and hold the power button, home and volume button at the same time

Step 2: When Samsung logo appears on the screen, holding the home & volume up button until appear “Android system recovery” screen

Step 3: Press volume down button until “Wipe data/factory reset” and press the power button to select it

Step 4: Press volume buttons to scroll to “Yes – delete all user data” and press the power button to select it.

Clearing the cache data may take 2-5 minutes.

Step 5: Use the volume buttons to scroll to “Reboot system now”, press the power button to select it

That’s all. I hope the above-given tricks helpful to reset forgot screen lock password on Galaxy S7 edge. Do you know any method to fix this issue? Share with us in below comment box.

How to Stop Pop up ads in Pixel 3 XL, 2 (XL), 3a (XL), Pixel XL

Annoying of pop up ads when surfing the Internet on your Google Pixel, Pixel 2 XL and latest Pixel devices? Here’s how to stop Pop up ads on Android Phone or Tablet devices. While searching and reading content on the Internet and suddenly show pop up ads on the screen. Some of the ads not easily stop and it’s freezing your android device and slow down your android device. You can easily block pop up ads on android phones using Chrome browser, Mozilla Firefox, or Internet Browser. A pop-up ad is one type of ad that displays in the web browser when you surfing on YouTube, Playing games on phone or apps, etc. You can also download free AdBlock browser & Adblock browser for android from Google play store, it will help you to stop pop up ads and video ads on android phone.

Some of the browsers by default stop pop up ads in your smartphone or tablet device such as UC Browser, Opera mini, etc. You can download the AdBlock browser for your Firefox browser and Opera browser on your android phone or tablet devices. Also free download apps from Google play store which is protecting your android device against pop up ads, viruses, malware, and other harmful contents. Follow the below-given step by step guide to block pop up ads on Google Pixel and Pixel XL.

Read Also:

How to Stop Pop up ads on Android Phone or Tablet

The different browser has slightly different settings to stop pop up ads on Pixel devices. Check out each one listed below steps to block pop up ads in Google chrome on the latest Pixel & android phone.

Stop pop-ups on Pixel 3 XL, 4 (XL), 3a (XL), 2 (XL): Android 10

Step 1: Open Google Chrome browser in your latest Pixel devices.

Step 2: Tap on Three vertical dots (More) at the upper right corner.

Step 3: Select Settings.

Step 4: Scroll down and tap on Site settings under the Advanced section.

How to Stop Pop up ads in Pixel 3 XL, 2 (XL), 3a (XL), Pixel XL

Step 5: Tap on Pop-ups and redirects.

Stop pop-ups on Pixel 3 XL

Step 6: Toggle on Pop-ups and redirects.

Block ads on Sites on your Google Pixel 3 XL, 3a XL, 2 XL

If you have found any sites that show intrusive or misleading ads, you’ll block ads using the below settings.

Google Chrome Browser > More > Settings > Site settings under the Advanced section > Ads > Toggle on Ads

Remove Pop-ups from Android devices (Older)

Step 1: Open the Google Chrome browser on your Pixel device.

Tap on three vertical dots at top of right side corner in chrome

Step 2: Tap on Three vertical dots from the top right side corner.

List of options show (See below screen).

block pop up ads on Google Pixel XL phone

Step 3: Tap on Settings.

Here you can view the basic section and advance section.
Site settings under advanced section in chrome

Step 4: Under advanced settings, tap on Site settings.

Stop pop up ads on android phone 7.1.2

Step 5: Scroll down to pop-ups and tap on it.

block pop up ads on Google Pixel phone

By default disable pop-ups on Chrome browser in android phone.

Step 6: Enable pop-ups on your Google Pixel devices.

Now block sites from showing pop-ups ads in your Chrome browser on android phone. If you want to block ads on android phone, download reading content or your favorite videos in your Pixel devices. You can also clear browser app cache in your Pixel or latest android devices using the below settings.

Clear app cache on Latest Pixel Devices

Step 1: Go to settings in your Pixel or Android devices.

Step 2: Tap on Apps & notifications.

Step 3: Tap on See all apps.

Step 4: Select App from the list.

Step 5: Tap on Storage & cache.

Clear browser app cache in latest Pixel to pop-up ads

Step 6: Tap on Clear cache.

Do let us know whether you liked this tutorial or not. Do you know some other methods to block pop up ads on Google Pixel and Pixel XL? Let me know what you think about this.