6 Ways to Fix Samsung Galaxy Note 8 Won’t Turn On

Irritated by Note 8 won’t power on after battery dies? Here’s the possible solutions to fix Samsung Galaxy Note 8 screen won’t turn on after fully charging or upgrade. Most of the users facing won’t charge issue in new Samsung devices. There are several reasons for this issue such as charger fault, damaged charging port or wall power outlet, faulted battery, and other problems.

If you find any app related issue on Galaxy Note 8, clear the app cache or use safe mode to find the third party downloaded apps that causing this issue. Sometimes due to charger fault, the galaxy Note 8 screen is unresponsive or freezing. Check out the below-given troubleshooting guide to fix Samsung galaxy Note 8 won’t power on after fully charging.

Read Also:

How to Fix Samsung Galaxy Note 8 Won’t Power On After Charging or Upgrade

Fix Samsung galaxy Note 8 wont turn on after fully charging

Check out below given methods to fix galaxy Note 8 won’t turn on or won’t charge.

Verify charging cable

Check your galaxy Note 8 charger to another device. If charge other device normally, it means your phone or hardware related issue.

Check wall outlet & charging port

If wall outlet is damage or power not reaches in your device to galaxy Note 8 won’t charge. Also, check the charging port not damage. Take a toothbrush and clean the port if any dust. Try another wall outlet and check what the fault is?

Connect your device to power

If you can see battery symbol in your galaxy Note 8 while connecting to charger, restart your device. Charge your phone 20-30 minutes. And check your device turn on or not.

Forced Restart

Long press the power button and volume down button at the same time until seeing the Samsung logo.

Enable Safe Mode to fix Samsung Galaxy Note 8 Won’t Turn On

Step 1: Press & hold the Power button on your galaxy Note 8.

Step 2: Touch & hold the Power off button.

You can see this message: Reboot to safe mode

Step 3: Tap OK.

Your device will restart in safe mode. You can see the Safe mode icon at the bottom of left side screen. Now, charge your device and check your Samsung Galaxy Note 8 power on or not. If not find any problem, any third party app causing this issue. Remove one by one third party app and check fix galaxy Note 8 issues or not.

Factory Reset or Master Reset your Galaxy Note 8 if won’t turn on/Power on

Step 1: Turn off your Samsung Galaxy Note 8.

Step 2: Press and hold Volume up and Power button at the same time until view the android recovery screen.

Step 3: Press the volume down button until highlight wipe data/factory reset.

Step 4: Press the Power button.

Step 5: Press the volume down button until select Yes then press the power button to start a factory reset process.

Wait until you see the data wipe complete message on the bottom left corner of the screen.

Step 6: Use the volume down button to select reboot system now and press the power button to restart your Samsung Note 8.

Now, check to fix the issue. If you still facing the issues, contact the nearby Samsung store and replace your phone if under the warranty.

End the list of possible solutions from our sides to fix Samsung Galaxy Note 8 won’t turn on after charging issues. Do you have any tips want to share? Let us know in below comment box.

How to fix Galaxy Note 8 battery drain issues

Battery life is the important for any Smartphone. Most of users facing battery drain issues with new Galaxy Note 8 and other Smartphone. Annoying of quickly drain battery on Samsung Galaxy Note 8? Let see some handy tips to fix Galaxy Note 8 battery drain issues. There are several reasons to fast draining battery such as running background apps, brightness, live wallpaper, screen time-out time and more.

To improve battery life on galaxy Note 8, you will also disable some network related apps when not in use such as Wi-Fi, location services, Bluetooth, Mobile hot-spot etc. Other battery relates problems are Galaxy Note 8 overheating or Galaxy Note 8 won’t turn on after fully charging. Check out below given several tips to fix Galaxy Note 8 battery drain issues.

Read This: How to fix Galaxy Note 8 freezing or crashing

6 quickly tips and tricks to fix Galaxy Note 8 battery drain issues

Fix Galaxy Note 8 battery drain issues

You will use battery saver mode, Doze mode and ultra power saving mode in your device to save battery life in fix Galaxy Note 8 devices. Try below given possible solution to extend battery life in galaxy Note 8.

1st Way: Minimum screen display time

Reduce screen display time and set it 15 seconds / 30 seconds to quickly turn off display and save battery in your Note 8.

Settings > Device > Display > Sleep > 15 seconds / 30 Seconds

2nd Way: Minimize screen brightness to fix Galaxy Note 8 battery drain issues

Scroll down notification bar from any screen and reduce screen brightness on your Samsung galaxy Note S8 to improve battery life.

3rd Way: Disable live wallpaper

If use live wallpaper on your galaxy Note S8 device, remove it from your Note 8 devices.

4th Way: Enable battery optimization to fix Galaxy Note 8 battery drain issues

Settings > Apps > Tap app > Optimize

If facing problem of suddenly drain battery on galaxy Note S8, find background app that consume more battery and high RAM used using battery settings. After found that app, force stops that individual app.

Settings > Battery > Tap on App to view details

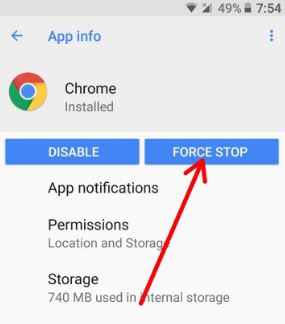
Force stop apps on galaxy Note 8:

Settings > Apps > Tap on app want to force stop > Force stop > OK

5th Way: Check any system software updates available

Check any system software update is available for galaxy Note 8 phone. It will fix small bugs and improve performance of your galaxy Note 8 device.

Settings > about phone > System updates

6th Way: Factory date reset galaxy Note 8

Step 1: Go to settings in your galaxy Note 8

Step 2: Under personal section, tap on backup and reset

Backup you’re important data to Google drive using your Gmail account.

Step 3: Tap factory data reset

Step 4: Tap reset device

If use password or pattern lock to unlock the galaxy Note 8, draw it to unlock your Note 8.

Step 5: Tap delete all

If none of the above method fix battery problem on Samsung galaxy Note 8 devices, hard reset or factory reset galaxy Note 8.

And that’s it. If you have any tips to fix Galaxy Note 8 battery drain issues, tell us in the below comment box. Read more about Samsung galaxy S8 and galaxy Note 8.

How to Install ARCore on Android Phone

Have you ever heard about the Google ARCore project? Let see how to download and install ARCore on Android Phone. Recently Google announced the Google ARCore project, it will authorize your Android devices to experience Augmented Reality (AR) through software. Google has been working on this ARCore project Tango for the past three years. This project aiming is to reach 100 million android devices that will not any additional hardware.

Currently, this first version of ARCore supported Google Pixel, Pixel XL, and Samsung Galaxy S8. You can download and install ARCore app in your Android Nougat 7.0 & 7.1.2 and later version. Google is already discussing with other android devices such as Samsung, LG, Huawei, HTC, and more. It will come in most of the Android devices at the end of this year. Do you have any idea to download and enable Google ARCore app in Android device?

Read Also:

How to Enable ARCore on Android Phone or Tablet

Download and install Google ARCore on android Phone

This ARCore app is useful to track the location of your device, orientation of phone, movement, and light detection. I hope you will excite to enjoy Google’s ARCore technology in your android Smartphone. You will see the complete fundamental details of Google’s ARCore here.

If you have Android 7.0 or above version, you can easily get Google ARCore on your Android phone. First of all download and install modified ARCore Service APK in your Android Oreo and Nougat devices. Make sure to enable unknown sources to install third-party APK files in the Android device. Now open the ARCore platform supported app and enjoy it on your android devices.

Now download and install Hello AR APK file in your device. This is a test app to see ARCore demo and enjoy Augmented Reality in your Android Oreo and Nougat. After completing the installation of both APK files, launch the demo Hello AR app in your device, it will show the camera interface. To add some Augmented Reality props, tap on the camera on the plain surface. Now enjoy ARCore video in your android devices.

Is your android phone supported ARCore? Do you still have questions about the download and install Google ARCore on Android phone or tablet? Let us know in below comment box. Stay connected with us for the latest Android Oreo tips and tricks.

How to Turn On and Use Picture-in-Picture WhatsApp Android

Recently WhatsApp added picture-in-picture mode feature in video calling. We already know how to use picture-in-picture in Android. Using this picture-in-picture in WhatsApp, you can chat with other people during WhatsApp video calls. All users make a video call and text message at the same time. It’s quite easy to enable and use picture-in-picture mode in WhatsApp video calling on Android phones.

WhatsApp is regularly added new features such as WhatsApp video call, two-step verification for security, WhatsApp status, broadcast message, and more. And recently added PIP mode in WhatsApp video calls. Not all android devices supported this PIP in WhatsApp. Follow the below-given step by step guide to use picture-in-picture mode in WhatsApp video calling and text messages.

Read Also:

How to Use Picture-in-Picture Mode in WhatsApp Video Calling on Android Phone or Tablet

Step 1: Open the WhatsApp app in your Android phone or tablet devices.

Step 2: Tap on Contact want to make a video call.

Tap video call in WhatsApp on your android phone

Step 3: Tap the Video call button from the top right side.

Step 4: Tap on the Back button from your device.

Use picture-in-picture mode in WhatsApp android device

You can see a small screen in the below right side corner. Also, change the size of the screen in your device. Now go back to chat and chat with your friends or family member and enjoy WhatsApp video calling also at same time. Now enjoy WhatsApp picture-in-picture mode in video calling.

1st Method: Disable PIP mode in Android (8.0 Oreo)

Step 1: Go to Settings in your Android (Oreo 8.0).

Step 2: Tap Apps & notifications.

Step 3: Tap Advanced.

Step 4: Tap Special app access.

Step 5: Tap Picture-in-picture.

List of supported PIP feature in Oreo 8.0

You will see a list of apps supported picture-in-picture mode in your Android. By default enabled PIP mode in your devices.

Step 6: Tap App want to disable PIP mode.

Step 7: Toggle off “Allow picture-in-picture“.

WhatsApp Picture-in-Picture Disable Android

Enable picture-in-picture mode in WhatsApp video call

Settings > Apps & notifications > App info > WhatsApp > Advanced > Picture-in-picture > Enable/Disable PIP in WhatsApp

And that’s all about WhatsApp new PIP features. I hope above given tips helpful to use picture-in-picture mode in WhatsApp on Android. If you have any kind of trouble, let us know in below comment box. Stay connected with us for latest Android tips.

Fix Samsung galaxy Note 8 is freezing or crashing

Annoying of Samsung galaxy Note 8 is freezing or crashing? Due to this app freezing, your galaxy Note 8 slow down and take more time to access phone or web browser. Sometimes your galaxy Note 8 suddenly stop or not responding of your any process. If you find any app related issue, use safe mode to find particular app that causing issue.

Several users reported issues of blank screen, call dropping or low call volume on Galaxy Note 8 devices. If none of the method fix your issue, you will try factory data reset or hard reset Samsung galaxy Note 8 phone. Check out below given troubleshooting steps to fix Samsung galaxy Note 8 is freezing or crashing issue.

Read This: How to extend battery life in Samsung galaxy S8

7 handy tips to fix Samsung galaxy Note 8 is freezing or crashing problem

Fix Samsung galaxy Note 8 is freezing or crashing

1st Way: Restart your galaxy Note 8 phone

If your galaxy Note 8 is crashing and freezing, switch off your galaxy Note 8 and after few second switch on again.

2nd Way: Check system software update available

Check system software update is available or not in your galaxy Note 8 devices using below settings. If update is available, update your galaxy Note 8 device. This system software update improves system and fix small bugs of your Galaxy Note 8 phone.

Settings > about phone > System updates

3rd Way: Check app update is available

Google Play Store > Menu > my apps & games > Update all

You can individually update apps and also update all apps at same time using above setting on your Galaxy Note 8 phone.

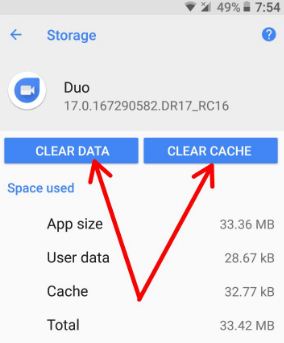
4th Way: Clear the app cache to fix Samsung galaxy Note 8 is freezing or crashing

Settings > Apps > Select apps > Storage > Clear cache

5th Way: Check galaxy Note 8 storage is not full

If internal storage is full on your galaxy Note 8 device, remove unnecessary data from your galaxy Note phone. Now check your Galaxy Note 8 device is working without freezing or crashing.

6th Way: Use safe mode to fix Samsung galaxy Note 8 is freezing

Step 1: Press & hold the power button on Galaxy Note 8 phone

Step 2: Touch & hold the power off button

You can view this message: Reboot to safe mode

Step 3: Tap OK

After enable safe mode on galaxy Note 8, you can use only phone apps, it will temporarily disable all third party downloaded apps. Now check your Galaxy Note 8 phone working perfect or not. If yes, it means any downloaded app causing the problem of galaxy Note 8 is crashing. Remove third party downloaded apps one by one and when find app that cause issue. And remove that app.

If none of the above methods fix Samsung galaxy Note 8 Crashing and frozen issue, try below given method.

7th Way: Factory data reset Samsung galaxy Note 8

Step 1: Go to Settings in your galaxy Note 8

Step 2: Tap Backup & reset

Step 3: Tap Factory data reset

Step 4: Tap Reset phone

It will erase all your phone data including Google account, photos, videos, downloaded apps and more. So before factory reset galaxy Note 8, back up your important data safely.

End the list of possible solutions to fix Samsung galaxy Note 8 is freezing or crashing issue. Do you have any other tips want to share? Let us know in below comment box. Stay connected with us for latest Galaxy S8 tips and tricks.

How to Enable Home Screen Rotation in Android 8.1 Oreo

You can enable and use screen rotation in Android 8.1 Oreo devices. When enabling landscape mode in the home screen on Oreo, your Oreo rotate the home screen when the phone is rotated. Also, rotate the content of the screen in your android 8.1 Oreo devices. By default disable landscape mode in the home screen in your android Oreo devices.

You will also only auto-rotate screen content (not a home screen) in android Oreo using accessibility settings and notification bar settings. In the auto-rotate screen, your device screen changes portrait view to landscape mode. In this tutorial, I will show you both auto-rotate screen and enable auto rotate screen on android 8 devices such as Google Pixel, Pixel XL, Nexus 6P, Nexus 5X, LG, HTC, Nokia, etc.

Read Also:

How to Enable Landscape Home Screen in Android Oreo 8.0

Check out below given different ways to enable landscape mode and auto-rotate screen in android 8.0 Oreo devices.

Auto-rotate home screen in Android Oreo 8.0

Step 1: Press and hold the blank space in your Android Oreo home screen.

You can see wallpapers, widgets and settings options.

Step 2: Tap Settings.

Be default disable home screen rotation in Oreo.

Enable home screen rotation android Oreo 8.0

Step 3: Enable allow home screen rotation.

Now when you are on the home screen and phone rotated, your home screen rotates. In android 8.0 Oreo home screen settings add new features such as change app icon shape, app suggestion, Notification dots, and Display Google app. You will easily enable home screen rotation android Oreo using the above settings.

There are 3 ways to auto-rotate the contents of the screen in android Oreo. Check out below given both ways.

1st Way: Enable auto-rotation in android 8.0

Step 1: Scroll down the notification bar from any screen in your Oreo devices.

Auto-rotate home screen settings in Android Oreo

Step 2: Tap auto-rotate.

Now your screen rotates content when your Oreo device is rotated, but remember home screen not rotate.

2nd Way: Enable/disable auto-rotation using display settings

Step 1: Go to settings in your android Oreo devices.

Step 2: Tap display.

Step 3: Tap advanced.

Step 4: Tap device rotation.

Rotate the contents of the screen in android 8.0

Step 5: Choose to rotate the content of the screen/stay in portrait view

You can change the portrait view to landscape view using this Oreo display setting.

3rd Way: Enable Auto-rotation in Oreo using accessibility settings

Step 1: Go to settings in android 8.1.

Step 2: Tap accessibility.

Disable auto rotate screen in android 8.0 Oreo

Step 3: Scroll down until Interaction controls and enable the auto-rotate screen.

You can also see the power button ends call above auto-rotate screen options.

And that’s all. I hope you will enjoy enabling home screen rotation Android Oreo 8.0. If you have any kind of problem, let us know in below comment box. Don’t forget to share it with others. Stay connected with us for latest android 8.0 tips and tricks.