How To Turn Off Google Feed Android 10, 9 (Pie), 8.1 (Oreo)

Remove or Stop Google news feed on the latest Android devices? Here’s how to turn off Google feed android 10, 9 Pie, and Oreo 8.1 devices. Google Feed feature is useful to daily get your favorite topics related news such as sports, politics, the latest technology, current event, and other National & international events. Some users find it helpful, while others are annoying also.

Different android device has slightly different settings to enable/disable Google feed on android Oreo from the home screen. You can individually remove Google now feed on your android devices. In android 8.0 & 8.1 devices, also disable display Google app from the main home screen if you can’t see this card on your device. Follow below given complete process to disable New Google feed android 8.1 Oreo devices.

Read Also:

How To Enable Or Disable Google Feed Android 8.0 and 8.1 Oreo

First of all, let see steps to individually disable Google feed card from your latest Android 10 and 9 Pie devices. This setting available on Pixel 4, Pixel 4 XL, Pixel 3, Pixel 3 XL, Pixel 3a, Pixel 3a XL, Pixel 2, Pixel 2 XL, Google Pixel, and Pixel XL.

Remove Google Feed From Android 10

Step 1: Swipe screen right side in your latest Android devices.

Step 2: Tap on the Profil icon at the top right corner.

Remove Recent Google Feed from Android 10 and 9 Pie

Step 3: Tap on Recent.

You can see recently opened feed on your devices.

Remove Google Feed From Android 10

Step 4: Swipe up the feed to remove from the recent feed list.

Turn off Google News Feed on Android 10 and 9 Pie

If you don’t want to show Google news when swipe screen right side in your android devices. By default turned on Google display app. You can stop it using the below settings.

Step 1: Long press on the blank area of your Android home screen.

Step 2: Tap on Home Settings.

Turn off Google News Feed on Android 10 and 9 Pie

Step 3: Toggle off Google Display App.

Now, swipe screen right side and you can’t see Google news feed.

For Android 8.1 and 8.0 Oreo:

Step 1: Unlock your android 8 and swipe screen left to the right side.

You’ll see Google news feed on your devices.

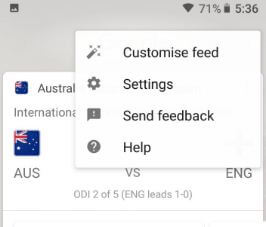
Tap on Google feed button in android 8

Step 2: Tap on the icon at the top right side (Show above screenshot).

Google Now feed settings in Oreo

Step 3: Tap on the Recent feed button below side.

Here you can see recent use Google feed in your android Oreo devices.

How to turn off Google Feed android 8.0 Oreo

Step 4: Swipe upside to remove Google feed in your latest Android devices.

Now that feed is removed from your recent feed list.

Remove Google Feed From Home Screen on Android Oreo 8.1 & 8.0

If you want to disable Google feed card on android 8 Oreo, follow the below steps in your device.

Step 1: Tap & hold the blank screen in your android 8 home screen.

Here you’ll see wallpapers, widgets and home settings options.

Home settings android 8.1 Oreo

Step 2: Tap in home settings.

By default enable display Google new feed-in Oreo devices.

Disable Google feed card on android 8 Oreo

Step 3: Turn off the toggle button of the Display Google app.

Now swipe the screen left to right and you can’t see any Google feed card in your Oreo devices.

Read Also:

Disable Show feed in android 8.0 and 8.1 Oreo:

Step 1: Open App drawer in your android 8.

Step 2: Tap on Google App.

Tap on menu at bottom right corner in android 8.0 Oreo

Step 3: Tap on Three horizontal lines at the bottom right side corner.

Step 4: Tap on Settings.

Google Feed settings in android 8.0 Oreo

Step 5: Tap on Your feed under the search section.

Turn off Google Feed android 8.0 Oreo


Step 6: Toggle off the show feed button in Oreo.

Here, you’ll also reset Google feed preferences on android 8.1 and 8.0 Oreo devices.

Google App > More > Your Feed > Reset feed preferences?

Stop apps from adding to the home screen in Android 8.1, 9, 10

By default when you download and install a new app in your android device, this app icon shown on the home screen. If you don’t want to add the app icon to the home screen, disable it in your device.

Long press on the blank area of home screen > Home Settings > Toggle off “add the icon to the home screen”

That’s it. I hope this tutorial is helpful to turn off Google Feed android 8.0 and 8.1 Oreo. If you have any kind of query, tell us in below comment box. We’ll respond as soon as possible. Don’t forget to check out our other android 8.0 tips and tricks.

How to Delete Google Plus Profile From Android Oreo 8.1

Want to remove Google Plus account from Android Oreo 8.1 and 9 Pie? Here’s a complete guide to delete Google Plus profile from Android Oreo, Nougat, and Marshmallow devices. Different android device has slightly different settings to remove Google+ from your Android device. After deleting your Google+ profile, your circle will be deleted but people in your circle will remain in your contacts. Also, posts, comments, and other activities will be deleted. This uninstall Google+ profile not remove your other Google services such as Gmail, YouTube, and other related Google accounts.

Read Also:

How to Delete a Google Plus Profile on Android Oreo 8.0 and 8.1

Check out below given two different methods to remove your Google Plus account without deleting the Gmail account.

Remove Google+ Account in Android Oreo

Step 1: Go to Settings in your Oreo.

Step 2: Tap on Google.

Personal info and privacy settings in Oreo

Step 3: Tap on Personal info & privacy under My account section.

Google Plus settings in android Oreo devices

Step 4: Tap on Google+ settings under your personal info.

Log in with your Gmail account you want to delete profile from your android devices.

Tap on three horizontal lines at top right corner

Step 5: Tap on Three horizontal lines at the top left corner.

Remove Google+ account in android Oreo

Step 6: Select Settings.

How to delete Google Plus profile from android Oreo

Step 7: Scroll down at the end of the page and tap on Delete your Google+ Profile under Account.

Step 8: Enter your Google account to a password for confirmation & tap on Next.

Step 9: Tap on Delete to remove your Google+ profile.

How to Delete Google Plus Profile From Android Oreo 8.0

Step 1: Go to the Settings app.

Step 2: Tap on Google Settings.

Step 3: Scroll down and tap on Google.

Step 4: Tap on Account preferences under My account.

Step 5: Tap on Delete Google services under other preferences.

Step 6: Log in your Google account & Tap on Next.

You’ll see below the given screen in your android Oreo 8.1 and 8.0 devices. Here you’ll delete other Google services including YouTube and Gmail.

Uninstall Google+ profile in android Oreo

 Step 7: Tap on Google+ Trash icon want to remove.

Remove Google+ account from android 8.1 Oreo

Step 8: Tap on Delete Google+ button.

Now delete your Google+ profile from your Android Oreo devices.

And that’s it. Do you still have a question about the delete Google Plus profile from Android Oreo devices? Let me know what you think about our findings. Read more about Android 8.0 tips and tricks.

How to Delete Google Services From Android Oreo 8.1

Want to delete Google play services permanently in your Android Oreo? Here’s a complete guide to remove Google services from Android Oreo 8.0 and 8.1 devices. You can remove individual Google services from your accounts such as Gmail, YouTube, Google+, and more. You’ll easily remove Google services using Google settings in your Android 8.1 Oreo and the latest Android devices. In several android devices, you can uninstall Google play services by root your Android device. To block Google play service, you’re Android device must need to root.

Read Also:

How to Delete Google Services From Android Oreo 8.0 and 8.1

Step 1: Go to Settings from the app drawer.

Step 2: Scroll down up to Google and tap on it.

Account preference settings in android Oreo

Step 3: Tap on Account preferences under the My Account section.

Remove individual Google services from android Oreo

Step 4: Tap on Delete Google services under Other preferences.

Step 5: Log in your Google account & Tap on Next.

You’ll see below the given screen in your Android Oreo, Nougat, marshmallow, and other devices. Now select Google services you want to remove from your android phone.

How to delete Google services from android Oreo

Step 6: Tap on the Trash icon to delete a Google service.

Step 7: Tap on Delete.

Now remove that Google service from your Android Oreo device. You’ll delete your Google Plus profile in android Oreo and other devices using the above-given setting. You can delete your Google account and all data using below given two different settings in your Android Oreo 8.1 devices.

Remove or Delete Google Account From Android Oreo 8.1 and 8.0

Remove your Google account from Oreo phone

Settings > Users & accounts > Tap on Google account you want to delete > Remove account > Remove account

Alternative Way: Settings > Google > Account preferences > Other preferences > delete your Google account > Sign in your Google account > Remove account

And that’s it. I hope this tutorial helpful to delete Google services from android Oreo. If you have any kind of trouble, tell us in below comment box. We’ll respond as soon as possible. Don’t forget to check out our other Android Oreo tips and tricks.

How to Clear Search History Google on Android, iPhone and PC

Do you want to clear search history Google on your Android phones, Samsung Galaxy, tablets and iPhone? Here’s how to clear Google search history on Android, iPhone (iOS 16.1.1) and PC/Laptop. Search history saved to your Google account that includes you search, result you click, and stories you watch. All this search history is the part of Web & app activity. You can set auto-deletes activity older than 3 months/18 months/36 months. If you have the latest Google app version, you can delete last 15 minutes Google search history. You’ll delete all searches on your phone activity using search & filters, certain day or time period, and delete all history or activity in your Android devices. You can see all your past searches when you use Google services in your devices using Google activity settings.

Read Also: How to Clear Cache Android

How to Delete Search History on Android 13, Android 12 and PC

Check out the below-given ways to delete all searches history or individual clear Google history activity in your latest Android devices.

How to Delete Google Search History on Phone (Android 12 and Android 11) – Auto Delete Activity

Step 1: Open the Google app in your device.

Tap on Profile icon in the Google App Android

Step 2: Tap the Profile icon at the top right corner.

View Google Search History on Android Phones

Step 3: Tap on Search history (Saving).

Two options are available here, one is saving to Web & app activity and another is auto-delete.

Clear search history Google on your Android

Step 4: Tap on Auto-delete (By default 3 months).

How to Delete Google Search History on Phone


Step 5: Tap the Auto-delete activity older than 3 months/18 months/36 months and tap on Next button at the bottom right.

Now, save your preference for auto-deleting your search history and other web and app activity you set in your phone. You can also set up auto-delete for location history and YouTube history also.

Auto-delete activity Google Search Android Phone

Alternative Way: Google App > Profile icon at the top right > Your data in search > Saving to web & app activity > Deleting activity older than 3 months > Auto-Delete activity older than > Next.

How to Clear History Google for Last 15 Minutes

It will deleting search history from your device.

How to Clear History Google for Last 15 Minutes

Google App > Profile icon at the upper right corner > Delete last 15 minutes

How to Erase Search History of All Web & App Activity on Android 13, Android 12, Android 11

You can delete all searches my activity (App activity) from your Android devices.

Step 1: Open the Google App.

Step 2: Tap the Profile icon at the top right corner.

Step 3: Click on Search history.

How to Delete Search History on Android

Step 4: Tap on Delete.

You can turn off web and app activity here if you don’t want to save your history search. Also, search your activity and filter by date & product in your Android phones and tablets.

How to clear Google search history on Android

Step 5: Choose from Delete today, Delete custom range, Delete all time, Auto-delete.

How to Clear Search History Google on Android, iPhone and PC

Step 6: Choose Activity you want to remove and tap on Next at the bottom right corner.

How to Erase Search History of All Web & App Activity on Android

Step 7: Tap on the Delete at the bottom right corner.

How to Clear Google Search History from PC/Laptop

Step 1: Open Activity.Google.Com in your web browser on PC and sign in with your account.

You can see my Google activity page including web & app activity, location history, and YouTube history.

How to Clear Google Search History from PC

Step 2: Tap on “×” icon to individually delete history or Tap on Web & app activity to delete past history.

View All History

Step 3: Tap on View all.

Delete Google search history from Laptop


Step 4: Tap on Delete.

Delete web and app activity using PC

Step 5: Select from Last hour, Last day, All time, or Custom range.

Delete Search History on PC or Laptop

Step 6: Choose Activity to Delete and tap on Next button.

Delete history from PC

Step 7: Click on Delete.

It’s easy to delete search history using desktop.

How to Clear Browsing History Chrome Android 

You can deleting browsing history for Google chrome browser using below settings.

Step 1: Open the Chrome browser in your phone.

Step 2: Tap the Three vertical dots (More) at the top right corner.

Clear Browsing History Android using Chrome

Step 3: Click on History.

Deleting browsing history for Google chrome browser

Step 4: Tap Clear browsing data.

You can see basic and advanced tabs here. Also, set time range to delete browsing history for last hour, last 24 hours, last 7 days, last 4 weeks, or all time.

How to Clear Browsing History Chrome Android

Step 5: Tick mark the box you want to delete and click Clear data button at the bottom left.

How to Delete Recent Searches on Google From this Phone

You can view and delete quick searches on your latest Android using below settings.

Step 1: Open the Google app.

Step 2: Click on the Profile icon at the top right.

Delete quick searches on Android Device

Step 3: Tap on Recent.

How to Delete Recent Searches on Google From this Phone

Step 4: Swipe up to delete recent Google search.

It will remove your search from your device only.

How to Delete Twitter Search History on Android 

Step 1: Sign in to your twitter account in your phone.

Step 2: Click on Search bar.

Step 3: Tap on × icon in-front of recent searches to clear all search history.

How to Delete Google History on iPhone for All Time

You can easily delete search in Google on your iPhone (iOS 16) or iPad using below settings.

Step 1: Open the Google app on your iPhone or iPad.

Step 2: Tap the Profile icon at the top right.

Step 3: Tap on Search history.

Step 4: Choose the time range you want to remove. Choose from All your search history, A specific time period, A specific day, or A specific activity.

Step 5: Click on Delete.

Step 6: Tap on Delete all time.

How to Delete History on Android 9 (Pie) and Android 8.1 (Oreo)

Step 1: Go to Settings in your Android device.

Step 2: Tap on Google settings.

Step 3: Tap on Personal info & privacy under My account section.

Here you’ll see all your Google activity details.

Google activity setting in android Nougat and Oreo

Step 4: Tap on My Activity under manages your Google activity.

You’ll see below the screen on your devices.

Remove my Google search history on android Nougat and Oreo

Now you can delete multiple or individual searches in your device. To delete individual Google searches on Android follows the next step.

Tap on individual activity you want to delete

Step 5: Tap Three vertical dots in front of the activity you delete.

Delete individual Google searches on android Oreo

Step 6: Select Delete.

Step 7: Tap on OK.

Now, individually Google search history delete from the list you want.

How to Remove Google Activity From a Certain Time Period in Android

You can easily delete history on phone using below steps.

Step 1: Follow steps 1 to 4 of Method 1.

How to delete my Google search history on android Oreo

Step 2: Tap on Three vertical dots.

Clear Google search history on android Oreo

Step 3: Select Delete activity by.

Step 4: Set date range or day you want to remove search history.

Remove Google activity from a certain time period in android Oreo

Step 5: Tap on Delete.

Step 6: Tap on OK.

How to Delete/Clear All Searches History on Android (9.0 and 8.1)

Step 1: Follow steps 1 to 3 of the above Method.

Delete All Google search activity on android Oreo


Step 2: Now tap on delete by date and choose All time from the drop-down.

Step 3: Tap on Delete & Press OK to clear all Google search history from your Android device.

You’ll also remove Google activity using search and filters using a date range and products in your Android devices.

Don’t Miss: How to Delete Google Search on Android

How to Delete My Search History on Android Using Google App

Step 1: Open the Google app in your devices.

Step 2: Tap on Three horizontal lines at the bottom right corner (In some Android device tap on top right side corner).

Step 3: Select Settings.

Google search history on android phone

Step 4: Tap on Accounts & privacy under the search section.

Google My activity settings in android device

Step 5: Tap on My activity.

Step 6: Now follow steps 5 to till the end of Method 1.

Now remove Google search activity in your Android devices you want to delete.

And that’s it. Did you find the above tutorial helpful to delete my Google search history on Android? If you have any kind of trouble, tell us in below comment box. We’ll respond as soon as possible. Don’t forget to check out our other Android tips and tricks.

Read Also:

How to post GIF on Instagram Android phone

Here’s complete guide to add or share GIF to Instagram in android phone. You can easily post GIF on Instagram android phone with GIPHY and GIF to Video app. You’ll download both app from Google Play store in your android devices. If you want to upload GIF to Instagram stories, you must download Instagram’s beta app in your android device.

It’s a quite easy to upload GIF to Instagram in android devices. You can add several types of GIF images such as funny, emotional, reaction, Action, Animals, Stickers and more. Do you have any tips to post GIF on Instagram story android? Follow below given step by step guide to post GIF on Instagram android phone.

Don’t Miss:

How to add a friend to your Instagram live story on android phone

How to upload GIF in WhatsApp android phone

How to hide inappropriate comments Instagram android

How to post GIF on Instagram Android phone

The GIPHY android app has one of the best and useful to share animated GIF with Instagram, WhatsApp and other social media apps also. You’ll capture your photo and add animated caption also and share with your friends on social media.

Step 1: First of all download GIPHY / GIF to Video app from Google Play store in your android device

After completed download, install app and launch the GIPHY app in your android device.

Add animated GIF to Instagram in android

Step 2: Tap on search all the GIFs from the search box

Upload GIF to Instagram in android

Step 3: Select GIF you want to post

You’ll see below given screen in your android device.

Tap three horizontal line in GIPHY app in android

Step 4: Tap on three horizontal dots beside messenger app icons

Share GIF to Instagram in android phone

Step 5: Select Instagram icon or Share icon to post GIF on Instagram Android and wait for few second to get the GIF on your Instagram direct share

If first time use, give permission to access photos, media and files on your android device. After few second, you’ll get GIF on Instagram.

Step 6: Adjust the crop and tap arrow icon

Filter GIF image in Instagram account

Step 7: Select filter and then tap on Next at top right corner

How to post GIF on Instagram Android phone

Step 8: Now add a caption and tap on share

Now add animated GIF to Instagram in android device.

I hope above given tutorial helpful to post GIF on Instagram Android phone. If you have any kind of trouble, tell us in below comment box. We will respond as soon as possible. Don’t forget to check out our other android tips and tricks.

How to take a picture with voice command on LG V30

Camera is the one of the most important part of any smart phones. In LG V30 devices, you can capture several types of photos such as slow motion, time lapse, 360 panorama, cinematic video, wide angle photo and more. But in this tutorial, I will show you step by step process to take a picture with voice command on LG V30.

In LG V30 device, you’ll take a photo by saying Smile, Cheese, Kimchi, Whisky or LG. To take a photo with a voice command on LG V30, enable cheese shutter in LG V30 under camera settings. Also use HDR mode for combines multiple photos taken at different exposures. Other included LG V30 camera options are steady recording, covered lens, tag locations and more. Follow below given complete guide to take a picture with voice command on LG V30.

See This:

How to use smart lock on LG V30

How to enable full screen apps on LG V30

Fix LG V30 touch sensitivity problem

How to take a picture with voice command on LG V30

How to take a picture with voice command on LG V30

Step 1: Open camera app in your LG V30 device

Step 2: Tap on settings gear icon at top left side corner

Here you’ll see HDR, timer, cheese shutter, steady recording for reduce motion blur in videos, covered lens and other settings. By default disable cheese shutter in your LG V30 device.

Step 3: Turn on toggle button of cheese shutter to take photo with voice control or command

Now just say Cheese, smile, kimchi, Whisky or LG to capture a photo in your LG V30 device.

In LG V30 device, you’ll also taking a selfie with auto shot or Gesture shot.

Taking a selfi with auto shot:

Camera will detect your face and automatically capture a photo.

Taking a selfi with Gesture shot:

First of all change settings from auto to gesture shot in your LG V30 using below settings.

Settings gear icon > Selfi > Gesture shot

Now open camera and hold your hand in front of the camera to take selfi with gesture shot.

You’ll also see several camera modes in your LG V30 camera settings including snap shot, match shot, cinematic video, Grid shot, Guide shot, Food, snap movie, popout, 360 Panorama and more.

And that’s all about LG V30 Camera tips. Did you find above article helpful to take a picture with voice command on LG V30? Do you have any other LG V30 tips? Share with us in below comment box. Check out our other best LG V30 tips.