How to Share Internet From Laptop to Phone: 3 Ways

Want to share the internet from laptop to mobile? Here’s how to share your internet with phones or tablets. Sometimes internet connection available but doesn’t have a connection in your android phone or tablet. You can share your cellular data network with laptop or desktop devices using a Wi-Fi hotspot (Multiple devices). If a single device then uses USB tethering or Bluetooth tethering. Simple use Wi-Fi hotspot settings to share your internet connection with single or multiple android devices.

Before using this connection, make sure your mobile data support this data sharing. Different Android devices have slightly different settings to share mobile data networks with others. Try below given different methods to share the internet connection with laptop or Windows devices such as Windows 10/Windows 8/Windows 7.
Related:

3 Different Methods to Share Your Internet connection From PC using Tethering

share internet connection with laptop device


1st Way: Use Wi-Fi hotspot to share the mobile data network

First of all setup Wi-FI hotspot in your android nougat, marshmallow, and other devices.

Step 1: Go to “Settings”.

Step 2: Tap “More”.

Tethering and portable hotspot settings nougat 7.0 device

Step 3: Touch “Tethering & portable hotspot”.

By default turn off portable Wi-Fi hotspot in android nougat 7.0 and other devices.

Step 4: Tap “Set up Wi-Fi hotspot”.

Set up wi-fi hotspot settings nougat phone 7.0

Here you can see network name, password, and broadcast channel/band size. You can change Wi-Fi hotspot settings any time using the above steps.

Step 5: Tap “Save”.

After setting up a Wi-Fi hotspot, let see how to use a Wi-Fi hotspot to connect other devices such as laptop/desktop or tablet devices.

First of all, make sure your phone cellular data is enabled. If not enabled, your internet connection is not shared with others. Using the below settings, you can enable cellular data in your android device.

turn on cellular data in android 7.0 nougat phone

Settings > Wireless & networks > Data usage > Turn on Cellular data

Turn on Wi-Fi hotspot in android 7.0 device  

Now turn on Wi-Fi hotspot using the above settings in your android phone or tablet devices. After turn on the Wi-Fi hotspot, you will see a hotspot symbol in the phone status bar. Now open Wi-Fi settings on the phone you want to connect, select your device’s network name from the list and enter the hotspot password you set.

To disconnect your device from a hotspot, turn off Wi-Fi hotspot in an android phone or tablet device. You can change the Wi-Fi password in android phone any time using the below settings.

change Wi-Fi hotpost password 7.0 nougat phone

Settings > More > Tethering & portable hotspot > Set up Wi-Fi hotspot > Check show password > Enter new password > Save

When using this portable Wi-Fi hotspot, your android phone battery quickly drains.

2nd Way: Share Internet Connection With USB tethering

First of all turn on cellular data in your android phone or tablet devices. Now follow below step by step guide.

Step 1: Connect your android phone to your Laptop / PC via USB cable.

Step 2: Go to “Settings” on your phone.

Step 3: Tap “More” (Make sure Wi-Fi) is turned off.

Step 4: Touch “Tethering & portable hotspot”.

By default disable USB tethering in android device.

Turn off USB tethering nougat 7.0 smartphone

Step 5: Turn on USB tethering.

3rd Way: Use Bluetooth tethering to share the internet connection with desktop or tablet

Step 1: Turn on Bluetooth on your android phone or tablet.

Step 2: Now pair your phone with other devices want to share the internet.

Step 3: Set up a network connection via Bluetooth using the below settings.

turn on bluetooth tethering android 7.0 nougat

Settings > More > Tethering & portable hotspot > Enable Bluetooth tethering

End the list of methods to share internet connection with laptop or desktop devices. If you find it helpful, don’t forget to share it with others. Also, mention which method easily worked for you to connect with other Windows or PC devices.

Fix Payment Method Declined on Google Play

Problems in Google Play store payment issues when purchasing apps or games from the Play store. You’re “credit/debit card was declined” message seen sometimes also. There are mainly three methods available in play store to purchase apps or games including credit or debit cards, online banking, Google play gift card & promotional code. Also, see the message of payment method is not valid or your card was declined message when purchasing apps from the play store. Try below-given troubleshooting steps to fix payment was declined issue on Google Play store android phone or computer device.

Related:

How to Fix Google Play Store Payment Issues in Android phone or tablet

Google Play store payment issues

Check credit or debit card information

First of all, check the date of your credit or debit card. Because expired cards are the reason for payment issues. You can update this Google Play store payment information using Google payment settings in your android device. Also, check the address you entered in the play store is the same as the credit/debit card owner. If it not the same address then your card declined.

Use different method to purchase from Google play store

Try a different method to purchase apps or games such as net banking/credit card or debit card (VISA/MasterCard/American Express)/gift card.

Add payment method in Play store to purchase apps or games

Google Play Store > More > Account > Payment methods > Credit or debit card / Net banking / Redeem code

Remove credit or debit card details and re-enter again

Open the Google Play store payment method settings in your android device. Remove the entered card details and add again and try purchasing apps or games from the play store.

Google Play Store > Menu > Payment methods > Tap added method > Remove

Check the country payment to Fix Payment Declined on Google Play

Check the country and its currency details is the same. If not the same then you’re payment was declined. You can change the Google Play store country and address using the below settings. When you change your home country in the play store, you need to sign in a new play store service.

Settings > Name & address > Pencil icon > Enter new address (Address, Country, phone) > Save

Clear the cache and data for the Google Play Store

Step 1: Go to “Settings”.

Step 2: Under the device section, Tap “Apps”.

Step 3: Scroll down until view Google Play Store option and tap it.

Step 4: Tap “Storage”.

Clear the cache of Google Play Store to fix payment issue

Step 5: Tap “Clear cache

Clear the cache for the Google play store.

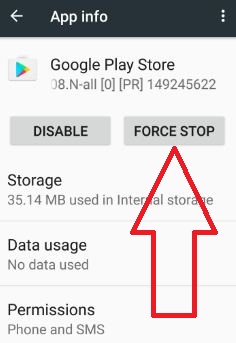
Force Stop the Play Store

Force stop Play Store to fix payment issue

Settings > Device > Apps > Google Play store > Force stop

Now restart your device and try to purchase apps or games from the play store.

Check bank site if any maintenance

Sometimes bank website is maintenance, so you can not properly use Internet banking or another payment method. Also, check your credit or debit card is not blocked.

Did you find the above steps helpful to fix Google Play store payment issues in android? Don’t forget to mention which method worked for you to solved the play store app purchase problem. Share this useful trick with your friends on social networks.

Fix Error 920 in Google Play Store

Downloading your favorite apps from the play store and see the error message “app could not be downloaded due to an error”.(920) This Google play store error 920 is the hurdle for you to downloading or updating app from android play store. We already know the solutions of other play store error that related with this problem including Error 504, Error 505, Error 963, Error 924, Error DF-DLA-15, Error 492 and more.

One of the simple solutions to fix error 920 in the play store is to restart your android device and try to downloading android apps from the play store. If not working then try below given possible solutions to fix Google play store error 920 code in android phone or tablet such as Moto G4 Plus, Nexus 6P/6, Samsung Galaxy S7, LG V20, Moto G5 Plus, Galaxy note 4, etc.

Related Article:

How to Fix Google Play Store Error Code 920 in Android phone or tablet

Google play store error 920

Different android device is slightly different settings. Follow below-given methods to fix error 920 play store in an android device. Below settings is android nougat 7.0 (Moto G4 plus) device.

1st Way: Uninstall update of Google play store

Step 1: Go to “Settings”.

Step 2: Tap “Apps” under the device.

Step 3: Touch “Google play store”.

Step 4: Tap “More”.

Uninstall update of Google play store to fix error 920 android

Step 5: Tap “Uninstall updates” & Touch “OK”.

Now try to download apps from Google play store. If not working then try the below method.

2nd Way: Clear the cache & data of Google Play Store

Step 1: Go to “Settings”.

Step 2: Under device, Tap “Apps”.

Step 3: Scroll down until the Google Play Store and open it.

Step 4: Tap “Storage”.

Step 5: Tap “Clear cache” & “Clear Data“.

Clear the cache & data play store to fix error 920


Clear the cache & clear data of Google play services

Settings > Device > Apps > Google Play Services > Storage > Clear cache

3rd Way: Delete Google account to fix Error Code 920 Play Store

Step 1: Go to “Settings”.

Step 2: Under the Personal menu, tap “Accounts”.

You can see a list of accounts you created.

Step 3: Touch “Google”.

Step 4: Tap “More”.

Remove your Google account to fix play store 920 error

Step 5: Tap “Remove account”.

Step 6: Again touch “Remove account” to delete it.

After removing the Google account, restart your android device and add your Google account again and downloading the app from the play store.

4th Method: Force stop Google Play store

Settings > Device > Apps > Google Play store > Force stop

Now restart your device and try to download apps or games from Google Play store.

End the list of methods to fix Google play store error 920 in android phones or tablets. If you find it helpful, don’t forget to share it with others. Stay connected with us to know the latest android trick and tips.

How to Use Mobile Hotspot on Android Phone

Have you ever use or connect android phone to Wi-Fi hotspot? Here’s how to set up a Wi-Fi hotspot on Android 7.1.2 Nougat and Marshmallow 6.0 devices. Using a Wi-Fi hotspot, you can share your phone mobile data with other devices. You can share your android phone’s mobile data with another device via Bluetooth tethering, Wi-Fi hotspot or USB tethering. Also, connect with your laptop or tablet device using a mobile data connection.

Different android device has slightly different settings to use Wi-Fi hotspot in your device. Some of the network carriers charge extra for tethering so checking it before connecting. Follow the below-given step by step guide to turn on Wi-Fi hotspot, customize Wi-Fi hotspot and connect android phone to Wi-Fi hotspot.

Related:

How to Set up a Mobile Hotspot With Android Phone 

First of all turn on Wi-Fi hotspot in your android nougat 7.0 and other devices.

Step 1: Go to “Settings”.

Tap more under wireless and networks in 7.0 nougat

Step 2: Tap “More” under Wireless & networks.

You can see airplane mode, Tethering & portable hotspot, VPN and cellular networks.

Tethering and portable hotspot settings in 7.0 nougat phone

Step 3: Tap “Tethering & portable hotspot”.

turn off portable wifi hotspot in nougat 7.0 phone

By default disable portable Wi-Fi hotspot.

Step 4: Turn on “Portable Wi-Fi hotspot”

If first times use hotspot then enter the network name and password.

How to customize Wi-Fi hotspot settings

Step 1: Follow the above-given method step 1 to step 3.

set up wifi hotspot in android nougat 7.0 device

Step 2: Tap “Set up Wi-Fi hotspot”.

connect android phone to Wi-Fi hotspot

Step 3: Enter network name, security, password and select AP band in your nougat device

You can change the network name any time, if you don’t want to security or password when connecting with Wi-Fi hotspot then select “none” under security, show or hide Wi-Fi hotspot password (at least 8 characters) and select AP band as 5 GHz band / 2.4 GHz band.

Step 4: Tap “Save

Now completed set up a Wi-Fi hotspot in android phone or tablet device.

How to Show Password Wi-Fi hotspot

Using the below steps you can see your portable Wi-Fi Hotspot network name and password.

Settings > Wireless & networks > More > Tethering & portable Hotspot > Set up WI-FI Hotspot > Show network name and check the box of “Show password” to see Wi-Fi Hotspot password

Connect Android Phone to Wi-Fi Hotspot

Step 1: Open Wi-Fi options.

Step 2: Check the hotspot network name in your device want to use.

Step 3: Enter the hotspot password.

Step 4: Click Connect.

Some of the latest android nougat 7.0 & 7.1.1 devices can automatically share data connections such as Pixel, Pixel XL, Nexus 6P/6, Nexus 5X, etc. Also automatically tether with Wi-Fi hotspot in android 7.0 & 7.1 Nougat devices.

End the all about Wi-Fi hotspot. If you find the above steps helpful to connect android phone to Wi-Fi hotspot, please share it with your friends. Stay connected with us for daily latest android technology news.

How to Use Google Authenticator App For Gmail Account

Here’s how to set up and use Google Authenticator app to secure your Gmail account. When Google two-step verification not working in android, This 2-step verification of Google not working due to text codes aren’t working / not getting codes or phone call or android device is lost. Simply enable Google Authenticator app for the Gmail account. If you have a problem with not getting codes by text or calls then you should try this. Follow the below steps to enable Google Authenticator app for Gmail in android phone or tablet device.

Read this:

How to Enable Google Authenticator App for Gmail Account in Android

If you find error getting text codes or Phone calls then set up the Google Authenticator app in your android device. Using this Google Authenticator app, you can get text codes even if not any mobile services or internet connection. Because of a bad network, you can’t get any code or call. If not work this trick then use you’re back up phone number to get codes or calls. If you set up a back phone number when setting up a Google 2 step authentication in android.

Follow the below-given step by step guide to enable Google Authenticator app for Gmail account when Google’s two-step verification not working in your android.

Step 1: Open the Google Authenticator app in your device.

If not downloaded, click here to download the Google Authenticator app from the play store. Now install it in your device.

Step 2: Tap “Begin”.

Here you can see two options, one is scan barcode and the other is provided key.

Open Authenticator app in your device

Step 3: Tap Barcode scanner or Google authenticator secret key.

Barcode scanner: Scan barcode with your PC under 2 step verification settings.

Secret key: Enter your email ID and a key to set up.

Enter account name and Key

Now you can see time-based and counter-based options. Make sure to set time-based.

Step 5: Tap “Add”.

To set up authentication app in your computer follow below given steps:

Step 1: Login your Gmail account.

Authenticator app in android

Step 2: In 2 step verification settings, tap set up in the Authenticator app in your android device.

You can see android or iPhone options.

Authenticator app set up in android

Step 3: Choose your device & Tap “Next”.

scan barcode in your device

Step 5: Now scan the Google Authenticator QR code seen your PC or Desktop.

This QR code also is seen on the phone using the below settings.

tap + button to set up authenticator app

Step 6: Open the Authenticator app & tap the “+” icon from below right side corner.

Scan a barcode to enable authenticator app in android

Step 7: Tap “Scan a Barcode”.

Now scan phone barcode to PC. You can get code on the phone that enters your account to finish Authenticator app settings. After setting up the Authenticator app in android device, automatically turning off 2 step verification of your phone call or text messages in your device.

enable Google authenticator app for Gmail

Step 8: Now login to your Gmail account or verified 2-step authentication using the Authenticator app.

Set up Google authenticator app in android

Step 9: Enter code in your Authenticator app.

You can’t remember this code because of this code change frequently after a few seconds in your device.

That’s all. I hope the above-given steps to enable Google Authenticator app for Gmail account when Google 2-step verification not working in your android device.

How to Fix Error RPC:S-7:AEC:0 In Google Play Store

When downloading or updating apps from the play store, see the error message of error retrieving information from server RPC:S-7: AEC:0. This error RPC:S-7: AEC:0 in Google Play store mostly occurs when you trying to purchase from play store in android phone or tablet. Also, check the play store update that fixes play store error RPC S-7: AEC:0. Sometimes reboot your device fix error, but this time didn’t help to fix RPC:S-7: AEC:0 play store error. In this tutorial, I will show you step by step guide to fix Google play store error RPC S-7: AEC:0 on android phone or tablet.

Related:

How to Fix Google Play Store Error RPC S-7: AEC:0 in Android phone or tablet

fix Google play store error RPC S-7

Follow below given different methods to fix error RPC:S-7: AEC:0.

1st Method: Delete your Google Account

 Step 1: Go to “Settings”.

Step 2: Under Personal settings, tap “Accounts”.

Step 3: Tap “Google”.

Step 4: Touch “More” from the top of the right side corner.

Delete Google account to fix error RPC S 7 AEC 0

Step 5: Tap “Remove account”.

Step 6: To remove the account from the device again tap Remove account.

2nd Way: Clear the cache and data Google Play Store

Step 1: Go to “Settings”.

Step 2: Under the device section, Tap “Apps”.

Step 3: Scroll down until the Google Play Store and tap it.

Step 4: Touch “Storage”.

How to Clear cache and data in android nougat 7.0 device

Step 5: Tap “Clear cache”.

Clear Cache of Google Play Services Android

Settings > Device > Apps > Google Play Services > Storage > Clear cache

3rd Method: Uninstall update Google play store to fix Google play store error RPC S-7: AEC:0

Step 1: Go to “Settings”.

Step 2: Tap “Apps” in the device section.

Step 3: Touch the “Google play store” app.

Step 4: Tap “More”.

Uninstall play store update to fix play store error RPC S 7 AEC 0

Step 5: Tap “Uninstall updates”.

Step 6: Tap “OK”.

Now check to download or update apps in your android phone or tablet device.

4th Method: Set date and time in Android

Check date and time if they are incorrect then correct date & time using below steps in your android device.

Step 1: Go to “Settings”.

Step 2: Under the system section, tap “Date & time”.

By default enable automatic date & time in your android device. First of all, disable it.

set data and time in android 7.0 nougat device

Step 3: Tap “Set date”.

Now set date and press OK.

Step 4: Tap “Set time”.

Now set time and press OK.

Step 5: Enable automatic date & time in android nougat 7.0 device

End the list of possible solutions from my sides to fix Google play store error RPC S-7: AEC:0. If you have known other tricks to fix RPC:S-7: AEC:0 error on play store, please share it with us.