How to Send Custom GIF on WhatsApp Android

Recently updated my WhatsApp app and seen new features to send GIFs on WhatsApp Android phone or tablet device. Using this new WhatsApp GIFs feature, you can send animated GIFs, live photos, and short videos as GIFs in WhatsApp on Android devices. Also, search GIFs on WhatsApp Android devices. We already send emoji, text, photo, and videos in WhatsApp. You can add your most like GIF into the star (Favorite) section in WhatsApp on Android phone.
You can send a short video as GIF in WhatsApp, send live photo as animated GIF in Whatsapp on Android, and save GIFs on android. But in this tutorial, I will show you step by step guide to sending GIFs in WhatsApp on Android devices.

Read Also: 

How to Send WhatsApp GIFs Android 2020 

First of all, check the latest version of WhatsApp installed in your device. If not then download the latest version of WhatsApp for your android device to send GIFs in WhatsApp on android.

Step 1: Launch the WhatsApp on your android device.

Step 2: Open any conversation.

Tap emoji icon in bottom left corner

Step 3: Tap the “Emoji” icon from below left side corner.

Tap GIF icon from bottom screen in WhatsApp

Step 4: Tap on the “GIF” button at the bottom middle.

You can see a number of GIFs on your device screen.

send GIFs in WhatsApp on android

Step 5: Tap on GIF you want to be sent.

How to send GIFs on WhatsApp in nougat

Step 6: Touch the “Send” button to send GIFs in WhatsApp contact.

It’s easy to send WhatsApp GIFs on android and iOS devices.

How to Send Animated GIFs on WhatsApp on Android phone or tablet

Step 1: Open the “WhatsApp” app in your android device.

Step 2: Tap any conversation.

Select GIFs video from gallery in WhatsApp

Step 3: Open Gallery from the WhatsApp app.

Step 4: Select a live photo from the gallery you want to send as GIF.

How to Save GIFs Into a Star in WhatsApp on Android Device

Step 1: Open WhatsApp & tap any conversation.

Step 2: Tap & hold any GIF or animation GIF.

save GIFs into star in WhatsApp on android phone

Step 3: Select the star icon to add your favorite GIF.

That’s all. This latest version of WhatsApp is more enjoying then other messaging experience.

We hope this makes it clear how to send GIFs in WhatsApp on Android phone or tablet. Let me know in the comment section if you have any kind of trouble to share GIF images in WhatsApp and send animated GIFs on WhatsApp in android.

How to Configure Dual SIM Settings in Android 12/11/10

Are you confused about which SIM you can use to set up calls and data? If not, then don’t worry about this issue, in this article, we can see how we can manage dual SIM settings in Android. In your Android 12 (Add a number using eSIM) and 11 devices, you can manage mobile data, set default SIM, activate dual SIM (eSIM), and many more settings with a few clicks. You can do SIM selection at your convenience. Also, you can manually set up your default SIM card by going to the setting menu.

Settings are different as per the Android Device & its version. If you are using Android 9 and 10, you can change SIM settings, manage settings, enable and disable SIM and much more. You can change the name of your SIM and color using the SIM card setting. The SIM controller app or android dual SIM manager manages your SIM card. This article will show the steps to configure dual SIM settings in Android 12/11/10 devices.

How to Manage Dual SIM Card on Android 12/11/10/9 (Pie)

Below you can manage Android 12 and Android 11 dual SIM settings.

Change SIM Settings on Android 12 and Android 11 (One SIM + One eSIM)

Step 1: Go to Settings.

Step 2: Tap on Network & internet.

Step 3: Tap on SIMs.

How to Configure Dual SIM Settings in Android 12 and Android 11

Step 4: Enable or disable mobile data, roaming, check app data usage, set data warning & limit, and set preferred network style in your Android 12 stock devices.

Change the SIM Name and Color on Android 12/Android 11

Change the SIM Name and Color on Android 12 and Android 11

Settings > Network & internet > SIMs > Pencil icon at the top > Change the SIM name and color you want to use > Save

Turn Off/Disable SIM Card Android 12/11

Disable SIM Card Android Phone

Settings > Network & internet > SIMs > Toggle off Use SIM > Yes

Configure Dual SIM Settings in Android 10 and Android 9 (Pie)

Settings > Network & internet > Choose a SIM > Change the Settings you want

Change SIM Name and SIM Color in Android 10/Android 9 (Pie)

Using the network and internet settings, you can set or change the default SIM name and choose the SIM color from Teal/Blue/Indigo/Purple/Pink/Red.

Settings > Network & internet > Mobile Network > Pencil icon > Enter name and choose SIM color > Save

Read Also:

Configure Dual SIM Settings in Android 7.0 (Nougat)

Step 1: Go to Settings.

Step 2: Under the wireless & network section, tap SIM cards.

Here you can see below two sections and other Samsung smart dual SIM settings.

Manage SIM Capabilities

Manage SIM capabilities in android phone

Manage SIM capabilities include Automatic selection of SIM, usage profile, and can do other settings. It’s pretty much easier for you to manage DUAL SIM on Android 12 and 11 Devices.

Usage Profile

In the usage profile, we can see the steps to set up DUAL SIM in Android because of these, you can easily manage the call, texts, data, and much more. Select the SIM card that uses data and calls in your Android Device. Easy to change the name of the SIM card and its color. Also, set your Personal SIM and work SIM too.

Connection Priority

SIM connection priority as data or voice

You can choose connection priority from Data or voice.

Automatic SIM Selection

When enabling automatic SIM selection in Android devices, whenever you call or message, it will ask you for which SIM card is used to call or message.

Preferred SIM

This section includes settings of cellular data, calls, and SMS messages.

How to manage dual SIM android 7.0 nougat

Cellular data: Select a SIM card for the mobile data network.

Set SIM call settings when calling someone

Call: Select SIM for outgoing calls or set “ask every time” so when calling someone, ask which SIM card to use.

SMS: Select the SIM card to use to send messages.

Change SIM Card Name and SIM Card Color in Android 7.0 (Moto G4 plus)

How to change SIM name and color in android nougat

Settings > Wireless & networks > SIM cards > Tap SIM slot 1 / SIM slot 2 > Enter SIM name & select color want to change > OK

Enable/Disable SIM Card Android 7.0 (Nougat ) and 6.0 (Marshmallow)

How to disable SIM card android 7.0 nougat

Settings > Wireless & networks > SIM cards > by default enable both SIM card > turn off toggle button of SIM want to disable SIM

That’s the end, above are the details that will help you to change the dual SIM setting in your Android Device. If you find this article helpful, don’t forget to share it with your friends.

How to Download Your Own YouTube Videos Android Phone or Tabltes

Want to download your video from YouTube? Here’s how to download videos you’ve uploaded on your YouTube channel on Android phones like Samsung Galaxy, OnePlus, Google Pixels, Sony Xperia, Motorolla, etc. Download high-resolution YouTube videos using a video manager on Android devices. You can easily download your own YouTube videos as MP4 on Android using video manager. You can also watch offline YouTube videos on Android phone or tablet device in the YouTube app.

You can use third-party apps and software tools for downloading YouTube videos for free on your desktop PC or laptop. Anytime download mp4 files of videos from YouTube to PC or MAC that you’ve uploaded. Also, use YouTube downloader to download videos. In this tutorial, I will show you a step-by-step guide to downloading your video from YouTube on a PC or laptop.

Related:

How to Download YouTube Videos You’ve Uploaded/Download MP4 YouTube Video on PC

Step 1: Log in to your YouTube account on your desktop/laptop.

Creator studio in YouTube

Step 2: Tap on the profile icon & tap Creator studio.

Video manager under creator studio

Step 3: Touch Video manager.

Video under video manager in YouTube

Step 4: Tap the“Videos submenu of the video manager.

Here you can see a list of uploaded YouTube videos by you. Select any video you want to download from your PC.

download your video from YouTube on PC

Step 5: Select “Download MP4” from the drop-down menu.

Now start to download YouTube videos on your desktop or laptop device. It’s easy to download your video from YouTube on a PC.

Use Google takeout to download all of your uploaded YouTube videos on your desktop device.

Step 1: Open Google Takeout & log in with your account.

You can see a screen for downloading your data on a PC or laptop. Scroll down until you see YouTube

YouTube data on PC

Step 2: Choose Select specific data.

Here you can see history, playlists, subscriptions, and video options. Select the data you want to download & tap done.

Step 3: Tap the Next button.

Now customize the archive format you want to download or save in the cloud. Select file type, Archive box, and delivery method on your desktop or laptop device. In the delivery method, you have four options.

Customize archive format of YouTube

  1. Send download link via email
  2. Add to drive
  3. Add to one drive
  4. Add to Dropbox

Step 4: Tap Create archive.

To download your favorite music, use Google play music manager. You can see the message of “May takes a long time to create“. You will receive an email when your archive is complete. When a link is ready, please email it to your account.

How to Save Offline YouTube Video Uploaded by You

save offline uploaded your own YouTube video

YouTube app > Profile icon > My videos > List of uploaded video seen > More > Save offline

I hope the above-given guide help to download your video from YouTube on a desktop or laptop device. If you have known other tricks to download your own YouTube video, please share them with us. Don’t forget to share this article with others.

How to Fix Google Play Store Error 919 Code

Error 919 in Google Play Store during application install on your android devices. When this error generated, show the message of “Unknown error code during application install: 919”. Various users reported this error code 919 occur while update or installing the app in android phone or tablet device. One of the reasons for this error code 919 is also not enough free space in your phone’s internal storage for application installation.

You can clear the cache & clear data or change your Access point name to fix this error code 919 in the play store. Below you can see the complete step by step details to fix Google play store error 919 in android phone or tablet device.

Related:

How to Fix Error 919 In Google Play Store While Installing Apps

fix Google Play Store error 919

To fix 919 play store error in Android, try below given possible solutions in the android phone.

Method 1: Clear the cache and data of Google Play Store

Step 1: Go to “Settings”.

Step 2: Under the device section, tap “Apps”.

You can view a list of installed apps on your device.

Google play store under apps in phone

Step 3: Scroll down until see “Google play store” & open it.

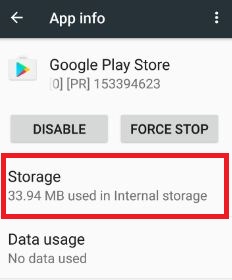
Tap storage in play store app info

Step 4: Tap “Storage”.

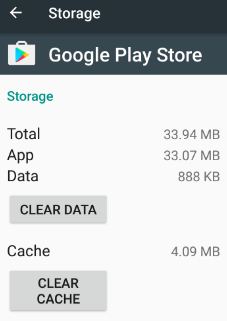
how to clear play store cache in android 7.0 device

Step 5: Tap on Clear cache

Step 6: Click on Clear data 

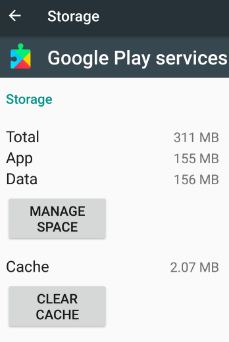
Clear the Cache of Google Play Services

Settings > Device > Apps > Google Play Services > Storage > Clear cache

Method 2: Check Internet Connection

If you are using mobile data to download and install applications, try to use a Wi-Fi network or another high-speed data network in your android phone or tablet device. It might resolve this play store error issue.

Method 3: Change your VPN settings in Android

Step 1: Go to “Settings”.

Step 2: Under “Wireless & networks”, tap “More”.

Cellular networks settings in 7.0 nougat phone

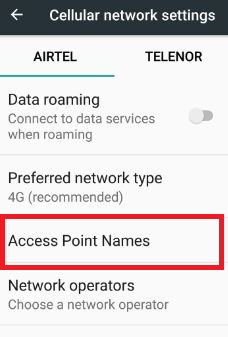
Step 3: Touch “Cellular network”.

Set access point names in 7.0 nougat phone

Step 4: Tap “Access point names”.

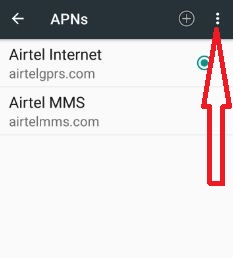
Step 5: Edit APNs in your android device.

4th Method: Uninstall Google Play Store Updates to Fix Error 919 Code

Step 1: Go to the “Settings” app.

Step 2: Under the device section, Tap “Apps”.

Step 3: Scroll down until see “Google Play Store” and tap on it.

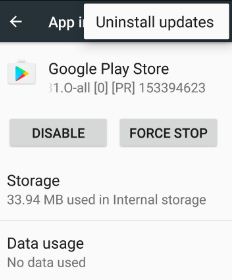
Step 4: Tap “More”.

Step 5: Tap “Uninstall updates”.

Step 6: Press “OK”.

Now try to install the app in your android phone or tablet devices.

All possible solutions listed above to fix Google Play Store error 919 in Android phone or tablet. Do you have any alternative methods to fix error code 919? Please share with us in the below comment box.

Fix OK Google Not Working Android

How to fix OK Google isn’t working issue. Use OK Google in your android device to talk with your Google Assistant that recognizes your voice when you say “OK Google” in your android device. You can use “trusted voice” Ok Google feature that unlocks your android phone when you’re using any favorite apps or games. Also, enable Google maps in your device while driving a car. It’s easy to fix the OK Google detection issue.

If you want to talk to your assistant, say “OK Google” anytime. After enabling Google assistant in android, it will use your device screen and related info, apps and more. Change this using an assistant setting. In this tutorial, I will show you step by step guide to fix OK Google is not working on android phone or tablet.

Related:

How to Fix OK Google Voice Search Not Working on Android 

Try below given possible solutions to fix the OK Google isn’t working issue in android devices.

1st Way: Check the Language

Check the language option in your android phone. Google now is compatible with only the US English language. You can change the language in android nougat 7.0 using this.

Step 1: Go to “Settings”.

Step 2: Tap the “Languages & input” section under the personal section.

You can see various sections in your android device.

Step 3: Under keyboard and input methods, tap “Virtual keyboard”.

Gboard settings in virtual keyboard settings

Step 4: Tap “Gboard” under the virtual keyboard.

voice typing under Gboard keyboard option

Step 5: Touch “Voice typing”.

offline speech recognition settings in voice section

Step 6: Tap “Offline speech recognition”.

Here you can see by default installed (English US) language. Also, download other languages from the list and set auto-update languages in the android device.

Step 7: Change the language you want to use

2nd Way: Google Assistant is on

Long press the home button to launch Google Assistant on your Android devices. If turned off, turn on Google Assistant. To use OK Google, turning on Google Assistant.

3rd Way: Make Sure Turn on Ok Google Command

Step 1: Logn press the home button to access Google Assistant.

Step 2: Tap the Compass icon at the bottom right corner.

Step 3: Click on your profile picture.

Step 4: Select Settings.

Step 5: Touch Assistant tab.

Step 6: Scroll down at the end of the page and tap your Device name under the Assistant device section.

Step 7: Toggle on Access with voice match.

Now enable Ok Google on your Android devices.

4th Way: Retrain OK Google to Fix OK Google Not Working On Android

Step 1: Open Google app in your android nougat 7.0 & other devices.

Step 2: Tap “Search” under the services section.

Tap voice under search section in Google app

Step 3: Under the search section, tap on “Voice”.

Ok Google detection under voice section

Step 4: Tap “OK Google” detection.

By default, toggle off say “OK Google” in your device.

Fix OK Google Not Working On Android

Step 5: Toggle on “OK Google”.

You can see a trusted voice option that unlocks your device when matching your sound with OK Google voice.

Step 6: Tap on the “Retrain voice model” under the OK Google voice model (By default disable).

It will delete your voice from your Android devices.

Step 7: Say “OK Google” three times.

This might fix the issue of OK Google not working issue on android phone or tablet device.

5th Way: Check Microphone issue

Google voice microphone issue

Google voice > Microphone icon on right side of search bar > if it is in dots, need to fix microphone issue

6th Way: Disable S voice

In Samsung Galaxy S6 & S6 edge device, S voice app causing the issue of OK Google. So disable S voice or delete it from your device.


End the list of solutions that fix OK Google is not working on android device. If you have known other tricks that solve this issue, please share with us on below comment box. Don’t forget to share this article with others.

How to Fix YouTube Error Occurred Android

Annoying by suddenly YouTube not working on Android devices? Here’s how to fix YouTube an error occurred retry on Android phone or tablet devices. There are many YouTube errors when the internet connection is lost or low network in Android devices. The most common YouTube error is no network connection (Retry), Error loading YouTube video, 500 internal server error, and no connection error. It’s simple to fix YouTube error message android phone or tablet device. Sometimes the issue of YouTube video streaming in android.

YouTube is the #1 video sharing website in the World. You can watch your favorite videos and channel. Also, watch offline YouTube videos in your android device. So when the internet connection is not available, you can watch videos offline. Try below given possible solutions to fix YouTube error message android phone or tablet device.

Related:

How to Fix Error on YouTube Android Phone or Tablet

fix YouTube error message android

Follow below-given steps that fix errors in the YouTube app on Android devices.

Check the Internet Connection

If the internet not working correctly in your android device, you can see this type of different message: Check your network connection, no network connection right now, No connection, and more. When this type of YouTube error seen, first of all, check internet connection.

set preferred network type in android 7.0 nougat phone

Connect your device to Wi-Fi, 4G, or 3G data to fix the connection issues. Also check your device is not on airplane mode.

Restart YouTube app & Reboot your device

First, close the app on your device. After a few seconds reopen again and try to watch videos or movies. If not working then reboot your android phone.

Enable Data Usage of YouTube App in Android

If you have used cellular data or WI-Fi data usage in your device, make sure to turn on data usage of the YouTube app on Android phones.

Step 1: Go to “Settings”.

Step 2: Under wireless & networks, tap “Data usage”.

Step 3: Tap “Wi-Fi data usage” or “Cellular data usage”.

Step 4: Touch “YouTube”.

wifi data usage of YouTube app in android 7.0 nougat

Step 5: Enable usage of cellular data or Wi-fi data usage.

Check YouTube App Update

Always use the latest and updated YouTube application in your device. To check the YouTube app update, follow the below settings in your device.

Step 1: Open the “Play Store app” in your android device.

Step 2: Tap “three horizontal lines” from the top left corner.

Step 3: Tap “My apps & games”.

You can see a list of installed apps and games lists in your Android phone or tablet device.

Check YouTube app udpate in play store

Scroll down and find the YouTube app. If you see any update on YouTube then updates it.

udpate all app from play store in android

Step 4: Tap on the “Update all”.

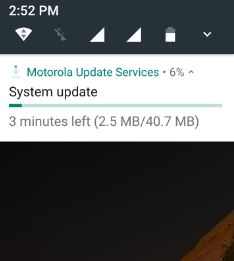
Also, check system updates on your device. It may be a fixed YouTube error message android phone.

Settings > System > about phone > System update

Clear app cache on YouTube App to Fix YouTube Error Occurred Android 

If suddenly YouTube keeps stopping or crashing YouTube app, trying to clear app cache & data on your Android devices.

Settings > Apps & notifications > See all apps > Select YouTube from apps list > Storage >  Clear cache 

Also, force stop app if clear app cache & data can’t fix the issue.

Check the video on a different phone

If none of the above methods works, you can try open video on other android devices. If the open video in another device then your device is something wrong. Contact your near phone store.

We hope this makes clear how to fix YouTube error message android phone or tablet. If you have any kind of problem, let us know on below comment box. Don’t forget to share this article on your social network.