How to hide lock screen notifications Galaxy S8

Show / hide lock screen notifications galaxy S8 and galaxy S8 plus device. You can easily change lock screen notifications settings on Samsung galaxy S8 devices. In galaxy S8 and galaxy S8 plus device, you can see two options for set lock screen notifications, one is hide sensitive content and another is notifications icons only. In android nougat 7.0 & marshmallow device, you can see show all notification content option also.

You can also individual disable app notifications on galaxy S8. By default enable lock screen notifications on your galaxy S8 device so you can get notification while any messages receive. In this tutorial, I will show you step by step guide to hide lock screen notifications galaxy S8 and galaxy S8 plus.

Related Galaxy S8 tips:

How to hide lock screen notification on Galaxy S10 Plus

How to set up secure folder on Samsung galaxy S8

Enable game launcher on Samsung galaxy S8

How to hide lock screen notifications galaxy S8 & galaxy S8 plus

Step 1: Go to “Settings

Step 2: Tap “Lock screen and security

By default disable notifications.

Step 3: Switch on “Notifications”

Here you can see below given two options:

  1. Hide content: It will hide all your notifications from lock screen while any messages or other notifications come.
  2. Notifications icons only: In this option, you can view only icon of that particular app that arrived message on your galaxy S8 device. You can’t see message texts.

hide lock screen notifications galaxy S8 phone

Step 4: Enable hide content to hide sensitive data from galaxy S8

Step 5: Turn on notifications icons only

When turn on notifications icons only on galaxy S8, you can see icons of notification apps on lock screen so you can easily decided to read that text if important. You can anytime hide lock screen notifications galaxy S8 using above settings.

How to turn on individually apps notifications on galaxy S8

Step 1: Swipe down notification bar from home screen

Step 2: Tap “Settings” gear icon

List of various setting view on your galaxy S8 screen.

Step 3: Select Notifications under settings

You can see notifications settings on galaxy S8 and galaxy S8 plus devices.

Disable app notifications on galaxy S8

Step 4: Turn on all apps to receive notifications from all apps

Step 5: Enable specific apps from list to get lock screen notifications from selected apps

How to adjust notification sound on galaxy S8 & galaxy S8 plus:

Swipe down notification bar from screen > Settings gear icon > Sounds and vibration > Notification sounds     

That’s all about Samsung galaxy S8 & galaxy S8 plus lock screen notifications settings and notifications sound.

I hope these little tips help you to hide lock screen notifications galaxy S8 and galaxy S8 plus devices. If you have any kind of problem, let us know on below comment box. Stay connected with us for latest Samsung galaxy S8 tips and tricks.

How to use Galaxy S8 edge screen

Do you know how to edit or use galaxy S8 edge screen? Let see how to edit and manage edge screen on Samsung galaxy S8 and galaxy S8 plus phones. You an enable / disable galaxy S8 edge panel, customize the apps edge screen, customize the tasks edge tab and enable edge lighting on galaxy S8 & galaxy S8 plus devices.

Also using handle settings, you can change size, position and transparency of the galaxy S8 edge tab. It’s quiet easy to access and manage edge screen on your galaxy S8 devices. Follow below given step by step guide to use galaxy S8 edge screen in your devices.

Related Galaxy S8 and Galaxy S8 plus tricks:

How to use voice control on galaxy S8 and galaxy S8 plus

How to use multi-window mode on galaxy S8 and galaxy S8 plus

How to manage and use galaxy S8 edge screen

In this tutorial, I will show you how to enable edge panels or enable edge lighting on Samsung galaxy S8 and galaxy S8 plus devices. You can easily use galaxy S8 edge screen.

Step 1: Tap “Settings” icon at bottom of the screen to access edge screen settings

Step 2: Select “Display” under settings

Edge screen setting on galaxy S8 phone

Step 3: Tap “Edge screen” under display section

Here you can see edge panels, edge lightning and edge screen details. By default disable edge panels on galaxy S8 and galaxy S8 plus phone.

How to use galaxy S8 edge screen

Step 4: Enable edge panels on galaxy S8

Also enable / disable edge lightning on galaxy S8 and galaxy S8 plus.

Step 5: Enable edge lighting on galaxy S8

You can customize apps edge screen to add or remove app from your galaxy S8 devices. Also add or remove task using edge tab and use handle settings to change size, transparency and position of edge tab on your galaxy S8 & S8 plus device.

Settings > Display > Edge screen > Edge panels > Menu icon > Handle settings

Quickly launch used app on galaxy S8:

Step 1: Drag the edge panel to centre of the screen

Step 2: Swipe left or right to open apps edge panel on galaxy S8

Step 3: Tap app to launch it

That’s all about Samsung galaxy S8 and galaxy S8 edge screen. You can any time customize galaxy S8 edge screen.

Do let us know you liked this tutorial of use galaxy S8 edge screen. Please share this galaxy S8 trick if you found it helpful. Share your thoughts and experiences related to edge screen on galaxy S8 feature. Connect with us for daily updates.

Fix Split Screen Problem on Samsung Galaxy S8

Here’s how to fix the split-screen view issues on Samsung Galaxy S8, S7 Edge, and S7 devices. Split-screen is one of the best features of Samsung Galaxy S8 and another android device which is useful to use two apps at the same time on your device. Many users report the issue of split-screen not working on galaxy S8 and other devices such as galaxy S7 & galaxy S7 edge etc. To use multi-window mode on galaxy S8, access recent apps and open another app. Some of the users also reported the issue of recent apps button not working on galaxy S8 & galaxy S8 plus device.

In Samsung galaxy S8 & galaxy S8 plus device, you can exit multi-window using window controls. Do you know any trick to disable split screen on the Galaxy S8 phone? While using a split-screen on the galaxy S8 device, you can switch between apps, adjust screen display size and copy data from one app to another. Try below-given troubleshooting guides to fix Galaxy S8 split screen problem or multi-window not working.

Related:

How to Fix Galaxy S8 Multi Window Issue

fix Galaxy S8 split screen problem

Restart your Galaxy S8 & S8 Plus

Restart your device and after few seconds turn on again. Sometimes restart your devices fix your galaxy S8 small bugs.

Check System Update Available

Check any latest update available for your Samsung Galaxy S8 & S8 plus device. If available update then updates your device. Now reboot your device and check multi-window mode is working or not.

Settings > System > about phone > System updates

Wipe Cache Partition on Samsung Galaxy S8 & Galaxy S8 plus

Step 1: Turn off your Galaxy S8 device.

Step 2: Press & hold the volume down button and power button at the same time until the device turns on.

You can view the “Android system recovery” option on your device. By default “start” button on your Galaxy S8 phone.

Recovery mode on galaxy S8 & S8 plus

Step 3: Press the volume down button until you see the recovery mode.

Step 4: Press the power button to restart into recovery mode.

Android robot logo with red exclamation mark to fix split screen galaxy S8

You can see the above screen of the android robot with a red exclamation icon on the galaxy S8 device.

Step 5: Press volume buttons to scroll to wipe cache partition, press the power button to select it.

This message view on the phone screen: Wipe cache?

Wipe cache partition on galaxy S8 and S8 plus

Step 6: Tap volume buttons to scroll to Yes and press the power button to select it.

Clearing the cache may take 5-10 minutes.

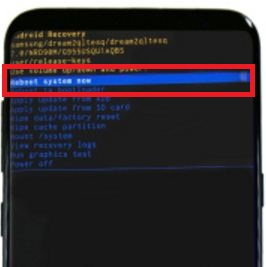
Step 7: Use the volume buttons to scroll to reboot system now, press the power button to select it.

That’s it. End the list of possible solutions from our sides to fix the Galaxy S8 split screen problem. Stay connected with us for daily latest Samsung Galaxy S8 and S8 plus updates.

How to migrating apps to android O

Google has announced android O developer preview during Google I/O. Any guess what is the full form of new upcoming android O OS? Some of the great android O features such as Notification channels & snoozing, API changes, picture-in-picture mode, system optimizations and more. This API changes the app functioning and behavior of installed apps that unnecessary. Let see how to migrating apps to android O.

While updating system software on your device, it will fix some of the application bugs. To migrating apps for android O, first of all check platform compatibility on your device and modify app with android O SDK. This android O supported device are pixel, pixel XL, Nexus 6P, Nexus 5X and Pixel C device.

You Might Like This: Best Android O features

How to migrating apps to Android O: Two Steps

migrating apps to Android O  

Check platform compatibility of app

First of all check that your app is fully compatible with new version.

  • Download android O system image for your device and also use flash installation to your device. Using this link, you can download system image of Nexus 6P, Nexus 5X, Nexus player, pixel XL, pixel C and Pixel device.
  • Check which app may be affected due to feature and API changes in android O
  • Install app on your device and running the application. Confirm it if any system changes and app flows.
  • Make sure any code changes to change system character. Without compile and build code with same API.
  • Upload the signed app and publish updated APK on your device

Modify your app for Android O

Android studio 3.0 only support all new developer Android O features. Other is Android studio 2.4 canary to build app. Below you can see how to migrating apps to android O.

  • To customize app for android O, first of all install android studio 3.0 canary. Make sure you have required conditions for development.
  • Check any modification on system while use android O. find affected system app and think about how to manage it.
  • To support new background limits and behavioral changes for android O, change the basic code and architectural.
  • Build your app for any modification occurs on the new android O version. Recompile for android O.
  • Check any background or other parts affect your app. If found any issues on API or third party then report it.
  • Update your target Sdk version and other verification.
  • Upload the signed app and updated APK version for Android O.

End the tips of migrating apps to android O. Do let us know you liked this tutorial or not. We are waiting for your feedback on comment box.

How to use voice control on Galaxy S8

Samsung galaxy S8 and galaxy S8 plus device introduce various new features such as Hello Bixby, Iris Scanner, visual intelligence, game launcher and more. In this tutorial, I will show you, how to use voice control on galaxy S8 and galaxy S8 plus phone. Using voice commands, you can control your galaxy S8 device and access voice control settings. This voice control feature already supported on Google pixel, pixel XL, Galaxy S7 & Galaxy S7 edge and other nougat and marshmallow devices.

To access voice control on your galaxy S8 device, tap Microphone icon from home screen and say OK Google to access it. Using this feature, you can get direction, make phone calls, send messages, set reminders, ask questions, schedule appointment, set alarms, play musics and more within a few seconds. Follow below given step by step guide to use voice control on galaxy S8 and galaxy S8 plus phone.

Related Tips:

How to set up secure folder on Samsung galaxy S8 & S8 plus

How to use voice control on galaxy S8 and galaxy S8 plus

use voice control on galaxy S8 device


Let see how to use voice command on galaxy S8 and change voice command language on Samsung galaxy S8 and galaxy S8 plus device.

Step 1: Tap “Microphone” icon from home screen on your galaxy S8 & other device

Step 2: Say “OK Google

You can see list of activities you can use it to search using Google voice control feature. For example just ask what is the temperature? To check the today weather related information and search other questions. It’s quiet simple to use voice control on galaxy S8 devices.

How to change voice access settings on Samsung galaxy S8 and galaxy S8 plus phone

Step 1: Swipe down home screen right side on galaxy S8

Step 2: Tap “Menu” from top of the left side corner

Step 3: Select “Settings

Step 4: Under search section, tap “Voice

You can see languages, OK Google detection, Hands-free, offline speech recognition, block offensive words and other options.

Step 5: Tap “Languages

List of languages seen on your galaxy S8 and galaxy S8 plus device screen. By default set English (US) as voice command.

Step 6: Choose language to change voice command language on galaxy S8

How to change voice access settings on Nougat 7.0:

Step 1: Tap & hold the home screen blank space

Tap settings gear icon to open settings menu

Step 2: Select “Settings” gear icon

You can see Google Assistant, search and home screen section.

Tap voice under search section on moto G4 plus device

Step 3: Tap “Voice” under search section

change voice access settings on Nougat 7.0

Various Google voice settings view on screen, you can change voice access settings on nougat such as change voice languages, enable / disable OK Google detection, enable / disable block offensive words and more.

That’s all about voice control feature of Samsung galaxy S8 and galaxy S8 plus.

Do let us know weather you liked this tips to use voice control on galaxy S8 and galaxy S8 plus devices. If you found it helpful, feel free to share this trick with your friends on social network. Stay connected with us for latest Samsung galaxy S8 and galaxy S8 plus tips.

How to fix Google Play Store error 103

Many android user report issue of apps or games not download due to error 103 in play store. While downloading apps or games from play store, suddenly stop downloading apps. Sometimes it is annoying the user when you must need to download that particular app. You can see this message: “App could not be downloaded due to an error. (103) you can easily fix Google play store error 103 in android phone or tablet devices.

To solve error 103 in Google play store, you can try checking internet connection, clear the cache of play store, and uninstall play store updates on your device. Other play store errors related with this issue are error 194error 492, error 505, error 924, error 101 and more. Follow below given troubleshooting step by step guide to fix Google Play Store error 103 in android device.

Related Play Store trick:

How to fix Google play store error RPC S-7:AEC:0

5 Tricky solutions to fix Google Play store error 103 in android device

Fix Google Play store error 103 in android

Try below given possible solutions to fix error code 103 in android.

1st Way: Check internet connection

While downloading app and suddenly stopped downloading app, first of all check your device is connected with internet or not. If disconnect internet, connect with other Wi-Fi or mobile data network and try to downloading apps or games. But internet work completely and app not download, restart your device and download again. If none of trick work, try below given method.

2nd Way: Clear the cache & data of Google Play Store

Step 1: Go to “Settings

Step 2: Under device section, tap “Apps

Step 3: Scroll down until see Google Play Store and tap on it

Step 4: Touch “Storage

Clear the cache of Google Play store to fix error 103 code

Step 5: Tap “Clear cache

Clear the cache of Google play services android:

Settings > Device > Apps > Google Play Services > Storage > Clear cache

3rd Way: Uninstall Google play store updates to fix Google play store error 103

Step 1: Go to “Settings

Step 2: Under device section, tap “Apps

Step 3: Scroll down until see “Google play store” & tap on it

Step 4: Touch “More

Uninstall Google Play store update to fix error 103

Step 5: Tap “Uninstall updates

Step 6: Tap “OK

Now try to downloading apps from Google play store.

4th Way: Remove your Google account

Step 1: Go to “Settings

Step 2: Under Personal section, tap “Accounts

You can see the list of account created.

Step 3: Tap “Google

Step 4: Tap “More

Remove google account to fix error 103 in play store

Step 5: Tap “Remove account

Step 6: Again tap “Remove account

After remove your Google account from android device, restart your device and log in again your account and try to downloading app from play store.

5th Way: Reset app preference to fix Google Play store error 103

Step 1: Go to “Settings

Step 2: Under device section, tap on “Apps

Step 3: Tap “More

Reset app preference to fix error 103 in Google play store

Step 4: Select “Reset app preferences

Step 5: Tap “Reset apps

It will reset all app preferences but not lose any app data from your android phone. If none of the above given method fix error 103 in play store problem, factory reset android device using below settings.

Settings > Personal > Backup & reset > Factory data reset > Reset Phone > Erase everything

That’s all. I hope this little tip helps to fix Google Play store error 103 in android device. If you have any kind of trouble, let us know below comment box, we will respond as soon as possible. Feel free to share this play store trick with your friends.