How to Fix Google Play Store Error 940 Code

Fix error 940 in Google play store while downloading apps from play store. You can see the process is running to downloading the app but the application can not download. Error message “App could not be downloaded due to an error. (940) sometimes see the message of download unsuccessful due to interruption. This is the common error and you can easily fix Google Play Store error 940 in Android phone.

Other play store errors related to this are error 905, error 498, error 500, error 101, and more. To fix error 940 in the play store, you have to clear the cache & data, uninstall updates of play store, force stop play store, and other solutions in your android device. Try below given possible methods to fix Google Play store error 940 in android device.

Related: Fix Google Play Store error 24 while application install

How to Fix Google Play Store Error 940 in Android Phone

Fix Google Play Store error 940

Check Wi-Fi or mobile data network

First of all check, your android device is connected with Wi-Fi or mobile data network. If poor internet connection in your device, interruptions during downloading apps. If the Internet working fine but not downloading apps from the play store, try below-given methods to fix error 940 in the play store while downloading the app.

Clear the cache and data of Google Play Store

Step 1: Go to “Settings”.

Step 2: Tap “Apps” under the device section.

Step 3: Scroll down until view Google Play Store and open it.

Step 4: Tap “Storage”.

Clear cache of Google Play store to fix error 940

Step 5: Tap “Clear cache”.

How to Clear Cache of Google Play Services in Your Android Phone

Settings > Device > Apps > Google Play Services > Storage > Clear cache

Uninstall Google Play Store Updates to Fix Google Play Store Error 940

Step 1: Go to “Settings”.

Step 2: Tap “Apps” under the device section.

Step 3: Tap “Google play store”.

Step 4: Touch “More”.

Uninstall Google Play store update to fix error 940 code

Step 5: Tap “Uninstall updates”.

Step 6: Tap “OK”.

Now try to download apps from the play store.

Delete Google Account

 Step 1: Go to “Settings”.

Step 2: Tap “Accounts” under the Personal section.

Step 3: Touch “Google”.

Step 4: Tap “More” from the top of the right side corner.

remove google account to fix error 940 in play store

Step 5: Tap “Remove account”.

Step 6: Again tap Remove account.

After removing your Google account, sign in again, and try downloading or updating the app. If none of the above solutions fix error code 940, try below-given solutions.

Factory Reset Your Phone

Make sure back up & restore your data before performing a factory reset your Android devices.

Factory Reset android to fix error 940 in Google Play Store

Settings > Personal > Backup & reset > Factory data reset > Reset Phone > Erase everything

That’s all. I hope the above-given troubleshooting steps fix Google Play Store Error 940 in android device. If you find it helpful, don’t forget to share it with others. Stay connected with us for daily android tips and tricks.

Android O features

Google has recently released android O developer preview during Google I/O. Google has brought its first developer preview of Android O. Android O’s first beta release with great android O features so far such as Notification channels & snoozing, picture-in-picture mode, Adaptive icons, API changes, Autofill, system optimizations and more.

Any guess what is the full form of android O? This android 8.0 version supported Google Pixel & pixel XL, Pixel C, Nexus 6P, Nexus 5X and android one device. Let see all new android O features, release date and beta features. You can see everything you need to know about Google new android O.

Read This: Fix Google Pixel & Pixel XL battery drain problem

Top 5 best android O features you should know

Notification channels / Notification dots

Android O Notifications settings

In android O, you can manage notifications channels individually for each group created by a user in messaging app such as WhatsApp, Hike, Messenger, WeChat and more. To view notification on android O, long press on app launcher icons in your android 8.0 devices. User manages notifications settings using a system UI in your android O 8.0 device such as pixel & pixel XL, Nexus etc. You can anytime change notification or block a notification channel. In this Android O feature user can set priority of individual notification also.

Picture-in-picture mode

best Android O features

This picture-in-picture mode feature of android O is one type of multi-window mode that used for manage two functions simultaneously such as watching video and also search latest news on your android device. You can easily manage two activities at same time in android 8.0 devices. This is one of the best android O features.

Adaptive icons

Android O another feature is adaptive icons. It can display different shapes across various device models. A new adaptive icon launcher also used in sharing dialog, shortcuts and overview screen. Also control launcher icon look by two layers of foreground and background.

Autofill framework

Autofill framework feature use to saves user time to re-typing information and minimize user input errors in android 8.0 devices. It will manage the communication between an autofill framework and app. You can used this autofill data in your app after authenticate. You can enable / disable autofill framework in android O 8.0 using below settings.

Enable autofill framework on android 8.0 O:

Settings > Apps & notifications > Defaults apps > Autofill app

Autosizing Textview

This android O feature automatically set the size of your text mainly based on textview. Using this autosizing textview, it easy to optimize text size on various screens with dynamic content.

That’s the not ends of android O features. Other most useful features of Google’s latest OS android O are Webview API changes, smart text selection, background app limit, Android GO, pointer capture etc. You can view all details of Google new android O features and API using below links.

If you find above given android O features helpful, don’t forget to share this article with others. Share your thoughts related with Google’s new OS android O in below comment box.

How to Set Mobile Data Usage Limit on Samsung Galaxy S8 and S8 Plus

Here’s how to set a data usage limits on Samsung Galaxy S8 & S8 plus device. You can check the particular app data usage, Wi-fi data usage, and manage other mobile data settings. To reduce mobile data usage, you need to set a data limit on Samsung S8 Plus and S8. It will automatically disable cellular data when reaches the set data limit. Also, change the data usage cycle or billing cycle, and restrict the app using this background data.

To reduce data usage, enable data saver on galaxy S8 to prevent some apps from sending or receiving data in the background. It also allowed the app to use unrestricted data access when data saver is on. Try the below-given step by step guide to set data usage limit on Samsung galaxy S8 and galaxy S8 plus.

Related Tips:

How to Set Data Usage Limit on Galaxy S8 and Galaxy S8 plus

Here you can see how to manage data usage on galaxy S8, change the data usage cycle, and restrict data usage by app.

Set data limit in Galaxy S8 & S8 plus

Step 1: Go to Settings.

Step 2: Tap Connections.

Step 3: Touch Data usage.

Step 4: Tap Mobile data usage under the mobile section.

Step 5: Tap Settings gear icon at the top right side.

Step 6: Toggle on Data limit.

Step 7: Tap Data limit.

set data usage limit on Samsung Galaxy S8 phone

Step 8: Set the data usage limit in GB/MB and tap SET.

Change the data usage cycle on Galaxy S8 & S8 plus

Step 1: Go to Settings.

Step 2: Tap Connections.

Step 3: Touch Data usage.

Step 4: Tap Mobile data usage under the mobile section.

Step 5: Tap Settings gear icon at the top right side.

Step 6: Tap Start billing cycle on.

Usage cycle reset date on galaxy S8 device

Step 7: Set date then tap SET.

Set data usage warning on Galaxy S8 & S8 plus

set data usage warning on Samsung galaxy S8 device

Settings > Connections > Data usage > Mobile data usage > Settings gear icon > Data warning > Set data usage warning in GB/MB > SET

You can also view data usage by app and restrict data usage by the app on the Galaxy S8 device.

View data usage by the app on Galaxy S8

View data usage by app on galaxy S8 phone

Settings > Connections > Data usage > Mobile data usage > A list of Apps with data usage

WiFi Data usage: Settings > Connections > Data usage > WiFi data usage under WiFi section

Unrestricted data usage by the app on Galaxy S8+

Unrestricted data usage on galaxy S8 device

Settings > Connections > Data usage > Mobile data usage > Tap any app > Toggle on Unrestricted data usage

That’s all about how to set the data usage limit on Samsung Galaxy S8 and S8 plus. If you find it helpful, don’t forget to share it with others. Stay connected with us for daily latest android tips and tricks.

How to change default apps on Samsung galaxy S8

Want to set and change default apps on Samsung galaxy S8 & S8 plus phone? In android nougat 7.0 devices, by default set some of the apps such as phone app, SMS app, browser app and set Google now launcher as home app. You can set default app from list or if you don’t like then download another app from play store and set it default. Also change home screen launcher on galaxy S8 & S8 plus device.

By default automatically set default apps on any android phones. Sometimes we use more than one app for messaging or calling.  So you can choose any one app and individually set default messaging apps on Samsung galaxy S8 phone. You can anytime change default app if you don’t like. Follow below given step by step process to set and change default apps on Samsung galaxy S8 and galaxy S8 plus phone.

Read This: 

How to change default apps on Galaxy S10 plus

How to change launcher on Galaxy S9 & S9 Plus

Fix Samsung galaxy S8 and galaxy S8 plus battery drain problem

How to change default apps on Samsung galaxy S8 & galaxy S8 plus

Step 1: Go to “Settings” in your galaxy S8 phone

Step 2: Tap “Apps

Step 3: Tap “Three vertical dots” from top of the right side corner

Step 4: Touch “Default apps

You can see list of calling app, messaging app, browser app and default app selection.

Step 5: Change default apps on galaxy S8 you want

It’s easy to set and change default apps on Samsung galaxy S8 & galaxy S8 plus phone.

Change default apps on android nougat 7.0 & 7.1:

change default apps on Samsung galaxy S8

Settings > Device > Apps > Settings gear icon > Default > Change default apps

You can also see home screen launcher settings in Galaxy S8 phone. By default home screen set as Google now launcher. You can change home screen launcher on galaxy S8 & galaxy S8 plus using below settings.

Settings > Apps > default apps > home screen > choose from list to set home screen launcher

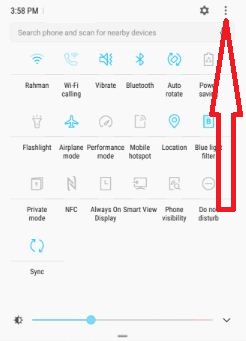
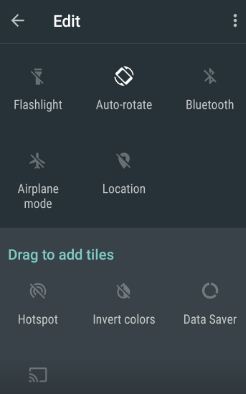
Customize quick settings on galaxy S8 and S8 plus phone:

Swipe down notification center from home screen > Quick settings > More > drag the options you want to add

That’s all about Samsung galaxy S8 and S8 plus phone default apps and quick settings options.

Did you find above given steps helpful to change default apps on Samsung galaxy S8 phone. If you find it helpful, don’t forget to share with your friends on social network sites. Don’t miss latest Samsung galaxy S8 phone tips and tricks.

Samsung galaxy S8 charging issue: How to fix

Are you facing charging problem on Samsung galaxy S8 and galaxy S8 plus phone? Some of the galaxy S8 users are facing wireless charging issue on galaxy S8 & S8 plus device. In this android smartphone, wireless charging built in your phone box. We already know steps to fix Samsung galaxy S8 & galaxy S8 plus wifi issue. But you don’t worry, you are coming to the right place to fix Samsung galaxy S8 charging issue.

Sometimes also issue of your Samsung galaxy S8 & galaxy S8 phone won’t turn on after charging. This android phone charging problem is causing because of charging cable damage, power adapter, battery problem and more. In this tutorial, I will show you step by step guide to fix Samsung galaxy S8 charging issue.

Related Samsung galaxy S8 & S8 plus tips: 

Fix Samsung galaxy S8 & S8 plus freezing or crashing

Samsung galaxy S8 & S8 plus battery drain problem: How to fix

5 Methods: How to fix Samsung galaxy S8 charging issue

fix Samsung galaxy S8 charging issue

First of restart your galaxy S8 & S8 plus phone. If not resolve issue then try below given possible solutions to solve Samsung galaxy S8 & galaxy S8 phone charging problem. After every steps check fix S8 charging issue or not.

 1st Method: Check charging cable not loose or damage

If cable is damage or loose wire then charging issue occurs on your galaxy S8 & S8 plus phone. Always use original cable or wireless charger to charge your Samsung galaxy S8 & galaxy S8 plus phone. Also check wall outlet is perfect working or not. If not find any solution, try new charging cable to fix Samsung galaxy S8 charging issue.

2nd Method: Check using USB cable

Check USB cable is not broken or loose USB port on PC or laptop. Connect your galaxy S8 & galaxy S8 plus phone to computer via USB cable. Wait few minutes, if you can see battery icon, your Samsung galaxy S8 phone is charging. If you see red light on phone, battery is fully discharged.

3rd Method: Samsung galaxy S8 & galaxy S8 plus screen problem

If your galaxy S8 & galaxy S8 plus screen problem or you can see red light icon after plug in your phone then issue with your Samsung galaxy S8 screen. To solve this galaxy S8 & S8 plus problem press power button few second and wait two minutes. Now check call your galaxy S8 phone from another device and make sure your device is ringing.

4th Method: Use safe mode on Samsung galaxy S8 & galaxy S8 plus

Boot Samsung galaxy S8 & galaxy S8 plus into safe mode if galaxy S8 & galaxy S8 plus won’t powered on after charging. Safe mode disabled third party apps from your device. Find third party app that causing this Samsung galaxy S8 charging issue.

Enable safe mode on Samsung galaxy S8 & galaxy S8 plus:

Step 1: Press & hold the power button on Galaxy S8 & S8 plus phone

Step 2: Touch & hold the power off

You can see this message: Reboot to safe mode

Step 3: Tap “OK

5th Method: Factory reset galaxy S8 to fix Samsung galaxy S8 charging issue

Step 1: Go to Settings in your Galaxy S8 & S8 plus

Step 2: Tap Backup & reset

Step 3: Touch factory data reset

Step 4: Tap Reset phone

If none of the above given tricks fix Samsung galaxy S8 and galaxy S8 plus charging issue, turn on Recovery mode on Samsung galaxy S8 & Galaxy S8 plus phone.

That’s all. Try above given methods to fix Samsung galaxy S8 charging issue. If you find it helpful, don’t forget to share with others. We are waiting for your feedback about this galaxy S8 & S8 plus phone issue.

Samsung galaxy S8 battery drain problem: How to fix

Some of the Samsung galaxy S8 & galaxy S8 plus device user report quickly drain battery issue. It’s easy to fix Samsung galaxy S8 battery drain problem. Let see how to improve battery life on android phone. There are various causes to quickly drain battery problem on Samsung galaxy S8 & S8 plus phone such as background apps, system software updates or app updates, unnecessary files, live wallpaper or photo, widgets and more.

You can turn on battery saver mode and use Doze mode on your galaxy S8 phone to fix Samsung galaxy S8 plus battery drain problem. Always keep away your Samsung galaxy S8 phone from hot place because of sometimes it will damage your phone battery. Try below given various methods to fix Samsung galaxy S8 battery drain problem.

Related trick: Fix Samsung galaxy S8 freezing and crashing issue

Complete guide of how to fix Samsung galaxy S8 battery drain problem

fix Samsung galaxy S8 battery drain problem

Try below given troubleshooting steps to fix Samsung galaxy S8 and galaxy S8 plus battery drain problem.

1st Way: Set screen display time minimum

Set 15 seconds / 30 seconds to switch off screen display. It reduces battery drain on galaxy S8 & S8 plus phone.

Settings > Device > Display > Sleep > 15 seconds / 30 Seconds

2nd Way: Reduce screen brightness if high

Reduce screen brightness on your galaxy S8 phone to save battery on your device.

3rd Way: Disable live wallpaper

If set live wallpaper on Samsung galaxy S8 & S8 plus device, remove / disable live wallpaper from your device.

4th Way: Check galaxy S8 & S8 plus system software updates

Check any system software update is available for Samsung galaxy S8 phone, it may be fix some of the small bugs and fix Samsung galaxy S8 battery drain problem also.

Settings > about phone > System updates

5th Way: Enable battery optimization for all apps to fix Samsung galaxy S8 battery drain problem

Settings > Apps > Tap app > Optimize

If quickly battery drains on galaxy S8 & S8 phone, check background apps and stop unnecessary apps or high RAM used by app. Also check apps which use more battery than other apps, force stop that particular app.

To force stop apps on galaxy S8 & S8 plus:

Settings > Apps > Tap on any app want to force stop > Force stop > OK

If none of the above given methods worked for you to fix Samsung galaxy S8 & galaxy S8 plus battery drain problem, try below given last solution.

6th Way: Factory reset your Samsung galaxy S8 & S8 plus

Step 1: Go to Settings in your Galaxy S8 & S8 plus

Step 2: Tap Backup & reset

Step 3: Touch factory data reset

Step 4: Tap Reset phone

That’s all about how to improve battery life on Samsung galaxy S8 and galaxy S8 plus phone.

Did you find above process helpful to fix Samsung galaxy S8 battery drain problem. Don’t forget to mention which method effective to increase galaxy S8 battery life. Stay connected with us for latest android device tips and tricks.