How to hard reset Samsung galaxy S8 plus

Annoying from galaxy S8 and galaxy S8 plus unresponsive or won’t turn on? To fix this issue, factory reset or hard reset Samsung galaxy S8 and galaxy S8 plus phone. Hard reset will deleted all third party apps, Google account, Samsung account, photos, videos and all other information from your device. Before hard reset galaxy S8 plus, backup and restore your Samsung galaxy S8 plus important data to PC or other Smartphone.

If your galaxy S8 and other android device have app related issue, you will clear that app cache or enable safe mode on your android device to find third party apps that causing this issue. This hard reset Samsung galaxy S8 and galaxy S8 plus also useful to fix frozen screen, app freezing, galaxy S8 slow, software related issue and more.

Read This: How to change launcher on Samsung galaxy S8

How to hard reset Samsung galaxy S8 and galaxy S8 plus

Follow below given step by step guide to factory data reset or hard reset galaxy S8 plus device.

1st Method: Hard reset Samsung Galaxy S8 when powered off device

Step 1: Power off your galaxy S8 device

Step 2: Press and hold the power button, Bixby key and volume up buttons at same time until see android recovery screen

Here you can view below various option on android recovery screen.

hard reset Samsung galaxy S8 plus phone

Step 3: Press volume down button until see wipe data / factory reset, after that press power button
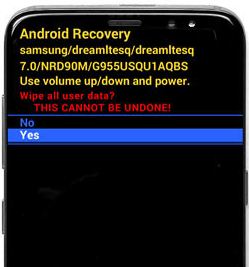
Android recovery screen on Samsung galaxy S8

Step 4: Press volume down button until Yes select then press power button to start reset process on galaxy S8 and galaxy S8 plus

Step 5: Press volume down button up to reboot system now and press power button

Check fix your Samsung galaxy S8 and galaxy S8 plus issue or not.

2nd Method: Factory reset your Galaxy S8 plus when device turn on

Step 1: Go to settings in your galaxy S8 and galaxy S8 plus

Step 2: Tap on backup and reset

You can back up your important data here.

Step 3: Tap on factory data reset

Step 4: Tap on reset

Unlock the screen to enter password or pattern lock.

Step 5: Touch delete all

It will delete all your Samsung galaxy S8 and galaxy S8 plus phone data. Most of all android devices have slightly changes to factory reset or hard reset device.

Do let us know you liked this hard reset Samsung galaxy S8 and galaxy S8 plus tutorial or not. Are you satisfied with our solutions? Let us know in the below comment box.
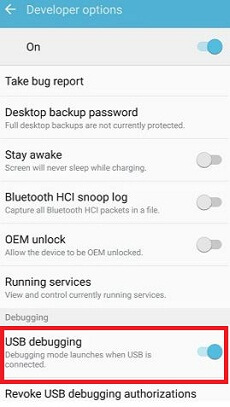
How to Enable USB Debugging on Galaxy S8/S8 plus

To enable USB debugging on Galaxy S8 and Galaxy S8 Plus, make sure to turn on developer options on Samsung Galaxy S8 devices. It will useful to a connection between your Galaxy S8 and the computer. You can copy data between your device, install apps without notification and improve connection. Also, use developer tools like Android SDK or android studio and other third-party tools.

Most of all android devices have the same settings to enable developer mode and use USB debugging on Galaxy S7/S7 Edge, S8/S8 plus, etc. USB debugging feature will fix a problem if your galaxy S8 issue to connecting to a desktop using USB ports. Follow the below-given step by step guide to activating Samsung S8 USB debugging.

Read Also:

How to Turn on USB Debugging on Galaxy S8 and Galaxy S8 Plus

You can use S8 USB debugging to easily transfer data between your Samsung and desktop PC devices.

Step 1: Go to settings in your Samsung Galaxy S8 and Galaxy S8 plus.

Step 2: Scroll down until the end of the page and tap on about device.

Step 3: Tap on build number several times until see this message: Developer mode has been enabled.

Step 4: Touch back button and you will see developer options in settings > Developer options.

Step 5: Enable developer options in your Samsung Galaxy S8.

Step 6: Tap OK. 

Here you can view various sections under developer mode.

Enable USB debugging on Galaxy S8 plus

Step 7: Scroll down until debugging section and enable Samsung S8 USB debugging.

That’s all about USB debugging. In the debugging section, you can also view other options such as logger buffer size, select debug the app, wait for a debugger, verify app over USB and more. Developer mode has also several amazing features such as OEM unlocking, strict mode, background process limit, running services, Picture color mode, USB configuration, pointer location, Window animation scale, force RTL layout direction, inactive apps, force GPU rendering and more.

And that’s it. We hope this makes it clear how to enable USB debugging on galaxy S8 and galaxy S8 plus? If you have any problem, let us know in below comment box. We would respond as soon as possible. Stay connected with us for the latest Samsung Galaxy S8 tips.

Google Play Protect Missing on Google Pixel

Recently Google has announced Google Play Protect for Pixel and other Android phone safety. But several users reported Google Play Protect missing on Google Pixel, Pixel XL, and Nexus 7.1.2 devices. Google Play protect feature to use to keep your Google Pixel apps safe and secure your data. It will scan your phone and find harmful apps & remove it from your device. Make sure to enable Google Play Protect on your Android devices to use it. Also, scan all installed apps from unknown sources on your device. You can easily enable it using Google app settings in your Pixel device.

Read Also: Fix Google Pixel not update or download apps from play store

How to Fix Can’t Find Google Play Protect on Google Pixel, Pixel XL, Nexus

There are four different methods to fix the Google play protect option not available on Android phones.

Force Stop Google Play Store on Pixel or Android

Step 1: Go to Settings in your Pixel.

Step 2: Under the device section, tap on Apps.

A list of installed apps appears on the screen.

Step 3: Scroll down until see Google Play store and tap on it.

Force stop Google Play store on Pixel phone

Step 4: Tap on Force stop.

Clear Data of Google Play Store

clear data of Google Play store on your pixel

Settings > Device > Apps > Google Play store > Storage > Clear data

fix can’t find Google Play protect on Google Pixel XL


Now check Google Play protect option available in your Pixel device. Click here to enable Google Play protect on your Android phones. If you can’t find Google Play protect on Android phone, try the below-given method.

Clear Cache of Google Play Services

Step 1: Go to Settings in your devices.

Step 2: Under the device section, tap on Apps.

Step 3: Scroll down until see Google Play services and tap on it.

Step 4: Tap on Storage.

Clear cache of Google play services in Pixel device

Step 5: Tap on Clear cache.

Now clear data of Google play services on Google Pixel XL.

Clear data of Google Play services in Pixel device

Settings > Device > Apps > Google Play services > Storage > Manage space > Clear all data

Remove your Google Account

Step 1: Go to Settings

Step 2: Under the personal section, tap on Accounts.

Step 3: Tap on Google.

Step 4: Tap Three vertical lines.

Remove your Google account to fix Google Play protect issue

Step 5: Touch Remove account.

Step 6: Again tap on Remove account.

Restart your Google Pixel or other Android device and add your Google account again. Check Google Play protect option available.

Did these solutions fix can’t find Google Play protect on Google Pixel and Pixel XL? What other fixes do you know? Tell us in below comment box. Stay connected with us for the latest Google Pixel tricks.

How to Enable Google Play Protect on Android Devices

Recently Google has announced Google Play Protect for Android device safety. Easy to enable Google Play protect on Google Pixel and other Android devices. Google Play protect feature is one type of security to keep your Android device apps safe and secure data. It checks the play store app before you download it. It will scan your device and find harmful apps & remove it from your device. While scanning the app and found a malicious app on the play store, it will send a notification to you. But in some cases, directly delete app and you’ll get a notification. It will scan all installed apps from unknown sources also in your Android phone.

Several users also reported can’t find Google play protect on Google Pixel or Nexus devices. Follow the below-given steps to turn on Google Play protect on all Google Pixel devices.

Read Also:

How to Enable/Disable Google Play Protect on Google Pixel, Pixel XL, Nexus 6P, Nexus 6

Different android device has slightly different settings to enable/disable Google play protect on Android phone. Check below given three methods.

How to Enable Google Play Protect on Android 10

Open Play Store > Three horizontal lines at the top left corner > Play Protect > Settings icon at the top right corner > Toggle on “Scan apps with play protect” & “Improve harmful app detection”

Alternative Way: Settings > Security > Google Play Protect under the security status section > Settings icon at the top right corner > Toggle on “Scan apps with play protect” & “Improve harmful app detection”

How to Enable Google Play Protect on Android 8.0 Oreo

Settings > Security & location > Google Play protect > Toggle on “Scan device for security threats”

Enable Google Play Protect on Google Pixel (Android Nougat 7.1.2)using Google App

Step 1: Go to Settings in your Google Pixel 7.1.2.

Step 2: Under the personal section, tap on Google.

Tap on security to open Google Play protect in android phone

Step 3: Tap on Security under the services section.

Use Google Play Protect in Pixel XL phone

Step 4: Tap on Google Play protect under a security status section.

How to enable Google Play protect on Google Pixel XL

Step 5: Make sure to toggle on “Scan device for security threats”.

Turn off toggle button if you want to disable Google play protect on Pixel and Pixel XL.

Improve harmfull app detection on android phone

You can see other options to improve harmful app detection below. Also, enable in your device so whenever founds any suspicious app, it will alert you. It will protect your Android device from harmful apps and useful to safe browsing in Google Chrome.

How to Protect Android Phone From Harmful Apps Using Google Play Protect

Step 1: Open Google Play Store in your Android devices.

Step 2: Tap on Three horizontal lines.

Step 3: Scroll down until Play protect and tap on it.

Several Pixel and other Android users did not find Play protect option in Play store settings. For those users, try the second method mention below.

Step 4: Turn on scan device for security threats to turn on Google Play protect.

Now Google will check your device apps and other data regularly. If found any problem, you’ll be notified. By default turn on Google play protect. To disable Google play protect on android, follow the below-given steps.

Google Play store app > Menu > Play protect > Turn off “Scan device for security threats”

Enable/Disable Google Play Protect on Google Pixel Using Phone Settings

Step 1: Go to Settings.

Step 2: Tap on Google play protect under security & location.

By default turn off Google play protect.

Step 3: Turn on it to protect your phone data and apps.

And that’s it. Are you satisfied with our solutions? If you have any tips to enable Google Play Protect on Google Pixel and Pixel XL, share it with us in below comment box. For more great ideas visit wordpress-221392-673273.cloudwaysapps.com

How to Turn On Color Inversion on All Android Versions

Have you ever used the color inversion feature on your latest Android phone? Here’s how to turn on color inversion on Google Pixel and other Android devices using accessibility settings or notification panel. This invert colors feature compatible with only running Android 5.0 Lollipop and later versions. Color inversion changes the color on your device like white text on a black screen and black text on a white screen. Most of all this color invert feature helpful to use your Pixel device at night, it works in the dark mode so less stress compares to regular use phone. This feature is perfect for those who work at home. Inverting colors on Android phone also save battery life and less stress to your eyes. After enabling it, you can easily reading night in your device.

Read Also:

How to Turn On Color Inversion on Google Pixel and Pixel XL

There are two ways to enable invert colors in Android devices. Check out below given two methods.

Turn On Invert Colors on All Android Screen Using Notification Panel

Step 1: Scroll down the notification panel from the top of the screen in your Android devices

Here you can view various shortcuts in your devices.

Turn on invert colors on android using notification panel

Step 2: Tap on Invert colors.

If not find the option on the notification panel, go to phone settings, and enable it.

Turn On Color Inversion Google Pixel and Pixel XL Using Phone Settings

Step 1: Go to Settings.

Accessibility settings under system section in pixel devices

Step 2: Scroll down until finding Accessibility under the system section and tap on it.

You will see the services, system, and display section. In the display section, you can see color inversion and color correction options.

By default disabled color inversion option in your Pixel and other Android devices.

Disable color inversion screen on pixel

Before enabling color inversion your phone looks like the above screen.

Enable color inversion on android phone

Step 3: Toggle on “Color inversion”.

turn on color inversion Google Pixel XL

Show the above screenshot to know what effect color inversion feature in your Google Pixel and other Android devices. Now in your Google Pixel device, the black text will appear as white and white text appear as a black screen. Your android phone’s color completely inversed.

You can see another correction mode option. You can invert screen color as RGB. By default set red-green in your pixel. Also, choose from red-green/blue-yellow.

How to Enable Invert Colors on Android 6.0 Marshmallow

Settings > Accessibility > Display > Turn on color inversion

How to Enable Invert Colors on Android Lollipop 5.1.1

Settings > Accessibility > Enable color inversion

That’s it. We hope this makes it clear how to turn on color inversion Google Pixel XL and other android devices. If you have any trouble, let us know in below comment box, we will respond as soon as possible.

Why Can’t I Download Netflix on my Android or iPhone?

Are you facing the issue of can’t download the Netflix app on Android, Samsung Tablet, or iPhone? Unable to find the Netflix app on an Android device or PC in the Google Play store. If you do not find the Netflix app in the play store, install the apk file of the Netflix app on your phone. Most rooted Android phones can’t get the Netflix app from the play store. An Android Police statement said an Android device that is not Google-certified will no longer work with the latest app.

Netflix is the most entertaining app in the world to enjoy unlimited movies and TV episodes on your Android device. You can download movies and TV shows from Netflix for offline viewing on your Android phone, iOS, and Windows 11/10. Watch Netflix on your Smart 4K TV, Xbox, Chromecast, Apple TV, PlayStation, Blu-ray players, and more. Try the below given possible solutions to fix can’t download Netflix app on Android phones.

Read More: How to Fix Play Store Pending or Apps Not Downloading on Google Pixel 

How to Fix Can’t Download Netflix App on Android or iPhone

fix can't download Netflix app on android phone

Some users show this message while downloading the Netflix app: Your device isn’t compatible with this version. Apply the below-given solutions to fix Netflix not compatible with Android 12 or Android 13.

Solution 1. Check your Device Support for Netflix

For Android: To install the Netflix app on your Android device, your phone version must have 7.0 or later installed.

For iPhone: To install the Netflix app on your iOS device, your Phone or iPad must have iOS version 15.0 or later installed.

Solution 2. Check your Phone Storage

Free Up Space to Fix Can't Download Netflix App on Android or iPhone

Make sure your phone storage is not full. Delete unnecessary junk files and apps from your phone and try to download and install the Netflix app on your device. Free up space to download and install the app on your Android or iPhone devices.

Solution 3. Check Parental Control Settings on your Android or iPhone to Fix Can’t Find the Netflix App

Why Can't I Download Netflix on my Android or iPhone

For Android: Open the Play Store> Profile icon at the top right corner > Settings > Family > Parental controls > Enter your PIN > Apps & games > Check the Netflix app.

For iPhone: Settings > Screen time > Content & Privacy Restrictions > Content Restrictions > Apps > Check for Netflix app.

Solution 4. Check Software Update on Android or iPhone

Make sure your device is running the latest software update on your device.

Check for Software Update to Fix Can't Download Netflix on my Android or iPhone

For Android: Settings > System > Software update > Check for Updates.

For Samsung Galaxy: Settings > Software update > Download and install.

For iPhone (iOS 16): Settings > General > Software Update.

Solution 5. Clear Google Play Store Cache on Android

Step 1: Go to Settings.

Step 2: Tap on Apps.

Step 3: Tap See all apps.

Step 4: Scroll down and tap Google Play Store.

Step 5: Tap Storage & Cache.

Step 6: Tap Clear cache.

Clear Google Play Store cache to Fix can't download Netflix on Android or iPhone

Step 7: Tap Clear Storge > Delete.

Restart your phone and try to download Netflix app on your phone.

Solution 6. Download Netflix APK File

Step 1: Download the Netflix app apk file.

Step 2: Follow the on-screen instruction to install the Netflix APK file.

When you try to sign in to a Netflix account, you need to subscribe Netflix plan to enjoy HD movies and TV shows on your Android phone or tablet. I hope the above-given solutions fix can’t download the Netflix app on Android devices.

If you still have to face the issue, contact Netflix support.

How to Download Movies and TV Shows from Netflix for Offline Viewing on Android Phone

Make sure the latest Netflix version is installed > Choose download quality (Standard or higher) > Menu > App Settings > Download > Video quality > Simply available for download > Download icon.

After completing downloading TV shows or movies on an Android phone, you can find them in my download section.

And that’s all. Are you satisfied with our solutions? Do you have any other tips to fix can’t download Netflix app on an Android phone or tablet? Please share with us in below comment box.

Read More: