How to Enable and Disable Developer Options on Android 8.1

By default hidden developer mode in your Android Oreo devices. To use this hidden setting, make sure to enable developer mode on Android 8.1 Oreo devices. You’ll find hidden developer mode using system settings in your Android Oreo 8.1/8.0 devices. To remove or disable developer options on Android 8.0/8.1 Oreo devices, just turn off the toggle button of developer mode and tap on the back button in your devices.

Android Oreo developer mode has several useful settings such as USB debugging, background process limits, memory usage by apps, OEM unlocking, running services, Picture color mode, logger buffer size, windows animation scale, Force GPU rendering, inactive apps and more.

Read Also:

How to Disable Developer Options on Android 8.1 Oreo

First of all, let see steps to enable developer mode in Android 8.1 Oreo devices.

Step 1: Go to Settings in your Android 8.1 Oreo devices.

Step 2: Tap System.

Step 3: Tap About phone.

Step 4: Scroll down at the end of page and tap on Build number 7 times,

You can see this message: You are now a developer!

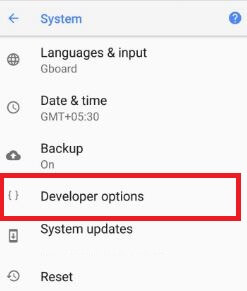
To see developer mode, go to Settings > System > Developer options

Now, enjoy developer mode settings in your Android phone.

Remove/Disable Developer Options on Android 8.1 Oreo

If you want to remove developer mode on Android Oreo 8.0/8.1 device, just turn off the toggle button of developer option in your device using below settings.

Step 1: Go to Settings in your Android 8.1 Oreo devices.

Step 2: Tap System.

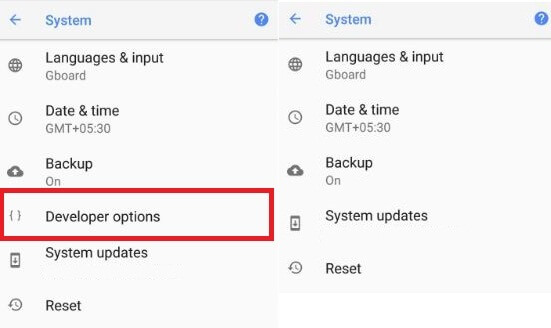
Android 8.1 Oreo Developer mode

Step 3: Tap Developer options.

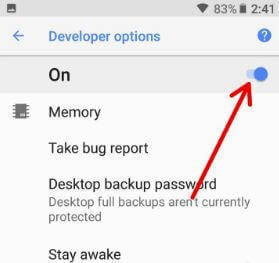
Turn on developer mode in android 8.0 Oreo devices

Here you can see enabled developer options in your Oreo device.

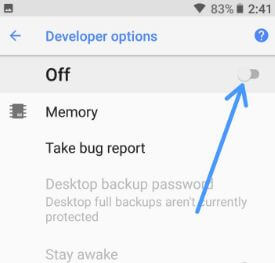
Disable developer options on android 8.1 Oreo

Step 4: Toggle off “Off”.

After turn off the toggle button, if you want to show developer option in Android Oreo system settings, turn on toggle before tap back button.

Step 5: Tap on the Back button.

Hide developer options in android Oreo

Now, you can’t see the developer option in your Android Oreo system settings (Show the second screenshot). Remove developer options from your Android Oreo devices. To use it again in your Oreo devices, again enable it to follow the above steps again.

That’s it. I hope this tutorial helps you to disable developer options on Android 8.1 Oreo devices. If you have any kind of trouble, tell us in below comment box. Don’t miss our single Android 8.0 Oreo tips and tricks.

How to Set Lock Screen Message on Pixel 2 and Pixel 2 XL

Here’s how to set lock screen message on Pixel 2 and Pixel 2 XL devices. You’ll put text message or phone number on the lock screen in Pixel 2 XL and other Pixels. Whatever text you enter on lock screen message will be shown on lock screen in your device. So if your device lost, that person who got your device can see your added message, phone number, and other emergency information without unlocking your Pixel. You can also put emergency information on the lock screen on your Pixel devices like Pixel 2, 2 XL, Pixel 3a, 3a XL, Pixel 3, 3 XL, Pixel 4, 4 XL, Pixel 4a 5G, and Pixel 5.

Read Also:

How to Set Lock Screen Message on Pixel 2 XL and Pixel 2

This add lock screen text or mobile number show only locks screen when your device lock. Also, change the lock screen message on your Pixels devices.

Step 1: Go to Settings in your Pixel 2 and other Pixels (Stock Android 11 OS).

Step 2: Tap Display.

Advanced settings to add message on lock screen Pixel 2

Step 3: Tap Advanced.

Pixel 2 lock screen settings to add message on lock screen

Step 4: Scroll down at the end and tap on Lock screen.

Put text on lock screen Pixel 2 XL

Step 5: Tap Add text on lock screen.

How to Set Lock Screen Message on Pixel 2 and Pixel 2 XL

Step 6: Enter the text message or phone number you want to show on the lock screen and tap Save.

Set Lock Screen Message on Pixel 2 XL

Step 7: Lock your phone and you can see your name and phone number on the lock screen.

Now change the lock screen message on the Pixel 2 device.

How to Put Emergency Information on Lock Screen Pixel 2 and other Pixels (Android 11 OS)

Tap on Emergency on the lock screen to add info on Pixel 2 lock screen

Step 1: Lock your phone and tap Emergency on the bottom of the screen.

Put emergency information on the lock screen Google Pixel 2 XL

Step 2: Double tap on View emergecy information.

How to Put Emergency Information on Lock Screen Pixel 2 XL Device

Step 3: You can add Medical information (Blood type, Address, etc.) and Emergency contacts.

Android 11 add mew personal safety feature to quickly connect to the right help with emergency sharing, safety check, and more.

How to Change Lock Screen Wallpaper on Pixel 2 and Pixel 2 XL

It’s quite easy to change Pixel 2 and Pixel 2 XL lock screen wallpaper using home screen settings.

Step 1: Tap & hold the blank space on your Pixel 2 & Pixel 2 XL home screen.

Here you’ll see wallpapers, widgets, and settings options.

Step 2: Tap Wallpapers.

List of several categories Pixel 2 wallpapers show such as live earth, landscapes, art, textures, and also choose from the Pixel 2 gallery.

Step 3: Select wallpaper want to set Pixel 2 lock screen.

Set wallpaper on Pixel 2 XL

Step 4: Tap Set Wallpaper from the top right side or bottom right side.

Set Pixel 2 lock screen wallpaper

Step 5: Tap Lock screen.

You can see a message on your device screen: Wallpaper set successfully

That’s it. I hope this little tip helpful to set a lock screen messages on Pixel 2 and Pixel 2 XL devices. If you have any kind of trouble, tell us in below comment box. Don’t miss our single Pixel 2 tips and tricks.
How to Reset Pixel 2 XL and Pixel 2

Several Pixel 2 XL users reported issues of display, screen burn-in, Blue tint, fatal camera error, connectivity issues, touch screen not working, hardware issue, etc. To fix Google Pixel 2 XL problems, boot Pixel 2 XL into safe mode or hard reset Pixel 2 XL device. Also, reported Pixel 2 XL randomly reboot several times a day. Not all Pixel 2 XL users will face these problems. Factory data reset or reset Pixel 2 will delete all your data including Google account, system & app data, downloaded apps, photos & music, and more. So before performing a hard reset, back up Pixel 2 XL data safely.

Read Also:

How to Hard Reset Pixel 2 XL and Pixel 2

Check out below given methods.

How to Reset Pixel 2 XL Using Hardware Key

Step 1: Turn off your Google Pixel 2 XL.

Step 2: Press & hold the volume down button and the power button at the same time until the phone vibrates.

You can view the Android system recovery screen. By default Start button show on Google Pixel 2 XL.

Step 3: Press the volume down button until view recovery mode.

Step 4: Press the Power button to restart into recovery mode.

You can see the screen of the Android robot exclamation mark with a red triangle icon in your device.

Step 5: Press & hold the power button and press the volume up button one time only.

You can see the Pixel 2 recovery mode screen that including reboot system now, reboot to bootloader, Apply update from ADB, Wipe data/factory reset, and other handy settings.

How to Reset Pixel 2 XL

Step 6: Press the volume down button until Wipe data/factory reset.

This message appears on your Google Pixel 2 screen: Wipe all user data?

Step 7: Press the Power button to continue the process.

Step 8: To confirm, press the volume down buttons to scroll to Yes and press the power button to select it.

Clearing the cache may take 2-3 minutes.

Step 9: Press the volume down buttons to scroll to reboot system now, press the power button to select it.

Let see the other two handy ways to fix Pixel 2 XL problems.

How to Factory Reset Pixel 2 and Pixel 2 XL When Powered on

Step 1: Go to Settings in your Pixel 2 XL.

Step 2: Tap System.

Step 3: Tap Advanced.

Reset Pixel 2 XL

Step 4: Tap Reset options.

Factory Reset Pixel 2 and Pixel 2 XL

Step 5: Tap Erase all data (Factory reset) in the latest Android 11 OS.

How to Reset Pixel 2 XL and Pixel 2

Step 6: Tap Erase all data.

How to Hard Reset Pixel 2 XL

Step 7: Tap Erase all data.

How to Boot Into Safe Mode Pixel 2 XL

Step 1: Press and hold the power button to view the power menu in your Pixel.

Step 2: Touch and hold the Power off button until show reboot to safe mode.

Step 3: Press OK to reboot safe mode Pixel 2 XL.

It will take 30-40 seconds to reboot your device.

Step 4: View the Safe mode symbol on the left side below the screen.

If you still facing issue in safe mode, it means hardware or OS related issue in your Pixel. If your Pixel working without any issue, you can find the third-party app that causing the issue on your phone and remove it. Restart your Pixel to exit safe mode Pixel 2 and 2 XL.

And that’s it. This hard reset Pixel 2 XL is the most helpful tips. Do you have any tips want to share to fix Pixel 2 XL problems? Stay connected with us for the latest Pixel 2 XL tips and tricks.

How to Get Android 8.0 Oreo Beta on Galaxy S8 and S8 Plus

Do you have a Galaxy S8 or S8 Plus device? If yes then you can install Android 8.0 Oreo Beta on your Galaxy S8 and Galaxy S8 Plus devices. To install Oreo Beta on Samsung Galaxy S8 and Galaxy S8 plus, first of all, install the Samsung+ app and register your device with Samsung account. Follow the below-given step by step guide to get Android 8.0 Oreo Beta on Galaxy S8 and S8 Plus. This Android Oreo Beta is currently available for the US, UK, and South Korea. Samsung is officially declared the Android 8.0 Oreo Beta for Galaxy S8 and S8 plus device.

Read Also:

How to Get Android 8.0 Oreo Beta on Galaxy S8 and S8 Plus

How to get android 8.0 Oreo Beta on Galaxy S8 and S8 Plus

Already android 8.1 Public Beta is available for Pixel 2, Pixel 2 XL, Pixel, Pixel XL, Nexus 5X, Nexus 6P, and Pixel C. But in this tutorial, I will show you steps to install android 8.0 Oreo on Galaxy S8 and Galaxy S8 Plus devices.

Step 1: Download the Samsung+ app from Google play store on your galaxy S8 and S8 plus device.

If you’re outside the US, you will download the Samsung members app instead.

Step 2: Sign in with your Samsung account and make sure your device is registered to your Samsung account.

Step 3: Wait until Samsung+ app will show you a prompt on your device screen where you can enroll to participate in the Android 8.0 Oreo Beta program.

Follow instructions until enrolled in your Samsung Galaxy S8 device for Android Oreo Beta.

Step 4: Now go to Settings > Software update > Download updates manually to pull down the OTA.

Now enjoy the latest Android 8.0 Oreo on your Samsung Galaxy S8 and Galaxy S8 plus devices.

And that’s it. Do you have questions about how to get Android 8.0 Oreo Beta on Galaxy S8 and S8 Plus? Have you installed Oreo on your Galaxy S8? Tell us in below comment section. Stay connected with us for daily latest Android Oreo tips.

How to Change Language and Input Settings on Android Oreo 8

You’ll change language and input keyboard settings 0n Android 8.1 Oreo using system settings. This setting is used to change the input language, keyboard, and keyboard language on your Android Oreo 8.1 devices. You can see languages, keyboard & inputs, and advanced sections in your Oreo devices. Also, change Google keyboard settings using this tutorial.

Read Also:

Language and Input Settings in Android Oreo 8.1/8.0

Let see one by one section wise details of the Oreo language & input section.

Languages

By default set English as language. You’ll change the language in Android Oreo devices from below given settings.

Language preferences in android Oreo

Settings > System > Languages & input > Languages > + Add language > Choose from list

Keyboard & input

Gboard keyboard settings in android Oreo

In Oreo keyboard & input settings, you can change the keyboard, Gboard keyboard settings, and Google voice typing settings.

Advanced

Language and input settings in android Oreo 8.1

In the last section of languages & input settings, you can see input assistance and gesture moves options.

Input Assistance:

It includes spell checker, personal dictionary, and auto-fill services. Auto-fill services are the new Android Oreo feature which is useful for automatically add username and password in your device after one time set up.

More info: How to use auto-fill in android Oreo 8.1

Gesture moves:

Here you can see five moves gestures for show notifications from the lock screen without unlocking the screen and other camera related moves.

More info: How to use moves gesture on Android 8.1 Oreo

Also at the end of the language & input section, you can see pointer speed and text-to-speech output settings. You’ll change text-to-speech output language in android Oreo using the below settings.

Settings > System > Languages & input > Text-to-speech output > Language > Choose language want to set

Change Gboard keyboard settings in Android Oreo 8.1

Here you’ll see several Google keyboard settings such as languages, preferences, keyboard theme, text correction, glind typing, voice typing, and more. Also, manage keyboards settings in Oreo devices.

Settings > System > Languages & input > Keyboard & inputs > Virtual keyboard > Gboard

How to Disable Predictive Search on Android Oreo 8.1/8.0

The predictive search feature is useful to suggest queries related as you type in keyboard languages.

Settings > System > Languages & input > Keyboard & inputs > Virtual keyboard > Gboard > Search > Predictive search > Toggle off

That’s it. Do you have any tips for Language and input settings in Android Oreo you want to share? Tell us in below comment section. Stay connected with us for daily Android 8.0 Oreo tips and tricks.

How To Perform a Factory Reset Android 8.1 Oreo When Locked

Perform a factory data reset on android 8.1 Oreo devices.  Factory reset android 8.1 Oreo will fix several issues such as low sound call quality, blank screen, touch screen not working, can’t send or receive messages, slow your android Oreo and other problems. This Factory data reset will erase all your device data, so before reset android 8.1 Oreo, backup and restore your android Oreo device data.

You can factory reset android 8.0 using system settings and using the hardware key (power button and volume button) settings. Follow below given both handy tricks to reset android 8.1 devices such as on Google Pixel, Google Pixel XL, Pixel 2 and Pixel 2 XL Oreo devices.

Read This:

How To Factory Reset Android 8.1 Oreo

In android 8.0 Oreo is a slightly different setting to factory reset your Oreo devices compare to previous versions.

1st Method: Factory data reset android 8.1 Oreo in Pixel 2 & Pixel 2 XL

Step 1: Go to settings in your Pixel 8.1 Oreo

Step 2: Tap system

Step 3: Tap Reset options

Factory reset android 8.1 Oreo

Step 4: Tap Factory data reset (Erase all data)

Factory reset android 8.1 Oreo on Pixel 2

Step 5: Tap Reset phone

Unlock your android Oreo device if set Pattern lock or Password.

Factory data reset android Oreo 8.1 on Google Pixel 2 XL

Step 6: Tap erase everything

It will erase all your android Oreo device data from your Pixel 2 and Pixel 2 XL devices such as system & app data, Google account & other related accounts, third party apps, photos & music and more.

Read More:

2nd Method: Factory data reset android 8.1 Oreo When Locked

When you forgot your Pixel 2 password or pattern lock, you can reset pattern lock on Pixel 2 without unlocking your device.

Step 1: Turn off your Pixel 2 and Pixel 2 XL Oreo devices.

Step 2: Press & hold the volume down button and the power button at the same time until the phone vibrates.

You can view the Android system recovery screen on your android Oreo 8.1. By default start button show on Pixel 2 & Pixel 2 XL

Factory Reset Pixel 2 Oreo 8.1 device

Step 3: Press the volume down button until view recovery mode.

Step 4: Press the power button to restart into recovery mode.

You can see the android robot exclamation mark with a red triangle symbol on your pixel 2 devices.

Step 5: Press & hold the power button and volume up button one time only. Now, press the volume down button until highlight wipe data/factory reset, press the power button to select it.

This message show on your Google Pixel 2 & Pixel 2 XL screen: Wipe all user data?

Step 6: To confirm, press volume down buttons to scroll to Yes and press the power button to select it.

Clearing the cache may take 3-5 minutes.

Step 7: Press the volume down buttons to scroll to reboot system now, press the power button to select it.

Factory Reset Android 9 Pie using a phone settings

Settings > System > Advanced > Reset options > Erase all data (Factory reset) > Reset phone > Confirm your PIN or pattern lock or password > Erase everything 

Factory Reset Android 10 using phone settings

Settings > System > Advanced > Reset options > Erase all data (Factory reset) > Erase all data > Erase all data

I hope this tutorial helpful to factory reset android 8.1 Oreo in Pixel 2 & Pixel 2 XL device. If you have any kind of problem, tell us in below comment box. Read more android 8.0 Oreo tips and tricks.