How To Use Picture-In-Picture Mode In Android 10, 9 (Pie), 8.1 (Oreo)

Here’s how to enable and use picture-in-picture mode in Android 8.0 Oreo, 9 Pie, and latest android version. This picture-in-picture mode in android Oreo 8.0 is useful to use two apps at the same time in your devices. By default android picture-in-picture mode enabled in your android devices. You can watch YouTube videos or movies and chat with your friends on social media sites or also reading books and more.

When turning on picture-in-picture mode on Android 8.0 Oreo, your Pixel device screens looks much smaller. This android 8.0 feature is useful for multitasking work in your device to save time. You can also individually enable picture-in-picture mode YouTube in android 8.0 Oreo. In this tutorial, I will show you how to use picture-in-picture mode in android Oreo 8.0 devices such as Pixel 2, Pixel 2 XL, Google Pixel, Pixel XL, Nexus 6P, Nexus 5X, etc.

Read Also:

How To Enable Picture-In-Picture Mode In Android 8 Oreo: YouTube, Whatsapp

Are you using picture-in-picture mode in android devices? Not all applications supported Picture-in-picture mode. This picture-in-picture mode is also useful for WhatsApp video calling. Using app & notifications settings, you can disable picture-in-picture mode in android Oreo 8.0. Let see step by step guide to using picture-in-picture mode in android Oreo 8.0.

You can individually disable picture-in-picture mode in YouTube, WhatsApp, Google Duo and other supported devices using below two methods.
Turn on Picture-in-picture mode on Android 10 and 9 Pie

Step 1: Go to Settings.
Step 2: Tap on Apps & notifications.
Step 3: Tap on Advanced.

Step 4: Scroll down the end of the page and tap on Special app access.

Step 5: Tap on Picture-in-picture.

You can see a list of apps that supported Picture-in-picture mode on your latest android devices.

Step 6: Select App from the list.

Step 7: Toggle on or off Allow Picture-in-picture.

For Android Oreo 8.0 & 8.1:

Check out below given two methods to enable and use PIP mode on Android 8.1 Oreo devices.

1st Way: Turn on PIP Mode for Individually app on Android  using apps & notifications settings

Step 1: Go to settings in your android Oreo devices.

Step 2: Tap on Apps & notifications.

List of installed apps views in your device.

Step 3: Tap on App info.

Step 4: Tap on YouTube/WhatsApp or other android O’s picture-in-picture mode supported apps want to disable PIP.

You can tap the app want to enable PIP mode in your android Oreo.

Step 5: Scroll down up to WhatsApp and tap on it.

Tap on picture-in-picture under advanced settings in android Oreo

Step 6: Under the advance section, tap on picture-in-picture.

use picture-in-picture mode in android Oreo 8.0

By default enable picture-in-picture mode in WhatsApp. You can also use WhatsApp video calling using this feature.

Step 7: Turn on the toggle button to allow picture-in-picture mode.

Now disable picture-in-picture mode in your android Oreo 8.0 devices such as pixel, Pixel XL and Nexus devices.

Related:

2nd Way: Use PIP Mode On Android 8.1 Oreo

Step 1: Go to Settings

Step 2: Tap on Apps & notifications

Step 3: Tap on Advanced

Step 4: Tap Special app access at end of the page

Step 5: Tap on Picture-in-picture

Step 6: Tap app want to enable or disable PIP mode

Step 7: Toggle off to disable picture-in-picture mode

We hope this makes clear how to use picture-in-picture mode in android Oreo 8.0 devices. If you have any problem, comment below. If you facing the issue of picture-in-picture not working on Pixel, Pixel XL and Nexus, let us know. We will help you as soon as possible.

How to Use Gestures on Android 14 and Android 13

Here’s how to enable and use gestures on Android 14, Android 13, and other Android Samsung Galaxy devices. You can use Android gestures to quickly access the functions on your phone, like notifications, camera, activate Do not disturb mode, capture a screenshot, and more. Different devices have different Android gesture settings. Let’s see how to enable gestures on your Android Samsung devices.

Read More:

How to Enable and Use Gestures on Android 14 and Android 13 Stock OS (Google Pixel Devices)

The given steps are for Google Pixel devices running the Android 14 version.

Step 1: Open the Settings app.

Step 2: Scroll down and tap the System.

Android Gesture Settings

Step 3: Tap the Gestures.

You can see the below-given gesture settings Android 14 and Android 13 stock OS devices.

How to Use Gestures on Android 14 and Android 13

  • Quick Tap to Start Actions: You can quickly access the function on your Android phone to double tap on the back of your phone (Google Pixel). Use this Android gesture to take a screenshot, access Digital Assistant, open recent apps, show notifications, Toggle the flashlight, open your favorite app, etc. For more details, please check out our guide about how to use quick tap on your Android phone.
  • Quickly Open Camera: Quickly access the camera by pressing the power button twice. It works from any screen.
  • Flip Camera for Selfie: Open the camera and double-twist to switch in and out of selfie mode in your Google Camera app.
  • Tap to Check Phone: Tap on the screen to check notifications, time, and other information.
  • Lift to Check Phone: Pick up your phone to check notifications, time, and other information.
  • One-handed mode: To access your phone with one hand, you must enable one-handed mode on your Android phone. Ensure the use of full-screen gestures is enabled in system navigation settings.
  • Flip to Shhh: It will be helpful to turn on Do Not Disturb mode on your phone quickly. Enable Flip to Shhh and place your phone face down on a flat surface to activate DND mode.
  • Press and hold the Power Button: You can use the power button to access the power menu or Google Assistant on your phone. Long-press the power button to launch the function you want.

Don’t Miss:

How to Use Gestures on Android Samsung (One UI 6.0/One UI 5.1)

You can use motions and gestures on your Samsung Galaxy devices.

Step 1: Go to Settings.

Step 2: Find the Advanced features and tap on it.

Step 3: Touch on Motions and gestures.

Below are Samsung Gestures available.

  • Lift to Wake: When you pick it up, it will turn on your Samsung phone screen.
  • Double tap to turn on the screen: Turn on the screen when you double tap on your screen.
  • Double-tap to turn off the screen: Double-tap an empty space on the home or lock screen to turn off the screen.
  • Keep the screen on while viewing: This Samsung gesture uses your front camera to detect your face and turn on the screen while you’re using your phone.
  • Alert when phone picked up: Your Samsung phone will vibrate when you pick it up after missing a phone call or text message.
  • Mute with Gestures: It will mute incoming calls and alarms by putting your hand over the screen or turning your Samsung phone face down.
  • Palm swipe to capture: You can take a screenshot on a Samsung phone to swipe the edge of your hand across the screen you want to capture the screen.

Related:

How To Enable Gestures On Android 8.1

Android devices have slightly different settings to enable gestures on Android Oreo 8.1 or Nougat 7.1.2 devices.

Enable Moves Gesture on Android 8.1 (Oreo)

Step 1: Go to Settings on your Android Oreo devices.

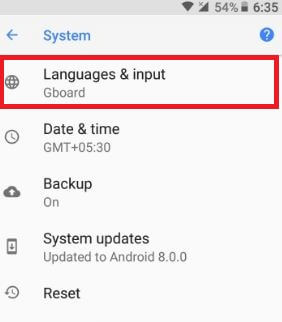
Step 2: Scroll down to the System and tap it.

Step 3: Tap on Language & Input.

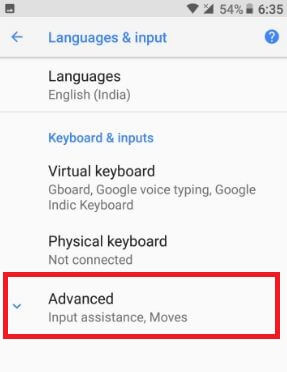
Tap on advance under languages settings in android O

Step 4: Tap on Advanced.

Under the moves section, you can see below 5 moves gestures in your Android 8 devices.

use moves gestures on Android Oreo 8.0 phone

Swipe Fingerprint for Notifications

Swipe fingerprint for notifications see on android Oreo

By default, turn off this fingerprint gesture in your Android. To check your notifications, swipe down on the fingerprint sensor on the back of your devices, such as Google Pixel, Pixel XL, etc. Enable this Android gesture on your device if you want to use it.

Using the settings below, you can also enable swipe fingerprint for notifications on Android 8.1.

Settings > Apps & notifications > Notifications > Enable swipe fingerprint for notifications.

Jump to Camera

Press the power button twice to quickly open the camera from any screen on your Android phone. By default, enable the Jump to Camera moves gesture in Android 8.1.

Flip Camera

When your device camera opens, double-twist your Android device to switch between the front and rear cameras. By default, enable the flip camera gesture in Android 8.1.

Double-Tap to Check the Phone

If you are busy and do not check received notifications, double tap on your screen to quickly check the message you received without unlocking your Android devices.

Lift to Check the Phone

Lift to check phone in your android Oreo

Just pick up your Android device to quickly check the notifications.

The Android 8.1 moves gesture list ends here. I hope this tutorial helps you use gestures on Android 8.1 devices. If you have any other problems with the above steps, please share them in the comment box.

Read This:

How to Check WiFi Speed on Android 8.1 Oreo

Android 8.1 Oreo shows public WiFi network is fast or slow. You can check wifi network speed on Android 8.1 Oreo under network & internet settings. To see the speed of networks in the Android Oreo device, open Wi-Fi networks. Four options including Very fast, Fast, Ok, and Slow. If your android device has updated to the latest Android 8.1 Oreo, you can display public Wi-Fi network speed before you connect. For higher quality YouTube video & live streaming, very fast speed requires in your devices.

Read Also:

How to Show WiFi Network Speed in Android 8.1 Oreo

Step 1: Go to Settings in your Android 8.1 Oreo.

Step 2: Tap on Network & internet.

Step 3: Tap on Wi-Fi.

How to show wifi network speed in android 8.1 Oreo

Here you can see the Wi-Fi network name and speed details.

Display public Wi-Fi network speed in android Oreo

Very fast: High-quality YouTube videos, live streaming, and more.

Fast: Stream Videos

OK: Reading websites or blog, streaming music

Slow: Phone calls, Wi-Fi calls, send texts on social media sites

If your Google device not updated to the latest version, you can’t see public network speed in your Android Oreo devices. Also, secure wi-fi networks won’t display network speed in Android Oreo devices.

How to Display Internet Speed in OnePlus 5T & OnePlus 5

Step 1: Go to Settings in your OnePlus 5/5T.

Step 2: Tap on the Status bar under the customization section

You’ll see several options such as show battery percentage, display network speed and more.

Step 3: Toggle on “Display network speed”.

Now, display the network speed in the status bar on your OnePlus 5T and OnePlus 5 devices.

And that’s it. Is your Pixel devices updated to this Public Wi-Fi network speed feature? Do you still have a question about show wifi network speed in android 8.1 Oreo? Tell us in below comment box. Don’t forget to check out our other Android 8.1 tips.

How to Snooze Notifications in Android Oreo 8.0

You can easily snooze notifications on Android 8.0 Oreo to swipe down the notification panel from any screen. Snooze notifications are used to ignore notifications of annoying apps or games in your Android Oreo devices to set a particular time. Recently updated my Google Pixel and Pixel XL to Android 8.0 Oree and got this new feature. This snooze Android Oreo notification is one of the useful changes to disable apps or games for some time. Also, snooze individual notifications for the specific time. In previous Android versions manually disable notifications for application or games.

Android 8.0 Oreo has great features such as picture-in-picture mode, instant app, smart text selection, background process limit, notification dots, and more. Daily we get several notifications from friends or family members.

Read Also:

How to Snooze Notifications on Android 8.0 Oreo: Google Pixel, Pixel XL, Nexus

When received notification in your device, swipe down the notification panel and slowly swipe its right side until see the clock icon. You can see below the screen in your Android Oreo 8.0 devices.

Snooze notifications on android 8.0 Oreo device

Now tap on the clock icon to snooze the notification for 1 hour (By default set 1 hour snooze time).

change android O snooze notification time in Google Pixel XL

There are four options available to snooze Android Oreo notifications in your Pixel and Pixel XL devices. To change android O snooze notification time also. To change tap on down arrow to set time to 15 minutes/30 minutes/1 hours/2 hours. In Android 8.0 Oreo OS, don’t snooze option removed. Just set time to ignore notifications from any app or games you want.

When swipe down notification bar to snooze notification on Android 8 Oreo, you can see a settings gear icon. This settings icon help to change app notification settings in your Android 8.0. In this individual app settings, you can enable/disable notification dot, change lock screen notification, and enable override do not disturb in your devices.

That’s all. Do let us know you liked this tutorial to snooze notifications on Android 8.0 Oreo? Let us know your thoughts in the below comment box. If you have any kind of trouble, let us know. We will respond as soon as possible. Stay connected with us for daily latest Android 8.0 Oreo tips and tricks.

How to Fix Contacts Sync Problem on Android Oreo

Several users reported contacts sync issue on Android Oreo 8.0. Are you trouble with this can’t sync contact issues? Most of all contacts and other details automatically sync using your Google account you added in your Android devices when the first time set up. You can easily sync contacts, app data, Gmail, Chrome, and other data if turned on automatically sync data in your Android Oreo devices. Also, facing can’t sync Google contact issues. When enabling auto-sync, it will be consuming more data and sometimes battery drain issue also.

Read Also:

How to Fix Contacts Sync Problem on Android Oreo 8.1/8.0

Turn Auto-sync Off and ON

Apps will refresh data automatically when you turn off and on auto-sync.

Settings > Account > Toggle off Automatically sync data > Toggle on Automatically sync data

Clear Cache of Contact Storage

Step 1: Go to Settings in your Oreo devices.

Step 2: Tap on Apps & notifications.

In the latest Android 8.1 Oreo devices (In Android 8.0, tap on App info), you can see Recently opened apps settings.

Android Oreo recently opened apps

In recently opened apps, you can see recently used the last five apps. If not view app in the list, tap on See all apps.

Can nor sync contacts on android phone

Step 3: Tap on Three vertical dots on the top right corner.

Show system in android Oreo 8.1 devices

Step 4: Tap on Show system.

Android Oreo contact storage settings

Step 5: Find the Contact storage and tap on it,

Contact storage app settings in Oreo device

Step 6: Select Storage.

Fix contacts Sync problem on android Oreo 8.1

Step 7: Tap on Clear data to fix contacts Sync issue on Android phone.

You’ll see this message on screen: Delete app data?

How to fix contacts Sync problem on android Oreo

Step 8: Tap on OK.

It will permanently delete all of these contacts app data including settings, accounts, database, and all other app-related files in your Android Oreo device.

And that’s it. I hope this tutorial helpful to fix contacts Sync problem on android Oreo. Do you have any alternative methods to fix this issue? Share it with us in below comment box. Let us know in the below comment box if you have any kind of trouble. Don’t forget to check out our other Android Oreo tips and tricks.

How to Change Snapchat Password on Android via Phone Number [2025]

Do you forget your Snapchat password Android? Here’s how to reset or change Snapchat password on Android via phone number in 2025. You’ll change the Snapchat password using your mobile number or email if verified. If you know your current password, you can easily set a new password on Snapchat using the app on your Android or iPhone devices.

If you want to change password on Snapchat using your phone number or email, make sure the email address & phone number are linked to the Snapchat account. Follow the below-given step by step process to reset your Snapchat password using your mobile number.

How to Change Snapchat Password on Android using Phone Number

Check out the below-given methods for resetting your forgotten Snapchat password on Android device.

Reset Password on Snapchat on Android using Mobile Number

If already sign in Snapchat account and forgot the password to your account, follow the below-given settings on your device.

Step 1: Open the Snapchat app on your Android phone or tablet.

Step 2: Tap the Profile icon at the upper left corner.

Step 3: Tap the Settings gear icon at the top right corner.

Snanpchat app password reset

Step 4: Scroll down and tap Password.

Forgot Snapchat password android device

Step 5: Tap Forgot your password.

How to reset Snapchat password on android via phone number

Step 6: Choose Via phone or Via Email to reset your password.

Step 7: We select Via phone.

Step 8: Now verify your phone number to Snapchat password reset.

Step 9: Tap Verify.

Confirm Snapchat password via mobile number

Now you’ll get a verification code to your mobile number. To complete your mobile number verification, enter a 6-digit verification code.

Reset Snapchat password android using mobile number

Step 10: Choose Send via SMS or call me.

Now reset your Snapchat password via SMS or call using your registered mobile number.

How to reset Snapchat password on android

Step 11: After completing the verification code, enter the New password & confirm password, and tap Save.

Password reset on Snapchat android

Now you can see this screen on your device: Your password has been updated!

It’s quite easy to reset your Snapchat password using a mobile number on an Android phone or tablet. You can also use Email to reset your password and unlock your Snapchat account.

And that’s all. We hope this makes it clear how to reset Snapchat password on android via phone number. Is it possible to Snapchat password reset by username? Do you have any other tips you want to share? Have you been applying for them already? Hit the comments and let us know!

Related: