How To Turn Off Notifications Android 8.1 Oreo

By default show notifications on the lock screen when you receive a new message in your android phone. Here’s how to turn off notifications Android Oreo 8.1. You can individually disable app notifications or hide notifications from the lock screen using apps settings. In android Oreo app notifications, you can see notification dots, override do not disturb, and change lock screen notification in Android Oreo 8.0.

By default enable notification, notification dots, and all sound in Android 8.0. You can see several options including notifications, app info, default apps, special app access, and emergency broadcast. Also, hide Android Oreo’s running background app.

Read Also:

How To Disable Notifications on Android 8.1 Oreo

Check out below given settings to stop notification on Android Oreo 8 lock screen & home screen.

How to Turn Off App Notification Android Oreo 8.0

Step 1: Go to Settings in your Android Oreo.

Step 2: Tap on Apps & notifications.

List of installed apps views in your Android Oreo device.

Step 3: Tap on App info.

Step 4: Tap App wants to disable notification Android Oreo.

Here you can see android Oreo app permission, storage, data usage, and battery options.

Tap app notifications in android Oreo

Step 5: Tap App notifications.

Enable notification on android Oreo 8.0

By default enabled notifications on Android 8.1.

Turn off notifications android Oreo 8.0 device

Step 6: Toggle off the “Off” button.

Your device is blocked by this app’s all notifications. Also, this particular app is disabled notification dots, disable sound, don’t show lock screen content, and override do not disturb in android Oreo.

How to Show or Hide Notification Info on Lock Screen in Android 8.0 Oreo

change notification info on lock screen in android Oreo

Settings > Apps & notifications > Notifications > on the lock screen > Show all notification content/hide notification content > Don’t show notifications at all

Settings > Apps & notifications > App info > Tap app > App notifications > On the lock screen > Choose from given options

How to Enable/Disable Blink Light on Android Oreo 8.0

By default enable blink light in android Oreo devices. Follow the below-given steps to disable it.

disable blink light on android 8.0 O

Settings > Apps & notifications > Notifications > Disable blink light

How to Enable Override Do Not Disturb in Android Oreo 8.0

When enable override do not disturb Android Oreo, your device not disturb by sounds, vibration, alarms.

Enable override do not disturb in android 8.0 O

Settings > Apps & notifications > App info > Tap app > App notifications > enable Override do not disturb

How to Change Default Apps on Android Oreo 8.0

By default set default apps on android Oreo such as a home app, SMS app, phone app, and browser app. You can change the default app on android 8.0 using the below settings.

Set default apps in your android 8.0 Oreo device

Settings > Apps & notifications > Advanced > Default app > Change android Oreo’s default app you want

And that’s all about how to use notification channels on Android Oreo.

Check out each one listed above apps & notifications android Oreo tips. We hope it makes clear how to turn off notifications android Oreo 8.0. Do you have any tips you want to share with us?

Android 8.0 Oreo Features and Release Date

Here’s the list of top best Android 8.0 Oreo features. This Android 8.0 features including Adaptive icons, Background process limit, Install unknown apps, Picture in picture mode, Autofill API, Wi-Fi Aware (NAN), Android Instant Apps, Smart text selection, Notification dots, New emoji of 60 sets & download fonts and more. Google has officially announced the next version of Android is Android 8.0 Oreo. First of all Google Pixel, Pixel XL, and Nexus device upgrade to Android 8.0 Oreo. This Android Oreo feature make your Pixel device more secure, power-efficient, and fast compare to other devices.

Read Also:

 7 Best Android 8.0 Oreo Features You Should Know

If you can’t wait for an OTA update on your Pixel, Pixel XL, and other android devices, you can install android Oreo on your Pixel and Nexus device to download system images and flash it on your device.

Picture-in-Picture mode

android 8.0 Oreo features list

Use two apps at the same time in your Pixel, Nexus, and another Android 8.0 Oreo devices. Watch YouTube videos while chatting on Facebook or WhatsApp.

Read: Enable Picture-in-Picture mode on Android 8.0 Oreo

Autofill Framework

You can log in to your account or app without entering a password, just give permission to your favorite apps want to log in. Autofill remembers your login details.

Android Instant Apps

This Android 8.0 Oreo feature is useful when your android device has not more space and need to install apps. Using Android install apps feature, access apps from anywhere without downloading from Google Play store. Users can easily access any apps with a single click on a URL, just like a webpage. No installation needed for apps.

Google Play Protect

Google Play protect on Android 8.0 Oreo

Google Play protect is built into every Pixel, Nexus, and other android devices. It will scan all play store apps to protect your phone data and device safe. It will find malicious apps by scanning 50 billion+ apps every day and remove harmful apps.

Read Also: 3 ways Enable Google Play Protect on Pixel and Nexus devices

Install Unknown Apps

In Android Nougat and the previous version, we enable unknown sources to install third-party apps in your device. But in Android 8.0 Oreo, you will manually give permission to install third-party apps from several sources.

Background Process Limit

This is one of the best android 8.0 Oreo features to save battery life Google Pixel, Nexus, and other android devices. It will help to minimize the background process in the apps that unnecessary. Automatically limit background activity, location, Wi-Fi, and other apps when not in use.

Notification Dots

Android 8.0 notification dots feature

This is useful to see how many notifications you receive or missed on particular apps. Just press the notification dots to see what’s new in the notification. Using this you can first of all check your favorite app notification.

That’s all about the latest released Android 8.0 features. I hope you will enjoy this article. Do you know any other important Android 8.0 Oreo features we missed above? Please share with us in below comment box. Stay connected with us for the latest Android Oreo tips.

How to Change the Notification Sound and Ringtone in Facebook Messenger App Android

By default set a Facebook messenger notification sound and ringtone. Here I’ll show you steps to change the notifications sound in the Facebook messenger app on Android devices. Using the notifications & sounds settings, you can enable or disable Facebook messenger sound or mute notifications, notification previews, Light, change notification sound & ringtone, in-app sound, free call vibrate on a ring, and manage notifications.

You can change or turn off messenger notifications sound for individual contacts or all conversations using the Facebook messenger app on Android devices. You can mute facebook messenger notifications for 15 minutes/1 hour/8 hour/24 hours. Follow the below-given steps to change Facebook messenger sound on Android phones or tablets.

Read Also:

How to Change And Enable/Disable Facebook Messenger Sound Android Phone

Check out below given one by one method to change the Facebook messenger notification sound and ringtone on your Android devices.

Using Facebook Messenger App (2020)

Step 1: Open the Facebook Messenger app on your android phone or tablet.

Change the notifications sound in the Facebook messenger app on Android

Step 2: Tap on the Profile icon at the top left corner.

Change the Notification Sound and Ringtone in Facebook Messenger App

Step 3: Tap Notifications and sounds under the preferences section.

Change the Facebook messenger notification sound and ringtone on Android

Step 4: Tap Notification sound.

How to Change the Notification Sound and Ringtone in Facebook Messenger App Android

Step 5: Choose a Notification tone from the list.

Change Ringtone on Facebook Messenger App Android in 2020

Change Ringtone on Facebook Messenger App Android

Open Facebook Messenger App > Profile icon at the top right corner > Notifications and sounds > Ringtone > Choose from the list

Enable/Disable Sound on Facebook Messenger App Android in 2020

Enable or disable Notification Sound in Facebook Messenger App

Open Facebook Messenger App > Profile icon at the top right corner > Notifications and sounds > Toggle off “On” > Choose from 15 Minutes/1 Hour/8 Hours/ 24 Hours > OK

Turn Off Sound Using Facebook Messenger App on Android (Older Version)

Step 1: Download and install the Facebook messenger app on your android device.

Step 2: Log in with your Facebook account.

Tap on settings in facebook messenger app

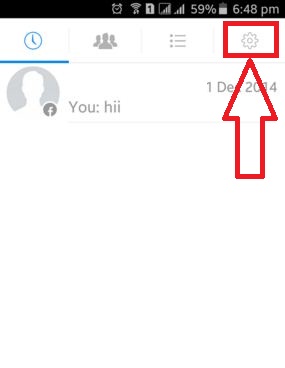
Step 3: Tap on the “Settings” icon from the top of the right side corner.

Tap on notifications & sounds option

Step 4: Click on “Notifications & Sounds”.

enable facebook notification sound in android

By default enable or turn on the sound of your Facebook messenger app.

How to disable facebook messenger sound android lollipop

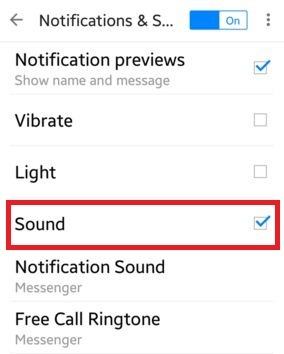
Step 5: Toggle off “Sound” to disable Facebook messenger sound Android phone or tablet.

That’s it. Using the above steps you can easily turn off sound in the Facebook messenger app on Android.

It’s easy to set different notifications sound tone & free call ringtone in the Facebook messenger app on your android phone or tablet device. You can also turn off chat in the messenger app so people won’t see online even you are active on the Facebook messenger app.

Change the Notification Sound on Facebook Messenger App

Open the Facebook Messenger app > Settings gear icon at the top left > Notifications & sounds > Notification sound > Select the sound

Change Ringtone on Facebook Messenger App

Open the Facebook Messenger app > Settings gear icon at the top left > Notifications & sounds > Free Call Ringtone > Select the ringtone

If you’re having problems implementing the above steps to enable or disable Facebook messenger sound android device, please let us know on the below comment box. Connect with us for daily latest technology updates. Don’t forget to share this Facebook tricks with your friends.

How To Change Font Size And Display Size On Android 10, 9 (Pie), 8.1 (Oreo)

Want to set or change the system fonts style in your android Oreo 8.1? How to change font size and display size on android Oreo 8.1, 9 Pie and 10 devices. By default set font size in android devices. In font size, you can increase or decrease the font size you like. When changing display size in Android Oreo, you can view a preview of both font size and apps icon on your screen change. Also, change screen density on the Android Oreo phone.

By default font size set as larger and display size set in your android 8.0 devices. When change font size in Android 8.1 Oreo, your device screen changes. You can also download fonts and emoji in your android devices. Check out the below-given step by step guide to increase the font size and display size on android 8.1 devices.

Read This:

How To Increase The Font Size And Display Size On Android Oreo 8.1

Check out below given settings to change the size of text, icons, style, and more on your latest android devices.

Change Fonts Style on Android 10

Step 1: Long press on the blank space on the home screen in your Android 10.

Change Font Size, Display Size, And Font Style On Android 10, 9 (Pie), 8.1 (Oreo)

Step 2: Click on Styles & wallpaper.

change system font, icon shape, icon color, font style Android 10

Step 3: Tap on Style.

Here you can change system font, icon shape, icon color, font style, and wallpaper. Also, customize your favorite style.

Step 4: Tap > icon until see fonts.

Change Fonts Style on Android 10 OS devices

Step 5: Choose a font style and tap Apply.

If you have Google Pixel & Pixel XL devices running Android 10, you can change the font style using the below settings.

Settings > System > Advanced > Developer options > Tap on Headline/Body font under Theming section

Change Font size & display Size on Android 10

Step 1: Go to settings in your device.

Step 2: Tap on Display.

Step 3: Tap on Advanced.

Change Font size & display Size on Android 10 OS

Step 4: Tap on Font size and set from Small/Default/Large/Largest.

Change display size in Android 10

Step 5: Tap on Display Size and set from Small/Default/Large/Larger.

Make Text Larger in Android 9 Pie

Step 1: Swipe down the notification panel twice from the top of the screen.

Step 2: Tap on the Settings gear icon.

Step 3: Tap on Display.

Step 4: Tap Advanced.

Step 5: Tap Font size.

Step 6: Move the slider left or right to respectively Decrease or Increase font size.

Step 7: Tap Display size.

Step 8: Move slider left or right side to a small or large screen.

For Android Oreo 8.0 & 8.1

There are 2 ways to change the display size, font size and font style in android 8.0 Oreo devices such as Google Pixel, Pixel XL, Nexus 6P, Nexus 5X and other android Oreo 8.0 supported devices.

1st Way: Change the font size on android Oreo using display setting

Step 1: Go to settings in your android Oreo device.

Step 2: Tap on display.

You can see Brightness level, Adaptive brightness, Wallpaper, Sleep, device rotation, font size, display size, screen saver, moves gesture and Night light mode in the android Oreo 8.0 device.

Tap on advanced section in android 8.0 Oreo device

Step 3: Tap on Advanced under the display.

Change display size in android Oreo using display section

Step 4: Tap on font size.

Change font size in android 8.0 Oreo device

By default set the largest font size in your android Oreo device. To change font size smaller, swipe slider to the left side and see preview above the screen. After set font size android Oreo, tap on a back button. You can download more fonts style and change the Oreo font style if you don’t like default font in your android 8.0 devices.

Step 5: Tap on display size.

Change font size and display size on android Oreo

You can set the display size to larger / larger / largest in your android device. When changing display size in Android, you will see change icon size in android Oreo 8.0.

 2nd Way: Change the font size on Android 8 Oreo using Accessibility settings

Step 1: Go to settings in your android 8.0 Oreo.

Step 2: Scroll down up to accessibility and Tap on it.

Here you can see various sections including, screen readers, download services, display, interaction controls, audio & on-screen text and experimental.

Change font size in android Oreo using accessibility settings

Step 3: Tap on font size under the display section.

The set font size you want to use in your android Oreo.

Step 4: Tap on Display size under the display section.

Change display size may affect your device screen apps and icon size in your android Oreo.

Change the default font size on Android 9 Pie and Android 10

Settings > Display > Advanced > Font size > Small/Default/Large/Largest

Change Font Style in Android phone running Android 10

Settings > System > Advanced > Developer options > Theming section at the end of the list >Headline/Body font

If you can’t find Theming section on your Android 10, follow below settings to change font style Android 10 devices.

Long press on the blank area of home screen > Style & Wallpaper > Style > change font style, icon style, icon color, icon shape > Apply

That’s all. We hope this makes clear how to change font size and display size on android Oreo 8.0 devices. If you have any problem, don’t hesitate to let me know in below comment box.

How To Turn on Battery Saver Mode In Android 8.1 Oreo

How to customize battery saver mode in android Oreo 8.1. Battery saver mode is useful to extend battery life in android Oreo 8.0 to disable background activity and stop using high-power features. When enable battery save mode in android 8.1 Oreo, it will consume minimum power and improve battery life in android Oreo 8.0. Disable battery saver mode automatically when your device fully charged.

Recently Google announced the latest android version and it’s called Android 8.0 Oreo with amazing features. Also, change battery saver settings in your android devices that include battery percentage, screen time out time, adaptive brightness, battery optimization and shows full device usage and app usage details since full charge your android phone. Follow the below-given step by step guide to customize battery saver mode in android Oreo 8.0 devices such as Pixel, Pixel XL, Nexus 6P, Nexus 5X, and other android Oreo supported devices.

Read This:

How To Change Battery Saver Settings In Android 8.1 Oreo

There are several different settings available in battery saver mode in android 8.0 compare to previous android 7.1.2 devices. First of all, see steps to turn on or turn off battery saver mode in android 8.0.

Enable/disable battery saver mode in android Oreo 8.0

Battery saver mode uses low power because it limits several functions such as reduce android O’s performance, limits vibration, location services, and most background app data. It will save battery life in your android Oreo device. Let see a complete guide to customize Android Oreo battery saver mode. You can enable and use battery saver mode on Android 8.0 Oreo using the below settings.

Enable battery saving mode on Android 8.0 Oreo:

Step 1: Go to settings in your android Oreo 8.0 devices.

List of various section sees in your android O’s settings.

Step 2: Tap on the battery.

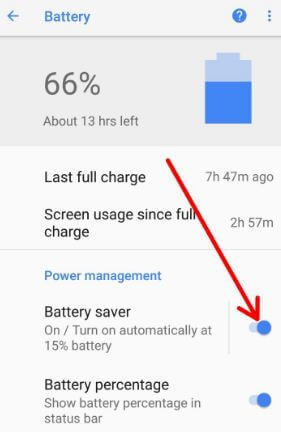
Battery saver mode in android Oreo 8.0 smartphone

Step 3: Tap on battery saver under power management.

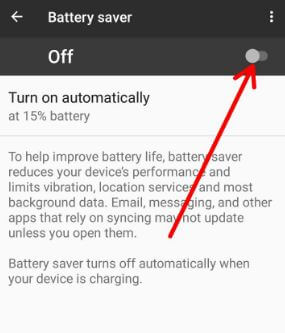
Disable battery saver in android Oreo 8.0 device

By default turn off battery saver in Android Oreo.

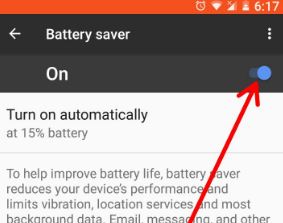
Step 4: Turn the toggle on to activate battery saver

Enable battery percentage in Android 8.0 Oreo

Battery percentage indicates the remaining battery percentage in your android Oreo. When turn on battery percentage in android Oreo, show percentage in the status bar in your Oreo devices.

Step 1: Go to settings in your android Oreo.

Step 2: Tap on the battery.

You can see below given various options in your android O devices.

Show battery percentage in your android Oreo 8.0 phone

Step 3: Enable/disable battery percentage under power management.

Enable adaptive brightness in android Oreo 8.0

It will automatically optimize android O’s brightness level for available light in your android Smartphone.

Enable adaptive brightness in android Oreo

Settings > Battery > Power management > Enable/disable adaptive brightness

Relevant:

Set screen display time out on android Oreo 8.0

This screen time out time is useful to save battery life in android 8.0 Oreo devices. Choose 15 seconds or 30 seconds to save the maximum battery in your device.

Set screen display time out to save battery life on android Oreo

Settings > Battery > Power management > Sleep > Choose from above options

Show full device system usage and app usage in android Oreo 8.0

Customize battery saver mode in android Oreo 8.0

In this customize battery saver mode in Android Oreo, you can see all details of app usage data and full device system usage data. Tap on the battery icon to show data usage by apps, system, Wi-Fi, Bluetooth, etc. Find the app that using more data and disable app background data in the Android Oreo device. Also, use battery optimization in android Oreo using the battery section.

Turn on battery saver mode in Android 9 Pie

Settings > Battery > Battery saver > Turn on Now

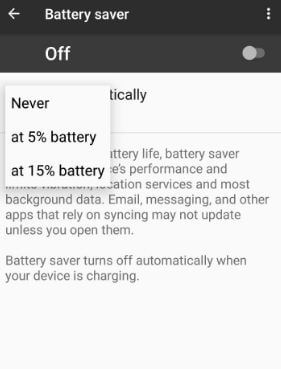
Also, set a schedule to automatically enable battery saver in your android phone and tables.

Turn on battery saver mode in Android 10

Settings > Battery > Battery saver > Turn on Now

And that’s all. I hope the above-given tips helpful to customize battery saver mode in android Oreo 8.0 devices. If you have any handy trick, tell us in below comment section.

How to Snapchat Account Delete on Android, iPhone, PC [2025]

There are several social media apps, but Snapchat is one of the most used platforms. Do you want to delete a Snapchat account on Android, Windows PC and Laptop? Here’s how to Snapchat account delete on Android, iPhone, and PC/Laptop in 2025. You can deactivate Snapchat account using the browser on your PC or laptop device. If you’re on an Android or Samsung device, you need to go Snapchat account portal and sign in with your username and password. One of the best advantages of a Snapchat account is you’ll reactivate Snapchat account within 30 days or 24 hours if accidently removed. After 30 days are completed, permanently delete your account.

After 30 days, your Snapchat delete account, including all your account settings, snaps, chats, location data, and other data will be deleted. Also, delete Snapchat messages and Snapchat stories. Follow the below given step-by-step process to delete my Snapchat account on Android device. You can download the Snapchat app or Snapchat apk file here on your Android or iPhone devices.

Read Also: How to Recover Lost Snap Streak

How to Snapchat Account Delete 2025 on a PC or Laptop?

You can’t delete a Snapchat account without your username and password on your desktop or Android device. It would be best if you used the browser to deactivate Snapchat. Check out the below-given settings to deactivate your Snapchat account, which will delete Snapchat data from your account.

What happens when you delete your Snapchat account?

When you delete your Snapchat account, all your Snapchat data will be removed, including your name, email, phone number, chats, Snaps, and Snapchat stories. Your account will no longer be available for any Snapchat user. Remember, any Snap data you have shared with your friends or other people may still be available for those people even after you have deleted your Snapchat account.

How to Delete Snapchat Account on Android and Samsung in 2025

Step 1: Open Snapchat App on your Android device.

Step 2: Tap the Profile icon at the top left.

Step 3: Tap the Settings gear icon at the top right.

Snapchat deactivate using Snapchat App

Step 4: Tap the I Need Help in the support section.

Managing Snapchat Account on Android devices

Step 5: Tap the Managing my account.

How to Deactivate Snapchat Account on Web

Step 6: Tap on Delete or Reactivate my account.

How do I Delete My Snapchat Account 2022

Step 7: Tap on How do I delete my Snapchat account?

How to Delete Snapchat Account on Android and Samsung Galaxy

Step 8: Tap on the Accounts portal link on your phone.

You can see the delete account page on your device.

How to Snapchat Delete Account on Android Phones

Step 9: Enter the Snapchat username and password and tap on Continue.

Now, you’re Snapchat deactivation.

Step 10: Open the Snapchat app, and you can see the message that Your account is currently deactivated.

Delete Snapchat account on your Android and iPhone

Step 11: To reactivate the Snapchat account, log in to your account (before 30 days) and tap Yes.

How to Temporarily Deactivate Snapchat Account Using Desktop in 2025

Step 1: Open this Snapchat account delete page on your PC or laptop.

Step 2: Enter the Snapchat username, email & password and tap login.

You’ll see the delete account page in your Chrome or Mozilla, or another browser you use on your desktop (Show the below-given screenshot).

How to delete Snapchat account on android device

Step 3: Enter username & password and tap the Continue button.

Permanently delete Snapchat account on android phone

Step 4: You can see this message on your browser: Account deactivated.

Now automatically log out Snapchat account from your Android phone or tablet. Now, your Snapchat deactivate. It’s easy to deactivate or delete your Snapchat account. None of your Snapchat friends contact you, and after 30 days, your account will be deleted permanently. If you’d like to reactivate your Snapchat account before deleted, sign in to Snapchat before 30 days.

Read More: How to Reset Forgot Snapchat Password

Snapchat Delete Account on iPhone and iPad

Step 1: Open the Snapchat app.

Step 2: Tap the Settings gear button on the profile screen.

Step 3: Scroll down and tap on Delete account in account actions.

Step 4: Follow the on-screen instruction to delete your account.

How to Delete Snap on Android

Step 1: Open the Snapchat app on your Android device.

Step 2: Tap on the Chat icon at the bottom.

Step 3: Tap Any friend you want to remove Snap.

How to Delete Snap on Android Phones and Tablets

Step 4: Long-press the Snap and tap on Delete.

Step 5: Tap on Okay.

You can see this pop-up message: Delete Snap?

Delete Snap

Step 6: Tap on Delete.

How to Delete Friends on Snapchat Android

You can delete a friend from your Snapchat account using the below-given settings.

Step 1: Open the Snapchat app on your device.

Step 2: Tap on the Profile icon at the top left.

Step 3: Tap on My Friends.

Step 4: Long-press any friend you want to remove.

Manage Friendship on Snapchat Android

Step 5: Tap on Manage Friendship.

Delete Friends on Snapchat Android Devices

Step 6: Tap on Remove friend.

How to Delete Friends on Snapchat Android Phones and Tablets

Step 7: Tap again on Remove.

And that’s all. I hope this tutorial is helpful in permanently delete Snapchat accounts on Android phones. Stay and connect with us for the latest updates. If you have any questions, please tell us in below comment box.
Read More: How to Fix WhatsApp Not Working Android

Frequently Asked Questions:

How do I Deactivate Snap Temporarily?

You can remove Snap from your friend list but can’t deactivate it. To remove the Snap, Open Snapchat > Chat icon at the bottom > Tap Any friend > Tap & hold the Snap> Delete > Okay > Delete.

If I delete my Snapchat account will my friends know?

You can inform your friends about deleting your Snapchat account. But your friends can’t send you Snaps or Chats. When you remove your Snapchat account, your friends will not receive any notification.

Can you Temporarily Deactivate Snapchat?

Yes, you can deactivate your Snapchat account temporarily for 30 days. Before 30 days, you must sign in with your username and password if you don’t want to delete a Snapchat account permanently.

Can I Remove my Phone Number from Snapchat?

No, you can’t remove your phone number from your Snapchat account. But you can change your mobile number and verify it using an SMS to help reset your forgotten Snapchat password.

How to Log Out of Snapchat?

To Snapchat log out, open the Snapchat app > Profile icon at the top left corner > Settings gear icon at the top right corner > Scroll down at the end and tap on Log out > Log out.

Can you Delete a Snapchat account?

You can permanently delete your Snapchat account using Android, iPhone, or PC devices. Make sure to remember your Snapchat username and password to delete your account.
Read Also: