How to Make Google my Default Search Engine on Android and PC

Do you want to change the default search engine on your Android phone and PC in 2023? You can set Google as your default search engine on computer browsers like Chrome, Mozilla Firefox, Safari, and Microsoft Edge (Windows 11/10). You can change the default search engine on your device from Google, Bing, DuckDuck Go, Yahoo, Ecosia, Wikipedia, AOL, Ask, etc. Here’s how to make Google my default search engine on Android phones and PC browsers.

Read More: How to Fix Gmail Won’t Load on Google Chrome 

How to Make Google Default Search Engine on Chrome in 2023

In most browsers, Google is set as the default browser. You can check your default search engine using the below method.

Set Google as Default Search Engine on Google Chrome Android Phone

Step 1: Open the Google Chrome app on your mobile.

Step 2: Tap Three vertical dots at the top right corner.

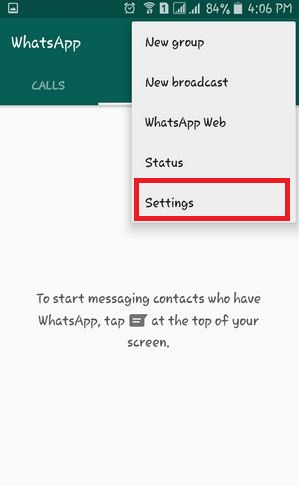
Step 3: Tap Settings.
Set Google as Default Search Engine on Google Chrome Android Phone

Step 4: Tap Search engine in the basics section.

You can see the list of search engines like Google, Yahoo, Bing, DuckDuck Go, and Ecosia.

How to Make Google my Default Search Engine on Android and PC

Step 5: Choose a Search engine you want to set as default on your phone.

You can change your search engine from Yahoo to Google, Bing to Google, etc.

How to Make Google as Default Search Engine in Chrome PC

Step 1: Open the Chrome on your PC or Laptop.

Step 2: Tap Three vertical dots at the top right corner.

Step 3: Tap Settings.

How to Make Google my Default Search Engine on Chrome PC

Step 4: Tap Search engine in the left side menu.

Make Google my Default Search Engine on Chrome

Step 5: Choose Google in the drop-down box to set the default Chrome search engine.

Read More: How to Record a Screen on Chromebook

How to Make Google as Default Search Engine in Microsoft Edge Computer

Step 1: Open Microsoft Edge on your Windows 11/10 computer.

Step 2: Tap on Three horizontal dots at the top right corner.

Step 3: Tap Settings.

Privacy, search and services in Microsoft Edge to set default Google search engine

Step 4: Tap the Privacy, search, and services in the left side menu.

Tap address bar and search in Microsoft Edge to change search engine

Step 5: Scroll down, tap on the Address bar and search at the end of the page.

How to Make Google as Default Search Engine in Microsoft Edge Computer

Step 6: Tap the drop-down box next to the Search engine used in the address bar and choose Google.

How to Make Google as Default Search Engine in Mozilla Firefox Computer

Step 1: Open the Firefox browser.

Step 2: Tap Three horizontal lines at the top right corner.

Step 3: Tap Settings.

Step 4: Tap Search in the left side menu.

How to Make Google as Default Search Engine in Mozilla Firefox

Step 5: Tap Drop down box in the Default search engine section and choose Google.

Related:

How to Change Bitmoji Gender Male to Female

Here’s how to change Bitmoji Gender from male to female on Android devices. When creating a Bitmoji on Snapchat Android or iPhone, you must select a male or female style avatar. You can change the gender of your Bitmoji from male to female or female to male after you reset the avatar or delete your Avatar on Snapchat on your Android or iPhone devices. Also, change the Bitmoji style to Bitstrips, Bitmoji deluxe, or Bitmoji classic. Annoying to accidentally set a male avatar instead of a female on a Snapchat Android phone?

Read More: How to Change Snapchat Username on Android

How to Change your Bitmoji Gender Android Phone

Let’s see how to change the Bitmoji avatar from female to male on Android devices. Download and install the Bitmoji app from the play store on your Android devices. First, you need to reset your avatar in Android to change the Bitmoji gender on Snapchat Android.

How to Change Bitmoji Gender Male to Female using Snapchat App

Make sure to Bitmoji linked to your Snapchat account.

Step 1: Open the Snapchat app on your device.

Step 2: Tap the Profile picture at the top left corner.

Step 3: Tap on your Profile icon.

How to Change Snapchat Avatar

Step 4: Tap Edit avatar.

How to Change Bitmoji Gender Male to Female using Snapchat App

Step 5: Tap on the Person icon at the bottom right corner.

How to Change your Bitmoji Gender Android phone

Step 6: Scroll down and select the Male or Female Bitmoji you want to set.

Save Avatar on Snapchat App Android

Step 7: Customize your avatar and tap Save at the top right corner.

How to Delete Bitmoji – Unlink My Bitmoji 

Step 1: Open the Snapchat app.

Step 2: Tap the Profile icon at the top left.

Step 3: Tap the Settings gear icon at the top right corner.

Tap on Bitmoji on Snapchat App Android Device

Step 4: Tap Bitmoji.

How to delete your avatar on Snapchat

Step 5: Tap Unlink my Bitmoji.

This pop-up view: Remove Bitmoji?

How to Delete Bitmoji

Step 6: Tap Remove.

It will permanently delete your avatar on Snapchat and all saved fashion items in your Closet.

Read More: How to Unblock Someone on Snapchat Android Phone

How to Reset Bitmoji Avatar on Android using Bitmoji App

Step 1: Open the Bitmoji app on your Android phone.

Step 2: Sign in with your Snapchat account or your email id.

How to Reset Bitmoji Avatar on Android Phone

Step 3: Tap the Settings gear icon at the top right corner.

Tap My Data on Bitmoji App


Step 4: Tap My data.

Reset Bitmoji avatar in Snapchat android devices

Step 5: Tap on Reset Avatar.

You can see a pop-up message: Are you sure?

Reset avatar in android phones

Step 6: Tap OK.


Now, delete Bitmoji avatar in your device and see the below-given screen.

How to change Bitmoji style male to female

Step 7: Select Male or female Bit moji if you want to create a new one.

Step 8: Customize or match Bitmoji outfits and tap Save at the top right corner.

You can also change avatar style on Android phone or tablet devices if you want to change Bitmoji to Bitstrips, Bitmoji deluxe, and Bitmoji classic.

How to Change Avatar Style on Android Phone (Older Bitmoji Version)

Step 1: Open the Bitmoji app on your android phone.

Step 2: Log in with your Snapchat account or email.

Step 3: Tap Three vertical dots at the upper right corner.

Step 4: Select settings.

Step 5: Tap Change Avatar style.

Here you can see Bitmoji deluxe, Bitstrips, or Bitmoji classic options.

Step 6: Choose any one and tap “Use this style

We hope this clarifies how to change Bitmoji style male to female in Android devices. If you have any questions, let us know in below comment box. Stay and connect with us for the latest Snapchat updates.

Related:

How to fix Google play store error 403

Facing error 403 in Google play store while downloading apps from the play store? This is a common play store error and you can easily fix Google play store error 403 using the below methods. When an error occurs, see this message “can’t download app” due to error 403. A various play store user facing this error code 403 issues in android phone. Other Google play store errors related to this are error 492, error 920, error 923, error 927, error 504, error 103, error 194 and more.

To solve error 403 in the play store, you should try to clear the cache of the play store, uninstall update of play store, force stop play store and remove your Google account in your android phone or tablet device. In this tutorial, you can see step by step detail solutions to fix Google play store error 403 code in an android device.

Related Tricks:

Fix Play store error code 500

How to fix package file is an invalid error in Google play store 

How to fix error 101 in the Google Play Store

5 different methods to fix Google play store error 403 in android phone

fix Google play store error 403

Try below given possible solutions to fix error 403 in the Google Play store. I hope one of the below methods fix the play store issue in your android device.

1st Method: Clear cache of Play Store

Step 1: Go to “Settings

Step 2: Under the device section, tap “Apps

Step 3: Tap “Google play store

Step 4: Touch “Storage

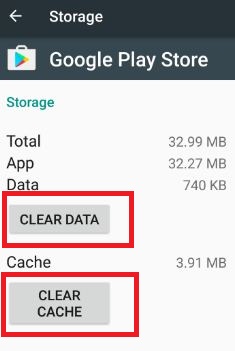
Clear cache of Google play store to fix error 403

Step 5: Tap “Clear cache

How to clear the cache of Google play services in android:

Settings > Device > Apps > Google Play Services > Storage > Clear cache

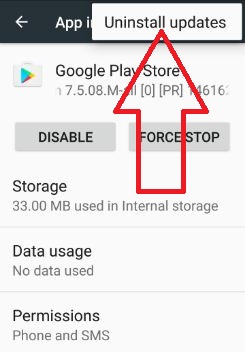
2nd Method: Uninstall updates of Google play store to fix Google play store error 403

Step 1: Go to “Settings

Step 2: Under the device section, Tap “Apps

Step 3: Scroll down until see “Google Play Store” and open it

Step 4: Tap “More

Uninstall Google play store updates to fix 403 error code

Step 5: Touch “Uninstall updates

Step 6: Touch “OK

Reboot your device and again try to download apps from the play store.

3rd Way: Force stop Google Play store

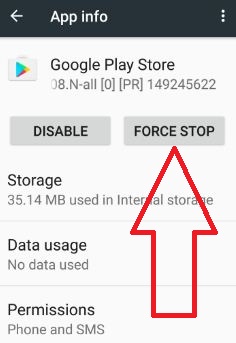
Force stop Google Play Store to fix error 403

Settings > Device > Apps > Google Play store > Force stop

4th Way: Delete your Google account to fix 403 error code

Step 1: Go to “Settings

Step 2: Under the Personal section, tap “Accounts

Step 3: Tap “Google

Step 4: Tap “More

Remove your Google account to fix error code 403

Step 5: Touch “Remove account

Step 6: Tap again “Remove account

After removing your Google account, restart your android device and log in again and try downloading an app from the play store.

5th Method: Check device memory is not full

If your device’s internal storage is full, you can’t download apps from the play store. Removes unnecessary files from your device to free space and try downloading an app from the play store.

I hope this article helps you to fix Google play store error 403 in android device. Let me know if you have known other tricks to solve error code 403 and other common Google play store errors. Feel free to share these tips with your friends.

How to Enable or Disable Secure Folder On Samsung Galaxy A50, A70, A30, A20

Here’s how to use a secure folder on Samsung Galaxy devices including A50, A70, A30, A20, and more. First of all, set up a secure folder on your device. You can use Samsung secure folder to lock and hide apps from the app drawer without using third-party apps. It will use to keep your personal files and apps safe and secure. Also, move your private pictures and other sensitive files to the safety of a secure folder.

Make sure your phone connects to a Wi-Fi network or turn on mobile data to access a secure folder on Samsung Galaxy A50. You can unlock the secure folder in Samsung A50 using Fingerprint. Also need to set a PIN, Password, or Pattern as your screen lock. Follow the below-given step by step process to enable and use a secure folder on Samsung Galaxy A50.

Read Also:

How to Use a Secure Folder on Samsung Galaxy A50

Let see step by step process to enable and set up a secure folder using your Samsung account or Google account.

Set up Samsung secure folder.

Step 1: Swipe up from the bottom of the screen to open the App drawer.

Step 2: Tap Biometrics and security.

Use Secure Folder On Samsung Galaxy A50

Step 3: Tap Secure folder.

Step 4: Sign in to your Samsung Account or Continue with Google account.

After sign in with your account, make sure to turn on mobile data or Wi-Fi in your devices to use a secure folder on galaxy A50. Also, set up a PIN or Pattern lock to unlock your Samsung secure folder. It will protect your data and make secure copies of your apps.

How to lock a secure folder on Galaxy A50

Step 1: Open the Secure folder on your Samsung A50.

Step 2: Tap Three vertical dots (More) at the top right corner.

Step 3: Tap Lock.

Now secure folder locked in your phone.

Step 4: To unlock the secure folder in Samsung, you need to enter PIN or Password or other lock screen security.

Customize a secure folder on Galaxy A50.

You can change the folder name and folder app icon on your galaxy A50 using below given settings.

Step 1: Open the Secure folder on your device.

Step 2: Tap Three vertical dots at the upper right corner.

Step 3: Tap Customize.

Step 4: Enter the app name and select an app icon from the list.

Step 5: Tap Apply.

Change secure folder lock type on Samsung Galaxy A50.

Step 1: Open the Secure folder on your device.

Step 2: Tap Three vertical dots at the upper right corner.

Step 3: Tap Settings.

Step 4: Tap Lock type under lock and security section.

Step 5: Select lock type from Pattern, PIN, or Password or Fingerprints & Dedicated fingerprint.

If you forget how to unlock a secure folder, you can reset your lock using your Samsung account. You can hide patterns on a secure folder, check notifications & data, show or hide a secure folder on galaxy A50. Also, set auto-lock to lock automatically when the screen turns off.

Add files or Add apps to secure folder on Galaxy A50 and A70

Step 1: Open the app drawer and tap the Secure folder.

Here you can see + add apps and Add file options.

Step 2: Tap + add apps.

Step 3: Select apps from list and tap Add at the bottom right corner

If you choose to add files, you can add images, videos, audio, documents and other files from your phone’s gallery.

In general secure folder settings, you can auto-sync secure folder data, backup & reset secure folder data, also choose which apps to show as full screen, use Samsung pass, Autofill service, Data usage, etc. Now enable secure folder on Samsung Galaxy A50, A70, etc.

Uninstall secure folder on Samsung Galaxy A50  

You can move your media files out of a secure folder before uninstalling it. Don’t turn off your phone while the secure folder is being uninstalled.

Step 1: Open the Secure folder on your device.

Step 2: Tap Three vertical dots (More) at the upper right corner.

Step 3: Tap Settings.

Step 4: Tap More settings under the general section.

Step 5: Tap Uninstall.

This message appears: Uninstall Secure Folder?

Step 6: Tap Uninstall.

And that’s all. We hope the above-given tutorial useful to set up and use a secure folder on Samsung Galaxy A50 And Galaxy A70. Don’t forget to share with others if you found it useful. Stay and connect with us for the latest updates.

Fix Google Play Store Error 500: How to

Annoying of Google Play Store app download issue? While downloading apps from the Google Play Store, see the error message “App Name that could not be downloaded due to an error. (500) You could not download any apps because of error 500 in the Google Play Store. This tutorial explains a possible solution to fix Google Play Store error 500 code and other common errors such as error 403, error 504, error 905, error 124, error 110, etc.

Sometimes this Google Play Store error 500 occurs while using mobile data networks on Android phones. To fix error 500 in Google Play Store, clear the cache & data of the play store, uninstall updates, or remove your Google account and again log in to your account. Follow the below-given step-by-step solutions to fix error code 500 on Google Play Store on Android and Samsung Galaxy devices.

Read More: How to Fix 0x80070005 Error Code in Windows 11, Windows 10

How to Fix Google Play Store Error 500 on Android Phone

Fix Google Play Store error 500

Try below given various tricks to fix error code 500 in the Play Store on your Android phone or tablet device.

1st Way: Clear Cache & Clear Data of Google Play Store and Google Play Services

Step 1: Go to Settings.

Step 2: Scroll down and tap on Apps.

Step 3: Scroll down until you view Google Play Store and tap on it.

Storage and cache settings on your Google Play Store

Step 4: Touch Storage & cache.

Clear Cache & Clear Data of Google Play Store to Fix Google Play Store Error 500


Step 5: Tap Clear cache.

Samsung Galaxy: Settings > Apps > Google Play Store > Storate > Clear cache.

Clear the Cache of Google Play Services for Android

Clear Google Play Services Cache to Fix Google Play Store Error Code 500

Settings > Apps > Google Play Services > Storage & cache > Clear cache.

Samsung Galaxy: Settings > Apps > Google Play Services > Storate > Clear cache.

2nd Way: Uninstall Google Play Store Updates

It will reset your app settings to the factory default version.

Step 1: Go to Settings.

Step 2: Tap Apps.

Step 3: Scroll down until you see Google Play Store & tap on it.

Step 4: Touch Three vertical dots at the top right corner.

Uninstall Google Play Store Updates to Fix Error Code 500


Step 5: Tap Uninstall updates.

Step 6: Tap OK.

Now try to download apps from the Google play store.

3rd Way: Remove your Google Account to Fix Google Play Store Error 500

Step 1: Go to Settings.

Step 2: Tap Accounts or Passwords & Accounts.

You can see a list of created accounts.

Step 3: Tap on your Google account or Gmail account.

Remove your Google Account to fix Error Code 500 on Play Store

Step 4: Tap Remove account.


Step 5: Tap Remove account.

After removing your Google account from the Android device, restart your phone and log in again Google account and try to download an app from the Google play store.

4th Way: Force Stop Google Play Store

Force Stop App to Fix Error 500 in Play Store


Settings > Apps > Google Play store > Force stop > OK.

If none of the above methods worked for you to fix Google play store error 500 code, try the below-given method.

5th Way: Reset App Preference on Android

Step 1: Go to Settings.

Step 2: Scroll down and tap System.

Step 3: Scroll down at the end and tap Reset options.


Step 4: Tap Reset app preferences.

Reset app preferences to fix Google Play Store Error 500

Step 5: Tap Reset apps.

If none of the solutions work for you, you can try to factory reset your Android device using the below settings. It will reset all app preferences but not lose any app data from your Android phone. Back up data before factory resetting your device.

How to Factory Reset Your Android

Factory Reset your Android phone to Fix Error Code 500 on Google Play Store


Settings > System > Reset options > Erase all data (Factory reset) > Erase all data > Unlock your phone > Erase all data.

End the list of solutions to fix Google Play Store error 500. Don’t forget to share it with others if you find it helpful. Stay connected with us for daily latest Android tips.

Related:

How to Use Samsung A50 Smart Lock

This tutorial explains your steps to enable and use Samsung A50 smart lock. By default turned off smart lock on Samsung Galaxy A50, A70, and other devices. This Samsung smart lock feature includes On-body detection, Trusted places, Trusted devices and Voice match. You can use smart lock on Samsung A50 to keep your phone unlocked when it’s in a trusted location or detects a trusted device nearby.

If you don’t want to use PIN, Password or PIN or other Biometrics security, you’ll use Google smart lock to unlock your phone automatically. Several users facing Smart lock on Android not working. Follow below given complete process to enable and use Samsung A50 smart lock.

Don’t Miss This:

How to use lockdown mode in Galaxy S10

How to use the trusted face on Pixel 2 and 2 XL

How to fix trusted face not working on Android

How to enable and use Samsung A50 Smart Lock  

You can enable smart lock on galaxy A50 using below given lock screen settings.

Step 1: Swipe up from the bottom of the screen to open the app drawer

Step 2: Tap Lock screen

Enable smart lock on galaxy A50

Step 3: Tap Smart Lock

enable and use Samsung A50 Smart Lock

You can see 4 Google smart lock (Show above screenshot) options are available in your Samsung Galaxy A50, A70, etc. Turned off the smart lock by default in your device.

ON-body detection

Use Smart lock on body detection galaxy A50

You can use Smart lock on body detection to keep your device unlocked while it’s on you. On-body detection can’t distinguish between you and someone else. If someone takes your device while it’s unlocked, they might be able to access it.

Trusted places

You need to add your location where the device should be unlocked. Enable trusted places a smart lock on A50 to use it.

Trusted devices

Google smart lock use

Add a Bluetooth device to keep your phone unlocked when connected. You can add your Bluetooth watch, your car’s Bluetooth, Wear watch, Mi Band, etc. It supports a range of up to 10 meters to connect other devices. Add your device to keep this one unlocked when it’s nearby.

Voice Match     

How to use Samsung A50 Smart Lock

Access your voice assistant any time that you say “OK Google” when your screen is on. Make sure to set up a voice match on your Samsung galaxy devices. It also works in Google Maps and other driving apps. Enable access with voice match to use Google Assistant on your devices.

And that’s all. We hope this makes it clear how to enable and use Samsung A50 Smart Lock. Do you still have any questions regarding this article? Stay and connect with us for the latest updates.