How to Wipe Cache Partition on Samsung Galaxy A50

This article explains you to how to wipe cache partition on Samsung Galaxy A50 or Galaxy A70. This clear cache partition or Wipe the cache data removes temporary files, logs and other apps on your phone. Wiping the cache data will not delete apps or other phone data from your devices. You need to enter Galaxy A50 into recovery mode to wipe the cache partition.

A cache is stored in your app & other data temporary on your Samsung or Android devices. If your device has specific app-related issues, you can clear the cache on Samsung A50. Follow the below-given step by step process to wipe cache partition on Samsung Galaxy A50.

Read Also:  

How to fix Wi-Fi not working on Galaxy A50

How to wipe cache partition on Google Pixel

How to clear app cache on Galaxy S10 Plus

How to Wipe Cache Partition On Samsung Galaxy A50 & A70

Make sure to turn off your device clear or wipe cache partition on Galaxy A50, A70, and other devices.

Step 1: Power off your Samsung Galaxy A50 if powered on

Step 2: Long press the power button and volume up button at the same time until waking up screen or Samsung logo appears

Step 3: Tap on the screen when “No command message” display with Robot exclamation mark symbol

You can see the Android recovery screen (Below given screenshot). Use the power button to apply and volume up or down button to select an option.

How to Wipe Cache Partition on Samsung Galaxy A50

Step 4: Press volume down button until select Wipe cache partition

Step 5: Press the Power button

By default select “No.

Step 6: Press volume down button

Step 7: Tap Power button

Now, wait until complete wiping the cache partition on Galaxy A50 and Galaxy A70.

How do I clear app cache on Samsung A50

You can clear the app cache that freezing or crashing on your Samsung A50 using the below settings.

Step 1: Swipe down notification center and tap Settings gear icon

Step 2: Scroll down and Tap Apps

Step 3: Select app from a list

Step 4: Tap Storage under usage section

Step 5: Tap Clear cache

It will temporarily remove your phone file, app data, etc.

And that’s all. We hope this makes it clear how to Wipe Cache Partition On Samsung Galaxy A50 And Galaxy A70. Do you still have any questions? Tell us in below comment box.

How to show hidden files and folder in Windows 7

Do you want to hide files and folders in Windows 7 PC or tablet, Windows 8, Vista and XP? This article explains how to show hidden files and folder in Windows 7. You can hide all important data or documents on your Windows 7 PC to protect from other users. There are several different reasons to hide files and folders on your Windows PC or desktop.

Also, hide display file icon, hide empty drives in a computer folder, hide file types extensions and display file size information in folder tips. Follow below given two ways to show hidden files and folder in Windows 7 PC / computer.

Check Also:

How to turn on WiFi in Windows 10

How to enable or disable USB ports Windows 7

How to turn off auto-update in Windows 7

How to show hidden files and folder in Windows 7 PC / Desktop

Check out below given two different methods to show hidden files and folder in Windows 7 laptop or PC.

1st Way: Show or hide important files and folders

Step 1: Tap on “Start menu” button

Step 2: Tap on “Control panel”

Step 3: Tap on “Appearance and Personalization”

Tap on folder options to hidden files and folders

Step 4: Tap on “Folder Options” 

Tap on view to change settings

Step 5: Tap on the “View”

By default, select don’t show hidden files, folders and drives on your Windows 7 PC / computer

Step 6: Choose the “Show hidden files, folders and drives” option

How to show hidden files and folder in Windows 7

Step 7: Click on “Apply” button

Now you can show hidden files and folder in Windows 7 PC /Desktop

2nd Way: Show hidden files and folder in Windows 7 PC

Step 1: Tap on the “Windows Start button”

Step 2: Go to the “Computer”

Tap on Organize

Step 3: Tap on “Organize” in the top left side corner

show hidden files and folder in Windows 7 PC

Step 4: Select “folder and Search Option”

Step 5: Tap on “View tab” 

By default, don’t show hidden files, folders and drives on your Windows 7 PC selected

Step 6: Tap on Show hidden files and folders in Windows 7

Step 7: Tap on the “Apply” button

Now open any computer drive where you hide files or folders, you can see all hidden files and folders without changing the settings.

Above you can see the steps to show hidden files and folder in Windows 7 Desktop. Did you find the above process helpful? Don’t hesitate to let me know in the comment box. It would be a pleasure to help you and connect with us for daily technology updates!

How to change font settings in windows 7

Change default Windows 7 font settings? It’s easy to change font settings in Windows 7 including font size, windows font style and adjust ClearType text for LCDs such as Pocket PC screens, laptop screens, and flat-panel monitors. This ClearType font looks almost as sharp and clear on your Windows computer screen.

In Windows font settings of your device, you can see only that fonts that will work with your language settings, show or hide fonts manually, install font files using shortcuts and if not change any of these options then restore default font settings on your Window 7 PC. Follow below given complete guide steps to change font settings in Windows 7 / Windows PC.

You might like this:

How to change screen resolution in Windows 10

How to increase or decrease font size in Windows 10

How to turn off auto-update in Windows 7

How to change font settings in Windows 7 or Windows PC

Step 1: Tap and click on the “Start” menu

Step 2: Tap on “Control Panel”

Tap on Appearance and Personalization category

Step 3: Tap on “Appearance and Personalization” category

Tap on fonts in Windows 7

Step 4: Tap on “Fonts”

How to change font settings in windows 7

Step 5: Tap on “Font settings” in top of the left sidebar

You can see the option to show and hide fonts in windows 7 based on language settings and allow fonts to be installed using a shortcut. To save space on your computer, you can choose to install a short cut to a font file instead of the file itself. Choose which fonts appear in your programs and how you want fonts to be installed on your Windows computer. If the font file becomes unavailable, you might not be able to use the font.

change font settings in windows 7

Step 6: After change font settings in Windows 7 PC, tap on “OK”. That’s all.

Read Also: How to turn on dark mode in Windows 10

Above you can see the simple process of change font settings in Windows 7 / Windows PC. Did you find the above process helpful?  Please let us know on the below comment box and connect with us for daily latest updates!

How to Fix Dropped Call on Android and Samsung

Irritated by the phone keeps dropping calls on your Android devices? The main reason behind dropped calls on Android and Samsung is poor or weak network signal on your carriers, such as AT&T, Verizon, T-mobile, Sprint, etc. If you’re facing call drop problems sometimes, it may be faulted SIM card issue. If the sound from your Android phone is distorted, check the strength of your mobile data connection. If you don’t have a strong signal, find a nearby area with a good network signal. Also, go to your carrier website to check if there is a carrier-related issue. It would be best if you avoided multitasking during phone calls or switching between apps during a call can cause dropping call problems. Here’s how to stop Android phones from dropping calls.

Read More: Why is my Phone Saying No SIM Card Error on Android?

Why Does My Phone Keep Dropping Calls on Android and Samsung?

Try below given various tricks to fix Android dropping calls issues during a phone call.

Restart your Phone

Restart your Android device to fix dropped calls

Long-press the power button and tap Restart in the power menu to reboot your phone.

Samsung Galaxy: Long-press the power button > Restart > Restart.

Read More: How to Restart the Samsung Galaxy

Turn Airplane Mode On & Off

Turn Airplane Mode On & Off to fix Android phone dropping calls

Swipe down the notification panel at the top and tap on Airplane mode to turn it on. Wait for 5-10 seconds and turn it off. Now, try to make phone calls on your Android device to check dropped calls.

Check Network Signal to fix Android Phone Dropping Call

How to Stop Android Phone from Dropping Calls

Check your network signal strength at the status bar. If there is a poor network signal, you can’t hear calls, or drop call issues occur.

Uninstall Phone App Update

Uninstall updates to fix phones keeps cutting out during calls

This will replace this app with the factory version. All data will be deleted from your device. Go to Settings > Apps > See all apps > Phone > Three vertical dots > Uninstall updates > OK. Now, restart your phone and check to fix the problem. If you are still facing the issue, update the app to go App drawer > Play store > Profile icon at the top right > Manage apps and device > See details > Update all.

Check Software Update

Check for system update to fix call dropping problem Android

If you face this issue after updating your system, you’ll wait until the next monthly security update on your Android devices. Go to Settings > System > System update > Check for update.

Samsung Galaxy: Settings > Software update > Download and install.

Remove the SIM Card & Re-insert it to Fix Dropped Call on Android

If you frequently face this Android call dropping problem, check if the SIM card is faulted. Remove the SIM card from your phone and restart your Android device. After rebooting your phone, re-insert the SIM card and check to fix the problem. Also, take your SIM card to another phone and call to check the issue.

Enable Safe Mode to Check Third-Party Apps Causing the Problem

Safe mode helps check if any downloaded app is causing the issue on your Android device. Click here to enable safe mode on your Android phones and tablets.

Now, hide or disable all third-party apps from your device. But if your phone works without any trouble in safe mode, any downloaded app causes this call-dropping issue. Exit safe mode to restart your Android device and delete one-by-one recently installed apps until finding the app causing the problem. After deleting the app, re-install other apps from the play store. If you still face issues in safe mode, it means hardware or OS-related problems.

Read More: How to Activate Safe Mode on Samsung Galaxy

Enable Wi-Fi Calling on your Android

How Do I Stop my Phone from Dropping Calls

If you want urgently make a call, you can use the WiFi calling feature to make a call over your Wi-Fi network. Instead of a phone call using your carrier, you can use your Wi-Fi connection to make a call. Go to Settings > Network and internet > Tap on your Carrier > Wi-Fi calling > Toggle on Use Wi-Fi calling.

Samsung Galaxy: Open the Phone app > Three vertical dots at the top right corner > Settings > Toggle on WiFi Calling.

Reset Network Settings

Reset network settings to fix Android phone dropping call issues


Go to Settings > System > Reset options > Reset Wi-Fi, mobile, and Bluetooth > Reset settings. This will reset all your network settings, including mobile data, Wi-Fi, and Bluetooth connections. Restart your phone and check the fixed call dropping issue.

Samsung Phone: Settings > General management > Reset > Reset network settings > Reset settings > Unlock your Samsung phone > Reset.

Contact your Carrier

If none of the above-given solutions worked for you, contact your carrier service provider to fix the problem.

That’s all. End the list of possible solutions to fix dropping calls on Android phones and tablets. Do you know any alternative methods? Please share with us in below comment box.

Related:

Frequently Asked Questions:

How do I Fix Call Ends Immediately after Dialing Android?

If your phone call ends immediately after dialing on your Android or Samsung phone, check the network signal strength at the status bar, which can cause drop calls or call-ending problems. You can check your phone call settings and ensure the call is not blocked by any apps. Try to turn off VoLTE on your phone by going to Settings > Network & internet > SIMs > Toggle off VoLTE. If you’re a Samsung phone, go to Settings > Connections > Mobile networks > Toggle off VoLTE Calls.

How do I Fix Verizon Dropped Calls?

If your Verizon calls are dropping, check your phone’s cellular signal. Restarting your Android device sometimes fixes the network or minor software problems. Also, try to enable or disable WiFi calling if it works. Reset the network settings to fix network-related issues. If you still have to face the call dropping problem, contact your Verizon customer care.

Why does my Phone Hang Up after 8 hours or itself?

Several reasons for your Android phone immediately hangs up at the start of a call include a weak or poor cellular signal during a phone call, a proximity sensor problem, or a software glitch. Also, suddenly stop or hang your Android phone if it overheats due to multiple activities simultaneously. You can check if a hardware issue like a phone speaker or microphone problem. If none of these methods work, please get in touch with your service provider or phone manufacturer.

Why is my Samsung Phone Dropping Calls?

Poor network signal is the main reason behind dropping calls on your Samsung Galaxy devices. If a Samsung device calls dropping sometimes, check your SIM card. Insert your SIM card into another phone and check to fix the issue. If none of the solutions worked for you, you could use the WiFi calling feature on your Samsung device to make calls over Wi-Fi.

Why does my Phone Cut Off?

If your phone faces a cut-off issue when a phone calls, you need to check if the low battery or warm phone automatically shuts down or cuts off. If you’re still facing the problem, check for hardware issues, such as a faulty battery or damaged charging port which may cut off your Android phone. Also, check the latest software updates installed on your phone to fix bugs.

How to Stop WhatsApp from Automatically Downloading Pictures and Videos on Android

Do you want to stop WhatsApp media from auto-downloading in Gallery to save storage on your Android phones and tablets? Here’s how to stop WhatsApp from automatically downloading pictures and videos on Android and Samsung Galaxy. It automatically downloads WhatsApp media files, including photos, videos, audio, and documents on your Android phone’s internal storage or SD card. You can change media settings on WhatsApp Android using storage and data settings. Also, individually change or turn off auto-download on WhatsApp PC or Android when using mobile data, Wi-Fi, or roaming.

How to Change Auto-Download in WhatsApp Media on Android

Step 1: Open WhatsApp on your Android device.

Tap on three horizontal dots in WhatsApp

Step 2: Tap on Three vertical dots at the top right corner.

Select Setting on WhatsApp menu settings

Step 3: Click on Settings.

Open storage and data settings on WhatsApp Android


Step 4: Tap on Storage and data.

change media settings WhatsApp android lollipop

Step 5: Scroll down until the Media auto-download section.

How to change media settings WhatsApp android

You can set or change individually WhatsApp media settings on Android devices. Now change WhatsApp media auto-download files (Photos, Audio, Videos, Documents) when using mobile data, connected on Wi-Fi, and roaming. Four options are available for WhatsApp media auto-downloading.

How to Stop WhatsApp From Auto Downloading Photos and Videos on Android

Step 6: Tap on When using mobile data. Check the box to automatically download WhatsApp photos, videos, audio, and documents you want to download when using mobile data and press OK.

How to Stop WhatsApp from Automatically Downloading Pictures and Videos on Android


Step 7:  Tap on When connected on Wi-Fi. Check the box to auto-downloading WhatsApp videos, photos, audio, and documents you want to download when using Wi-Fi and press OK.

How to Change Auto-Download in WhatsApp Media on Android


Step 8: Tap on When roaming. Check the box to auto-downloading WhatsApp images, audio, videos, and documents you want to download when roaming and press OK.

Click here to see all downloaded WhatsApp statuses, videos, profile photos, documents, and audio on your Android phone without any app. 

How Do I Stop WhatsApp From Saving Media Samsung Galaxy?

By default, automatically download WhatsApp photos, videos, and other media files on your Samsung One UI devices. You can stop automatic downloads of WhatsApp media on Samsung using below given settings.

WhatsApp > More > Settings > Storage & data > Media auto download > Uncheck the box (Photos, Audio, Videos, Documents) you don’t want to automatically download

Suppose you’re having problems implementing the above process to change media settings WhatsApp Android device. Did you find the above process helpful? Don’t hesitate to let me know in the below comment box. Stay and connect with us for the daily latest WhatsApp updates!

How to Change the Font Size on Windows 11/10/7 Desktop

Do you want to change font settings on Windows 11/10/7 PC? In this tutorial, I’ll show you steps to change the font size on Windows 11/10/7 desktop or laptop. You can change the size of default text, change display settings, adjust resolution & clear type text, and set custom text size on your Windows 11, Windows 10, or Windows 7 device.

It’s easy to change the Windows 7 font size. If you’ve Windows 7 PC, you can change the text size and other texts on your screen by choosing a Smaller, Medium, or Larger font size. Also, increase or decrease font size in Windows PC to change the DPI settings scale from the drop-down box of DPI scale percentage.

Read More: How to Reset All Audio Settings on Windows 11

How to Change Windows 11 Font Size (Text Size) and Display Size

Check out below given two methods to change Windows 11 font size on a PC or Laptop.

How to Change the Font Size on Windows 11 PC

Step 1: Go to Settings on your Windows 11.

change-font-size-on-windows-11-using-accessibility-settings

Step 2: Tap on Accessibility.

change-the-text-tize-in-windows-11

Step 3: Tap the Text size tab in the Vision section.

how-to-change-the-font-size-on-windows-11-10-7-desktop

Step 4: Move the slider to the right side to increase the font size and tap on Apply button.

Alternative Way: Settings > System > Display > Scale (Change the size of text, apps, and more) > Text size > Adjust text size > Apply.

How to Change the Font Size on Windows 10

Step 1: Go to Settings.

Step 2: Tap on Ease of Access.

Step 3: Tap Display in the Vision section.

Step 4: Adjust the Windows 10 font size to move the slider to the right side and tap Apply button.

Read Also: How to Customize Taskbar in Windows 11

How to Set or Change Font Size on Windows 7 Desktop or Laptop

Step 1: Tap the Start button on your Windows 7 PC/Laptop.

Step 2: Tap on Control Panel.

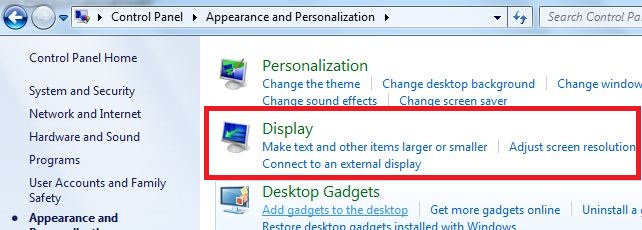
Tap on Appearance and Personalization

Step 3: Tap on Appearance and Personalization.

Tap on fonts in Windows 7 desktop

Step 4: Tap on Fonts.

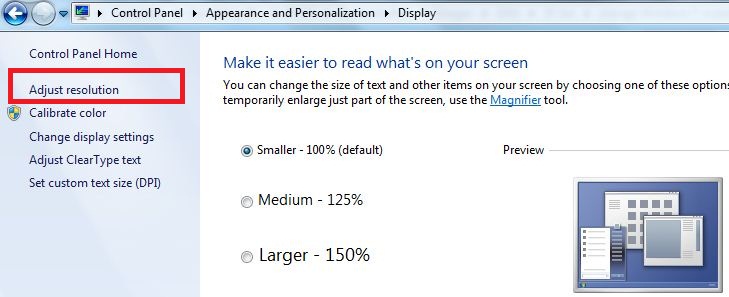
change font size in windows 7

Step 5: Tap on Change Font size in the left sidebar.

Step 6: Choose from Smaller/Medium/Larger to change the font size on Windows 7 desktop/Laptop.

How to change font size in windows 7 desktop

Step 7: Press the Apply button.

Set DPI scale settings on Windows 7

You can also change or set custom text size (DPI) to select a percentage from a drop-down list. It changes all Windows PC text sizes and icons.

How to Increase or Decrease the Font Size on Windows 7 PC/Laptop

Tap on personalize

Step 1: Right-click on your desktop & tap on Personalize.

Tap on dispaly

Step 2: Tap on Display.

Step 3: Set the font size by choosing Smaller/Medium/Larger.

FAQs:

How do I Change the Screen Refresh Rate on Windows 11?

To change the refresh rate on your Windows 11 PC, go to Settings > System > Display > Scale > Advanced display > Tap on “Choose a refresh rate” > Choose from 60 Hz (Interlaced)/60 Hz/59.94 Hz (Interlaced)/59.94/50 Hz (Interlaced)/50 Hz.

How do I Change Font Style and Text Size on Windows 10 PC?

By default, set Windows 10 font style and size using the below settings. You can change font style by going to Windows Settings > Personalization > Fonts > Select font style from the list.

Did you find the above process to change the font size in Windows helpful? If you’re having problems implementing the above-given steps, please let me know in the comment box below. It would be a pleasure to help you.

Read Also: