How to customize lock screen shortcut android O

Change or customize lock screen shortcut android O. By default set camera icon on right side corner and Google Assistant on left side icon in your Google pixel & pixel XL devices. You can change lock screen shortcut using System UI tuner menu in your android O devices. This system UI tuner includes status bar, do not disturb (DND), Navigation bar and lock screen options.

You can change left shortcut & right shortcut icon of lock screen from list of options given such as Wi-Fi, Google chrome, battery, messages, play store, my apps, contacts, Email and more. Select app shortcuts you want to use on the lock screen. Below you can see complete process to customize lock screen shortcut android O (Android 8.0) devices.

Don’t miss this:

Enable picture-in-picture mode android O

How to set background limits on apps android O

Step by step guide to customize lock screen shortcut android O / Android 8.0

How to customize lock screen shortcut android O


To change lock screen shortcuts on android O, first of all find hidden system UI tuner in your android 8.0 devices. To enable system UI tuner on android O, scroll down notification panel and touch & hold settings gear icon few seconds.

Hidden system UI tuner on android O OS

You can see this message on screen: Congrats! System UI tuner has been added to settings. Now follow below given steps to customize lock screen shortcut android O / android 8.0.

Step 1: Go to “Settings” in your Google pixel & pixel XL

You can see various sections under phone settings.

Step 2: Tap on “System UI tuner” under system section

Step 3: Tap “lock screen

You can see left shortcut and right shortcut options.

Step 4: Tap “Left shortcut

List of available options show on your screen, choose from it and set as left shortcut.

Step 5: Tap “Right shortcut

List of available options show on your screen, choose from it and set as right shortcut.

You can also unlock both left shortcut and right shortcut using this lock screen settings. Now you can use this app shortcut directly from lock screen without unlock your android devices. It’s quite simple to change lock screen app android O supported devices such as Google pixel, pixel XL, Nexus 6P, Nexus 6 and more.

You might like this:

Customize lock screen shortcuts android marshmallow (Android 6.0) and lollipop (Android 5.1.1):

Customize lock screen shortcuts android marshmallow & lollipop

Settings > Lock screen & security > Info and app shortcuts > App shortcuts > Left shortcut / Right shortcut

Remove lock screen shortcuts android phone:

Remove lock screen shortcuts android phone

Settings > Lock screen & security > Info and app shortcuts > App shortcuts > Left shortcut / Right shortcut > Enable / Disable

That’s all. I hope this little tips helps to customize lock screen shortcut android O devices. If you have any regarding this trick, let us know in below comment box. Feel free to share this android O trick with your friends.

Background limits on apps android O

Android O has various amazing features such as picture-in-picture mode, background limits, notifications channels, API changes, Adaptive icons and more. But in this tutorial, I will show you how to works background limits on apps android O devices. This feature will improve your android O battery life to limit its use of background processes of individually apps.

While more than one app running in background, it will consume more battery and slow down your android device system. Due to this issue, android O devices add limitations on those apps which user are not use and background process running. This android O will limit background app activity in two ways. Let see how to work Background limits on apps android O / Android 8.0.

Related Android O tips:

How to enable picture-in-picture mode on android Oreo

How to enable background limits on apps android O / Android 8.0

You can limit background apps and services in android O using this feature. Set how long a background service can run in your android Oreo devices. It will help you to save battery life in your android O devices.

In background service limitations, set limits to the apps for use background services. Sometimes you running background app can replace background service with others. You can use settings screen to enable background process limit in android O devices.

In broadcast limitations app is registers to broadcast so whenever broadcast sent, it will consume batter every time. So if more than one app registers, it can cause issue. So use battery optimizations to extend battery on android O.

Using this android O background limitation on apps, set limit to what an app can do while it’s in the background. So increase battery life in your android O (Android 8.0) devices. That’s all about use background limits on apps android O.

Let see how to set background process limit on Google pixel & pixel XL phone.

To limit background process on Google pixel & pixel XL phone, first of all enable developer mode in your Google pixel devices using below settings.

Step 1: Go to “Settings” on your Google pixel and pixel XL phone

You can view various sections in phone settings menu.

Step 2: Under system section, tap on “About phone

Step 3: Scroll down until end of the page and tap on “Build number” 7 times

Now you can see message on your Google pixel device: You are now a developer!

Now Go to settings > System > Developer options

Background process limit Google pixel phone

Step 4: Scroll down until apps section & tap “Background process limit

By default set standard limit in your device. You can see below screen on your android devices.

set background process limit on Google pixel phone

Step 5: Choose from above given options

That’s all. Do let us know you liked this tutorial to use background limits on apps android O. Let us know your feedback about android O this feature. We are waiting for your valuable feedback in below comment section.

How to enable picture in picture mode Android O

Google has recently released android O developer preview during Google I/O. Android 8.0 Oreo is the next version of android devices. This android 8.0 has great features such as picture-in-picture mode, multi display support, background limits, keyboard navigation, notifications channels, API changes, Autofill, system optimizations, better icons and more. In this tutorial, I will show you how to enable picture in picture mode Android O.

This picture-in-picture mode in android O allows user to multitasking work at same time such as watching YouTube video & chat with friends and more. This android 8.0 Oreo version supported devices are Pixel 2, Pixel 2 XL, Google Pixel & pixel XL, Pixel C, Nexus 6P, Nexus 5X and android one device. Below you can see step by step guide to enable picture in picture mode Android O

Related Article: How to update android 7.1.2 to android O (Android 8.0)

How to enable picture in picture mode Android O / Android 8.0

This Android O picture-in-picture mode feature is use as multi-window mode, it will help to manage two functions simultaneously such as watching video and also search latest news on your android Oreo device. You can easily manage two activities at same time in android 8.0 devices.

Before enable enable picture in picture mode Android O, first of all enable system UI tuner in your Google pixel and other android O supported device. By default hidden system UI tuner in your Google pixel & other devices.

Step 1: Swipe down notification bar on your android Nougat 7.0 / 7.1.2 devices

Step 2: Tap & hold on “Settings” gear icon few seconds

Enable hidden system UI tuner on android O

You will show message: Congrats! System UI tuner has been added to settings

Now enable system UI tuner on your Google pixel and pixel XL devices. Follow below given step by step guide to use picture in picture mode on android O devices.

Step 1: Go to “Settings

You can view various sections in phone settings.

Step 2: Under system section, tap on “System UI tuner

Step 3: Tap on “Navigation bar

Here you can view left and right navigation bar button, select one of them and choose keycode. Now tap left keycode or right keycode.

Step 4: Enter text input code and tap right icon & left icon. Now select icon you want to use in picture-in-picture (PIP) mode.

You can use this navigation bar extra button as picture-in-picture mode. Now open any apps such as browsing internet and text with your friends at same time.

That’s all about one of the best android O feature called picture-in-picture mode. You can enable picture in picture mode Android O using above steps. Did you find above process helpful? Let us know on below comment box.

How to Enable USB Debugging on Google Pixel and Pixel XL

How to enable USB debugging on Google Pixel and Pixel XL phone. To use USB debugging on your Google Pixel phone, make sure to enable developer mode on Google Pixel & Pixel XL. You can find USB debugging under the debugging section in developer mode. It will copy data between your desktop PC and your Google Pixel devices. Also, without notification install apps and read log data. This debug mode is used when USB is connected to your device. In short, debug mode has authorized to access or revoke previously connected phone & desktop.

Read Also:

How to Enable or Disable USB Debugging on Google Pixel and Pixel XL

To turn on USB debugging on Google Pixel & Pixel XL, you need to find hidden developer mode and enable it in your device. Below you can see how to activate developer mode on Google Pixel and Pixel XL devices.

Step 1: Go to “Settings” on your Google Pixel and Pixel XL phone.

You can see various sections in your Pixel device.

Step 2: Under the system section, tap on “About phone”.

Tap on build number seven times enable hidden developer mode

Step 3: Scroll down until the end of the page and tap on “Build number” 7 times.

Turn on developer mode google pixel device

Now you can see a message on your Google Pixel device: You are now a developer! To see developer mode settings, Go to Settings > System > Developer options

Disable USB Debugging on Google pixel & pixel XL

You can see the USB debugging option under the debugging section. By default disabled USB debugging on your Pixel devices.

Step 4: Toggle on “USB debugging” in your Pixel devices.

While trying to enable USB debugging, you can see the below screen on your device.

Enable debug mode on Google Pixel & Pixel XL phones

Step 5: Tap on “OK” to enable it.

Enable USB debugging Google Pixel & Pixel XL

Now in your Google Pixel and Pixel XL USB debugging is enabled.

Other options include in the debugging section are debug the app, verify app over USB, logger buffer sizes, mock location app, revoke USB debugging authorization, and more.

How to Change Logger Buffer Sizes on Google Pixel & Pixel XL

Change logger buffer sizes on Google pixel & pixel XL

Settings > System > Advanced > Developer options > Turn on developer mode > Debugging > Logger buffer sizes

By default set logger buffer sizes 256 K per log buffer. You can choose from off/64 K/256 K/1 M/4 M or 16 M.

That’s all about how to turn on developer mode and Use USB debugging on Google pixel and pixel XL devices.

We hope this article makes clear how to enable USB debugging Google Pixel and Pixel XL devices. If you have any kind of trouble, let us know in the below section. Let us know your thoughts about USB debugging.

How to Fix Google Pixel Keep Restarting Itself

Annoying of Google Pixel and Pixel XL keep restarting itself? Before few days, suddenly my Google Pixel keep restarting itself. This is the first time that happened so I am not worried. But after 2-3 days, my Google Pixel phone restarting again and again itself. It’s annoying me. So I will search the solutions online and I found some of the possible tricks to fix this issue. Sometimes Google Pixel and Pixel XL freezing or unresponsive due to this problem and you can’t operate your device smoothly.

Read Also:

How to Fix Google Pixel Restarting Itself

Google pixel restarting itself issue

Check System Updates

Check system software updates are available for your Google Pixel and Pixel XL device, it will fix critical bugs & improves device performance and stability of your phone.

Check system software update on pixel

Settings > System > Advacned > System updates > Check for update

Check App Updates on Google Pixel & Pixel XL

Check any apps update is available or not using the below settings.

Play Store > Menu > My apps & games > Update all

Now check Google pixel and pixel XL restarting its own way issue fix or not. If not solved, try below the given solution.

Turn On Safe Mode to Fix Google Pixel Restarting Itself

Step 1: Press and hold the power button on your Google Pixel and Pixel XL.

Step 2: Touch and hold the “Power off” button until view “Reboot to safe mode”.

Use safe mode to fix Google pixel restarting again and again issue

Step 3: Press “OK” to reboot safe mode.

It will take 30-40 seconds to restart your device.

Step 4: View “Safe modesymbol below the left side corner.

Check to fix the Google Pixel and Pixel XL rebooting issue. If not found any issue, it means any downloaded apps causing issues. Remove safe to restart your phone and delete one by one recently downloaded app & see solve the problem. After finding the app, re-install other apps. If you still facing issues in safe mode, your device problem related to hardware or OS.

Factory Reset Google Pixel and Pixel XL

It will delete all your phone data and the third party downloaded apps. Before resetting your Google Pixel device, back up your Pixel device important data.

Step 1: Go to “Settings”.

Step 2: Under the personal section, touch “Backup & reset”.

Step 3: Tap on “Factory data reset”.

Factore Reset your Google pixel device

Step 4: Tap on “Reset Phone”.

If set any pattern lock, PIN or Password or fingerprint, draw the pattern to unlock Google pixel and pixel XL phone.

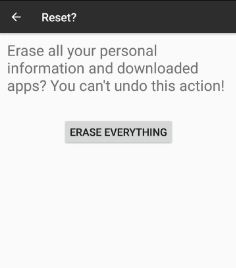
Step 5: Tap on “Erase everything”.

That’s all. Do you have any alternative methods to fix Google Pixel restarting itself problem? Let us know in below comment box. If you found this article helpful, don’t forget to share it with others. Stay connected with us for the latest Google Pixel and Pixel XL tips.

How to Enable Developer Options in Google Pixel and Pixel XL

By default is hidden developer mode on Google Pixel and Pixel XL. Here’s how to disable or enable developer options in Google Pixel and Pixel XL. It includes various sections including Debugging, Networking, Input, Drawing, Hardware-accelerated rendering, media, Windows animation scale, background process, monitoring & apps, etc. Most of all Android devices disabled developer options. These developer mode settings are use only for development purposes only. They can cause your Google Pixel phone and application on it to misbehave.

Read Also:

How to Turn On Developer Mode in Pixels

Step 1: Go to “Settings” in your Google Pixel and Pixel XL phone.

You can view various sections such as wireless & networks, device, personal and system.

Step 2: Under the system section, tap “About phone”.Tap build number seven times to turn on developer options

Step 3: Scroll down until the end of the page and tap on “Build number” 7 times.

enable developer mode on Google pixel phone

Now you can see a message on your Pixel screen: You are now a developer! To see developer mode settings, follow below given settings.

Developer options in Google pixel & pixel XL phone

Step 4: Go to Settings > System > Developer options or Settings > System > Advanced > Developer options (Google Pixel & Pixe XL Running Android 10)

Enable/Disable developer options in your Google Pixel and Pixel XL devices.

Step 5: Turn on Developer mode if disable.enable developer mode Google pixel and pixel XL phone

Step 6: Press “OK” to activate developer mode on Google Pixel phone.

This developer mode includes various options such as picture color mode, demo mode, USB debugging, logger buffer size, disable absolute volume, smallest width, background process limit, Force GPU rendering, and more.

Alternative Way: Settings > System > Advanced > Developer options > Toggle on “On”  – Google Pixel & Pixel Running Android 10

How to Disable Developer Mode on Google Pixel and Pixel XL

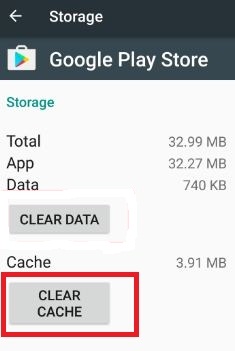
Settings > Device > Apps > Settings > Storage > Clear data > OK

Now go to settings and check to disable developer mode on Google Pixel and Pixel XL devices.

Alternative Way: Settings > System > Advanced > Developer options > Toggle off “On” > Tap back button (Latest Google Pixel Version)

How to Enable USB Debugging Google Pixel & Pixel XL

To enable USB debugging on Google Pixel & Pixel XL device, first of all, enable developer mode in your Pixel devices.

Settings > System > Developer options > Turn on developer mode > Debugging > Enable/disable USB debugging

Alternative Way: Settings > System > Advanced > Developer options > Toggle on “USB debugging” under the debugging section > OK (Latest Google Pixel Version)

That’s all. Did you find the above process helpful to enable developer mode on Google Pixel and Pixel XL phone? If you are facing any problem, don’t hesitate to let us know in below comment box. We will respond as soon as possible. Stay connected with us for the latest Google Pixel phone tricks and tips.