How to create story on Snapchat in android phone

Want to create a custom story on Snapchat in android phone? It’s quite simple to create story on Snapchat in android devices. You’ll add snap to story, save story, see who can view your Snapchat story, remove a snap from story and hide Snapchat story also. This added snap to your story is working as same as WhatsApp or Instagram story. User can view this Snapchat story up to 24 hours.

You can see Private story, custom story and Geo story on Snapchat options in your android device. You’ll add a screenshot to your Snapchat story. You can view you Snapchat story to swipe left on the camera screen and tap on My story. Follow below given step by step process to create story on Snapchat in android devices.

Read More:

How to change Snapchat notification settings in android phone

How to disable chat heads on facebook messenger app in android

How to create story on Snapchat in android phone

There are two ways to add a snap to story. Let first of all see steps to create story on Snapchat in android device.

1st Way:

Step 1: Open Snapchat app in your android devices

Snapchat app android devices

Step 2: Tap on Profile icon at top left side corner

My story in Snapchat app android phone

Step 3: Tap on My story to add a snap

Step 4: Now take a snap

You’ll see below given screen in your android devices.

Create story on Snapchat in android devices

Step 5: Tap on Story at bottom left side

This pop up message view on screen: Add to your story?

How to create story on Snapchat in android phone

Step 6: Tap on Add

Now create story on Snapchat in your android devices. This added snap to your story allows your friends to view snap. You’ll change who can view your story in settings.

How to view your added story in Snapchat in android

Snapchat > Tap top left side corner > My story

2nd Way:

Step 1: Open Snapchat app in your android devices

Step 2: Tap on Profile icon at top left side corner

Step 3: Tap on My story to add a snap

Step 4: Now take a snap

Send Snapchat story in android devices

Step 5: Tap on Send button at bottom right corner

It’s quite easy to add snap to story on Snapchat in android devices.

Remove Snapchat story in android devices

Remove Snapchat story in android devices

Open Snapchat app > Tap on story > My story > Three vertical dots at top right side > Trash icon

Now remove snap from story in your android devices.

Do you have questions about create story on Snapchat in android phone? Have you created Snapchat story in your android phone? Let us know in the below comment section. Stay and connect with us for latest android tips.

How to clear all cache on Snapchat android devices

Want to free up space on your Snapchat app in android devices? One of the easiest methods is clear all cache on Snapchat android devices. This clear Snapchat cache in android makes the app run faster in your device. You’ll clear all cache at once or individual clear cache on Snapchat in android phone.

If Snapchat app is using more storage on your android, clear memories cache on Snapchat. In your android Snapchat app, you’ll clear & view stories cache, clear browser cache, clear memories cache, clear Map cache, clear discover cache and clear lens cache on Snapchat android devices. Check out below given complete processes to clear all cache on Snapchat android Oreo, Nougat and other devices.

You May Like:

How to turn off Snapchat notifications settings in android

How to clear cache on Pixel 3a and Pixel 3a XL

How to turn off notifications on Facebook messenger app in android

How to recover deleted WhatsApp messages on android

How to clear all cache on Snapchat android phone

It’s quite easy to clear cache on Snapchat individually or clear all cache at once in your android devices.

Step 1: Open Snapchat app in your android devices

Snapchat app in android

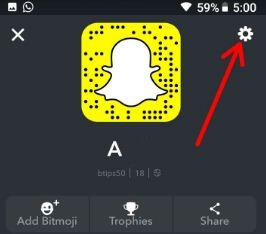
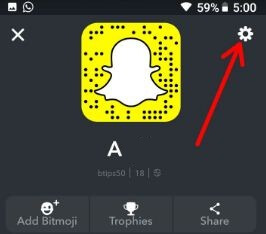
Step 2: Tap on Snapchat Profile icon at top left side corner

Snapchat settings in android phone

Step 3: Tap on Settings icon at top right side corner

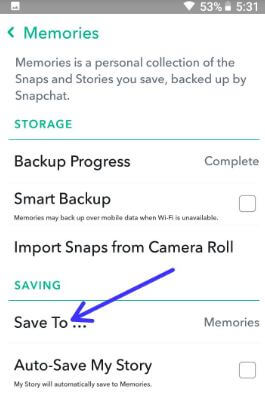
Here you’ll see several sections such as My account, Who Can, Advanced, More information, Additional services and Account actions.

Clear cache on Snapchat in android phone

Step 4: Scroll down up to Account actions and tap on Clear cache

You’ll see below given screen in your android devices. Now clear all Snapchat cache or individually delete cache in your device.

Clear all cache on Snapchat android devices

Step 5: Tap on Clear all

You’ll see notification pop-up message: Clear all caches?

How to clear all cache on Snapchat android phone

Step 6: Tap on Clear to clear all cache at once

It will clear all of your caches but your memories backup won’t be deleted from your android devices. Now speed up Snapchat in android or iPhone devices.

Also clear individual cache of Snapchat stories, browser cache, memories cache, Map cache and Snapchat lens cache in android.

Clear individual cache of Snapchat in android devices

Step 7: Select option from above list to individually clearing cache

Step 8: Tap on Clear

You’ll also clear conversations and clear sticker searches on Snapchat in android devices.

And that’s it. I hope above given article helpful to clear all cache on Snapchat android devices. If you have any kind of trouble, let us know in below comment box. Stay and connected with us for latest android tips.

How to set up fingerprint sensor on Galaxy S9 and Galaxy S9 Plus

Samsung latest flagship Samsung galaxy S9 and galaxy S9 plus event are few days away. Galaxy S9 and galaxy S9 Plus feature rumors built in fingerprint sensor in screen, Wireless charging, IP68 water & dust resistant, Iris scanner, super slow motion and more. Will galaxy S9 & S9 plus have a latest Oreo OS? In this tutorial, I’ll show you step by step process to set up fingerprint sensor on galaxy S9 and galaxy S9 Plus.

Lock screen security is one of the most important parts of any Smartphone devices. In previous galaxy S8 and galaxy S8 plus device, you’ll find fingerprint sensor under lock screen and security settings. Also include other lock screen security such as Face recognition, Iris scanning, Pattern lock, PIN number and more. Follow below given step by step guide to set up fingerprint sensor on galaxy S9 and galaxy S9 Plus devices.

Read Also:

How to set up secure folder on galaxy S8

How to enable game launcher on Samsung galaxy S8

How to set up fingerprint sensor on galaxy S9 and galaxy S9 Plus

How to set up fingerprint sensor on galaxy S9 and galaxy S9 Plus

Different Samsung galaxy device has slightly different settings to set up and enable fingerprint on galaxy S9 and galaxy S9 Plus devices.

How to set up fingerprint on galaxy S9 & S9 plus

Step 1: Go to settings in your galaxy S9 and S9 Plus

Step 2: Tap on lock screen & security

You will see Fingerprint sensor, face recognition and Iris scanner options.

Step 3: Tap on Fingerprint scanner under Biometrics

Step 4: Now follow on screen instruction in your galaxy S9 devices

Step 5: Create PIN number, Pattern or Password

This will useful if not unlock your device using fingerprint sensor.

Step 6: Now place a finger on the fingerprint sensor several times in your phone until show 100% completed.

Now set up fingerprint sensor on Galaxy S9 plus and galaxy S9.

Step 7: Tap on Add to add other fingerprints on your galaxy S9 plus device

You can also use fingerprint verification for Samsung Pass and Samsung Pay to make payment quickly and security in your Samsung galaxy S9 and S9 plus devices.

Turn off Fingerprint sensor on galaxy S9 and galaxy S9 Plus

Settings > Lock screen & security > Fingerprint sensor > Turn off

Add new fingerprint to galaxy S9 & S9 Plus

Settings > Lock screen & security > Fingerprint scanner > + icon > Add fingerprint

Delete fingerprint on galaxy S9 and galaxy S9 Plus

Settings > Lock screen & security > Fingerprint scanner > Edit > Choose fingerprint you want to delete > Remove > Remove

And that’s it. I hope this tutorial helpful to set up fingerprint sensor on galaxy S9 and galaxy S9 plus devices. If you have any question, leave them in below comment section. Don’t miss out our other galaxy S8 tips.

How to Set Up and Use Autofill in Chrome on PC or Laptop

Want to enable autofill in Google Chrome or any other browser? Here’s how to set up and use autofill in Google chrome browser in PC. After turn on autofill in chrome or Mozilla Firefox, automatically fill out forms in your desktop or laptop devices. You’ll change Google chrome autofill settings under advanced settings in your PC. Also, save the address, credit cards, and other details. After turned on autofill in Google Chrome or Mozilla Firefox or Opera and it will fill out forms in a single click. We already discussed enable autofill in Android devices.

Read Also:

How to Set Up Autofill on Google Chrome Browser in PC or Laptop

Step 1: Open Google Chrome browser on your desktop or laptop devices.

Step 2: Tap on Three vertical dots at the top right side corner.

Step 3: Select Settings.

Advanced settings in Google chrome browser in desktop PC

Step 4: Tap on Advanced.

Autofill settings in Google chrome browser

Step 5: Tap on Autofill settings under Password and forms section.

How to use autofill on Google chrome browser in PC

Step 6: Enable/disable Autofill settings you want.

You’ll also add address and credit card details if use as Autofill in your chrome browser in desktop PC.

Use Autofill settings in Google chrome browser in PC

Step 7: Tap on Add to enter addresses or Credit card details.

Step 8: Tap on Save button after entering the details you saved.

Now enjoy Autofill in your Chrome browser and enter details by only one click.

Read Also: Best Android browser apps

How to Enable Autofill in Android 11 Stock OS

You’ll enable autofill using the below settings in your latest stock Android versions.

Step 1: Go to Settings in your Android 11 device.

Step 2: Tap System.

Step 3: Tap Language & input.

Step 4: Tap Advanced.

Step 5: Tap Autofill service under the tools section.

By default set Google as an autofill service in stock Android 11 OS.

How to Enable Autofill in Stock Android 11 OS


Step 6: Tap the Settings icon of Auto-fill service.

How to Set Up and Use Autofill in Chrome on PC or Android

 Step 7: You can add personal information, addresses, payment methods, passwords, and autofill security.

Alternative Way: Settings > Privacy > Advanced > Autofill service from Google

And that’s it. We hope this makes it clear how to use Autofill on Google chrome browser in PC. Do you have any other tips you want to share? Let us know in the comments if any questions. Stay and connect with us for the latest android device tips and tricks.

How to Automatically Backup Photos and Videos on Google Pixel

Want to back up photos & videos on Google Photos on your Pixel, Pixel XL, and Pixel 2 XL? Here’s a complete guide to automatically backup photos and videos in Google Pixel and other Pixel devices. You’ll back up your important images and videos using the Google photo app in your device. Photos and videos uploaded from your device will get unlimited free storage at high quality in Pixel devices. If accidentally lost photo from your Pixel devices, you’ll retrieve Google back up photos and videos in Google Pixel, Pixel XL, Pixel 2, and Pixel 2 XL devices. And the camera folder is automatically backed up.

Read Also:

How to Enable Automatically Backup Photos and Videos in Google Pixel: Pixel XL, Pixel 2 XL

You’ll upload, search, organize, edit, and share your photos from any device using Google photo app in Pixel and other devices.

Step 1: Open Google photos app in your Pixel & other Android devices.

Google Photo app in android devices

Step 2: Tap on Three horizontal lines at the top left side corner.

Google Photos Settings in Pixel Oreo

Step 3: Select Settings.

Here you’ll see back up account, mobile data back up and when to back up (Roaming) section for enabling automatically photos and videos in a folder on your Google Pixel and other Android devices.

Backup and sync photos and videos in Google Pixel Oreo

Step 4: Tap on Backup & sync.

Make sure to enable back up & sync in your Pixel (Show below screenshot). If disabled, enable it to back up photos and videos to the device folder in your Google Pixel 2 XL.

How to enable automatically backup photo and video in Google Pixel 2 XL

Step 5: Tap on Back up device folders.

Here you’ll see several app folders to back up data on device folder in Google photos such as Instagram, Screenshots, WhatsApp images, WhatsApp animated GIF, Hike GIF, Snapchat video, image and more.

Enable automatically backup photo and video in Google Pixel

Step 6: Turn on the toggle button of the folder you want to back up photo & video.

Now automatically back up photos and videos to device folder you enabled app folder from list. You’ll back up photos and videos uploaded by mobile data in your Google Pixel and other devices. Also, back up when your Pixel device is roaming.

How to Automatically Backup Photos and Videos on Google Pixel and Pixel XL

Alternative Way (Latest Google Photo app): Open Google photo app > Tap Profile icon at the top right corner > Photos settings > Back up & sync > Toggle on Back up & sync

That’s it. I hope this article helpful to enable automatic backup photos and videos in Google Pixel and Pixel 2 XL. If you have any questions, tell us in below comment box. We’ll respond as soon as possible.

How to Set Up Dual Apps (App Pair) on Galaxy Note 8

Here’s how to set up and use dual apps (App Pair) on Samsung Galaxy Note 8. This galaxy Note 8 dual app feature is useful to access two apps at the same time as a multi-window mode/split-screen view. You’ll enjoy YouTube videos and send a text on WhatsApp/Facebook at the same time using this Samsung dual app/app pair features. You’ll chat with your friends and play music or video on your devices.

You can use a dual messenger feature to use two WhatsApp/Facebook account at the same time in your Samsung Galaxy devices. It’s quite easy to use Galaxy Note 8 dual app and add or remove app pair in your devices.

Read Also:

How to Use Galaxy Note 8 Dual App Feature

How to use Galaxy Note 8 dual app features

Step 1: Swipe the edge panel to left from any screen to open Apps Edge.

Step 2: Tap + Sign button.

Step 3: Tap on Create app pair from the top right corner.

Now a list of installed apps views on your Note 8 screen, select two apps want to use as a split-screen view on galaxy Note 8. Not all apps supported the app pair feature.

Step 4: Tap on Done.

Now use dual apps on Galaxy Note 8 device. The first app will appear at the top screen and another app will appear at the bottom half when opened on a split-screen view.

How to Use App Pair on Galaxy Note 8

Step 1:  Open Apps Edge by swipe the edge panel to the left side.

Step 2: Tap on App pair.

Now, enjoy multi-window mode in galaxy Note 8 using selected two apps.

How to Enable Multi-Window Mode on Galaxy S8 and Galaxy S8 Plus

Step 1: Open Settings from the app drawer on the galaxy S8 home screen.

Step 2: Select Advanced features.

Step 3: Tap the Multi-window icon on the app.

You can view the recently opened apps list, tap use recants button.

Step 4: Select the apps from the bottom of the screen to use as a split-screen mode.

That’s it. Did you find above tutorial helpful to use Galaxy Note 8 dual app? If you have any questions, tell us in below comment box. Stay connected with us for daily latest Galaxy Note 8 tips.