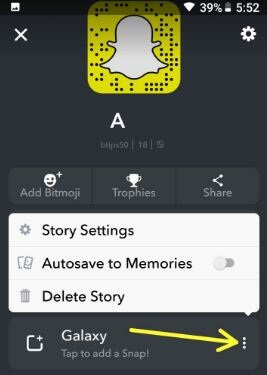
How to automatically save Snapchat stories in android phone

Snapchat is one of the most using social media apps. We create a Snapchat story and share with friends or other people. Do you know Snapchat include feature for automatically save snaps to camera roll or memories? By default your snap or story save to memories. In this tutorial, I’ll show you complete guide to automatically save Snapchat stories in android phone.

In Snapchat memories, you’ll collect all of your snaps and stories you save and backed up by Snapchat in android device. To save Snapchat message automatically in android, enable Auto-save My story under memories settings. Follow below given step by step process to automatically save Snapchat stories in android phone.

You May Like:

How to block someone from seeing your Snapchat story in android

How to change who can see my story on Snapchat in android

How to turn on automatically save Snapchat stories in android phone

Step 1: Open Snapchat app in your android devices

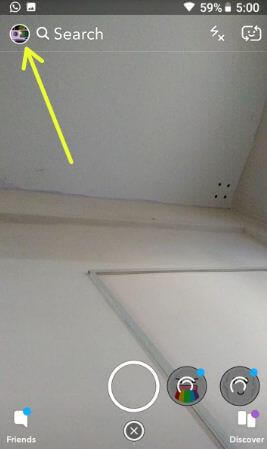
Snapchat Ghost icon in android

Step 2: Tap on Snapchat Ghost icon at top left side corner

Snapchat settings in android devices

Step 3: Tap on Settings gear icon at top right side corner

Turn on automatically save Snapchat stories in android

Step 4: Scroll down up to Memories under settings and tap on it

Here you can see Storage and saving sections.

Storage:

You’ll enable smart backup of memories when Wi-Fi not available and back up memories using mobile data in your android data. Also import Snaps from camera roll in your android devices.

Saving:

By default Snap saves to memories. You’ll automatically save snaps to camera roll only/memories & camera roll.

How to automatically save Snapchat stories in android phone

Step 5: Tick mark box Auto-save My story

Now your story will automatically save to memories in your android devices.

Save Snapchat message automatically in android

Step 6: Tap on Save to if you want to move or save all Snapchat memories to camera roll

How to automatically save snaps to camera roll

Step 7: Choose Memories & camera roll/Camera roll only option you want to save a snap in your android or iPhone devices.

And that’s all. Do let us know whether you liked this article turn on automatically save Snapchat stories in android phone. Let us know your thoughts in the below comment section. If you have any other idea, you can share with us.

How to Change Lock Screen Timeout on Galaxy Note 10 (Plus), Note 9, Note 8

Do you want to make a lock screen stay longer on Samsung Note 8/9/10+? Here’s how to change lock screen timeout on Galaxy Note 8, Note 9, Note 10, and Note 10 Plus. Just set the lock screen time and after your Note 8 turns off automatically. You’ll change sleep time galaxy Note 8 using lock screen and security settings. Also, set auto-lock and lock instantly with power key in your galaxy devices. In galaxy Note 8 lock automatically settings, you’ll choose from immediately/5 seconds/10 seconds/30 seconds/1 min/2 min/5 min/10 min/30 minutes. By default set 30 seconds after your Note 8 screen turns off automatically.

Read Also:

How to Change Galaxy Note 8 Lock Screen Timeout

Apply below settings to set screen lock time on your latest Samsung Galaxy Note devices.

Change screen timeout auto-lock on Galaxy Note 10/Note 10+/Note 9

Step 1: Go to the Settings.

Step 2: Tap Display.

Step 3: Scroll down and tap on the screen timeout.

By default set 30 seconds screen timeout on your Note 10+ and Note 10 device.

Step 4: Choose from 15 seconds/30 seconds/1 min/2 min/5 min/10 minutes.

For Galaxy Note 8

Step 1: Go to Settings in your galaxy Note 8.

Step 2: Tap on the Lock screen and security settings.

Step 3: Tap on Secure lock settings under the phone security section.

Here you can see lock automatically, lock instantly with power key, auto factory reset and lock network, and security options.

Step 4: Tap on Lock automatically.

By default set 5 seconds screen time out time in your galaxy Note 8.

How to change Galaxy Note 8 lock screen timeout time

Step 5: Choose from above-given lock screen timeout options.

Now after set lock screen timeout time, your Note 8 turns off automatically. You’ll also enable lock network and security on Note 8. It will keep network & security-related functions locked while your Samsung Galaxy Note 8 is locked, making it easier to locate if it’s lost or stolen.

Alternative Way: Settings > Display > Screen timeout > Chose from 15 seconds/30 seconds/1 min/2 min/5 min/10 minutes

How to Change Screen Timeout on Galaxy S8 and Galaxy S8 Plus

Step 1: Scroll down the notification panel and tap on the Settings gear icon.

Step 2: Tap on Display settings.

Step 3: Tap on Screen timeout.

Step 4: Choose from 15 seconds/30 seconds/1 min/2 min/5 min/10 minutes.

And that’s it. I hope this tutorial helpful to change Galaxy Note 8 lock screen timeout time. Do you have any other tips you want to share? Tell us in below comment section box. Don’t miss out check other Galaxy Note 8 and Galaxy S8 tips.

How to Fix Galaxy Note 8 Iris Scanner Problem

Iris scanner is one of the best Biometric security to unlock your Note 8 quickly compare to the Fingerprint sensor or facial recognition. But several users reported Galaxy Note 8 Iris scanner not working issue. Sometimes while setting up the Iris scanner in your Note 8, you can see a message of Iris recognition not working. Have you been ever facing Note 8 Iris sensor not responding issue? Position your eyes in the circles shown on the screen when set up the Iris scanner on Samsung Note 8.

For easily set up Iris recognition, make sure away from direct sunlight or indoors and hold your device 25 to 35 cm from your face. Check out below given possible solutions to fix the Iris scanner not working on Galaxy Note 8.

Read Also:

How to Fix Galaxy Note 8 Iris Scanner Not Working

Here I’ll show you three possible solutions to fix the Iris scanner stopped working on Galaxy Note 8 devices.

How to fix Galaxy Note 8 Iris scanner not working

Restart your Galaxy Note 8

Press and hold the power button in your galaxy Note 8 and tap on the Restart button. After restarting, check the Iris scanner working.

Clear cache & data to fix Galaxy Note 8 Iris scanner not working

Step 1: Go to Settings in your Galaxy Note 8.

Step 2: Tap on Apps.

By default hidden Iris option in your Note 8 or Galaxy S8. You’ll find it under system apps settings.

Step 3: Tap on Three vertical dots at the top right side corner.

Here you’ll see sort by size, default apps, app permissions, show system apps, special access, and reset app preferences options.

Step 4: Select System apps.

Step 5: Scroll down up to Iris and tap on it.

Step 6: Tap on Storage.

Step 7: Now clear cache and clear data in your Note 8.

Now restart your galaxy Note 8 and check the fix issue.

Update the App

Make sure all apps updated with the latest version.

Step 1: Open the Play Store in your device.

Step 2: Tap Three horizontal lines (Menu) at the top left corner.

Step 3: Tap My apps and games.

Step 4: Tap Update all.

Enable Safe Mode

Step 1: Press & hold the Power button on your Samsung Note 8 until seeing the power menu.

Step 2: Long press the Power off button until see “Safe mode“.

You can view this message on the screen: Reboot to safe mode

Step 3: Tap OK.

Step 4: You can see the Safe mode icon at the bottom of the left side screen.

Now, boot into safe mode galaxy note 8 device.  All third-party apps are disabled from your device. Check Iris scanner is working, if you can’t find any problem in safe mode, it means any downloaded apps causing the issue. Restart your phone to turn off safe mode on Note 8. Now, remove recently downloaded apps one by one and check to fix the issues. If you still facing issues in safe mode, it means hardware or OS related issues.

Remove Iris Scanner and Set Up Again

Step 1: Go to Settings in your Note 8

Step 2: Tap on Lock screen & security.

Here you can see screen lock type, face recognition, fingerprint scanner, Iris scanner, smart lock and other settings.

Step 3: Tap on the Iris scanner under phone security.

Enter PIN or Password to continue steps.

Step 4: Tap on Remove Iris data under manage Irises.

Now follow on-screen instruction and after remove Iris scanner on Note 8, restart your device. Now again set up the Iris scanner in Galaxy Note 8 or Galaxy S8.

You’ll also enable/disable Iris unlock and Iris unlock when screen turns on options in your Samsung Galaxy Note 8.

End this list of possible solutions to fix Galaxy Note 8 Iris scanner not working. Do you have any other tips? Share with us in below comment box. Don’t miss out our other Galaxy S8 and Galaxy Note 8 tips.
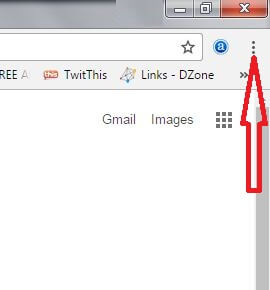
How to block someone from seeing your Snapchat story android

Can you block someone from seeing your story on Snapchat in android after new snap?? Here’s the quick solution to block someone from seeing your Snapchat story android devices. You’ll block certain people from seeing your Snapchat story in android phone. There are two ways to block someone on Snapchat in android from seeing your story.

This blocked people on Snapchat can’t seeing your new add snaps in him android or other devices. Have you know any idea about how to check if someone blocked you on Snapchat? Follow below given step by step process to block someone from seeing your Snapchat story android devices.

Read Also:

How to create a story on Snapchat in android phone

How to change who can see my Snapchat story in android devices

How to block someone from seeing your Snapchat story android phone

Check out below given two handy solutions to hide Snapchat stories from someone in android or other devices.

1st Method:

Step 1: Open Snapchat app in your android phone

Snapchat story in android Oreo

Step 2: Tap on Snapchat Profile icon at top left side

Hide Snapchat stories from someone in android

Step 3: Tap on Settings gear icon at top right side

View my story in Snapchat android phone

Step 4: Tap on View my story under Who can section

By default everyone selected. Here you can see also My friends and custom options.

Block someone from seeing your Snapchat story android

Step 5: Select Custom

You’ll see list of your Snapchat friends.

How to block someone from seeing your Snapchat story android phone


Step 6: Tick mark box to block specific friends

Now hide Snapchat stories from your selected friends. They will not seeing your new add Snap in him devices.

2nd Method:

Step 1: Open Snapchat app in your android devices

Step 2: Tap on Snapchat Profile icon at top left side corner

Step 3: Tap on Three vertical dots of My Story

You can see three options. By default set everyone can view in your Snapchat story.

Step 4: Select Custom

Step 5: Choose from friend list you want to hide your Snapchat story

Now only selected friends can see your Snapchat story in android devices.

And that’s it. Do you still have questions about block someone from seeing your Snapchat story android? Are you satisfied with our solutions? Let us know by leaving a comment below section.

How to Turn Off Predictive Text and Auto Correct on Android 8.1 Oreo

Predictive text feature suggests words when you type on your android 8.0 & 8.1 devices. Here’s a complete guide to turning off predictive text on android 8 devices such as Google Pixel, Pixel 2, Pixel 2 XL, Nexus 6P and more. You’ll disable predictive text on android Oreo under language & input settings.

In this tutorial, I’ll show you step by step process to turn off autocorrect, predictive text, auto-capitalization, double-space full stop, block offensive words, show suggestion strip, enable glide typing, show search and more button and more. Follow the below-given step by step process to turn off predictive text on android 8.1 and 8.0 Oreo.

Read Also:

How to Turn Off Predictive Text on Android 8.0 and 8.1 Oreo

First of all, let see steps to remove predictive text in android Oreo 8.0 and 8.1 devices.

Turn off predictive text on android 8.1 & 8.1 Oreo

Step 1: Go to settings in your android 8.

Step 2: Tap on System settings.

Step 3: Tap on Language & input.

Virtual keyboard settings in android 8 Oreo

Step 4: Tap on the virtual keyboard under the keyboard & input section.

Here you’ll see Gboard, Google voice typing, and Google Indic keyboard options.

Gboard settings in android 8 Oreo

Step 5: Tap on Gboard.

List of Gboard keyboard settings sees in your android 8 devices such as Languages, Preferences, Theme, Text correction, Glind typing, Voice typing and more.

How to turn off predictive text on android 8.0 Oreo

Step 6: Tap on Search.

By default enable predictive search in your android Oreo and other devices.

How to turn off predictive text on android 8

Step 7: Toggle off Predictive search.

Enable or Disable Predictive Text on Android 9 Pie

Settings > System > Language & input > Virtual keyboard > Gboard >Search > Predictive content search

How to Disable Auto Text Correction on android 8.1 & 8.0 Oreo

This Android 8 auto-correct feature is helpful to the space bar and punctuation insert highlighted word automatically in your devices.

Step 1: Follow the above-given method steps 1 to 5.

Step 2: Tap on Text correction.

Step 3: Scroll down up to corrections section

By default enable auto-correction and auto-capitalization feature in your android 8 devices.

Turn off Auto correct on android 8.1 & 8.0 Oreo

Step 4: Disable Auto-correction toggle button in your Oreo.

And that’s all. I hope the above-given tutorial helpful to turn off predictive text on android 8. If you have any kind of trouble, tell us in below comment box. We’ll respond as soon as possible. Don’t forget to check out our other android 8 tips. Stay and connected with us for the latest updates.

How to Set Up Iris Scanner in Samsung Galaxy S9 And S9 Plus

Scan with Iris on Galaxy S9 and S9 Plus? Here’s how to set up Iris scanning in galaxy S9 and Galaxy S9 Plus devices. There are several lock screen options available such as pattern lock, PIN number, password, Fingerprint security, Iris scanning, face unlock and more. Iris scanning is one of the fastest ways to unlock your Galaxy S9 compares to fingerprint or facial recognition. Lock screen security is most important for all smartphones.

Galaxy S9 lock screen security added a combination of facial recognition and Iris scanner. This galaxy S9 plus Iris scanner feature is one type of biometric security to protect your devices. Also, rumors said galaxy S9 and galaxy S9 plus Iris scanning improve compare to Galaxy S8 devices. Follow the below-given step by step process to set up Iris scanning in galaxy S9 and Galaxy S9 Plus.

Also Read:

How to Set Up Lock Screen Iris Scanning in Galaxy S9 and S9 Plus

How to set up Iris scanning in galaxy S9 and Galaxy S9 Plus

Step 1: Go to Settings in your Galaxy S9 & Galaxy S9 Plus.

Step 2: Tap to lock screen & Security.

Step 3: Select the Iris scanner under the Biometrics section.

Step 4: Enter Password, PIN or pattern.

Read the on-screen instruction and follow it.

Step 5: Choose Iris.

Set the position of your eyes in front of the camera until 100% completed scanning.

Step 6: Press OK.

Now finished set up Iris scanning in galaxy S9 and galaxy S9 Plus devices. To unlock your Samsung Galaxy S9, just hold your Galaxy S9 device in front of your eyes. Also, use this Iris scanning for online shopping and any purchase transaction using Samsung Pay in galaxy S9 Plus.

You’ll also use the smart lock feature to unlock your S9 using different lock screen security such as trusted devices, trusted places, on-body detection, trusted face and trusted voice. You’ll find this setting using below given settings in your android Oreo, Nougat and other devices.

Settings > Lock screen & security > Smart lock

It’s quite easy to use Iris scanner S9 and other Samsung Galaxy devices.

That’s all. I hope this setting worked for you to set up Iris scanning in galaxy S9 and Galaxy S9 Plus. Do let us know whether you liked this tutorial or not. For more such smart tips, stay connected with us for the latest Samsung galaxy devices updates.