How to Rotate the Screen on Pixel 2 XL, 2, Pixel XL

Here’s how to enable screen rotation on Google Pixel 2 and Pixel 2 XL. You can automatically rotate the screen and home screen rotation in your Pixel devices using this tutorial. You can see a screen rotation button on the navigation bar in your device. Also, enable auto-rotate screen in the latest Pixel devices using display settings.

Google Pixel 2 comes with several new features such as design style Notification panel, Gesture controls like iPhone X, Volume control widgets, Wind down mode, Shush gesture, screen rotation button on the Navigation bar and more. In this tutorial,

Read Also:

How to Auto Rotate Screen in Google Pixel 2, 2 XL, Pixel, Pixel XL

You can download and install android P Beta on Pixel and Non-Pixel (With Pictures) devices here.

Check out below given three methods to Google Pixel 2 rotate screen in your device.

1st Method: Rotate home screen in Google Pixel 2 and 2 XL

Step 1: Unlock your Google Pixel, Pixel 2 XL & other supported Android devices.

Step 2: Rotate your phone screen Portrait/Landscape.
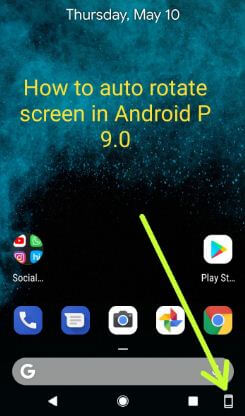
How to rotate screen in android P 9.0

Step 3: Tap the Rotation icon at the bottom right corner in the Navigation bar.

Step 4: Now rotate your device home screen and app drawer in your Google Pixel
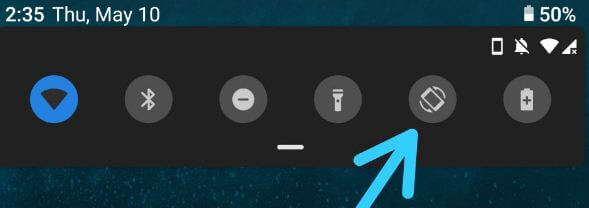
Android P rotate screen manually

Step 5: To turn off rotation, swipe down the notification shade and tap Auto-rotate.

Now rotate screen manually in your Google Pixel, Pixel XL, Pixel 2 and 2 XL.

2nd Method: Quickly enable auto-rotate screen in Pixel 2 XL and Pixel 2

Step 1: Swipe down the notification panel from any screen in your Pixel devices.

Enable auto rotate screen in android 9.0 P

Step 2: Tap Auto-rotate.

Step 3: Now rotate your device screen while the rotate phone.

Note: It will only rotate apps in your device, you can see app drawer and home screen not rotate.

3rd Method: Auto-rotate screen in Pixel 2 using display settings

Step 1: Swipe down the notification shade and tap the Settings icon.

Step 2: Tap Display.

Step 3: Tap Advanced.
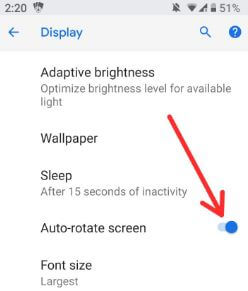
Rotate home screen in android P 9.0

Step 4: Turn on the Auto-rotate screen toggle button.

Disable auto-rotate screen in Pixel 2 XL, if you don’t like it.

And that’s it. I hope this tutorial helpful to auto-rotate the screen in Google Pixel 2 and 2 XL. If you have any kind of trouble, tell us in below comment box.

How to Install Android P Beta on Google Pixel and Other Devices

Google has released the first public Beta for the next Android P 9.0 OS at Google I/O 2018. Android P Beta is now available for Google Pixel, Google Pixel XL, Pixel 2, Pixel 2 XL, and other non-pixel devices such as Nokia 7 plus, Oppo R15 Pro, Vivo X21UD, Sony Xperia XZ2, Xiaomi Mi Mix 2S and more. Here’s how to install Android P Beta on Google Pixel and other devices.

You can download and install android P Beta on Google Pixel and other devices using the Android Beta website. Open this Google android Beta program and find your phone from the list & tap Get the Beta. Before installing Android P Beta, back up your important data. Follow the below-given step by step guide to download and install Android P Beta on Google Pixel, Pixel XL, Pixel 2, Pixel 2 XL, and non-pixel devices.

Read Also:

How to Install Android P Beta on Google Pixel and other Non-Pixel devices

Step 1: Open developer Android Beta page in your device.

Step 2: List of Pixel and Non-pixel devices view that compatible with Android P 9.0.

Step 3: Find the device from the list you want to download & install Android P Beta.

Step 4: Tap Get the Beta.

Step 5: Sign in with your Google account you used in your device.

You can see your Google Pixel or other devices.

How to install android P Beta on Google Pixel

Step 6: Tap + Opt in.

Step 7: Now Tick marks the “I agree to the terms of the beta program” & tap Join Beta.

Android P install in Google Pixel

Step 8: Now in your Google Pixel, go to Settings > System > System updates > Download and install.

If use Wear OS, go to Settings > System > About > System updates.

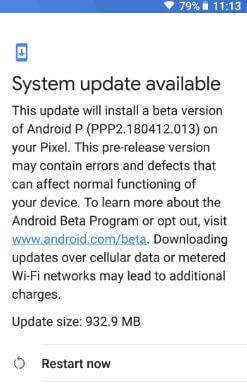
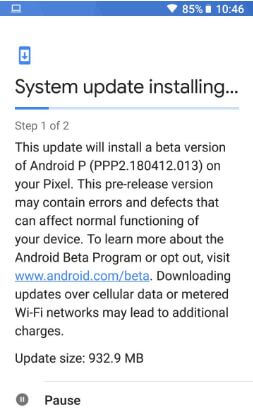
This Android P Beta version for Google Pixel device update size is 932.9 MB. This pre-released Android 9.0 version may contain errors and defects that can affect the normal function of your Google Pixel and other devices you install android P Beta.

Download and install android P Beta on Google Pixel

Step 9: Now System update installing in your Google Pixel and other devices.

Download Android P Beta in Google Pixel 2

Step 10: Tap Restart now.

You can see this message after restart your Google Pixel: This device is enrolled in the Android Beta program

Step 11: Tap OK.

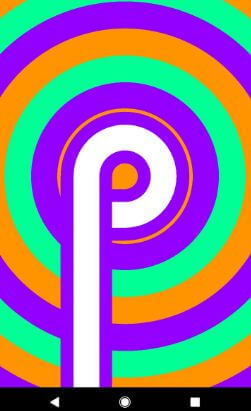
Now enjoy Android P Beta version 9.0 in your Google Pixel devices. To check Android P logo in your Google Pixel, Pixel 2, Pixel 2 XL and other devices go to

Install android P Beta on Google Pixel and other Non-Pixel

Settings > System > About phone > Advanced > Android version > Tap again and again Android version

And that’s all. We hope this makes it clear how to install Android P Beta on Google Pixel and other Non-Pixel devices. If you have any kind of trouble, tell us in below comment section. We’ll respond as soon as possible.

How to get 3D Bitmoji on Snapchat android phone

Do you know how to create and use 3D Bitmoji Snapchat android or iOS devices? In this tutorial, I’ll show you complete guide to get 3D Bitmoji on Snapchat android devices. You can add 3D animated Bitmoji in Snapchat android, if latest updated Snapchat app. Also use AR Bitmoji and 3D lenses in Snapchat app.

Snapchat Bitmoji is your personal Emoji. This 3D Bitmoji Snapchat not working in android or iOS devices, if you’re Snapchat apps not updated to latest version. Also change Bitmoji style Male to Female or Female to Male anytime you want to change. Let see step by step process to get 3D Bitmoji on Snapchat android phone or tablet.

Don’t Miss This:

How to make AR Emoji on Samsung Note 10 Plus and Note 10

How to create a Bitmoji in Snapchat android phone

How to read WhatsApp deleted messages in android device

How to add Bitmoji to WhatsApp android device

How to get 3D Bitmoji on Snapchat android device

Step 1: Download Bitmoji app in your android device from play store

Log in With your Snapchat or Email

Step 2: Now install & open Bitmoji app and login with Snapchat account or Log in with Email

Snapchat avatar in Bitmoji app android

Step 3: Tap Avatar icon at upper right side

Get 3D Bitmoji on Snapchat android

Now create your Snapchat avatar and set hairstyle, facial hair, eye shape, eye color, nose, glasses, jaw, face shape, mouth, outfit and more.

3D animated Bitmoji stickers in Snapchat android

Step 4: Tap Save Avatar or Arrow icon at upper right corner

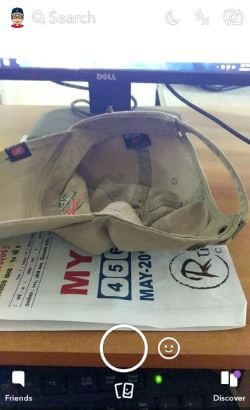
Step 5: Now Open Snapchat app in your android or iOS devices and make sure updates to latest version to use this 3D Animated Bitmoji.

Open Snapchat app in your android smartphone

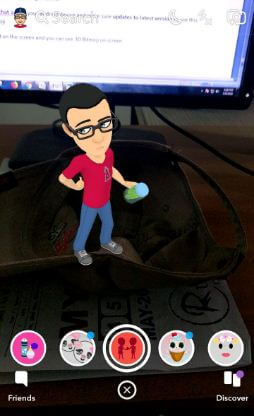
Step 6: Tap & hold on the screen to see 3D Bitmoji on screen

3D Animated Bitmoji android

Step 7: Swipe left side to see more 3D animated Bitmoji stickers

How to get 3D Bitmoji on Snapchat android device

Step 8: Tap 3D Bitmoji icon you want to use in your device

Now you can see 3D Animated Bitmoji on your device screen. Also set different types of face shapes and moving stickers.

And that’s it. Did you find above article useful to get 3D Bitmoji on Snapchat android device? Don’t forget to share with others, if you found it helpful. Stay and connect with us for latest Snapchat updates.

How to transfer photos and videos from Galaxy S9 to MAC

There are several ways to transfer photos and videos from Galaxy S9 to MAC devices. One of the easiest methods is download and install android file transfer app on your MAC. It will helpful to easily transfer photos & videos from Samsung S9 to PC or MAC. We already discussed about import music from MAC to galaxy S9 & S9 plus Oreo.

You can easily transfer photos individually or all photo at once from your Samsung S9 to computer or MAC devices. Also use third party software to transfer data such as photos, videos, messages, contacts, apps and more from galaxy S9 to MAC or laptop. Follow below given methods to transfer photos and videos from Galaxy S9 to MAC.

Don’t Miss This:

How to transfer files between android phone to PC using Dropbox

How to transfer data from android to iPhone X/8 using Xender

Fix error transfer data android to Samsung S9/S8

How to transfer photos and videos from Galaxy S9 to MAC or Computer PC

How to transfer photos and videos from Galaxy S9 to MAC

Check out below given two methods to transfer photos from galaxy S9 and S9 plus to MAC or PC.

1st Method: Transfer photos & Videos from S9/S9 Plus to MAC using Android file transfer

Step 1: Download android file transfer software on your Mac

Step 2: Connect your galaxy S9 & S9 plus to MAC using USB cable

Step 3: Open android file transfer in your MAC under applications

Step 4: Tap DCIM folder and open Camera folder

You can see all photos and videos list.

Step 5: Select photos and videos you want to transfer

Step 6: Drag the selected photos & videos and drop into the MAC folder you want to move

2nd Method: Transfer photos and videos from Galaxy S9 to MAC using Dr.Fone software

This Dr.Fone software helpful to transfer files between S9 to MAC/PC, including photos, videos, contacts, messages, apps, music and more.

Step 1: Download and install Dr.Fone software which compatible with your MAC or Computer PC

Step 2: Connect your galaxy S9 with USB cable

Step 3: Open Dr.Fone software in your devices and find your device

Step 4: Tap Transfer

Step 5: Select Transfer device photos to PC/MAC

Step 6: Select photos & videos you want to transfer between S9 to MAC/PC

Step 7: Tap Export to MAC/PC

Step 8: Tap OK

Now selected files transfer from Samsung galaxy S9 and galaxy S9 plus to MAC or desktop PC.

And that’s all. We hope this makes it clear how to transfer photos and videos from Galaxy S9 to MAC. Do you have any other tips? Share with us in below comment box.

How to customize quick settings in LG V30

In LG V30 notification panel, you can see several helpful quick settings such as Do not disturb mode, Sync, Battery saver, NFC, Hi-Fi Quad DAC and more. Also add your daily routine use feature to quickly access from notification shade in your device. Here’s how to customize quick settings in LG V30 phone.

You can drag the icon you want to add or remove from your device quick settings menu. Also customize settings order and reset quick settings in LG V30 device. Different android device has slightly different settings to organize quick settings in LG V30. Follow below given step by step process to set or customize quick settings in LG V30.

You May Like This:

How to customize lock screen LG V30

How to use two apps at same time in LG V30

How to customize navigation bar in LG V30

How to customize quick settings in LG V30

How to customize quick settings in LG V30

Pull down notification panel to quickly access your important LG V30 features from any screen.

Step 1: Swipe down notification panel from any screen

Step 2: To see all LG V30 quick settings, swipe down again

Step 3: Tap Edit button or Pencil icon (Android 8.1 Oreo)

You can see all quick settings options in your LG V30 devices to edit it notification panel.

Step 4: Drag and drop the feature you want to add quick settings

Step 5: Tap Arrow icon at upper side screen to save settings

Now you can directly access this new added quick settings feature from any LG V30 screen to just swipe down notification shade.

How to change lock screen app icon on LG V30

Step 1: Swipe down notification panel and tap settings in your LG V30

Step 2: Tap lock screen under display section

Step 3: Select shortcuts menu

You’ll see + buttons for the empty icon.

Step 4: Tap + button

Step 5: Select app from the list you want to add LG V30 lock screen

Now these selected apps will view in your device lock screen. And that’s all.

I hope this little tip helpful to customize quick settings in LG V30. If you have any kind of trouble, tell us in below comment box. Stay and connect with us for latest updates.
How to Read Deleted WhatsApp Messages in Android Phone Without Any App

WhatsApp added several new features and one of the most useful is to delete WhatsApp messages after you send someone if accidentally send. Sometimes people accidentally send messages to the wrong person or group, so using this feature you can easily delete it. After deleted WhatsApp messages, you can see “This message was deleted” message on WhatsApp android or iOS devices. Do you want to read deleted WhatsApp messages in Android phone? Here’s how to see deleted WhatsApp message someone sent on your Android or iOS devices. You can read WhatsApp deleted messages in android using Notification log or download third-party apps such as Notification history, WhatsRemoved+, and more. But remember you have just seven minutes to recover or read deleted messages in WhatsApp android or iOS devices.

Read Also:

How to Read Deleted WhatsApp Messages in Android phone

How to read deleted WhatsApp messages in android phone

To see deleted messages in WhatsApp android using notification log, follow below given 2 methods.

How to Read Deleted WhatsApp Messages Without Any Third-Party App

Step 1: Tap and hold the blank space in your android devices home screen.

Widgets in android smartphone

Step 2: Tap Widgets

You can see a list of widgets in your Android devices.

Settings widget in android phone

Step 3: Search settings widgets and tap & hold it and move to the home screen.

You can see settings shortcut screen in your device.

See deleted messages in WhatsApp android using notification log

Step 4: Scroll down up to the Notification log and tap on it.

Step 5: Now Notification log app view in your device home screen.

Notification log in android device

Step 6: Tap Notification log app icon.

Read WhatsApp deleted messages android

Step 7: You can see deleted WhatsApp messages in your devices.

Have you been ever retrieve deleted WhatsApp messages Android or iOS?  You can use this tutorial if you were busy to work and someone who sent messages on WhatsApp and quickly deleted it.

How to Read Deleted WhatsApp Messages on Android

Step 1: Download WhatsRemoved+ app in your Android device.

Step 2: Allow all the permission app needed.

Step 3: After that, open the app and tap on the Detected tab (Show below given screenshot).

How to Read Deleted WhatsApp Messages in Android Phone Without Any App

Step 4: Here you can see the All deleted messages (Hey, How r u) list in your Android phone.

And that’s all. We hope this makes it clear how to read deleted WhatsApp messages in Android phones. If you found it helpful, don’t forget to share it with others. Do you have any trouble? Tell us in below comment box.