How to Disable Apps in Android Oreo 8.1

Want to hide or disable system apps on Android Oreo 8.0 & 8.1? Here’s how to disable apps in android Oreo devices. This disabled app is hidden from your app drawer or apps list on the home screen. You can’t delete pre-installed apps on Android devices but individually disable it using app’s settings. Also, remove or uninstall third-party apps you downloaded from play store if using more battery and running in the background even not use. Different android device has slightly different settings to enable or disable apps.

Read Also:

How to Enable or Disable Apps on Android Oreo 8.1 & 8.0

Check out the below-given settings.

How to Disable System Apps Android 8.1 Oreo

Step 1: Swipe down the notification panel and tap the Settings gear icon.

Step 2: Tap Apps & notifications.
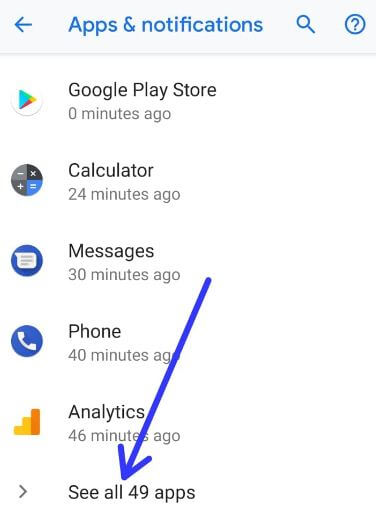
See all apps in android Oreo 8.1 device

Step 3: Tap App info or See all apps.

A list of applications are view in your Android devices.

Enable or disable apps in android Oreo 8.1 & 8.0

Step 4: Find the app you want to disable on Oreo and tap on it.

How to disable apps in android Oreo

Step 5: Tap Disable.

Step 6: Again touch Disable app.

Step 7: Tap OK.

Now, this app is hidden from your app drawer. To again show that app in your device apps list, enable the app in your Oreo device.

How to Enable App in Android 8 Oreo

Settings > Apps & notifications > See all apps > Tap the disabled app > Enable

How to Force Stop Apps in Android Oreo 8.1 & 8.0

Settings > Apps & notifications > See all apps > Tap any app you want to force stop > Force stop

If none of the methods fix the app-related problems in your android Oreo, uninstall the app in your device. After uninstall app, restart your phone and again download the latest update version of the app in your device.

How to Uninstall Apps Android Oreo 8.1 & 8.0

Open Play store > Three horizontal lines (Menu) at upper left corner > My apps & games > Installed tab > Tap “App” you want to uninstall > Uninstall

And that’s all. Did you find the above tip helpful to enable or disable apps in android Oreo 8.1 & 8.0? Do you have any alternative methods? Share with us in below comment box. Stay and connect with us for Oreo updates.
How to Set Up Iris Scanner on Galaxy Note 9

There are several lock screen security options available to unlock your Samsung Galaxy Note 9 including a rear-mounted Fingerprint scanner, Iris scanner, Face Unlock,  Pattern lock, PIN number, Pattern, and more. But in this tutorial, I’ll teach you how to set up the Iris scanner on Galaxy Note 9 Phablet. Iris scanning is one of the best and secure ways to unlock your Note 9. When you set up Iris scanning on Note 9, keep away your device from direct sunlight, Iris scanner does not work properly in this condition.

Several users reported can’t recognize the Iris issue. There are several reasons for Iris scanning not working such as wearing glasses or contacts, dust & dirt on Iris camera, direct sunlight, and more. Follow the below-given step by step process to set up the Iris scanner on Galaxy Note 9.

Read Also:

How to Set Up Galaxy Note 9 Iris Scanner

How to set up Iris scanner on Galaxy Note 9

Currently, Iris scanner features are supported on Samsung Galaxy S8, S8 Plus, Galaxy S9, S9 Plus, and Galaxy Note 8 devices. You’ll set up Iris scanning in Note 9 using lock screen & security settings. Apply below-given settings to use the Iris scanner on Galaxy Note 9.

Step 1: Swipe down the notification panel and tap the Settings gear icon.

Step 2: Tap Biometrics and security.

Here you can see an Intelligence scan, Face recognition, Iris scanner, and Fingerprint scanner.

Step 3: Tap Iris scanner under Biometrics.

Step 4: Tap Continue.

To securely use Iris scanner, you’ need to set a PIN number, Password, or Pattern lock.

Step 5: Create a PIN number, Pattern, or Password.

This will use if not unlock your device using fingerprint. When this type of situation occurs, unlock your Samsung Note 9 using security you set up such as Pattern lock or PIN number or Password.

Step 6: Follow the on-screen instruction to set up & use the Iris scanner on Note 9.

Step 7: Tap Continue.

Step 8: Hold your device about 25-35 cm away from your face with the screen facing towards you. Position your eyes in the circles shown on the screen.

Step 9: Wait until 100% complete Iris scanning on Note 9.

Step 10: Tap Done.

Now unlock your galaxy Note 9 using Iris recognition you enabled. You’ll use Samsung Galaxy Note 9 Iris scanner feature to purchase apps or other payment when using Samsung Pass. Also, enable the Iris scanner when the screen turns on without use a PIN or password.

How to Remove Iris Scanner in Galaxy Note 9

Settings > Lock screen & security > Phone security > Iris scanner > Manage Irises > Remove Iris data > Remove

Now your set up Iris data has removed from your Samsung note 9 devices.

And that’s it. I hope this tutorial helpful to set up the Iris scanner on Galaxy Note 9. If you have any questions, tell us in below comment box. Stay and connect with us for the latest updates.

How to Disable Apps in OnePlus 6 Oxygen OS

Here’s how to enable/disable apps in OnePlus 6 Oxygen OS device. You can’t delete all installed apps, some system apps are running in the background even we don’t use it on your OnePlus 6 or any other Android device. After disable app, that particular app hide from your device. You’ll add it back any time on your    b   phone to enable it. You need to disable Bloatwares app that running in the background and consume more battery in your device. This disabled app on Android can’t appear on the app drawer.

Read Also:

How to Enable/Disable Apps in OnePlus 6

How to disable apps in OnePlus 6 Oxygen OS

You’ll individually enable/disable apps on your OnePlus 6 device to hide the app from the app drawer. Check out given settings.

Step 1: Swipe down the notification shade at the top and tap the Settings gear icon.

Step 2: Tap Apps & notificatons.

Here you can see the scren time, notifications, default apps, app permission, data usage control, and more.

Step 3: Tap on See all apps.

A list of installed application is view in your device.

Step 4: Find the app you want to disable from your OnePlus 6 and open it.

Step 5: Tap on Disable.

You can see this pop-up message on screen: If you disable this app, Android and other apps may no longer function as intended.

Step 6: Tap Disable app.

Step 7: Tap OK.

Now hide the app from your OnePlus 6 apps list. Also, replace this app with the factory version and all app data removed from your device. If you want to enable apps on OnePlus 6, follow same above-given steps and enable it on your device. After enable, you can see the app on the app drawer list. Let see other helpful app settings for the OnePlus 6.

How to Force Stop Apps in OnePlus 6/OnePlus 6T

Settings > Apps & notifications > See all apps > Select the app > Force stop > OK

How to Lock & Unlock Apps on OnePlus 6 Using App Locker

OnePlus 6 has an awesome in-built App locker feature to protecting your important app data from other people. You can lock apps on OnePlus 6 using this feature. Also, unlock the app using a fingerprint or Password.

Step 1: Go to Settings in your OnePlus 6 Oxygen OS.

Step 2: Scroll and Tap Utilities.

Step 3: Tap on App locker.

Step 4: Tap on + Add apps.

Step 5: Select the apps you want to lock or hide.

Step 6: Now open the app you added in the app locker on OnePlus 6.

Step 7: You need to Enter fingerprint or PIN number or Password to unlock apps in OnePlus 6.

Step 8: Tap on Cross icon of the app to unlock app in your OnePlus.

And that’s all. Are you satisfied with our solutions? Let me know what you think about our tutorial disable apps in OnePlus 6 Oxygen OS. We are waiting for your valuable feedback.

How to Check RAM Usage in OnePlus 7T, 7 Pro, 6T, 6

Here’s how to check apps RAM and memory usage on OnePlus 6 device. You can check individually app usage data and which app usage more data using storage & memory settings in OnePlus 6 Oxygen OS. You can see OnePlus 6 RAM usage by apps setting also. Different android device has different settings to see memory usage by apps.

This setting is compatible with OnePlus 7T, OnePlus 7 Pro, OnePlus 6T and other latest OnePlus devices. Some of the android systems are always running in your devices such as Android OS, Android system and more. In a third-party app that using more data, you’ll force stop them anytime. Follow below given complete process to check apps memory usage on OnePlus 6.

Relevant Article:

How to Check Memory Usage on OnePlus 6 Oxygen OS

How to check apps memory usage on OnePlus 6

Check RAM usage in OnePlus 7T/7/7 Pro

Step 1: Go to Settings on your latest OnePlus 7/7T devices.

Step 2: Find Developer mode on your OnePlus.

If you can’t find developer mode, enable it using this. After activating developer mode, follow the below settings.

Step 3: Tap on Memory.

Step 4: Tap on Memory used by apps.

Here you can see app usage memory and RAM on your OnePlus and other latest android devices.

Check RAM or Memory Usage on OnePlus 6/6T

Step 1: Swipe down the notification panel and tap the Settings icon.

Step 2: Tap on Storage & memory under a device subheading.

Here you can see Memory, Apps, Videos, Audio, Images, Cached data and more.

Step 3: Tap on Memory.

Step 4: Tap on Memory used by apps.

You can view a list of apps used memory in your OnePlus 6 device. You’ll force stop app on OnePlus 6 if usage more data and not regular use.

Force stop app usage more data on OnePlus 6 Oxygen OS

Settings > Device > Storage & memory > Memory > Memory used by apps > Three vertical dots > Force stop

Check RAM & Memory Usage by Apps in Android Oreo

Step 1: Go to settings in your Oreo device.

Step 2: Tap on System.

Step 3: Tap on developer options.

Step 4: Scroll down and tap Running services.

Here you’ll view and control currently running services. Also, appear app RAM usage data in your android Oreo 8.0 & 8.1 devices. You can stop apps to usage more RAM on your phone. Also, show cached processes in your Oreo devices.

And that’s all. We hope this makes it clear how to check apps memory usage on OnePlus 6 Oreo 8.1. If you have any kind of trouble, tell us in below comment box. Stay and connect with us for the latest updates.

How to Use Trusted Face (Face Unlock) on Pixel 2 and Pixel 2 XL

Do you know how to use face unlock on Google Pixel 2 and 2 XL? You can use trusted face features to unlock Pixel 2 using face unlock. To set up face unlock on Pixel 2 XL, you need to activate a trusted face. Here’s how to use a trusted face on Pixel 2 and Pixel 2 XL. Smart lock feature is helpful to unlock your device automatically without a Password, Pattern lock, or PIN number. Pixel 2 smart lock options including on-body detection, trusted places, trusted face, trusted devices, and voice match. Google removed the trusted face and trusted voice options from Android 10 and the latest Android 11 smart lock.

Read Also:

How to Enable and Use Trusted Face on Pixel 2 XL and Pixel 2

You can find smart lock settings under security & location settings. Check out the below-given settings to use the face recognition on Pixel 2 and Pixel 2 XL.

Step 1: Swipe down the notification shade twice and tap the Settings gear icon.

Step 2: Scroll down the page and tap Security & location.

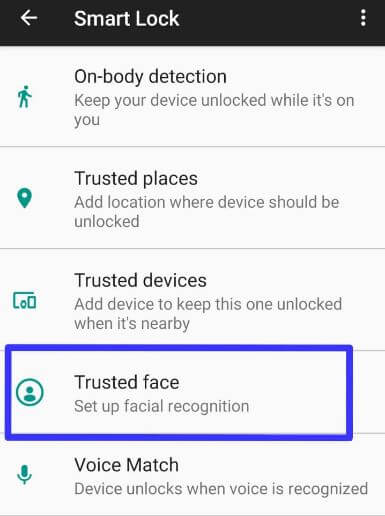
Step 3: Tap Smart lock under device security.

Enter a password or pattern lock if set to continue the process.

Set up facial recognition in Pixel 2 XL

Step 4: Tap Trusted face to set up facial recognition in Pixel 2 & Pixel 2 XL.

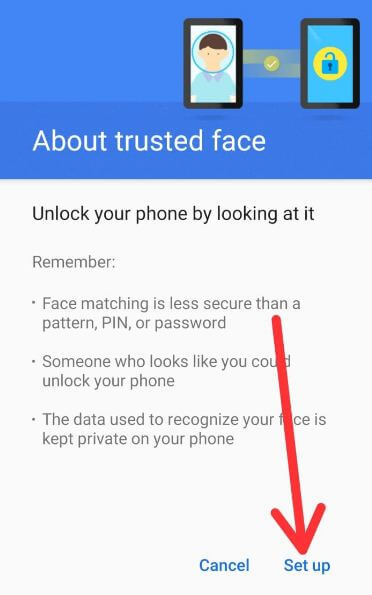
Note: Face unlock is less secure than a pattern lock, password, or PIN number.

The device will unlock when the face is recognized on your phone.

Set up trusted face in Pixel 2 XL Oreo

Step 5: Tap Set up.

Step 6: Tap Next.

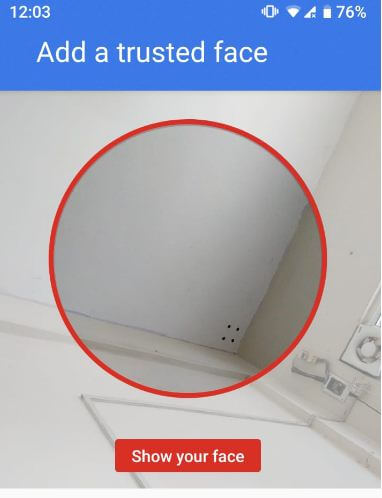
You can see add a trusted face screen in your Google Pixel 2 and other Pixel devices.

How to use trusted face on Pixel 2 and Pixel 2 XL

Step 7: Show your face in the circle appear on your device screen.

After the completed process, you can see this message on the screen: All Set!

Step 8: Tap Done.

Now your Pixel 2 unlock while recognizing your face. If your face isn’t recognized, unlock your device with a PIN number, pattern lock, or password. Also, improve face matching and remove trusted face on Pixel 2 and Pixel 2 XL using below given settings.

How to Remove Trusted Face on Google Pixel 2 & Pixel 2 XL

Settings > Security & location > Smart lock > Trusted face > Remove trusted face > Remove

Now turned off trusted face in your Pixel 2 and Pixel 2 XL device. And that’s it.

Hope this tutorial helpful to set up face unlock on Pixel 2 & Pixel 2 XL. Do you have a question about using a trusted face on Pixel 2 and Pixel 2 XL? Let us know in the comments below!

How to Auto Sync Account on OnePlus 7T Pro, 7T, 7 Pro, 7, 6T, 6

To sync account to OnePlus 7T Pro, 7T, 7 Pro, 7, 6T, 6, make sure to turn on auto-sync account in your devices. When enabling auto-sync, it’ll automatically sync your phone data when updates available such as contacts, chrome, docs, people details and other data. Also, sync your apps & accounts and password to other device. You’ll sync each account manually to get latest updated information. When turn on auto-sync on OnePlus 6, it’ll update data automatically without send any update notification. One of the disadvantages of this feature is consume more data and battery usage more. Let see how to sync the account to your OnePlus devices.

Read Also:

How to Sync Account on OnePlus 7T Pro, 7T, 7 Pro, 7, 6T, 6

How to sync account to OnePlus 6 Oxygen OS

First of all enable auto-sync in OnePlus 6 using below given settings. After that you’ll sync contacts to Google on OnePlus 6 Oxygen OS.

Step 1: Swipe down notification panel and tap Settings icon.

Step 2: Scroll down and Tap on Accounts.

Here you can see the Auto-sync personal data option. To sync data to Google on OnePlus 6, activate it.

Step 3: Scroll down at the end and toggle on Auto-sync personal data.

Now turn on auto sync in your OnePlus 6 devices. You’ll individually sync data of account in your device using below given settings.

How to Sync App Data on OnePlus 6 Oxygen OS

Here you can sync individual app data on your OnePlus 6 device data with Google account (Contacts, passwords, chrome, and other details), WhatsApp, Facebook, OnePlus account, Google Duo, Evernote, and more.

Settings > Accounts > Select the account or app > Account sync > Enable or disable sync you want

Now enable/disable data you want to sync with a Google account or OnePlus account from your OnePlu 6 Oxygen OS device.

If facing account sync issues on OnePlus 6, make sure auto-sync is on or internet connection works in your device. Also check for system software updates on your device to fix problem. If none of the solutions worked, remove account & again add to your device.

And that’s all. We hope this makes it clear How to sync account to OnePlus 6 Oxygen OS 5.1.9. If you have any kind of trouble, tell us in below comment box. Read more about OnePlus 6 tips and tricks.