How to Use Trusted Face (Face Unlock) on Pixel 2 and Pixel 2 XL

Do you know how to use face unlock on Google Pixel 2 and 2 XL? You can use trusted face features to unlock Pixel 2 using face unlock. To set up face unlock on Pixel 2 XL, you need to activate a trusted face. Here’s how to use a trusted face on Pixel 2 and Pixel 2 XL. Smart lock feature is helpful to unlock your device automatically without a Password, Pattern lock, or PIN number. Pixel 2 smart lock options including on-body detection, trusted places, trusted face, trusted devices, and voice match. Google removed the trusted face and trusted voice options from Android 10 and the latest Android 11 smart lock.

Read Also:

How to Enable and Use Trusted Face on Pixel 2 XL and Pixel 2

You can find smart lock settings under security & location settings. Check out the below-given settings to use the face recognition on Pixel 2 and Pixel 2 XL.

Step 1: Swipe down the notification shade twice and tap the Settings gear icon.

Step 2: Scroll down the page and tap Security & location.

Step 3: Tap Smart lock under device security.

Enter a password or pattern lock if set to continue the process.

Set up facial recognition in Pixel 2 XL

Step 4: Tap Trusted face to set up facial recognition in Pixel 2 & Pixel 2 XL.

Note: Face unlock is less secure than a pattern lock, password, or PIN number.

The device will unlock when the face is recognized on your phone.

Set up trusted face in Pixel 2 XL Oreo

Step 5: Tap Set up.

Step 6: Tap Next.

You can see add a trusted face screen in your Google Pixel 2 and other Pixel devices.

How to use trusted face on Pixel 2 and Pixel 2 XL

Step 7: Show your face in the circle appear on your device screen.

After the completed process, you can see this message on the screen: All Set!

Step 8: Tap Done.

Now your Pixel 2 unlock while recognizing your face. If your face isn’t recognized, unlock your device with a PIN number, pattern lock, or password. Also, improve face matching and remove trusted face on Pixel 2 and Pixel 2 XL using below given settings.

How to Remove Trusted Face on Google Pixel 2 & Pixel 2 XL

Settings > Security & location > Smart lock > Trusted face > Remove trusted face > Remove

Now turned off trusted face in your Pixel 2 and Pixel 2 XL device. And that’s it.

Hope this tutorial helpful to set up face unlock on Pixel 2 & Pixel 2 XL. Do you have a question about using a trusted face on Pixel 2 and Pixel 2 XL? Let us know in the comments below!

How to Auto Sync Account on OnePlus 7T Pro, 7T, 7 Pro, 7, 6T, 6

To sync account to OnePlus 7T Pro, 7T, 7 Pro, 7, 6T, 6, make sure to turn on auto-sync account in your devices. When enabling auto-sync, it’ll automatically sync your phone data when updates available such as contacts, chrome, docs, people details and other data. Also, sync your apps & accounts and password to other device. You’ll sync each account manually to get latest updated information. When turn on auto-sync on OnePlus 6, it’ll update data automatically without send any update notification. One of the disadvantages of this feature is consume more data and battery usage more. Let see how to sync the account to your OnePlus devices.

Read Also:

How to Sync Account on OnePlus 7T Pro, 7T, 7 Pro, 7, 6T, 6

How to sync account to OnePlus 6 Oxygen OS

First of all enable auto-sync in OnePlus 6 using below given settings. After that you’ll sync contacts to Google on OnePlus 6 Oxygen OS.

Step 1: Swipe down notification panel and tap Settings icon.

Step 2: Scroll down and Tap on Accounts.

Here you can see the Auto-sync personal data option. To sync data to Google on OnePlus 6, activate it.

Step 3: Scroll down at the end and toggle on Auto-sync personal data.

Now turn on auto sync in your OnePlus 6 devices. You’ll individually sync data of account in your device using below given settings.

How to Sync App Data on OnePlus 6 Oxygen OS

Here you can sync individual app data on your OnePlus 6 device data with Google account (Contacts, passwords, chrome, and other details), WhatsApp, Facebook, OnePlus account, Google Duo, Evernote, and more.

Settings > Accounts > Select the account or app > Account sync > Enable or disable sync you want

Now enable/disable data you want to sync with a Google account or OnePlus account from your OnePlu 6 Oxygen OS device.

If facing account sync issues on OnePlus 6, make sure auto-sync is on or internet connection works in your device. Also check for system software updates on your device to fix problem. If none of the solutions worked, remove account & again add to your device.

And that’s all. We hope this makes it clear How to sync account to OnePlus 6 Oxygen OS 5.1.9. If you have any kind of trouble, tell us in below comment box. Read more about OnePlus 6 tips and tricks.

How to Turn On WiFi Automatically Android 9 Pie

You can turn on WiFi automatically Android 9 pie device under Wi-Fi preferences. To connect Android 9 to WiFi automatically, make sure to turn on location in your device. If available nearby saved networks, it will automatically connect to your Android devices. Wi-Fi won’t turn on automatically on Pixel or Android when the location is off or airplane turned on or Wi-Fi scanning off. Also, make WiFi calling on your Android Pie 9.0 devices using network and internet settings.

Read Also:

How to Turn On WiFi Automatically Android Pie 9.0

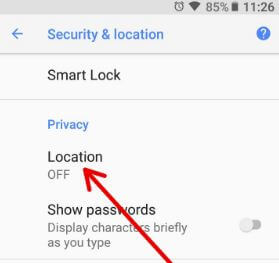
To wifi turns on automatically Android Pie 9.0, confirm location must turn on.

Swipe down notification shade twice > tap Location

Now follow the below-given step by step process to enable Wi-Fi automatically in Android Pie 9.0 device.

Step 1: Swipe down the notification panel twice and tap the Settings icon.

Step 2: Tap Network & internet.

Here you can see Wi-Fi, mobile network, Data usage, hotspot & tethering, Airplane mode, and advanced settings.

Open Wifi in android P 9.0

Step 3: Tap WiFi.

Wifi preferences in android P 9.0

Step 4: Tap Wi-Fi preferences.

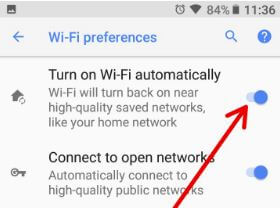
Enable Wi-Fi automatically in android P 9.0

By default turned off “turn on Wi-Fi automatically” option.

How to turn on WiFi automatically android P 9.0

Step 5: Toggle on “Turn on Wi-Fi automatically

Now you can see new settings added to Wi-Fi preferences called “connect to open networks”. By default disabled this option. It will automatically connect to the high quality public network on Android Pie 9.0 device when turned on.

Automatically connect to high quality public network in android P

Step 6: Turn on toggle Connect to open networks to automatically connect to the high quality public network.

Wi-Fi assistant by Google connectivity services auto-connects to high-quality public WiFi hotspots and helps secure your connection. To protect you on public Wi-Fi, your data is transmitted through a secure VPN (Virtual Private Network) managed by Google.

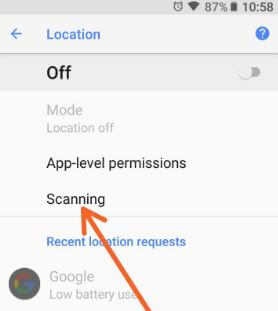
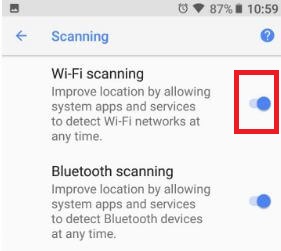
If turn on Wi-Fi automatically not working in Android device, then enable Wi-Fi scanning in Android Pie 9.0 & after that again turn on Wi-Fi automatically.

Stop WiFi From Turning on Automatically Android

Settings > Network & internet > WiFi > WiFi preferences > Toggle off “Turn on Wi-Fi automatically”

Turn on WiFi Scanning in Android 9 Pie

Turn on Wi-Fi scanning in android P 9.0

Settings > Security & location > Location > Advanced > Scanning > Toggle on “Wi-Fi scanning”

Now your Pixel device automatically connects near the Wi-Fi network if available.

You’ll enable/disable “turn off hotspot automatically” in your devices.

Automatically Turns Off Hotspot on Android 9 Pie

Settings > Network & internet > Hotspot & tethering > Wi-Fi hotspot > Advanced > Turn off hotspot automatically

By default enable this option. You can disable it any time in your android 9.0 device.

And that’s all. Do you still have a question about turn on WiFi automatically Android 9 Pie? If you have any kind of trouble, tell us in below comment box. Stay and connect with us for the latest updates.
How to Forgot Unlock Screen Password on Android

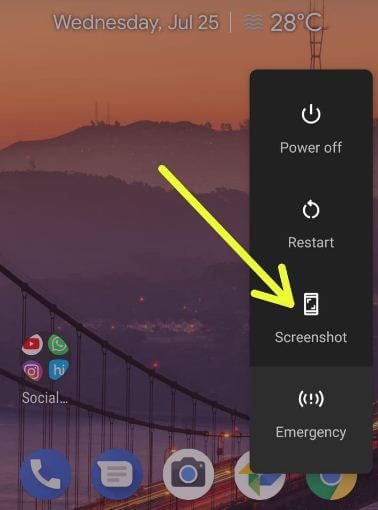
Want to unlock the android phone if you forgot the password, pattern lock, or PIN number? Here’s how to unlock forgot password in android 8.1, 9 Pie and latest android devices. Factory reset or hard reset android 8.1 to unlock android phone without a password or PIN number.

This hard reset on the latest android devices will reset all phone settings or remove all phone data such as Google & Samsung account, internal storage, photos, videos, music, and other personal information. So make sure back up & restore important data safely in Google account or other devices. Follow the below-given step by step process to unlock forgot password in android 8.1 devices.

Read Also:

How to Unlock Forgot Password in Android 8.1

This master reset android 8.1 Oreo is also helpful to fix several problems such as phone won’t turn on or black screen, touch screen not working or unresponsive, app freezing or crashing, battery won’t charge and more. To unlock forgot password in the android Oreo 8.1 device, apply the below-given step by step process on your phone.

Step 1: Turn off your android 8.1 Oreo device.

Step 2: Press & hold the volume down button and the power button at the same time until the screen wakes up. Now appear Android system recovery screen on your Oreo device. By default start button show on your device.

How to unlock forgot password in android 8.1 device

Step 3: Press the volume down button until move recovery mode.

Step 4: Press the power button to restart into recovery mode.

You can see the screen of the android robot exclamation mark with a red triangle icon on your android Oreo 8.1 devices.

Step 5: Press & hold the power button and volume up button at the same time to scroll to wipe cache partition, press the power button to select it.

This message appears on your android Oreo 8.1 screen: Wipe all user data?

Step 6: Press the volume down button to scroll Yes and press the power button to select it.

Now wait for few minutes to wipe cache data in android 8.1 Oreo.

Step 7: Press the volume down buttons to scroll to reboot system now, press the power button to select it.

You can factory reset android 8.1 Oreo if you’re device unlock to fix several problems in your device.

Factory reset Android 8.1 Oreo using phone settings

Step 1: Go to Settings.

Step 2: Tap Backup & reset under the personal section.

Step 3: Tap Factory data reset.

Step 4: Tap Reset phone.

Step 5: Tap Erase everything.

It will erase all you android phone data. So back up data safely in your device, then after perform this action.

And that’s all. Did you find above tutorial helpful to unlock forgot password in android 8.1? Do you have any other tips you want to share with us? Tell us in below comment box.

How to Personalize Android 9 (Pie) Home Screen Settings

Here’s how to change home screen settings in Android Pie 9.0. You can personalize Android 9 home screen settings, including Notification dots, At a glance, add the new app icon to the home screen, see the Google news app, suggestions for overview & all apps list, home screen rotation, and change app icon shape in Android Pie 9.0. Android Pie added new features such as Navigation gestures, Adaptive Battery, Adaptive Brightness, App timer, Dashboard, Wind down, standby apps, lockdown, and more.

Read Also: How to Customize Android 14 Lock Screen

How to Change Home Screen Settings in Android 9 Pie

You can customize the home screen settings in Android 9.0 using the settings below.

Step 1: Long press on the blank space in your Android 9.0 device.

Here, you can see home settings, widgets, and wallpaper settings.

How to change home screen settings in android P 9.0

Step 2: Tap Home settings.

You can see the below-given Android 9 home screen settings.

Customize home screen settings in android P 9.0

Enable/Disable Notification Dots

By default, turn on notification dots in your Android 9.0. When you receive any notification on your device, you’ll see a dot icon on that app. Turn it off on your device if you want to show notification dots.

At a Glance

Appear information at the top of your screens, such as the next upcoming meeting or event alert, flight information, traffic alerts, and more. Individually turn on/off the settings you want to set.

Add the New App icon to the Home Screen

Add the app icon to the home screen in your Android Pie or other devices by default. So, when installing new apps from the Play Store, you can see app shortcuts on the Android 9.0 home screen. Turn off the add app icon if you want to hide the app shortcut from the home screen.

Show Google News

Display Google app in android P 9.0 device

Swipe the screen left to the right side to open the Google news app or Google feed in Android Pie 9.0. Here, you can see your favorite topics like Galaxy Note series, Android P, Google, Cricket, iPhone, Windows device, Google Assistant, and other pages. If you don’t want to show the latest updates of your favorite topics, toggle off the display Google app.

Read More: How to Customize Google Feed on Android

Suggestions

You can see “Apps” and the new Android Pie “Apps Action” features. You can see the most recently used apps list in your Android 9 Pie app drawer at the top of the apps list. The app actions feature helps show the most used data on app drawers in your Android 9.0.

Enable Home Screen Rotation

Enable Android Pie home screen rotation to rotate the screen when your phone is rotated.

Change App Icon Shape

Change icon shape in android P 9.0 device

By default, use the system icon shape in Android Pie 9.0 devices. Choose from Square/Rounded square/Squircle/Teardrop to change shape in Android 9.0 devices.

And that’s all. We hope this clarifies how to change home screen settings in Android Pie 9.0. If you have any questions, let us know in the comment box below. What would you like to see on the Android Pie home screen?

Read Also:

How to Fix Instant Apps Not Working on Android Oreo 8.1

Annoying by instant apps not running on Pixel Oreo? Here’s how to fix instant apps not working Android Oreo 8.0 & 8.1 devices. You can enable and use instant apps on Android Oreo using Google settings. Android instant apps feature is helpful to use android apps without installation in your device. Instant apps are temporarily and you can see instant app link under instant app settings. You’ll remove instant app link or clear app data to change instant app settings in your Android Oreo devices. Also, view used recent apps list to tap the overview button on your phone.

Read Also:

How to Fix Instant Apps Not Working Android Oreo 8.0 and 8.1

Several users reported Android instant apps not showing or instant apps won’t open on Pixel device. Check out the list of troubleshooting steps to fix problems.

Check the Internet

If the Android instant app not opens, check your device Wi-Fi or mobile data connection not lost. After the start, refresh the page and open the app on your device or web such as Google Chrome or Firefox browser.

Clear Specific Instant App Data

You can view the instant app list under instant apps settings in your Android Oreo. Here you can see apps opening in a browser if already installed in your Android device. If not find any instant app link, no apps have been installed.

Settings > Google > Instant apps > Tap app link you want to remove > Clear the data for a specific instant app  

Turn Off Instant Apps and Again Turn On

Step 1: Swipe down the notification panel and tap Settings.

Step 2: Tap Google at the end of the page.

Use instant apps on android Oreo phone

Step 3: Tap Instant apps under the services section.

Here you can view instant app links if available in your android Oreo 8.0 & 8.1 and Android 9.0 devices.

How to fix instant apps not working android Oreo

Step 4: Select None.

You’ll see this pop-up screen in your device: Turn off instant apps? Now all android instant apps & associated app data, including app permission, will be removed for your account.

Turn off instant apps android Oreo

Step 5: Tap Turn off.

Now restart your device and after that again turn on instant apps and check android instant app link work or not.

And that’s all. End the list of possible solutions to fix instant apps not working Android Oreo 8.0 and 8.1. Do you have any other tips you want to share? Let us know in the comments.