How to Disable Instant Apps on Android Oreo 8.1

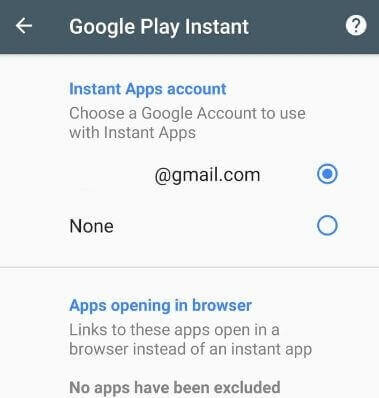
Here’s how to enable or disable instant apps on Android Oreo 8.0 & 8.1. Do you know what is instant apps? Android instant apps feature is helpful to use play store apps without installation in your device. Instant apps are kept on your device temporarily. If you found the app helpful, go to play store and download it on your android phone. You can find instant app settings under Google settings in your Android Oreo. If you can see the app link in android instant app settings, this app links open in a browser instead of an instant app. If you can’t see instant apps in your Google settings, then it is not yet available for your phone. Also, see recent instant apps, clear data for the instant app, manage permission for instant apps, and turn off instant apps on Android Oreo 8.1.

Read Also:

How to Disable/Turn Off Instant Apps on Android Oreo 8.0 & 8.1

Step 1: Swipe down notification panel and tap the Settings.

Step 2: Scroll down up to the end of the page and tap Google.

Use android instant apps on Oreo

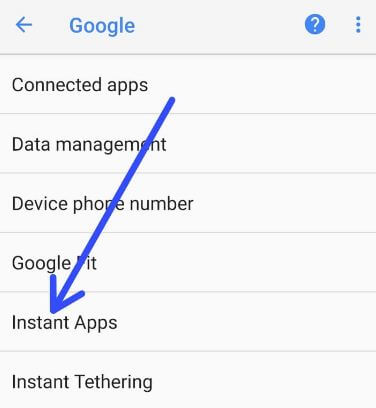
Step 3: Tap Instant apps under the services section.

Here you can see Android instant app links if available in your Android Oreo and Android Pie 9.0 devices. If available, use instant apps in your Android Oreo 8.0 and 8.1 devices.

Turn off android instant apps on Oreo 8.1

Step 4: Choose None.

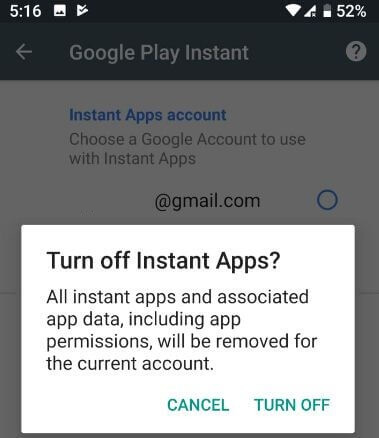
You’ll see this pop-up screen in your device: Turn off instant apps? Now all instant apps and associated app data, including app permission, will be removed for the current account.

How to disable instant apps android Oreo

Step 5: Tap on Turn off.

Now, clear all Android instant app links from settings. Do you know how to download instant apps on Android? This article is also helpful while instant apps not working on Android Oreo devices. Several users facing the problem of Android instant apps not showing or instant apps not working in Google Pixel and other devices. Have you been ever facing this type of problem in your device?

Read Also:

How to Clear Instant App Data on Android Oreo 8.0 & 8.1

Settings > Google > Instant apps > Tap Instant app you want to clear > Clear app data

And that’s all. We hope this makes it clear how to disable instant apps Android Oreo. If you have any kind of trouble, tell us in below comment box. Stay and connect with us for the latest updates.

How to Factory Reset Samsung Galaxy Note 9 Without Password

Here’s how to factory reset Galaxy Note 9. You need to perform this reset setting if you’ve forgotten the password, PIN, or pattern lock. This reset Note 9 will delete all your phone data from your device such as internal storage, Google accounts, photos, videos, music, and other personal info. So before factory reset or hard reset galaxy Note 9, back up all your important data safely to other phone or desktop PC.

This Samsung Galaxy Note 9 factory reset data will help to fix Note 9 frozen, unresponsive, stuck on the boot screen, app freezing and more problems. You’ll perform factory data reset on galaxy Note 9 using back up and reset settings. Follow the below-given step by step process to factory reset Samsung Note 9.

Relevant:

How to Factory Reset Galaxy Note 9

How to factory reset Galaxy Note 9

This factory reset setting will reset all your phone settings such as remove account password, third party apps and all other settings from your device. Back up & restore important data, after that apply below-given settings.

Step 1: Swipe down the notification shade and tap the Settings gear icon.

Step 2: Tap Reset under General management.

Step 3: Tap Factory data reset.

Step 4: Tap Reset phone.

Enter PIN number or Password if set to continue the process in your Note 9.

Step 5: Tap Delete all.

Now, wait for the perform factory data reset and restart your device. Now all your phone settings set as when buying a new device.

If this method can’t fox your Samsung Galaxy Note 9 problems, hard reset galaxy Note 9 using recovery mode in your device with help of power button, volume button, and Bixby Key. This galaxy note 9 hard reset settings helpful while forgot pattern lock or password, Note 9 touch screen not working, Note 9 won’t turn on, black screen and more.

Using Android system recovery settings, you’ll reboot the system, apply update from ADB, update/recover from SD card, wipe data/factory reset and wipe cache partition on Galaxy Note 9.

And that’s all. I hope this little tip helpful to factory reset Galaxy Note 9. Have you been ever reset phone settings? If yes, then tell us the reason in below comment box. Stay and connect with us for the latest galaxy Note 9 updates.

How to Factory Reset Pixel 3 and Pixel 3 XL

Here’s how to factory reset Pixel 3 and Pixel 3 XL device. To remove data from your Google Pixel device, resetting it to factory settings. This resetting process will erase all your data from your device. This reset phone is also called a hard reset Pixel 3 and Pixel 3 XL. You’ll apply this setting if your Pixel 3 won’t turn on, touch screen unresponsive, black screen of death, and other issues.

This Pixel 3 factory reset data will remove all data from your phone’s internal storage including Google account, system & app data, downloaded apps, photos, music and other information related to your signed accounts. So back up and restore data on Pixel 3 & Pixel 3 XL before performing a factory reset. Apply below-given step by step process to reset Pixel 3 and Pixel 3 XL to factory settings.

Read Also:

How to Reset Pixel 3 to Factory Settings

This Pixel 3 factory reset will helpful while Google Pixel 3 won’t turn on or apps freezing or crashing and another problem occurs. If none of the solutions worked, you’ll try the factory reset or hard reset on Pixel 3 and Pixel 3 XL.

Step 1: Swipe down the notification panel and tap Settings.

Step 2: Scroll down at end of the page and tap System.

Step 3: Tap Advanced.

Here you can see Language & input, Gestures, backup, reset options, developer options if activated, multiple users, system update and more.

Reset Pixel 3 and Pixel 3 XL

Step 4: Tap Reset options.

How to factory reset Pixel 3 and Pixel 3 XL

Step 5: Tap Erase all data (Factory reset).

Reset phone settings in Google Pixel 3 XL 9.0

Step 6: Tap Reset phone.

Step 7: Confirm your pattern lock or password to continue the process.

Factory reset Pixel 3 and Pixel 3 XL

Step 8: Tap Erase everything.

Now erase all your phone personal data and the third party downloaded apps in your Google Pixel 3 and Pixel 3 XL devices. You can’t back up this deleted information on your device. Also, clear cache partition or hard reset Pixel 3 and Pixel 3 XL using hardware key (Power and Volume buttons) to fix several issues.

Factory Data Reset when a phone is locked or won’t turn on

Step 1: Make sure to switch off your Pixel 3 XL.

Step 2: Press & hold the volume down button and the power button at the same time until your device vibrates.

Now Android system recovery screen is a view in your Pixel 3 XL. By default start button show on your Android device.

Step 3: Press the volume down button until view recovery mode.

Step 4: Press the power button to restart into recovery mode.

You can see the android robot exclamation mark with a red triangle icon with No command on your Google Pixel 3 XL.

Step 5: Press & hold the power button and press volume up button one time only and then release the only the volume up button.

You can see several recovery mode options for your Google Pixel 3 XL.

Step 6: Press the volume down button until Wipe data/factory reset.

Step 7: Press the Power button to perform the factory reset.

This message appears on the Pixel 3 XL screen: Wipe all user data? By default No selected.

Step 8: Press the volume down button to select Yes.

Step 9: Press the power button to factory reset Pixel 3 XL settings.

Wait until wipe all data in your device.

Step 10: Press the volume up button until highlight reboot system now.

Step 11: Press the power button to reboot the system.

And that’s all. I hope this little article helpful to factory reset Pixel 3 and Pixel 3 XL. If you have any kind of trouble, tell us in below comment box. Stay and connect with us for the latest updates.
How to Fix Samsung Galaxy Note 9 WiFi Issue

Annoying by Samsung Galaxy Note 9 Wi-Fi not connecting? Here’s how to fix Galaxy Note 9 Wi-Fi not working problem even connected to the internet. Different android users face different types of Wi-Fi problems such as Wifi keeps disconnecting or Wi-Fi authentication issues or WiFi won’t turn on or WiFi connected but no internet and more. Have you been ever facing this type of issue on your Samsung galaxy or other android devices?

First of all, find the problem types such as device or network or internet problem in your galaxy Note 9. If your galaxy Note 9 connects to the Wi-Fi network but you still have no internet, the problem is with your internet connection. Follow below given possible methods to fix Galaxy Note 9 Wi-Fi not working issue.

Read Also:

How to Fix Galaxy Note 9 WiFi Not Working issue

How to fix Galaxy Note 9 Wi-Fi not working

Restart your Galaxy Note 9 device and check Wi-Fi working or not. If not working, try below-given troubleshooting methods.

 Make sure Wi-Fi is enabled

Check Wi-Fi turned on in your device. Turned it off and on again to reconnect and check the Wi-Fi problem solve.

Restart the wireless router & modem to Fix Galaxy Note 9 WiFi Not Working

Unplug the router and modem’s power cord from the power outlet for 20 seconds. Plug the power cords back in. Wait a few minutes, until lights on the modem and router. Now connect with the Wi-Fi network on Note 9 and check to fix the WiFi connectivity issue.

Check Wi-Fi password

Make sure the network password you entered in your galaxy Note 9 is the same as your Wi-Fi password.

Settings > Network & internet > Wi-Fi > Network name > Show password

Turn off Airplane mode

Turned on Airplane mode and off again after 1-2 minutes. Now connect with Wi-Fi and check Wi-Fi working or not in your device.

Swipe down notification panel > tap Airplane mode

Delete WiFi network connected & add again

Delete connected Wi-Fi network from your Samsung galaxy Note 9 and after that again add the Wi-Fi network in your device.

Remove Wi-Fi network on Galaxy Note 9

Settings > Network & internet > Wi-Fi > Turn on Wi-Fi, if needed > Tap & hold added network you want to delete > Forget network

Add Wi-Fi network on Galaxy Note 9

Settings > Network & internet > Wi-Fi > Add network > Enter SSID (Network name) & other info > Save

If none of the above given methods fix Wi-Fi not working on Samsung galaxy Note 9 issue, reset all network settings in your device.

Enable Safe Mode and check WiFi working

Step 1: Press & hold the Power button on your Samsung Note 9.

Step 2: Long press the Power off button until appearing “Restart in safe mode“.

You can view this message on the screen: Reboot to safe mode

Step 3: Tap OK.

Step 4: You can see the Safe mode icon at the bottom of the left side screen.

Now, start into safe mode galaxy note 9.  All third-party apps are disabled from your device. Check your phone WiFi is connected, if you can’t find any problem in safe mode, it means any third-party apps causing an issue. If you can’t connect WiFi in safe mode, it means a hardware or OS related issue. To turn off safe mode on Note 9, restart your device. Now uninstall a recently downloaded app one by one and check fix issue in your device. After finding the app, remove it from your device and reinstall the other apps in your Samsung Note 9 Phablet.

Reset Network Settings

It’ll reset all network settings in your Samsung Note 9 including Wi-Fi, mobile data, and Bluetooth connections.

Step 1: Go to Settings.

Step 2: Tap Network & internet.

Step 3: Tap Three vertical dots (More) at the top right corner.

Step 4: Tap Reset Wi-Fi, mobile & Bluetooth.

Step 5: Tap Reset settings.

If you still can’t connect Wi-Fi on galaxy Note 9? Contact the network administrator or your internet service provider.

And that’s all. End the list of possible solutions to fix Galaxy Note 9 Wi-Fi not working issue. Do you have any other tips you want to share? Let me know in the below comment section.

How to Change Keyboard In Huawei P30 Pro, P30, P20 Pro, P20 Lite, Mate 20

Change the swift keyboard on Huawei? Here’s how to set or change the keyboard in Huawei P20 Pro and P20. By default Swiftkey keyboard set as a keyboard in your Huawei P20 device. You can change the default keyboard & keyboard language in Huawei P20 Pro using language & input settings. Also, set Gboard (Multilingual typing) keyboard as Huawei P20 keyboard.

This setting is compatible with Huawei P30 Pro, P30, P20 Pro, P20 Lite, Mate 20, and more. In Huawei P20 Pro and P20 language & input settings, you can see languages, virtual keyboard, default keyboard, Google voice typing, spelling correction, text-to-speech output, pointer speed, and more settings. If you don’t want to use a phone keyboard, you’ll download APK file or Huawei keyboard download from the play store on your device.

Read Also:

How to Change Keyboard Layout on Huawei P20 Pro and P20

How to change keyboard in Huawei P20 Pro 

Let see how to change the default keyboard and keyboard layouts in Huawei P20 Pro and P20 devices.

Step 1: Swipe down the notification panel and tap the Settings icon.

Step 2: Tap on System.

Step 3: Tap on Language & input under advanced settings.

Here you can see languages, default keyboard, Gboard, Google voice typing, autofill, and other settings.

Step 4: Tap on the Default keyboard under Keyboard & input methods.

By default, Swiftkey keyboard set in your Huawei devices.

Step 5: Choose Gboard.

Now you can change Gboard keyboard settings in Huawei P20 Pro and P20 using the given settings.

Settings > System > Advanced settings > Language & input > Keyboard & input method > Gboard

Here you can see language, preferences, theme, text correction, Glide typing, voice typing, search, and advanced settings. Using this setting, you’ll change your keyboard languages, change keyboard theme, enable/disable auto-correction, enable gland typing, enable gesture cursor control, predictive search, and more.

How to Change Keyboard Language on in Huawei P20 Pro

Step 1: Go to Settings on your device.

Step 2: Tap on System.

Step 3: Tap on Language & input.

Step 4: Tap the virtual keyboard under the keyboard & input method.

Step 5: Tap on Gboard.

Step 6: Tap on Languages.

You can see the default setting of your keyboard languages and layouts.

Step 7: Tap on Add keyboard at the bottom of the page.

Step 8: Tap the language you would like to set.

Step 9: Touch Done.

How to Change Phone Languages in Huawei P20 Pro and P20

Step 1: Swipe down the notification panel and tap Settings.

Step 2: Tap System.

Step 3: Tap Language & input.

Step 4: Tap Language.

By default set English (United States).

Step 5: Tap Add a language.

Step 6: Choose a language from the list.

Step 7: Tap & hold the language and move it first position to set the default language in your device.

Now back to the home screen in your device and you can see a set language you selected.

And that’s all. I hope this little tip helpful to change the keyboard in Huawei P20 Pro and P20. If you have any questions, tell us in below comment box.

How to Restrict Members From Sending Messages in WhatsApp Android

WhatsApp added a new feature for group admins to stop members from sending messages in WhatsApp on Android or iPhone devices. WhatsApp group admins have already permission to choose who can change the group’s subject, icon & description. Also, edit or delete WhatsApp group admin. But in this tutorial, I’ll show you how to set only admins can send messages in WhatsApp group in your Android devices. When you choose only admins to send messages to this group, all other WhatsApp group participants can’t send messages to the group.

Do you think this WhatsApp group admin feature is essential? Now Whatsapp gives more settings that only change by group admins. Follow the below-given step by step process to see how to stop someone from sending messages on WhatsApp group on your Android devices.

Read Also:

WhatsApp Group Admins Restrict Sending Messages Android Phone

Make sure the WhatsApp app updated to the latest version in your device. You can check any update is available or not in your android device using below settings.

Play store > Three horizontal lines at upper left corner > My apps & games > Update all

Now, update apps if available WhatsApp app update. After updated apps, follow the below-given settings to see how WhatsApp group admins restrict members from sending messages to the group in Android phones.

Step 1: Open the WhatsApp app in your Android device.

Step 2: Tap Any Group you want to restrict sending a message to a group.

Step 3: Tap Three vertical dots at the upper right side corner.

WhatsApp group info settings in android

Step 4: Select Group info.

WhatsApp group settings in android devices

Step 5: Tap Group settings.

Here you can see edit group info, send messages, and edit group admins settings in your android devices.

WhatsApp group admins restrict sending messages android phone

Step 6: Tap Send messages.

WhatsApp group admins restrict members from sending messages

By default selected All participants. So all group members can send messages to the group.

WhatsApp group admins restrict sending messages android

Step 7: Choose Only Admins and Tap OK.

Now only WhatsApp Group admins send messages to this particular group. All other group members can’t send messages to the group.

How to Add More Admins to WhatsApp Android

WhatsApp group admins can only edit or delete admins in your android or iPhone devices.

WhatsApp app > Tap any Group > Three vertical dots or tap group name > Group settings > Edit group admins > Tick mark participants you want to make admin

And that’s all. Do you still have a question about how WhatsApp group admins restrict sending messages? Tell us in below comment box. Don’t miss out to check our other Whatsapp tricks.