How to Find Your Lost Android Phone using Android device manager

Have you ever track your lost android phone location on your device without the android app? Here’s the way to find a lost phone location Android device manager. Android device manager allows you to remotely find, lock and erase your android phone. To find the location of your lost or stolen device location services is turned on. If not enable location, you can still chance to lock and erase the phone but you can’t search its exactly current location. It’s easy to enable android device manager on your device.

Android device manager gives permission to the app Google play services to perform lock the screen, change the screen lock and erase all data. You can also track your lost android phone using a desktop computer, click here to find a lost or stolen phone using a computer. Also, track lost phone location using Google Maps on Android devices. Follow the below-given step by step guide to find lost phone location android device.

Don’t Miss This:

How to Track My Lost Android phone location

Step 1: Tap on “App drawer” from home screen in your Android Nougat 7.0 (Moto G4 plus).

Step 2: Go to “Settings” or Swipe down the top of the screen of notifications & tap on the “Settings” gear icon.

You can see various sections including wireless & networks, device, personal and system.

Security under personal section on nougat 7.0 phone

Step 3: Under the personal section, tap on “Security”.

Tap on device administrators under security

Step 4: Tap on “Device administrators” under the device administration section.

Enabel android device manager on android 7.0 nougat

By default activate or enable android device manager on Moto G4 plus device (Android nougat 7.0). After enabling the android device manager to follow below settings on your phone to track lost phone location.

find lost phone location android

Settings > personal section > Google > Services > Location (If disable then enable it) > Location services > Google location history (Enable it on your device).

find lost phone location android device

After enable you can see the above screen on your android phone.

Step 5: Tap on “More” from the top of the right side corner.

manage lost phone location using android device manager

Step 6: Tap on “View / Manage“.

Now you can view or find lost phone location android device current location.

Step 7: Tap on “Android device manager”.

find lost phone location android phone 7.0

Step 8: To deactivate this feature, tap on “Deactivate this device administrator”.

Find Lost Phone Location on Android 8.1 Oreo, 9 Pie, 10 using your Android device

Step 1: Go to settings in your latest android devices

Step 2: Tap Security

Step 3: Tap Find my device under security alerts section

To use find my device on android, make sure turn on location in your device. Three different methods available here including Google find my device app, using Web, and using your phone Google account.

Find a lost or stolen phone using computer/laptop device

Find lost android phone using computer

First of all log in your Gmail account, after log in location data from your lost phone will be collected by the android device manager and sent to Google. You can view your android phone location approximate near, but not completely accurate. You can ring the stolen phone, lock & reset device password and erase data on your device.

I hope this article will help you to find lost phone location android device. If you have any kind of trouble when using the android device manager, let us know on the below comment box. It would be a pleasure to help you. Don’t forget to share this useful trick with your friends!

How to Use WhatsApp Video Call on Android

You can make a WhatsApp video call with your WhatsApp contact on Android or iPhone devices. Before this video calling feature, WhatsApp support only voice calling feature to only talking with others. To make a video call on WhatsApp Android phone, open the WhatsApp contact list and tap on any individual contact, and click on the video call icon. If you have the latest updated WhatsApp, you can make a group video call with up to 8 people at the same time. To make free video call (Not using mobile data) both WhatsApp contact user has Wi-Fi available. Also, tap on the calling icon to make a WhatsApp voice call.

WhatsApp is one of the most popular instant messenger apps to chat with friends, family members, and send photos, videos, documents, contact, audio, etc. If your android device hasn’t received the latest update then don’t worry automatically update the WhatsApp app on your android phone. Follow the below-given steps to use WhatsApp video call Android phone.

Read Also:

How to Make WhatsApp Video Call on Android

Check out below given two methods to use WhatsApp video calling on your Android devices.

How to Video Call on WhatsApp Android in 2020

Step 1: Open the “WhatsApp” app in your Android devices.

Open WhatsApp chat to make a group video call Android

Step 2: Tap on the Chats at the top left side.

Step 3: Tap on Any individual contact want to make WhatsApp video calling.

Use WhatsApp Video Call on Android

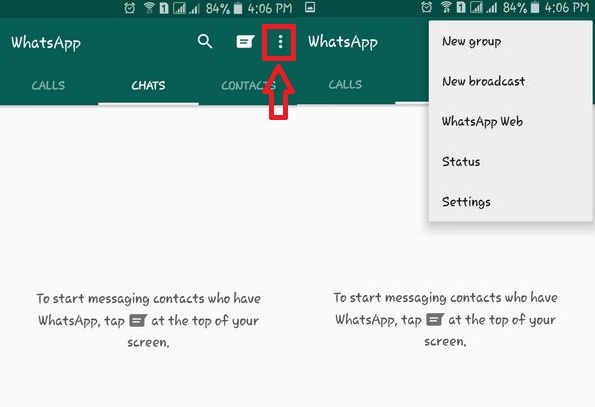
Step 4:  Click on the Video call icon at the top right side.

Step 5: When receiving the call, you can see the below screen.

How to Use WhatsApp Video Call on Android

Step 6: Tap the Red icon to stop the video call.

WhatsApp group video call contacts

Alternative Way: Open WhatsApp app > Tap Contact icon at the bottom right > Tap any contact > Tap Video call icon

How to Video Call on WhatsApp Android

Step 1: Open the “WhatsApp” app in your Android devices.

Make a WhatsApp video calling

Step 2: Tap the Calls tab at the top right corner.

How to Video Call on WhatsApp Android

Step 3: Tap Video call icon to make a video call.

How to Make a Group Video Call on WhatsApp Android

Step 1: Open the “WhatsApp” app in your Android devices.

Step 2: Tap on the Chats at the top left side.

Step 3: Tap on Any individual contact want to make WhatsApp video calling.

Step 4:  Click on the Video call icon at the top right side.

Step 5: When receiving the call, you can see the below screen.

Make a Group Video Call on WhatsApp Android Smartphone

Step 6: Tap the Contact icon at the top right and tap on it to add it.

You can add up to 8 people in the latest WhatsApp versions.

Step 7: Tap on the Red icon to stop it.

In some of the devices not get the latest WhatsApp updates, so when you call that particular contact it will see couldn’t place a call because that person does not receive WhatsApp video calling updates.

Did you find the above tricks to WhatsApp video call android phone helpful? If you have any problem occurs when to implement the above steps, please let us know on below comment box. Don’t forget to share this article with your friends on social networks.

How to change Bluetooth Audio Codec on Android 10, 9 Pie, 8.1 Oreo

You can change Bluetooth audio codec on android 8.0 Oreo under developer options. Android Oreo includes SBC, AAC, aptX, aptX HD and LDAC Bluetooth audio codec options. This Android 8.1 Bluetooth audio codec feature is useful to improve sound quality and provide better audio experience in your device. Android Oreo introduced new Bluetooth features called Bluetooth audio codec (Available for Android 10, 9 Pie).

You can see several Bluetooth audio codec options including Bluetooth audio simple rate, Bits per sample, channel mode and LDAC codec playback quality. You’ll change Bluetooth music output quality by changing Bluetooth audio codec in android 8.0 Oreo devices.

Read This:

How to Change Bluetooth Codec Android 8.1 Oreo

To change Bluetooth codec android 8.1 Oreo, make sure to enable developer options in your device. You can enable developer mode in your Oreo device using the below settings.

Change the Codec on Bluetooth Android 10 and 9 Pie

Step 1: Go to settings in your latest Android devices.

Step 2: Scroll down and tap on System.

Step 3: Tap on Advanced.

Step 4: Tap on Developer options.

If you can’t find developer mode, click here to enable it on your latest Android 10 devices.

Step 5: Scroll down and tap Bluetooth Audio Codec under the Networking section.

Step 6: Choose from SBC/AAC/Qualcomm aptX audio/Qualcomm aptX HD/LDAC/Enable optional Codecs/Disable optional Codecs

That’s it.

For Android 8.1 & 8.0 Oreo:

Step 1: Go to settings in your android Oreo devices.

Step 2: Tap on the system.

Step 3: Tap on about phone.

Step 4: Scroll down at the end of the page and tap on Build number 7 times.

You can see this message on your device screen: You are now a developer!

To see developer mode go to Settings > system > Developer options

Change Bluetooth audio codec on android Oreo 8.0/8.1

Step 1: Go to settings in your Oreo devices.

Step 2: Tap on the system.

Android O developer options

Step 3: Tap on Developer options.

Step 4: Scroll down up to the Networking section, here you’ll see the Bluetooth Audio codec option.

Android O Bluetooth Audio code

Step 5:  Tap on Bluetooth Audio codec.

By default set audio codes as system selection.

Change Bluetooth audio codec on android 8.0 Oreo

Step 6: Choose from SBC/AAC/aptX audio/aptX HD audio/LDAC/enable optional codec/disable optional codec

Are you using the Bluetooth Audio codec feature on your android Oreo device? Have any questions related to change Bluetooth audio codec on Android 8.0 Oreo? Feel free to leave them in the comment section. Check out our other android Oreo tips and tricks.

How to Enable or Disable Motion Sense on Pixel 4 and 4 XL

Google added new soli powered Motion sense gestures in Pixel 4 XL and Pixel 4. Here’s how to enable and use motion sense on Pixel 4 and 4 XL. This Google Pixel 4 XL Motion sense feature support air gestures, so you need to just wave your hand at your device to change certain actions such as skip to the next or previous song, snooze alarms, and silence calls, etc. With this new sensor, your Pixel can recognize distance and movement around the phone.

You can find Motion sense under system settings. A Google Pixel 4 motion sense feature includes quick gestures and ambient display settings. Also, find motion sense quick gestures under Pixel 4 gesture settings. Let see step by step process to enable or disable motion sense on Pixel 4 and 4 XL running Android 10.

Read Also:
How to Enable Google Pixel 4 Motion Sense

You can enable motion sense on Pixel 4 XL and Pixel 4 using the below steps.

Step 1: Swipe up from the bottom of the screen to open the app drawer in your Pixel 4 & 4 XL.

Step 2: Scroll down and tap on System.

You can see languages & input, Gestures, Date & time, Motion sense, Backup, Reset options, multiple users and system update settings.

Step 3: Tap on Motion sense.

Step 4: Toggle on Motion sense.

Now use motion sense on Pixel 4 XL and Pixel 4. You can see below-given Pixel 4 XL motion sense settings. Use this new Pixel 4 gestures to automatically change actions without touch your Smartphone.

How to enable or disable motion sense on Pixel 4 and 4 XL phone


Quick gestures

Below given two options are available in the quick gestures list.

Skip songs

Using this new motion sense feature, you can move to the next song without touch your Pixel 4 & 4 XL device. Just swipe your hand from the phone screen to go back to a previous song or next song.

Silence interruption

You can disable snooze alarms and silence calls to just wave your hand on your Google Pixel 4 & 4 XL.

Ambient display

Show notification icons, date & time, and other information when you’re nearby. By default enable show display when nearby on Pixel 4 XL and Pixel 4. Also, use reach to check the phone using this setting.

Turn off Motion sense on Pixel 4 XL and Pixel 4

If you disable motion sense, you can’t use quick gestures, show display when nearby, and reach to check the phone in your devices.

Settings > System > Motion sense > Turn off toggle Motion sense > Turn off

You can access quick gestures using Pixel 4 XL gestures settings.

Settings > System > Gestures > Quick gestures > Skip songs / Silence interruption

Also, use Pixel 4 gestures such as Active Edge, jump to camera, system navigation, Flip to Shhh, prevent ringing and more.

And that’s it. We hope the above-given tutorial useful to enable or disable motion sense on Pixel 4 and 4 XL. If you have any questions regarding this article, tell us in below comment box. Don’t forget to share it with others if you found it useful.

How to Set Up Face Unlock on Pixel 4 and Pixel 4 XL

Here’s how to set up and use face unlock on Pixel 4 XL and Pixel 4 using security settings. Using Google Pixel 4 face unlock feature, you’ll unlock your phone, sign in to apps, and confirm payment by glancing at your phone. Google removed fingerprint security from Pixel 4 and 4 XL devices. Recently got security updates and Pixel 4 & 4 XL device added new “Require Eyes to be open” option in face unlock settings. To unlock the phone, your eyes must be open.

Pixel 4 and 4 XL added new features such as super-fast face recognition, Motion sensing, Use Live Pokemon Wallpaper, 90 Hz refresh rate, customize Pixel 4 icon style & wallpaper and more. Google Pixel 4 and Pixel 4 XL event completed. This Google Pixel 4 event 2019 introduced Pixel Buds, Pixelbook Go, Stadia for gaming lovers and more. Follow the below-given step by step process to activate face unlock on Pixel 4 and 4 XL.

Read Also:
How to Activate Face Unlock in Pixel 4 XL And Pixel 4

How to set up face unlock on Pixel 4 and 4 XL

Enable Require Eyes to be Open on Google Pixel 4 and Pixel 4 XL

Settings > Security > Face unlock > Toggle on require eyes to be open under requirements for face unlock

Google added a new face recognition feature with soli powered on Pixel 4 & 4 XL that quickly unlock your device even if your eyes are closed. Let see steps to enable Pixel 4 XL face unlock on your phone.

Note: Your phone can be unlocked by someone who looks a lot like you.

Step 1: Swipe up from the bottom of the screen to access the app drawer in Pixel 4 & 4 XL.

Step 2: Scroll down and tap on Security.

You can see play protect, screen lock, face unlock, smart unlock and more.

Step 3: Tap on Face unlock.

Now display screen for set up face unlock. Also, choose from PIN or Password or Pattern lock screen security for unlock device.

Step 4: Tap on Next at the bottom right corner.

Step 5: Tap on Start at the bottom right corner.

You can see a rounded circle on your screen.

Step 6: Rotate your head, capture all angles of your face by removing all the tiles. Hold the phone still complete the process.

Step 7: Tap Done at the bottom right.

Now just looking at your phone can unlock it, confirm actions, and more.

Step 8: Locked your phone and just pick and you can see super fast unlock your Pixel 4 and 4 XL.

You’ll use the Pixel 4 XL face recognition feature when buy apps or games or other purchases using your Smartphone.

Disable or Remove Face Unlock on Pixel 4 XL and Pixel 4

Settings > Security > Face unlock > Delete Face data > OK

Now remove your face recognition from your Pixel 4 XL and Pixel 4 running Android 10. You’ll enable or disable unlocking your phone, app sign-in & payments and Skip lock screen. Also, turn on toggle of always require confirmation.

You can change lock screen security on Pixel 4 XL from Swipe, PIN, Password or Pattern lock. Set up a lock screen on Pixel 4 you want to unlock your phone.

And that’s it. I hope this little tip useful to set up face unlock on Pixel 4 and 4 XL. Do you still have any questions regarding this article? Tell us in below comment box. Stay and connect with us for the latest Pixel 4 and 4 XL updates.

How to show cached processes android phone

Show cached processes android phone. Using developer options settings, you can manage running services, RAM usage by applications and show cached processes on your android marshmallow 6.0, lollipop 5.1.1 and latest android 7.1.2 nougat devices. Before turn off cached processes, you can stop app’s running services in your smartphone. In show cached processes RAM manager clean or stop cached background processes in android phone. You can see running apps, system apps and free RAM space using this.

You can view and control currently running apps using running services settings. Sometimes stopping running service may cause application to fail, so alert before stop running apps and cached processes in your android phone. Below you can see step by step process to show cached processes android marshmallow device.

Read this:

How to check app memory usage in OnePlus 6

Best Solar Charger for android phone

How to check memory usage by apps in Android 9 Pie

How to show cached processes android phone

Step 1: Open “Settings” app on your smartphone

If in your android phone not turn on developer mode, you can enable developer options on android using this. By default disable developer mode.

Developer options lollipop device

Step 2: Scroll down until see “Developer options” and tap on it

Without turn on toggle button of developer options you can open running service on your android marshmallow device.

Running services settings under developer options

Step 3: Tap on “Running services

You can manage running services in your device using this setting. Stop any apps using RAM manager.

Manage running services android phone

Step 4: Tap on “More” from top of the right side corner

show cached processes android

Step 5: Click on “Show cached processes

You can see list of all cached processes application on your android phone. All see status of used, cached and free RAM.

Cached process apps android phone

Step 6: Tap any application want to stop cached processes

After tap any application, you can see app is active or not in phone screen. That’s all.

I hope you will enjoy above steps to show cached processes android phone. If you notice there is any error when implement then let us know on below comment box, would be pleasure to help you. Stay connected with us for latest updates!