How to Use Pixel 4 Styles and Wallpapers Menu: Android 10

Here’s how to customize the Pixel 4 XL styles menu. You can customize your Pixel 4 theme app including font style, icon shape, accent color, Font icon, Font color, and more. To change your Pixel 4 XL theme using style menu, open styles & wallpapers under display settings. You can change the default Pixel 4 and Pixel 4 XL style and wallpaper using this new setting. Different styles are available such as Caryon, Collage, and Ash. If you don’t like all styles, you’ll customize your own Pixel 4 theme style. Add your favorite fonts to every screen. Also, change the specific style name on your latest Pixel devices.

Google Pixel 4 and Pixel 4 XL have super fast face unlock, amazing Motion sense, 90Hz display, and more features. In Android Q Beta, new Pixel themes app spotted for customizing Android 10. Follow the below-given step by step process to customize Pixel 4 XL theme.

Read Also:

How to Theme Your Google Pixel 4 XL With Style Menu

You can make your own Google Pixel 4 and 4 XL theme that includes font style, choose icons, customize icon colors and icon shape.

Step 1: Go to Settings.

Step 2: Tap on Display.

Customize the Pixel 4 XL styles menu

Step 3: Tap on Styles and wallpapers.

Here you can see the current wallpaper set.

How to customize Pixel 4 XL theme

Step 4: Swipe left side and tap on Custom 1.

Step 5: Choose a specific font style from the list and tap on Next.

Step 6: Choose icons such as Wi-Fi, Bluetooth, Airplane mode, Flashlight, and few others.

Step 7: Tap on Next.

Step 8: Choose a color from the list and tap on Next.

Step 9: Choose icon shape on Pixel 4 XL & Pixel 4 and tap on Next.

How to Theme Your Google Pixel 4 XL With Style Menu

Step 10: Enter style name you customize the Pixel 4 theme and tap Apply at the bottom right corner.

Now automatically apply to your Google Pixel 4 and Pixel 4 XL devices.

Alternative Way:

How to Use Pixel 4 Styles and Wallpapers Menu For Android 10

Long press on the blank space in your Pixel 4 home screen > Styles & Wallpaper > Style > Custom at last > Chose font, icons, icon color, icon shape, Name style > Apply

Change wallpaper on Pixel 4 XL and Pixel 4

Step 1: Go to display settings.

Step 2: Tap Styles and wallpaper.

Step 3: Tap on Wallpaper at the bottom side.

Step 4: Select wallpaper from lits or phone gallery.

Step 5: Choose the Home screen, Lock screen, or Home screen and Lock screen.

Now customize Pixel 4 wallpaper you want to set. You’ll any time change or delete Pixel 4 style and wallpaper you customized.

And that’s it. What do you think about this new Pixel 4 XL styles & wallpaper features? Don’t forget to mention which is your favorite Pixel 4 theme style?

How to Change the Refresh Rate on OnePlus 8 Pro, 8, 7T Pro, 7 Pro

Here’s how to change the screen refresh rate on OnePlus 7 Pro and OnePlus 7. By default set a 90Hz screen refresh rate in your OnePlus 7 Pro. You can switch the refresh rate using display settings. Choose from 90Hz or 60 Hz. The higher the screen refresh rate, quickly operate the screen in your device. Can 90Hz screen improve battery life on the OnePlus 7 Pro?

In OnePlus 8 Pro, you’ll easily switch between the 120Hz and 60Hz. It will maximize the smoothness of your device with a higher refresh rate.

OnePlus 7 and OnePlus 7 Pro devices are officially available. OnePlus 7 Pro has a 6.5-inch amazing screen with a 19.5:9 aspect ratio. You can see better fingerprint scanner compare to previous OnePlus 6T, 48 MP cameras with pop-up, latest Oxygen OS, and more. Let see steps to use the screen refresh rate on OnePlus 7 Pro.

Read Also:

How to Adjust Screen Refresh Rate on OnePlus 7 Pro

How to use screen refresh rate on OnePlus 7 Pro

Using this 90Hz refresh rate, you’re device operates much smoother, touch response improves, faster scrolling, and more. Also, change the screen refresh rate in OnePlus 7 Pro using a display setting.

Change Refresh Rate on OnePlus 8 Pro and OnePlus 8

Step 1: Go to Settings.

Step 2: Tap on Display.

Step 3: Tap Advanced.

Step 4: Tap Screen refresh rate.

Step 5: Choose from 120Hz or 60HZ in OnePlus 8 Pro & Choose from 90Hz or 60Hz in OnePlus 8.

For OnePlus 7 Pro, 7T Pro, 7T and 7

Step 1: Swipe down the notification panel from the top of the screen and tap the Settings gear icon.

Step 2: Tap Display.

Here several display settings available such as night mode, screen timeout, screen resolution, Wallpaper, theme, video enhancer, ambient display, and more.

Step 3: Tap screen refresh rate.

Step 4: Choose from 90Hz or 60Hz.

It’s quite easy to use the screen refresh rate on OnePlus 7 Pro devices. You can set QHD+ resolution in your OnePlus.

Change OnePlus 7 Screen Resolutions

By default set auto-switch option in your device that automatically switches the resolution perfect to the screen. Not all apps supported QHD+ resolution, some of the apps misbehave also.

Settings > Display > resolution > Auto switch/QHD+/FHD+ > Switch

And that’s all. I hope this little tip useful to use screen refresh rate on OnePlus 7 Pro. Do you know any other new OnePlus 7 Pro tips? Share with us in below comment box. Stay and connect with us for the latest updates.

How to Fix YouTube Not Loading on Chrome Android, PC [2023]

The quality of your home network can primarily affect the videos that will play on your Android phone. You can see various video streaming problems such as buffering or lagging, playback errors, video loading but not playing, server connection loss, and video being unavailable. Watching YouTube videos on your device and suddenly getting YouTube not loading on Chrome or video won’t play on any browser. If multiple devices stream videos or use the same network simultaneously, you may run into buffering issues.

Solving YouTube video loading problems on your desktop and Android device is easy. To watch YouTube videos without loading, you need a good and fast internet connection on your Android phone or Chrome browser if using a PC or laptop. YouTube videos won’t play or load slowly if your internet speed is slow. Below you can see helpful tricks to fix your YouTube video streaming problems on Android phones.

Read More: How to Fix YouTube Offline Error Issue

How to Fix YouTube Not Loading on Chrome Desktop

Check out below given possible solutions to fix YouTube won’t play issues on Android phone or tablet devices.

Why Are Videos Not Playing on YouTube?

There are several reasons for YouTube videos not playing, such as a slow internet connection or internet disconnect, YouTube down, YouTube app error, software glitches, check browser updates, etc.

Check your Internet Connection

Ensure your internet connection is working. If a slow internet speed, the video will not correctly load or freeze. Use a WiFi network to avoid buffering or Youtube video loading issues. If using a WiFi network, enable mobile data and check to fix the problem.

Check for Chrome Browser Update on your PC

Ensure to install the latest Google Chrome browser on your PC. To check for Chrome updates, Open the Chrome browser > Tap Three vertical dots at the top right corner > Settings > About Chrome.

Check YouTube Servers

Check if YouTube servers are down using the down detector.

Open YouTube in Incognito Mode

Incognito mode is working as private mode. Check this to enable Incognito mode on your PC.

Disable Browser Extension

If using the Chrome browser extension, try to remove them and check to fix the problem.

Open Chrome Settings > Extension > Toggle off All Extension.

Clear Chrome Browser Cache & Cookies

If cache-related issues, your browser sometimes stops playing videos or suddenly stops YouTube. Clear the cache and cookies and open YouTube videos in your browser.

Step 1: Open the Chrome browser on your PC.

Step 2: Tap Three vertical dots at the top right corner and select Settings.

Step 3: Tap Privacy & Security at the left side menu.

Step 4: Tap Clear browsing data.

How to Fix YouTube Not Loading on Chrome Desktop

Step 5: Select the time range and tap Clear data.

Disable VPN

VPN can sometimes cause problems with YouTube loading. Temporarily disable them and check if YouTube loads.

Step 1: Open Windows Settings.

Step 2: Tap Network & Internet.

Step 3: Tap VPN.

Disable VPN to Fix YouTube Not Loading on Chrome

Step 4: Toggle Off Allow VPN over metered networks.

How to Fix YouTube Not Loading on Android Phone

Restart your Phone

Restart your phone to fix YouTube streaming problem Android

Long press the power button and tap Restart to reboot your phone and check to fix this issue.

Check the YouTube App Update

YouTube App Update Fix straming problem

Open Play Store > Profile icon at the top right corner > Manage apps & games > See details > Update or Update all.

Check Software Update

Settings > System > System update > Check for update.

Clear the YouTube Search and Watch History

Delete or clear all YouTube search history and watch history. Restart the YouTube app.

Permanently Clear YouTube Search History Android

Clear YouTube Cache

Fix YouTube Video Loading But Not Playing on Android

Settings > Apps or Apps & notifications > See all apps > YouTube > Storage & cache > Clear cache.

Change YouTube Video Quality to Fix YouTube Won’t Load Problem

If you have a slow internet connection, you can change YouTube video quality to fix buffering issues on your Android device using the below settings. You can choose YouTube upload video quality from auto, 144p, 240p, 360p, 480p, 720p, 1080p, 1440p, 2160p (4K), etc.

Change YouTube Video Quality marshmallow


Open YouTube > Play any video > Settings gear icon at the top right corner or Three vertical dots at the top right corner > Quality > Advanced > Choose the video quality you want to set.

That’s it. I hope the above-given tricks h to fix YouTube video streaming problems on Android phones and help to solve YouTube buffering issues. Do you have any alternative? Please share it with us below the comment box. Don’t forget to share this article with your friends.

Related:

How to install voice data android phone

Do you want to install voice data android phone? Install voice data required for speech synthesis in Google text-to-speech engine settings android lollipop (5.1.1) and marshmallow (android 6.0) device. You can add multiple different voices of male & female and install other additional speech. In Google text-to-speech engine settings, you can auto-update voices and download voice data using Wi-Fi / mobile data.

It’s simple to install voice data for speech synthesis on android phone. You can amplify speech volume to make spoken text louder than normal so it’s easier to hear over other audio that might be playing. There are various voice language available for set such as Hindi (India), English (India), Bengali (Bangladesh), English (UK), English (USA) and more. Below you can see complete guide to install voice data android phone or tablet.

Read this:

How to use Google voice search on Android

How to turn off predictive text on Android Nougat 7.1.2

How to delete unnecessary files android phone

7 simple step of: How to install voice data android phone

Step 1: Open “Settings” app on your android device

You can see below options on settings.

language-and-input-settings-android-phone

Step 2: Scroll down until see “Language and input” and tap on it

install voice data android

Step 3: Under speech section, tap on “Text-to-speech”

google-text-to-speech-settings-android-phone

Step 4: Tap on “Settings” icon of Google Text-to-speech under Preferred TTS engine section

install-voice-data-settings

Step 5: Click on “Install voice data”

You can see below screen on your device.

voice-data-language-options

Step 6: Tap on any language want to set Google TTS voice data

download-voice-data-android-phone

Step 7: Download that voices on your device

Now install voice data feature for speech synthesis on your android phone. You can also use anonymous usage reports that help us to better understand of the performance of this Google text-to-speech feature on your device. Also get details of performance requests, language used, deliver speech output and more.

Above you can see trick to install voice data android phone. Did you find above process helpful? Let us know on below comment box. Don’t forget to share this article with your friends on social network. Stay connect with us for daily updates!

How to Find Your Lost Android Phone using Android device manager

Have you ever track your lost android phone location on your device without the android app? Here’s the way to find a lost phone location Android device manager. Android device manager allows you to remotely find, lock and erase your android phone. To find the location of your lost or stolen device location services is turned on. If not enable location, you can still chance to lock and erase the phone but you can’t search its exactly current location. It’s easy to enable android device manager on your device.

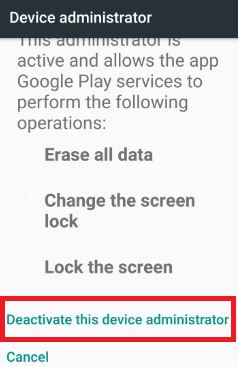
Android device manager gives permission to the app Google play services to perform lock the screen, change the screen lock and erase all data. You can also track your lost android phone using a desktop computer, click here to find a lost or stolen phone using a computer. Also, track lost phone location using Google Maps on Android devices. Follow the below-given step by step guide to find lost phone location android device.

Don’t Miss This:

How to Track My Lost Android phone location

Step 1: Tap on “App drawer” from home screen in your Android Nougat 7.0 (Moto G4 plus).

Step 2: Go to “Settings” or Swipe down the top of the screen of notifications & tap on the “Settings” gear icon.

You can see various sections including wireless & networks, device, personal and system.

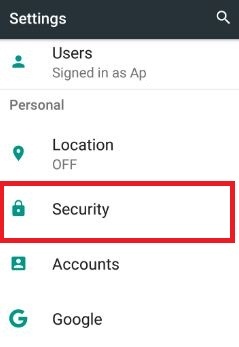
Security under personal section on nougat 7.0 phone

Step 3: Under the personal section, tap on “Security”.

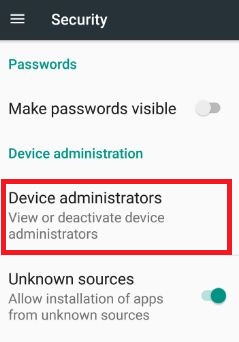
Tap on device administrators under security

Step 4: Tap on “Device administrators” under the device administration section.

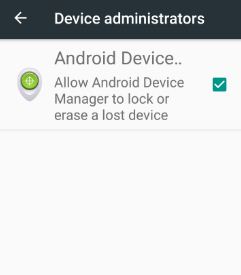
Enabel android device manager on android 7.0 nougat

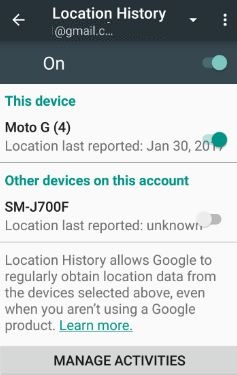
By default activate or enable android device manager on Moto G4 plus device (Android nougat 7.0). After enabling the android device manager to follow below settings on your phone to track lost phone location.

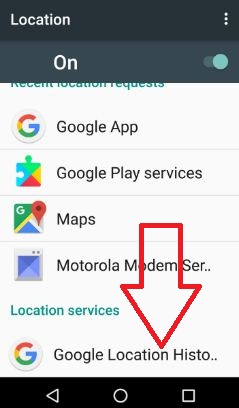
find lost phone location android

Settings > personal section > Google > Services > Location (If disable then enable it) > Location services > Google location history (Enable it on your device).

find lost phone location android device

After enable you can see the above screen on your android phone.

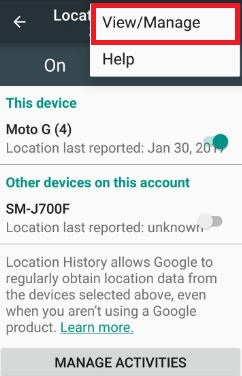
Step 5: Tap on “More” from the top of the right side corner.

manage lost phone location using android device manager

Step 6: Tap on “View / Manage“.

Now you can view or find lost phone location android device current location.

Step 7: Tap on “Android device manager”.

find lost phone location android phone 7.0

Step 8: To deactivate this feature, tap on “Deactivate this device administrator”.

Find Lost Phone Location on Android 8.1 Oreo, 9 Pie, 10 using your Android device

Step 1: Go to settings in your latest android devices

Step 2: Tap Security

Step 3: Tap Find my device under security alerts section

To use find my device on android, make sure turn on location in your device. Three different methods available here including Google find my device app, using Web, and using your phone Google account.

Find a lost or stolen phone using computer/laptop device

Find lost android phone using computer

First of all log in your Gmail account, after log in location data from your lost phone will be collected by the android device manager and sent to Google. You can view your android phone location approximate near, but not completely accurate. You can ring the stolen phone, lock & reset device password and erase data on your device.

I hope this article will help you to find lost phone location android device. If you have any kind of trouble when using the android device manager, let us know on the below comment box. It would be a pleasure to help you. Don’t forget to share this useful trick with your friends!

How to Use WhatsApp Video Call on Android

You can make a WhatsApp video call with your WhatsApp contact on Android or iPhone devices. Before this video calling feature, WhatsApp support only voice calling feature to only talking with others. To make a video call on WhatsApp Android phone, open the WhatsApp contact list and tap on any individual contact, and click on the video call icon. If you have the latest updated WhatsApp, you can make a group video call with up to 8 people at the same time. To make free video call (Not using mobile data) both WhatsApp contact user has Wi-Fi available. Also, tap on the calling icon to make a WhatsApp voice call.

WhatsApp is one of the most popular instant messenger apps to chat with friends, family members, and send photos, videos, documents, contact, audio, etc. If your android device hasn’t received the latest update then don’t worry automatically update the WhatsApp app on your android phone. Follow the below-given steps to use WhatsApp video call Android phone.

Read Also:

How to Make WhatsApp Video Call on Android

Check out below given two methods to use WhatsApp video calling on your Android devices.

How to Video Call on WhatsApp Android in 2020

Step 1: Open the “WhatsApp” app in your Android devices.

Open WhatsApp chat to make a group video call Android

Step 2: Tap on the Chats at the top left side.

Step 3: Tap on Any individual contact want to make WhatsApp video calling.

Use WhatsApp Video Call on Android

Step 4:  Click on the Video call icon at the top right side.

Step 5: When receiving the call, you can see the below screen.

How to Use WhatsApp Video Call on Android

Step 6: Tap the Red icon to stop the video call.

WhatsApp group video call contacts

Alternative Way: Open WhatsApp app > Tap Contact icon at the bottom right > Tap any contact > Tap Video call icon

How to Video Call on WhatsApp Android

Step 1: Open the “WhatsApp” app in your Android devices.

Make a WhatsApp video calling

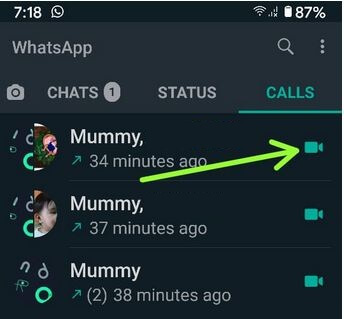
Step 2: Tap the Calls tab at the top right corner.

How to Video Call on WhatsApp Android

Step 3: Tap Video call icon to make a video call.

How to Make a Group Video Call on WhatsApp Android

Step 1: Open the “WhatsApp” app in your Android devices.

Step 2: Tap on the Chats at the top left side.

Step 3: Tap on Any individual contact want to make WhatsApp video calling.

Step 4:  Click on the Video call icon at the top right side.

Step 5: When receiving the call, you can see the below screen.

Make a Group Video Call on WhatsApp Android Smartphone

Step 6: Tap the Contact icon at the top right and tap on it to add it.

You can add up to 8 people in the latest WhatsApp versions.

Step 7: Tap on the Red icon to stop it.

In some of the devices not get the latest WhatsApp updates, so when you call that particular contact it will see couldn’t place a call because that person does not receive WhatsApp video calling updates.

Did you find the above tricks to WhatsApp video call android phone helpful? If you have any problem occurs when to implement the above steps, please let us know on below comment box. Don’t forget to share this article with your friends on social networks.