How to Delete Chat History in Facebook Messenger App in Android

It’s simple to remove or delete Facebook entire chat history using the Android browser. You can delete individual messages or entire Facebook chat history from your android mobile browser or desktop PC. Also, delete Facebook chat history or messages using the Facebook messenger app. When you delete all Facebook chat conversations or messages from your android devices it won’t delete from your friend’s chat messages.

You can not remove sent or received messages from your friend’s chat conversation. In this tutorial, I will show you how to delete facebook entire chat history android mobile browser only. Follow the below-given steps to remove all Facebook chat conversations on Android devices.

Read Also:

How to Delete Facebook Entire Chat History on Android Devices

Check out below given methods to remove the entire Facebook chat history using the Facebook messenger app and android mobile browser.

Delete Chat History using Facebook Messenger App in Android

Step 1: Open the Facebook messenger app and sign in with your account.

Step 2: Search the name on the search bar and on a name.

Delete Facebook Entire Chat History on Android using messenger app

Step 3: Tap i (Information) icon at the top right corner.

Here, you can see your conversation. To remove a single message, tap & hold the message > tap “Remove” at the bottom of the screen > Trash icon > Remove

Step 4: Tap Three vertical dots at the top right corner.

Delete Facebook entire conversation on Android

Step 5: Tap Delete conversation.

This Pop-up message appears on the screen: Delete this entire conversation?

How to Delete Chat History in Facebook Messenger App in Android

Step 6: Tap Delete.

Using Android Mobile Brower (Google Chrome)

Step 1: Open “Chrome” or another browser on your android devices.

Step 2: Login your Facebook account.

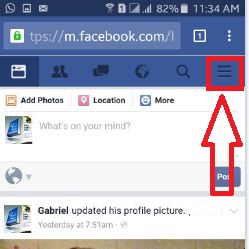
Click on three horizontal line right side

Step 3: Tap on “Three horizontal lines” from top of the right side corner.

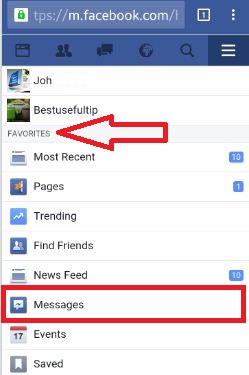
Click on messages under favorite section

Step 4: Tap on “Messages” under the favorites section.

You can see the list of all your chat conversations with your friends.

Step 5: Tap on any friends chat list want to delete or remove entire Facebook chat messages or individual messages from your mobile browser.

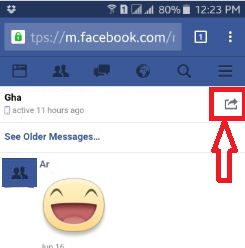
Click on arrow to open chat messages

Step 6: Tap on the “right side aero” symbol which looks like the above screen.

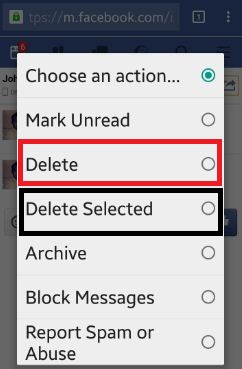
How to delete facebook entire chat history android lollipop

Choose “Delete” to remove or delete facebook entire chat history android mobile or choose “Delete selected” for individually conversation messages from your android phone or tablet.

Step 7: Choose the “Delete” option.

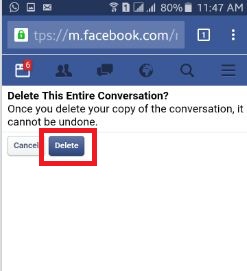
You can see the message of “Delete this entire conversation?”

delete facebook entire chat history android phone

Step 8: Click on the “Delete” button.

Once you delete your copy of the conversation, it cannot be undone. Now, all Facebook chat messages delete from your chat history.

Did you find the above process to delete Facebook’s entire chat history android helpful? Don’t hesitate to let me know on below comment box, would be a pleasure to help you. Don’t forget to share this Facebook tricks with your friends!

How to Take a Screenshot on Google Pixel 4 and Pixel 4 XL

Here’s how to take a screenshot on Pixel 4 XL and Pixel 4. Different tricks are available for capture screenshot on Pixel 4 XL. You can easily capture screen and directly share with others without open that saved screenshot. Open the content you want to take a screenshot and hold down the power & volume down button at the same time to capture the Pixel 4 XL screenshot.

Google Pixel 4 and Pixel 4 XL is the recently launched latest flagship device. Pixel device doesn’t support scrolling screenshot features that can use to capture a long webpage. Also, use Google assistant to capture a screenshot. Apply below-given methods to take a screenshot on Pixel 4 XL and Pixel 4.

Read Also:

How to Screenshot on Google Pixel 4 XL and Pixel 4

You can screenshot on Google Pixel 4 XL and Pixel 4 and find screenshots saved under gallery settings. Check out the below methods.

1st Method: Take a Google Pixel 4 XL screenshot using power & volume down button

Step 1: Open webpage in your Pixel 4 & 4 XL you want to capture a screenshot.

Step 2: Press the volume down button and power button at the same time.

You can find the captured screenshot in a gallery on your device. Also direct share screenshot in your Pixel 4 & 4 XL devices.

2nd Method: Capture screenshot Pixel 4 XL       

Step 1: Long press the power button in your Pixel 4 & 4 XL.

How to take a screenshot on Pixel 4 XL and Pixel 4

Step 2: Tap Screenshot.

3rd Method: Take a screenshot on Pixel 4 XL using Google Assistant

Make sure to enable access with voice match and donate screen captures in your Pixel 4 and 4 XL devices.

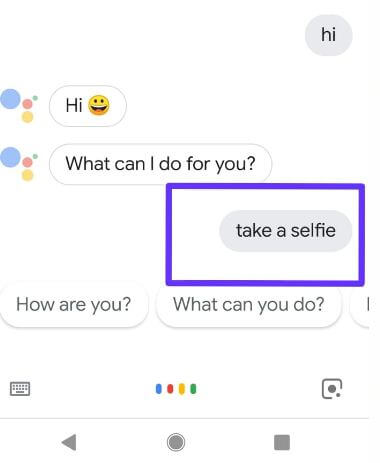
Step 1: Long press home button or say “OK Google” or “Hey Google” to launch Google Assistant.

Step 2: Say take screenshot or capture screenshot.

Wait until automatically capture screenshot in your Google Pixel 4 and Pixel 4 XL devices.

It’s quite easy to take a screenshot on Pixel 4 XL and Pixel 4. Do you know any other methods? Share with us in below comment box. Stay and connect with us for the latest updates.

How to Disable Apps Consuming Battery in Android 8.1 Oreo

How to disable apps consuming battery alert in android 8.1 Oreo. To improve battery life, disable apps running in the background activity on your android Oreo 8.1 devices. There are several apps running in the background even we don’t use them regularly. It will consume more battery and slow down your android device performance also. Apps Running in the background is the reason to quickly drain battery life on your android devices.

Recently updates my Google Pixel to Android 8.1 Oreo. This Oreo version includes several awesome features such as change the Oreo theme using light or dark wallpaper, Neural network API, Camera HAL HDR+, Recently opened apps, Hide the running in background notification, and more. Follow below given a complete guide to disable app using battery notifications and stop apps consuming battery in android 8.1 Oreo.

Check This:

How to Turn off Apps Consuming Battery Notifications in Android 8.1 Oreo

You can check which app consuming more battery using below settings in your android Oreo devices such as Pixel 2, Pixel 2 XL, Google Pixel, Pixel XL, Nexus 6P, Nexus 5X, etc.

Settings > Battery > App usage since full charge (Also show full device storage)

Disable Apps Consuming More Battery in Android 8.1 Oreo

Step 1: Go to settings in your android 8.1 Oreo.

Step 2: Tap on apps & notifications.

Apps & notification settings in android 8.1 Oreo

Step 3: Tap on Notifications.

Android 8.1 apps notifications settings

Step 4: Tap on app notifications.

Step 5: Tap on three vertical dots at the top right side corner.

Show system apps in android 8.1 Oreo

Step 6: Select the show system.

Android system settings in android 8.1 Oreo

Step 7: Touch on the Android system.

Stop apps consuming battery android Oreo 8.1

Under other sections, you can see the app consuming battery option. By default turned on this option.

Disable apps consuming battery in android 8.1 Oreo

Step 8: Toggle off app consuming battery.

You can also restrict or disable app background activity in android 8.1 Oreo using the below settings.

Restrict Apps Background Activity in Android 8.1 Oreo

Step 1: Go to settings in your android Oreo device.

Step 2: Tap on apps & notifications.

List of recently opened five apps and other apps see in your android devices.

Step 3: Tap on the app you want to stop background data.

Step 4: Tap on the battery.

Disable app background activity on android 8.1 Oreo

Step 5: Disable background activity under manage battery usage.

Now extend battery life in your android 8.1 settings. You can individually disable app background activity in android 8.1 Oreo devices.

And that’s it. I hope the above-given tutorial helpful to disable apps consuming battery in android 8.1 Oreo and improve the battery life of your Oreo device. If you have any kind of trouble, tell us in below comment box. We will respond as soon as possible.

How to Turn On Dark Mode on Instagram Android, PC, and iPhone

Do you want to enable Instagram dark mode on Android, PC, and iPhone? Here’s how to turn on dark mode on Instagram account. You can make your Instagram background black using dark mode/dark theme settings. To automatically make Instagram dark mode, you must enable a system-wide dark theme in your Android, Samsung Galaxy, OnePlus, and other phones. It will be helpful to save battery life and reduce eye strain on your phone. Turning on dark mode Instagram will change your display to a dark background, such as the app drawer, notification panel, phone settings, etc.

This Android dark theme setting applies to the Android system UI and apps running on your phone. Also, use color inversion on Android phones to set a dark background. Follow the below-given step-by-step process to enable dark mode Instagram on Android devices.

Read Also:

How to Turn On Dark Mode on Instagram Android

You can turn dark mode on Instagram using below given three different methods in your latest Android devices.

How to Change Instagram to Dark Mode on Android 13, Android 12, and Android 11 – Manually

To automatically use dark mode on apps, ensure the system settings mode is dark.

Step 1: Open the Instagram app and sign in with your account.

Step 2: Tap the Profile picture at the bottom right corner.

Turn Instagram to dark mode on your Android devices

Step 3: Tap the Three horizontal lines at the top right corner.

Go to System settings to enable dark mode on Instagram app Android

Step 4: Click Settings.

How to Turn On Instagram Dark Mode Android Devices

Step 5: Tap the Theme.

How to Enable Instagram Dark Mode Android Phones


Step 6: Set theme as Light, Dark, or System default.

How to Turn On Dark Mode on Instagram Android using Notification Panel

Step 1: Swipe down the Notification panel from the top of the screen.

Enable dark mode for Instagram on Android 10

Step 2: Tap on the Dark theme.

Step 3: Now open Instagram and log in with your account.

How to enable dark mode for Instagram on Android 10

Step 4: You can see it turned on Instagram’s dark mode.

Disable dark mode on Instagram

Step 5: Tap Dark theme again to turn off dark mode Instagram. Also, set a schedule to enable dark mode on Instagram Android phones automatically.

It’s pretty easy to turn dark mode on or off on the Instagram app using phone settings on Android devices.

How to Put Instagram on Dark Mode Android using Phone Settings

Step 1: Swipe up from the bottom of the home screen in your Android to open the app drawer.

Step 2: Tap on Settings app.

Step 3: Tap the Display.

Turn on Instagram dark mode Android

Step 4: Toggle on the Dark theme toggle to use the dark mode in Instagram app.

If you don’t want to use a dark theme, turn off the toggle on your Android phone.

How to Turn Off Dark Mode on Instagram

Open the Instagram app > Profile icon at the bottom right corner > Three horizontal lines at the top right > Settings> Theme > Light.

Enable Instagram Dark Mode PC/Desktop – Chrome Browser

Step 1: Open Instagram in your PC browser (Google Chrome, Mozilla, etc.) and sign in with your account.

Turn On Dark Mode Instagram for PC using Google Chrome Extension

Step 2: Replace your Instagram URL with https://instagram.com/?theme=dark to activate the dark theme automatically.

How to Turn On Dark Mode on Instagram for PC using Google Chrome Extension

Step 1: Open the Google Chrome browser on your PC or Laptop.

Search Dark mode for Chrome extension on Desktop

Step 2: Open the Chrome web store, search Dark mode for Chrome, and tap on it.

Enable Instagram Dark Mode PC

Step 3: Click on Add to Chrome.

Step 4: Tap the Add extension.

Turn Dark Mode on Instagram iPhone (iOS 16)

You can enable or disable dark mode Instagram iPhone using the below-given settings.

Step 1: Go to Settings.

Step 2: Tap the Display & brightness.

Step 3: Tap the Dark to turn on insta dark mode.

Turn On Dark Mode on Instagram using Control Center on your iPhone

Settings > Control center > Dark mode 

Turn Off Dark Mode Instagram iPhone

Settings > Display & brightness > Tap the Light

And that’s it. I hope the above-given methods are helpful to enable dark mode for Instagram on Android. Do you still have any questions regarding this tip? Tell us in below comment box.

Related:

How to Enable And Turn Off Always on Display Pixel 3 and Pixel 3 XL

Here’s how to turn on or turn off always-on display Google Pixel 3 and 3 XL. When turning on Pixel 3 Always-on display, it will show notifications, time, weather and other information on your Pixel 3 lock screen. You can turn off clock on lock screen Pixel 3 to turn off always-on display in your device. The always-on ambient display will reduce your phone battery life.

If you want to wake up screen when you receive any notifications in your Google Pixel 3 & 3 XL, you need to turn on new notifications under Pixel 3 ambient display settings. You can turn on Always-on display Pixel 3 under display settings.

Read Also:

How to Turn On Always on Display Google Pixel 3 and Pixel 3 XL

Only Google Pixel 3 and Pixel 3 XL device has added this always-on option under ambient display settings. You’ll enable or disable Pixel 3 always-on display using below given settings.

Step 1: Swipe down the notification shade and tap the Settings gear icon.

Step 2: Tap Display.

In Google Pixel 3 and Pixel 3 XL display settings, you can see Night light, Adaptive brightness, Auto-rotate screen, screen saver, font & display size, Ambient display, device theme, and more settings.

Pixel 3 XL display settings

Step 3: Tap Advanced.

Pixel 3 ambient display settings

Step 4: Tap Ambient display.

Here you can see always on and new notifications options that use to show lock screen information if you want.

How to turn on Always on display Pixel 3

 Step 5: Turn on “Always on” toggle.

You can also enable/disable new notification under the Pixel 3 ambient display that helpful to wake your Google Pixel 3 and Pixel 3 XL screen when receiving any new notifications.

Settings > Display > Advanced > Ambient display > New notifications

In the latest Google Pixel 3 always-on display or Ambient display settings, you can activate double-tap to check phone and lift to check phone settings for quickly show notifications on your Pixel devices.

Turn off Pixel 3 Lock Screen Clock 

Settings > Display > Advanced > Ambient display > Toggle off Always on

Now, you can’t see clock, date & time, and other info on your Google Pixel 3 and 3 XL lock screen. Also, change clock on lock screen Pixel 3 if activating screensaver on your device. You can choose the clock from Analog or Digital when turning on a screensaver.

Turn on Ambient display on Google Pixel 3 and Pixel 3 XL

Step 1: Go to the Settings app in your device.

Step 2: Tap on Display.

Step 3: Tap Advanced.

Step 4: Tap on Ambient display at the end of the page.

Two settings available here for when to show notification, time and other info on lock screen in your PIxel devices.

Double-tap to check phone

Double-tap your phone lock screen to check date & time, notification and other detail you receive. Enable it to use this Pixel 3 ambient display feature.

Lift to check phone

While enabled lift to check the phone, just pick up your phone and you can see the time, receive notifications, and other info on Pixel 3 XL lock screen and ambient display.

And that’s all. I hope this little tip useful to turn on Always-on display Pixel 3 XL. If you have any questions, tell us in below comment box. Don’t forget to share with others if you found it helpful. Are you excited about Google’s latest flagship Pixel 3 and Pixel 3 XL? Do let us know what you think of the Smartphone in the below comments.

How to Use Gestures in Pixel 4 and Pixel 4 XL

Here’s how to enable and use gestures in Pixel 4 and Pixel 4 XL devices. Google Pixel 4 and Pixel 4 XL added a new Motion Sense feature that use Air gestures to skip the next songs or previous song and snooze alarms & silence calls without touch your phone. We use gestures for quickly show notifications on the lock screen, open or switch camera mode, active edge, vibrating phone and more. Enable or disable gestures in Pixel 4 XL and Pixel 4. Google Pixel 4 XL gestures include quick gestures for Motion Sense, Active Edge, jump to camera, Flip camera, System navigation, Tap to check phone, Flip to Shhh, Lift to check phone and Prevent ringing.

Read Also:

How to Use Pixel 4 Gesture Navigation and Gestures

You can easily interact with your android phone using gestures. Apply below steps to turn gestures on and off.

Step 1: Open app drawer and tap on the Settings app.

Step 2: Scroll down and tap on the System at the bottom.

Step 3: Tap Gestures.

Two sections available for Pixel 4 and Pixel 4 XL gestures, one is quick gestures and another is handheld gestures. Let see one by one.

How to use gestures in Pixel 4 and 4 XL

Quick gestures

You can use Motion Sense on Pixel 4 XL and Pixel 4 using this Air gestures. Just wave your hand at phone screen to “skip songs” (next or previous) and “Silence interruptions” which is useful to stop alarms & mute phone calls.

Handheld gestures

Below given different Pixel 4 and Pixel 4 XL gestures are available.

Active Edge

You’ll silence incoming calls, snooze alarms, disable timers, squeeze the bottom half of your phone. Enable active Edge on Pixel 4 XL and Pixel 4 if you want to use squeeze for silence. Also, talk to your google assistant.

Settings > System > Gestures > Handheld gestures> Active Edge

Jump to camera

Open your Pixel 4 camera from any screen by pressing the power button twice.

Flip to camera

Switch between your front and rear cameras by twisting your phone two times.

Use Pixel 4 Gesture Navigation

By default set fully system navigation in Pixel 4 and 4 XL. You’ll set 3 button navigation in Pixel 4 XL if you want to use back, home, and switch apps buttons on your navigation bar.

Settings > System > Gestures > Handheld gestures > System navigation > Gesture navigation or 3-button navigation

Also adjust back sensitivity of Google Pixel 4 & 4 XL gesture navigation.

Tap to check phone

Check your notifications by tapping your phone screen when locked.

Flip to Shhh

It will quickly enable Do not disturb on Pixel 4 and 4 XL, put your phone face down on a flat surface.

Lift to check phone

Check your notifications by picking it up when locked.

Prevent ringing

Press the power and volume up button at the same time to vibrate or mute your device.

End the Pixel 4 and 4 XL gestures list. We above article useful to use gestures in Pixel 4 and 4 XL. Do you still have any questions? Tell us in below comment box.