How to Change Contact Name in WhatsApp Android

How to change contact name in WhatsApp Android. You can easily change or edit a contact name on a WhatsApp Android device using WhatsApp contact settings. Also, change your contact name using your phone book list. Whatever changes on your device contact name, you can see that name on WhatsApp contact. Also, change the display name on WhatsApp Android devices. You can add a shortcut of WhatsApp contact on your Android device to chat with that person from the home screen without opening WhatsApp.

WhatsApp is one of the best ways to connect with friends or family and share media files, including photos, videos, audio, and other files. Follow the below-given instruction to change the contact name on WhatsApp Android devices.

How to Change WhatsApp Display Name on Android

Let’s see methods to change the WhatsApp contacts name and WhatsApp display name on your Android or Samsung Galaxy devices.

Step 1: Open WhatsApp on your Android devices.

Tap on More on WhatsApp to open WhatsApp Settings Android

Step 2: Tap on Three vertical dots from the top right corner.

Go to WhatsApp settings to change WhatsApp Contact Name Android

Step 3: Click on the Settings.

How to Change Contact Name in WhatsApp Android

Step 4: Tap on your WhatsApp name.

Change the display name on WhatsApp Android

Step 5: Click on the Pencil icon in front of your name.

How to Change WhatsApp Display Name on Android

Step 6: Edit or Enter the name you want to set and tap on Save to change the WhatsApp display name.

How to Change the WhatsApp Contacts Name on Android

Step 1: Open the WhatsApp app on your device.

Step 2: Tap on the Chats tab.

Step 3: Tap on any Contact or Groups you want to change the name.

Step 4: Tap on the Name of a person or group.

Change the WhatsApp Contacts Name on Android

Step 5: Tap Three vertical dots at the top right corner.

How to Change Contact Name on WhatsApp Android Phone and Tablet

Step 6: Select Edit.

Edit the WhatsApp Contacts Name on Android

Step 7: Rename or Edit a contact name and tap on Save at the top right.

Now, change the name of this contact in your WhatsApp.

Why Can’t I Edit a Contact Name on WhatsApp?

Make sure to enable permission for contacts on your Android (Android 12/Android 11) device.

Why Can't I Edit a Contact Name on WhatsApp

Settings > Apps > See all apps > WhatsApp > Permissions > Contacts > Allow

Settings > Privacy > Permission manager > Contacts > WhatsApp > Allow

How to Hide your Last Seen on WhatsApp on Android Phone

By default, everyone can view your WhatsApp last online time. You can hide Whatsapp last seen using privacy settings. Also, set My contacts, so only your phone contacts will show your last seen. Apply the below settings to change WhatsApp last seen on android.

Step 1: Open the WhatsApp app.

Step 2: Tap on Three vertical dots at the top right corner.

Step 3: Select Settings.

Step 4: Tap on Account.

Step 5: Tap on Privacy.

Step 6: Tap on Last seen.

Show or hide WhatsApp last seen on your Android Device


Step 7: Choose from Everyone/My contacts/My contacts except/Nobody and tap on Done.

If you don’t share your last seen, you won’t be able to see other people’s last seen. Also, change different WhatsApp privacy settings such as Profile photo, About, Status, Groups, Live location, etc.

Above, you can see the simple process to change the contact name on a WhatsApp Android phone or tablet device. Did you find the above steps helpful? Don’t hesitate to let me know in below comment box. It would be a pleasure to help you. Connect with us for the latest WhatsApp updates!!
How To Enable or Disable Unknown Sources Android Oreo 8.0/8.1

To install third-party apps on your android device, you need to enable unknown sources Android Oreo 8.0 and 8.1. Android Oreo 8.1 removes the unknown source option. But don’t worry, you can individually allow unknown sources or apps on the Android 8.0 device. You will find the “install from unknown source” option on android Oreo under Apps & notifications settings. Before Android 8.0 Oreo versions, users need to enable unknown source one time only to install third-party apps anytime. Now in android 8 Oreo, you’ll enable install from unknown sources on an app basis.

This setting is very helpful to compare to previous versions of OS. Just disable app you found harmful for your device. Follow the below-given step by step guide to enable unknown sources to install third-party apps on android Oreo 8.1 devices.

Read Also:

How To Disable/Enable Unknown Sources Android 8.1 Oreo

Sometimes allow install from unknown sources app will damage your android phone or loss of data. So be careful before enable install unknown apps on android Oreo 8.0 and other devices. Check out below given two different methods to see change settings to install unknown apps on Oreo.

Install unknown Sources on Android 10 and Android 9 Pie

Step 1: Go to Settings.

Step 2: Tap on Apps & notifications.

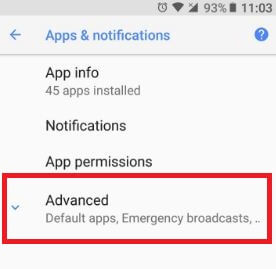
Step 3: Tap on Advanced.

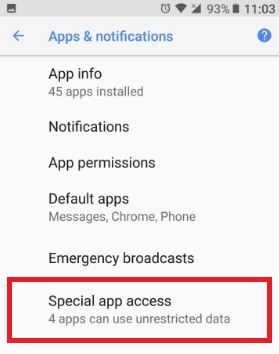
Step 4: Scroll down the end of the page and tap on Special app access.

Step 5: Tap on Install unknown apps.

Step 6: Select App from the list.

Step 7: Toggle on Allow from this source toggle

For Android 8.1 & 8.0 Oreo:

Check out below given two methods to enable unknown sources in Android Oreo.

1st Way: Enable install from unknown sources on android Oreo using special app access settings

Step 1: Go to settings in your android Oreo.

Step 2: Tap apps & notifications.

Android Oreo advanced apps & notification settings

Step 3: Tap advanced.

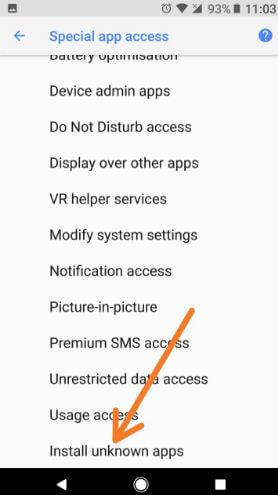
Special app access on android Oreo device

Step 4: Tap special app access.

Here you can see several options such as battery optimization, device admin apps, DND, Picture-in-picture, unrestricted data access, modify system settings, Notification access, and more.

Enable Install unknown apps on android Oreo

Step 5: Scroll down up to the end of the page and tap install unknown apps.

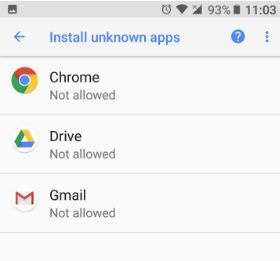
Install unknown apps on android 8.0 Oreo

You will see Chrome, Drive, and Gmail apps.

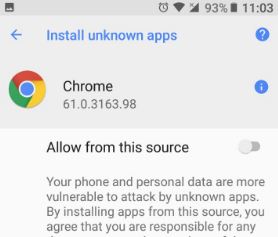
Enable unknown sources android Oreo 8.0

Step 6: Tap app wants to enable.

By default disable install an unknown source on your android device (Show above screenshot).

Step 7: Enable allow from this source.

It’s quite easy to enable the app source in your android 8.0 Oreo.

Read Also:

2nd Way: Install from unknown sources Android 8.1 Oreo using apps & notification settings

Step 1: Go to settings in your android Oreo.

Step 2: Tap apps & notifications.

Step 3: Tap app info.

Step 4: Tap Chrome or another app.

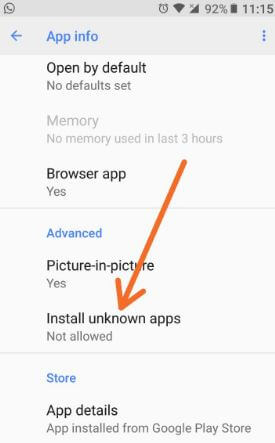
Enable install from unknown sources on android Oreo

Step 5: Tap installs unknown apps under the advanced section.

Step 6: Enable allow from this source on android 8.0 Oreo.

And that’s all. We hope this makes it clear how to enable unknown sources android Oreo 8.0 devices. Are you satisfied with this android Oreo article? Let us know by leaving a comment section below. Don’t miss our single android Oreo tips and tricks.

How to change the language on Samsung Galaxy A50

Here’s how to change the language on Samsung galaxy A50. You can change language and input settings on your Samsung devices using Language & input settings. By default set phone language and default keyboard language in your Samsung A50, A70 and other devices. Also add multiple language to your Samsung keyboard.

The language at the top of the list will be used by default. If an app doesn’t support that language, the next language in the list will be used instead. You’ll add language to A50 such as Deutsch, English, Italiano, Chinese, Portuguese and more. Follow below step by step process to change the language on Samsung galaxy A50.

You May Like This:

How to change the Google keyboard theme in Android

How to change the lock screen security on Samsung A50

How to change the background theme in Gboard keyboard

How to change the language on Samsung Galaxy A50

You can change language on Samsung A50 using below settings.

Step 1: Open app drawer and tap Settings app in your galaxy A50 & A70

Step 2: Scroll down and tap General Management

Change the language on Samsung Galaxy A50

Step 3: Touch Language and input

Step 4: Touch Language

Step 5: Tap + Add language

How to change the language on Samsung Galaxy A50

Step 6: Choose language from list to set A50 system language

You can see this message when select language: Set selected language as default language?

Step 7: Choose from Keep current or Set as default

Add your languages to the list. Also tap & hold the language and drag it to first position to set as default language on galaxy A50.

Remove language on Galaxy A50

If you have added any language temporary, you’ll remove it anytime using below settings.

Settings > General management > Language & input > Language > Remove at upper right corner > Choose language from list > Remove > Remove

Change keyboard language on Galaxy A50  

By default set Samsung keyboard as default keyboard in your Samsung devices. You can change Samsung keyboard languages and types using below steps.

Step 1: Tap Settings app in your Samsung A50

Step 2: Tap General Management

Step 3: Tap Language and input

Step 4: Tap On-screen keyboard under keyboards section

Step 5: Tap Samsung keyboard

Step 6: Tap Languages and types

Step 7: Tap Manage input languages

You can see list of available languages.

Step 8: Turn on language toggle you want to add language on keyboard

Now added this language to keyboard language list. Also change keyboard layout such as keyboard size, keyboard theme, custom symbols, keyboard swipe controls and more.

And that’s it. Do you still have any question regarding this tip to change the language on Samsung Galaxy A50? If you have any querry, tell us in below comment box.

How to Turn On/Turn Off Pop-up Notifications on WhatsApp Android

Do you want to get pop up notifications on WhatsApp? Here’s how to turn on or turn off pop-up notifications on WhatsApp Android devices. You can see a pop-up notification on your Android lock screen when receiving a new message on WhatsApp if set “always show pop-up”. You can enable high-priority notifications to show previews of notifications at the top of the screen. You can change popup notifications settings on WhatsApp Android or iPhone devices. By default, set the “No popup” option selected, so you can’t get any popup notification on your phone lock screen or home screen. If you have the latest updated WhatsApp version (2.20.157 or later), pop-up notifications are no longer available on your Android 12/Android 11 stock OS.

What is Pop Up Notification WhatsApp?

When enabling a pop-on screen, you can show notifications as a banner across the top of the screen when a device is unlocked.

Read Also:

How Do I Get WhatsApp Notification to Pop Up on Android

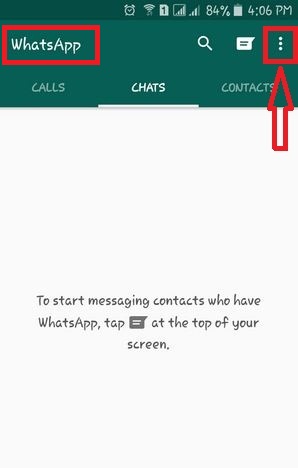
Step 1: Open WhatsApp on your Android devices.

Tap on the More option in top right side corner

Step 2: Tap on Three vertical dots (More) in the top right corner.

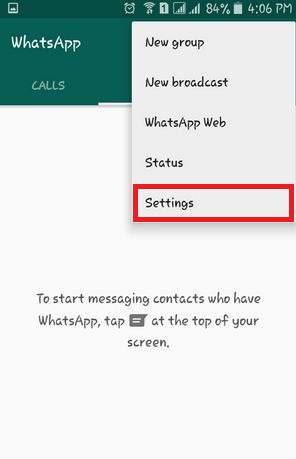
Choose Setting Options in WhatsApp

Step 3: Tap on Settings.

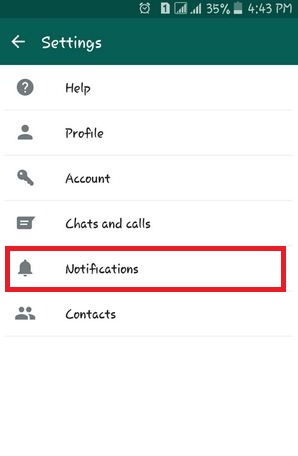
Tap On Notifications option under settings

Step 4: Tap on Notifications.

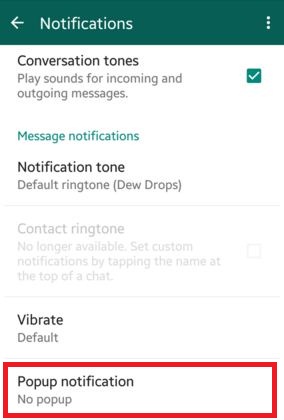
Tap on popup notification on WhatsApp

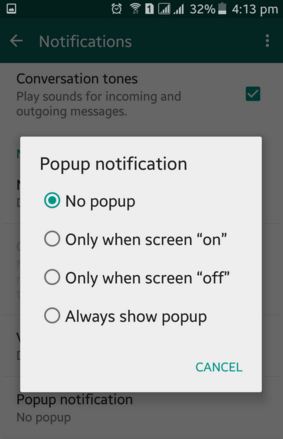
Step 5: Tap on “Popup notification”.

Note: If you have installed the latest WhatsApp version (2.20.157), you can’t enable pop-up notification options

Now you can see the below options on your android phone and tablet screen.

How to change popup notification on WhatsApp

  1. No popup: By default selected, you have not seen a WhatsApp message notification on your Android device’s home screen or lock screen. Only you can read the message when opening WhatsApp.
  2. Only when screen “on”: You can only see WhatsApp popup notification on the home screen when your android phone or tablet screen is “on”. Show WhatsApp popup notification when screen is onWhen an open phone locks, then you can see the above the screen. You can reply directly from the home screen popup notification.
  3. Only when screen “Off”: You can only see WhatsApp popup notification on the home screen when your android device screen is “off”. You can reply directly from the home screen popup notification.
  4. Always show popup: You can see all WhatsApp message popup notifications when your android phone or tablet screen is on/off.

Step 6: Choose the options to turn off WhatsApp popup notification or tap on cancel to set default settings.

How do I Enable Push Notification on WhatsApp?

Step 1: Go to Settings.

Step 2: Tap on Apps.

Step 3: Tap on See all apps.

Step 4: Tap on WhatsApp.

Step 5: Tap on Notifications.

Enable Push Notification on WhatsApp Android Devices

Step 6: Make sure to toggle on All WhatsApp Notifications.

How Can I See WhatsApp Message in Notification Bar?

Make sure to select the show all notification content option to view messages on the notification bar on your device.

Step 1: Go to Settings.

Step 2: Tap on Apps.

Step 3: Tap on See all apps.

Step 4: Tap on WhatsApp.

Step 5: Tap on Notifications.

Step 6: Tap on Message notifications.

Step 7: Tap on the Lock screen.

How Can I See WhatsApp Message in Notification Bar

Step 8: Select Show all notification content.

Why WhatsApp is Not Showing Pop Up Notification?

Make sure to allow all WhatsApp permission on your Android device.

Settings > Apps > See all apps > WhatsApp > Permissions 

That’s all. Above, you can see a perfect solution to change WhatsApp popup notifications on WhatsApp Android devices. If you have any problems, then post a comment on the below box. We will respond to you as soon as possible. Don’t forget to share it with others if you find it useful.

How to take a screenshot on Samsung Galaxy A50

Take a screenshot on Samsung galaxy A50? Here’s how to capture screenshot on Samsung A50 and Galaxy A70. You can use power button & volume down button (Oldest method), enable palm swipe to capture and use Google Assistant or Alexa to screen capture. Open the webpage or image and press the power & volume down button at same time to take screenshot A50.

You can easily and quickly capture any screen or webpage using palm swipe to capture gestures in galaxy A50 and A70. Can galaxy A50 capture scrolling screenshot? Android 10 added new screenshot option in power menu for screenshot. Follow below given step by step process to take a screenshot on Samsung galaxy A50.

You May Like This:

How to change home screen wallpaper on Galaxy Note 10+

How to capture screenshot in Pixel 4 and 4 XL

How to change lock screen security on Galaxy A50

How to enable and use gestures in Android 10

How to take a screenshot on Samsung Galaxy A50 and A70

Check out below given multiple methods to screenshot on Samsung galaxy A50 and A70 devices.

1st Way: Use power & volume button

This is one of the oldest methods to capture screen on your Samsung A50.

Step 1: Open content or webpage you want to capture screenshot

Step 2: Press the power button & volume down button at same time

You can see captured screenshot on your galaxy A50 screen. Also share or edit screenshot in your Samsung galaxy devices.

2nd Way: Take a screenshot on Samsung Galaxy A50 using gesture

First of all enable palm swipe gesture in galaxy A50 using below settings.

Step 1: Open app drawer in your Samsung galaxy A50

Step 2: Tap Settings app

Step 3: Scroll down and tap Advanced features

Galaxy A50 motions and gestures settings

Step 4: Tap Motions and gestures

Palm swipe to capture gesture to capture screenshot A50

Step 5: Turn on Palm swipe to capture toggle

Now you can use this A50 gesture to take screenshot.

Step 1: Open page you want to capture screenshot

Step 2: Swiping the edge of your hand across the screen to take a A50 screenshot

Note: This gesture can’t be used while the keyboard is shown.

3rd Way: Use Google Assistant to capture screenshot

Make sure enable Google assistant in your Samsung galaxy A50 device.

Step 1: Long press the home button or say “OK Google” to launch Google assistant in your android phone

Step 2: When launch assistant, say “take a screenshot”

How to take a screenshot on Samsung Galaxy A50

Step 3: Wait 5-7 second and it will automatically capture screenshot

Here you can directly share this screenshot to any people on social media or mail without open it.

And that’s it. I hope above given methods useful to take a screenshot on Samsung galaxy A50. Do you know any alternative methods to capture screenshot? Share with us in below comment section.

How to change lock screen on Samsung Galaxy A50

This tutorial will explain you steps to change lock screen on Samsung Galaxy A50. By default set swipe (No security) in your phone when you buy. To secure your important data, you need to manage screen lock settings on your Samsung Galaxy devices. You can see different A50 screen lock type including Pattern, Pin, Password, Face unlock and in-display Fingerprints.

PIN or Password is strongest lock screen security compare to Biometrics security. Set your favorite Samsung A50 lock screen security using lock screen settings. Also use smart lock on galaxy A50 to auto lock and lock instantly with power key. Follow below given step by step process to change lock screen on Samsung galaxy A50 and A70.

Don’t Miss This:

How to set up face unlock on Pixel 4 and 4 XL

How to take a screenshot on Samsung Galaxy A50

How to enable and use gestures in Android 10

How to change lock screen on Samsung Galaxy A50   

You can set or change lock screen security in galaxy A50 using below given lock screen settings.

Step 1: Open app drawer in your Samsung A50

Step 2: Tap Settings app

Samsung A50 lock screen security

Step 3: Tap Lock screen

Change lock screen security in Galaxy A50

Step 4: Tap Screen lock type

Enter current Pin or Password if you already set.

How to change lock screen on Samsung Galaxy A50

Step 5: Choose A50 screen lock type from Swipe, Pattern, PIN, Password, None. Also choose Biometrics lock from Face recognition or Fingerprints.

Add fingerprints on Samsung Galaxy A50

You can add your fingerprint lock screen security on Samsung A50 using below settings.

Step 1: Go to settings

A50 biometrics and security settings

Step 2: Scroll down and tap Biometrics and security

Manage screen lock settings on your Samsung galaxy A50

Step 3: Tap Fingerprints

Step 4: Tap Add fingerprints

Step 5: Press your finger on the sensor, and then lift it off when the percentage goes up. Wait until complete 100%

You’ll maximum add 3 fingerprints on Samsung galaxy A50. Also remove fingerprint on A50 using below settings.

Settings > Biometrics and security > Fingerprints > Tap on added fingerprint you want to remove > remove at upper right corner > remove

You can use your fingerprints to verify you identity with online shopping, Samsung pass and other supported apps.

How to set up face recognition on Galaxy A50

When you set up face unlock on your Samsung galaxy A50, it will unlock your phone when your face is recognized.

Step 1: Go to settings

Step 2: Tap Biometrics and security

Step 3: Tap Face recognition

Step 4: Follow on screen instruction to set up face unlock

When complete process, you can see this message: Your face has been registered. Also remove face data anytime using same settings in your device.

And that’s all. We hope this makes it clear how to change lock screen on Samsung Galaxy A50. Do you still have any question? Tell us in below comment box.