How to use multi window on Samsung galaxy S8

It’s quite easy to use multi window on Samsung Galaxy S8, Galaxy S8 plus phone. Have you ever use two apps at once on your Samsung galaxy devices? Using this multi-window mode, you can access two apps at the same time in your galaxy S8 and galaxy S8 plus devices. You can surf the web & chat with your friends or send messages while watching videos simultaneously. Not all apps support this feature, only apps that display multi-window icon can use multi window features.

This is the same use as the split-screen view on galaxy S8 and galaxy S8 plus phone. Both allow a user to use two apps at the same time on the galaxy S8 and galaxy S8 plus device. Also, adjust screen size and copy information from one app to the other. In this tutorial, I will show you step by step guide to use multi window on Samsung Galaxy S8 and Galaxy S8 plus phone.

Related tips:

How to use Dual app feature on Galaxy Note 8

How to enable Split screen Galaxy S10 Plus

How to create app pair on Galaxy Note 9

How to change launcher on Samsung Galaxy S8

How to use multi window on Samsung Galaxy S8 and Galaxy S8 plus

Step 1: Open settings from the app drawer on galaxy S8 home screen

Step 2: Select advance features

Step 3: Tap “Multi-window icon” on the app

You can view recently opened apps list, tap recent button

use multi window on Samsung galaxy S8 phone

Step 4: Select the app from the bottom of the screen to use as split-screen mode

Easily use two apps at once on your galaxy S8 devices. If you are currently using an app that supports multi-window mode, select another app to use as a split-screen mode. You can view the dock icon, reverse icon, minimize icon and X icon on your Samsung Galaxy S8 and Galaxy S8 plus device screen. Using these icons, easily minimize the app in the bottom screen and close an app on your device.

If you can see a blue line on any app, it means that the app is currently using as a split-screen mode on your Galaxy S8 devices. Also, adjust the size of the display on the screen using drag the divider up to or down, up the top of the screen if you want to open fulls below screen. Easy to use the multi window on Samsung Galaxy S8 and other android devices.

Step 5: To exit multi window on galaxy S8, select the divider and select X icon

That’s all about how to enable multi window on galaxy S8 and galaxy S8 plus phone.

Use multi window mode on Galaxy Note 5

Step 1: Press & hold the recent button from the bottom left screen

Step 2: Select the app want to use as multi window

Step 3: Select app from the recently opened list to use as a split-screen view on galaxy note 5

Do let us know you liked this tutorial to use multi window on Samsung Galaxy S8. We are waiting for your feedback on comment box. For more such smart android phone tips, stay connected with us via Facebook, Google Plus and Twitter.

How to Unblock Someone on Messenger

Annoying by spam calls or messages on Facebook Messenger app? Here’s how to block or unblock someone on Messenger on Android phones and tablets. Using the Facebook messenger app, you can chat with your friends or family. You can send a message to that person to know he is bothering you and also stop seeing his Facebook posts without blocking him.

What happens When you Block Someone on Facebook?

When you block someone on Facebook, you won’t receive messages and calls from that person. You can’t share groups or rooms with this account. Even can’t view posts, comments, and reactions on Facebook. If you have the latest updated Facebook messenger app, you can see “Block messages and calls” (Will not be blocked on Facebook) and “Block on Facebook” (Won’t be friends on Facebook) options. Also, unblock people on messenger if accidently block them on your phone.

Read Also:

How to Unblock Someone on Facebook Messenger Android

Below you can see the 3 different ways to block somebody on Facebook messenger app on your Android devices.

1st Way: How to Block Somebody on Messenger

Step 1: Open the Messenger app on your Android device.

Step 2: Tap and hold any contact you want to block in the chats tab at the bottom left corner.

Blocked someone on Facebook


Step 3: Select Block.

How to Block Somebody on Messenger


Step 4: Tap on Block messages and calls or Block on Facebook.

Block People Facebook Messenger App

Step 5: Click Block.

2nd Way: Block People Facebook Messenger App using Profile Settings

Step 1: Open the Facebook Messenger app.

Step 2: Open the Profile of any Facebook contact you want to block a message or call.

Tap on settings in top right corner

Step 3: Tap on the “i” icon in the top right corner.

block contacts in facebook messenger app in android device

Step 4: Scroll down and tap the Block.

Step 5: Choose from Block messages & calls or Block on Facebook.

Step 6: Tap the Block.

3rd Way: Block Contact in Messenger

Step 1: Open the Facebook Messenger app.

Step 2: Tap your Profile picture at the top left corner.

Step 3: Scroll down and tap Privacy and safety.

Step 4: Tap Blocked accounts.

Step 5: Tap on the +Contact icon at the top right corner.

Step 6: Tap Any contact you want to block.

Step 7: Choose Block messages & calls or Block on Facebook.

Step 8: Tap the Block and click Done at the top right.

Now, this person blocked on messenger.

How to See Blocked People on Facebook Messenger

If you blocked someone on Facebook messenger, you can find blocked list using the below-given settings.

Step 1: Open your Messenger app.

Step 2: Tap the Profile icon at the top left corner.

Step 3: Scroll down and tap Privacy & safety in the Preferences section.

Find blocked People Messenger


Step 4: Tap the Blocked accounts.

You can see the list of someone you blocked on Facebook.

How to Unblock Somebody on Messenger using Privacy & Safety Settings

Step 1: Open the Facebook Messenger app.

Step 2: Tap the Profile icon at the top left corner.

Step 3: Scroll down and tap Privacy and safety.

Find blocked Facebook People

Step 4: Tap the Blocked accounts.

How to See Blocked People on Facebook Messenger

Step 5: Click on the Person you want to unblock.

Step 6: Choose Unblock messages & calls or Unblock on Facebook.

How to Unblock Someone on Facebook Messenger Android

Step 7: Tap Unblock.

You can unblock messages and calls or unblock your Facebook account.

How to Unblock Someone from Messenger

Step 1: Open the Facebook Messenger app on your device.

Step 2: Tap & hold the Blocked contact from your chat list.

Unblock Someone on Facebook Messenger App Android

Step 3: Tap the Unblock.

How to Block or Unblock Someone on Facebook Messenger App Android

Step 4: Tap on Unblock on Messenger.

This pop-up message appears: Unblock People?

Unblock People Facebook Messenger App Android

Step 5: Tap the Unblock.

It’s easy to unblock from browser. You’ll receive new messages and calls from that contact but not anything that may have been sent during the block.

Above, you can see the steps to block or unblock messenger on Facebook on your Android phone. Did you find the above process helpful? Don’t hesitate to let me know in below comment box. Connect with us for the latest Facebook updates!

Related:

How to Change WhatsApp Profile Picture on Android

Do you want to change your profile picture on WhatsApp Android device? Here’s how to change WhatsApp profile picture on Android phones and tablets. You can choose your WhatsApp profile photo from the phone gallery or capture your photo using a camera. Also, change your WhatsApp profile name and change your WhatsApp phone number also. You can hide your WhatsApp profile photos from all contacts also in your device using privacy settings. We have already discussed change the WhatsApp group icon and group name on your Android devices.

Read Also:

How Do I Change My WhatsApp Picture on Android Device?

Here’s the quickest solution to set or change the WhatsApp profile picture on your Android and Samsung Galaxy devices.

How to Change WhatsApp Profile Picture on WhatsApp For Android

Step 1: Open the WhatsApp app on your device.

Step 2: Tap Three vertical dots at the top right corner.

WhatsApp Settings on Android

Step 3: Tap on Settings.

Set Profile Picture on WhatsApp For Android

Step 4: Tap on the Profile icon.

How to Change WhatsApp Profile Picture on Android

Step 5: Tap on the Camera icon of your profile picture.

Set a new profile photo on WhatsApp Android

Step 6: Choose from Gallery or Camera.

Change the WhatsApp profile picture in the latest Android mobile

Step 7: Select a photo from the gallery and tap on Done.

How to Remove WhatsApp Profile Picture on Android?

Step 1: Open the WhatsApp app on your device.

Step 2: Tap Three vertical dots at the top right corner.

Step 3: Choose Settings.

Step 4: Tap the Profile icon.

Step 5: Tap the Camera icon of your profile picture.

Delete Profile Photo WhatsApp Android


Step 6: Tap on the Trash icon.

This pop-up message view: Remove profile photo?

How to Remove WhatsApp Profile Picture on Android device


Step 7: Tap on Remove.

How Can I Hide My WhatsApp Profile Picture on Android & Samsung Galaxy? 

You can show or hide profile photos from all contacts on WhatsApp using privacy settings on your Android device. Below are three options available.

Everyone: All WhatsApp users show your profile photos.

My Contacts: Users who added your phone number can see your WhatsApp profile picture.

My Contacts Except: Select the contacts you want to hide your profile picture.

Nobody: Hide WhatsApp profile pictures from all people.

How Can I Hide My WhatsApp Profile Picture on Android devices

Go to WhatsApp > Three vertical dots > Settings > Account > Privacy > Profile photo > Everyone/My contacts/My contacts exceptional/Nobody > Done

Also, change privacy settings for WhatsApp last seen, Profile photo, status, and more.

Older Version

Step 1: Open the “WhatsApp” app on your device.

Tap on More option

Step 2: Tap on Three vertical dots (More) at the top right corner.

Choose Setting Options

Step 3: Choose Settings.

Tap On Profile

Step 4: Tap on Profile.

How to Change WhatsApp Profile Picture in android

After an open profile menu, you can edit or change the WhatsApp profile photo on your Android devices.

  • Gallery: You can set your gallery image as your WhatsApp profile picture.
  • Photos: In this option, you can select photos from your android mobile, such as camera, WhatsApp Images, and others.
  • Camera: Upload live photos using a camera.
  • Remove Photo: Remove your WhatsApp profile picture.

WhatsApp > More > Settings > Profile

Change WhatsApp Contact Name on android

You can also edit or change your WhatsApp contacts name below on the WhatsApp profile picture.

That’s all! Using the above steps, you’ll quickly change your WhatsApp profile photo on Android mobiles. Stay and connect with us for the latest updates. Do you still have any questions? Tell us in below comment box.
How to Improve Google Pixel 4 and Pixel 4 XL Battery Life

Make Pixel 4 battery last longer? Here’s how to improve battery life on Google Pixel 4 and Pixel 4. Google Pixel 4 has very tiny 2800 mAh battery, so users are facing battery draining issues. Different solutions available to extend battery life on Pixel 4 or 4 XL including enable Dark theme, use simple wallpaper, disable always on display, disable the smooth display, turn off Motion sense, low brightness and more.

If your phone’s battery life seems poor, you need to choose settings to save battery last. Pixel 4 battery life is the main reason not to buy it. If you are Pixel’s fan, you’ll buy Pixel 4 XL has 3800 mAh battery. Check out below given possible solutions to improve battery life on Google Pixel 4 and Pixel 4 XL.

Read Also:

How to Fix Google Pixel 4 XL Battery Life Issue 

Annoying by Pixel 4 battery draining so fast? Apply below-given methods to improve battery life on Google Pixel 4 and 4 XL.

Turn on Dark mode Pixel 4 & 4 XL

Make sure to enable a dark theme on Pixel 4 and 4 XL. It will use system wise dark mode to save battery life on your phone.

Step 1: Go to Settings.

Step 2: Tap on Display.

Improve battery life on Google Pixel 4 and 4 XL

Step 3: Turn on Dark theme toggle.

Disable Motion Sense on Pixel 4 & 4 XL

Google Pixel 4 and Pixel 4 XL added new motion sense (Project soli) features to quickly skip songs, snooze alarm, mute phone calls without touch your device.

Step 1: Open the Settings app.

Step 2: Scroll down and tap the System.

Step 3: Tap Motion Sense.

Step 4: Turn off Motion sense toggle.

Don’t Miss: How to enable and use Motion Sense on Pixel 4 & 4 XL

Disable Smooth Display to extend battery life on Pixel 4 XL and Pixel 4

Pixel 4 and Pixel 4 XL use 60Hz or 90Hz screen refresh rate. The higher the screen refresh rate, the smoother the screen experience. But it will consuming more battery power, so turn off smooth display Pixel 4 to save battery.

Step 1: Open app drawer in your Pixel 4 and 4 XL.

Step 2: Tap the Settings app.

Step 3: Tap Display.

Step 4: Scroll down and turn off Smooth display toggle.

Read More: How to change refresh rate (90Hz) in Pixel 4 and 4 XL

Set short screen timeout time on Pixel 4 & 4 XL

You need to reduce screen time on Pixel 4 and 4 XL if set higher. Set screen timeout as 15/30 seconds.

Step 1: Open the phone’s settings app.

Step 2: Tap Display.

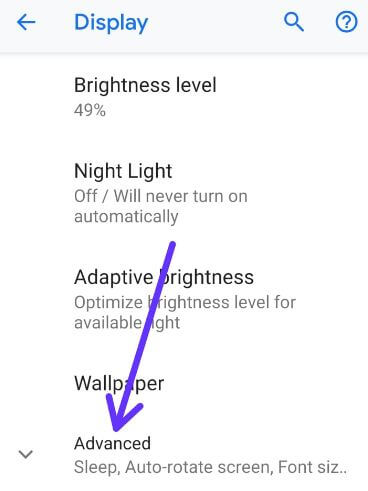
Step 3: Tap Advanced.

Step 4: Tap Screen timeout.

Step 5: Choose 15 seconds or 30 seconds.

Use screen attention to set short screen timer in your Pixel 4 and 4 XL devices.

Settings > Display > Advanced > Screen attention > Turn on-screen attention

You can reduce screen brightness to save battery on Pixel 4 & 4 XL. Swipe down notification panel from top of the screen and lower your screen’s brightness. Also turn off live wallpaper if use.

Disable Always-on display in Pixel 4 & 4 XL

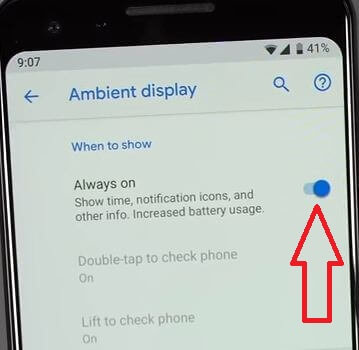
When turning on always-on display, you’re screen wake up when receiving new notifications. Turn off your screen when you’re not using it.   

Step 1: Go to Settings.

Step 2: Tap Display.

Step 3: Tap Advanced.

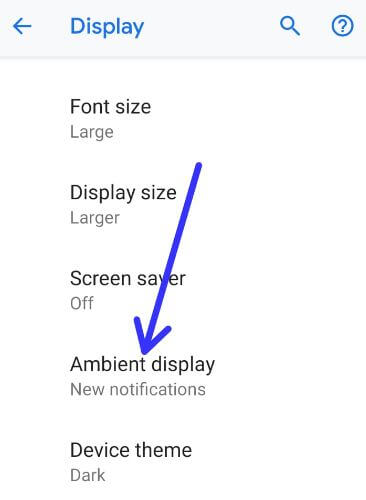
Step 4: Tap Ambient display.

Step 5: Turn off toggle Always on

You can enable battery saver, adaptive brightness, adaptive battery, set battery optimization for apps, close running background apps and more in your devices.

Limit Apps permission on Pixel 4 and Pixel 4 XL

You can restrict the app background location to limit the app usage location in your device using below given settings.

How to Fix Google Pixel 4 XL Battery Life Issue

Settings > Location > App permission > Choose from Allowed all the time/Allowed only while in use/Denied

Uninstall unnecessary apps

If you have installed some of the app temporaries and you will no longer use it, then remove it from your device.

Long press the app and move it to the Uninstallat the top of the home screen > OK

And that’s all. Apply above given methods to improve battery life on Google Pixel 4 and 4 XL. If you know any other ways to fix Pixel 4 battery drain issues, share it with us in the comment section.

How to Change the Font And Display Size on Android 10

Here’s how to change font style and display size on Android 10 devices. By default set font size, display size, and body font on Android 10. You can make text bigger or smaller using display settings to change icon size Android 10. Android 10 added new font styles called Noto Serif/ Source Sans Pro under developer mode settings. Also, use new styles & wallpaper settings to change icon shape, font style, font color, icon color, and more.

When you change the font size on android, it will set the text size on a screen smaller or larger. You can increase icon size on your screen to set display size as large or larger. Some apps on your screen may change position when changing the default size. Follow below given complete process to change the font on Android 10.

Read Also

How to Change Font Style and Display Size on Android 10

You can change font size, display size, and font style in android 10 using below given settings.

Step 1: Swipe up from the bottom of the screen to open the app drawer in android 10.

Step 2: Tap on Display.

Step 3: Tap on Advanced.

Change font style and display size on Android 10

Step 4: Tap Font size.

Step 5: Choose a font size from Small/Default/Large/Largest.

Step 6: Go back and tap on Display size.

Step 7: Set display size as Large or Larger or Largest if you want to increase the icon size.

Now change icon size on your android 10. You can change the android 10 font style using below given settings.

Change Font in Android 10: 2 Methods

Check out below-given methods to change font style in android 10 using styles & wallpaper settings if the latest updated devices.

Step 1: Go to Settings.

Step 2: Tap on Display.

Step 3: Tap on Styles at the bottom left side.

Step 4: Tap on Styles and wallpapers.

Step 4: Swipe left side until view font style.

Also, change the font icon, icon shape, icon color, and more.

Step 5: Choose a specific font style and tap on Apply.

Change the Android 10 Font style using Developer Mode: Google Pixel and Pixel XL

Make sure to enable developer options to manually change the android 10 font style.

Step 1: Open app drawer and tap on the Settings app.

Step 2: Tap About phone.

Step 3: Scroll down the end of the page and tap on Build number 7 times until seeing a message: You are now a developer!

Step 4: Tap the back button and tap System.

Step 5: Tap Advanced.

Step 6: Tap Developer options.

Step 7: Scroll down at the end of the page and tap Headline/Body font under the Theming section.

Change body font in Android 10

Step 8: Choose Noto Serif/Source Sans Pro.

Now change the body font style in your android 10 running devices.

And that’s it. We hope the above-given tutorial useful to change font style and display size on Android 10. Do you still have any questions? Tell us in below comment box. Stay and connect with us for the latest updates.

How to Use Gestures On Android 10

Here’s how to enable and use gestures in Android 10. Android 10 gestures include Active Edge, Swipe fingerprint for notifications, Jump to the camera, Flip camera, System navigation, Double-tap to check phone, Lift to check phone and Prevent ringing. Android 10 gesture navigation added new three settings for navigation including gesture navigation, 2-button navigation, and 3-button navigation.

Google launched Android 10 with new features including new gestures system, Focus mode, Parental controls with Google Family link, improve privacy, location permission and more. But this tutorial explains to you about enable gestures on Android 10 devices (Pixel 3, Pixel 3 XL, Pixel 3a, 3a XL, Pixel 2, 2 XL, Google Pixel and Pixel XL).

Read Also:

How to Turn on Android 10 Gestures

You can enable android 10 gestures in your Pixel devices using below given steps.

Step 1: Swipe up from the home screen to open the app drawer.

Step 2: Go to settings.

Step 3: Scroll down and tap on System.

Android 10 gestures use on Pixel

Step 4: Tap Gestures.

List of below-given android 10 gestures available in your devices.

How to enable and use gestures in android 10

Active Edge

Use active edge to squeeze for your assistant, squeeze for silences and quickly launch assistant when turning off the screen. You can change squeeze sensitivity as a light or firm squeeze.

Swipe fingerprint for notifications

Enable swipe fingerprint for notifications android 10 device

To quickly check the notification on your phone screen, swipe down the fingerprint sensor on the back of your phone. Enable swipe fingerprint for notifications android 10 to access notifications.

Jump to camera

Press the power button two times to quickly launch the camera. This trick works from any screen.

Flip camera

To switch in and out of selfie mode in Google camera, double-twist when you’re in the app. Turn on the flip camera on your phone.

System navigation

You can activate Android 10 gesture navigation using this setting. This new android 10 gesture works the same as iPhone X, OnePlus 7 Pro/7, etc. Click here to see steps to enable the new gesture system in android 10.

Double tap to check phone

Android 10 gestures list

Enable double-tap on the lock screen to check notifications, time, and other info.

Lift to check phone

Pick up your phone when you’re device locked. Turn on a lift to check the phone in your device.

Prevent Ringing

Use prevent ringing Android 10

You can quickly mute or vibrate the device to press the power and volume up button together. Enable prevent ringing in your device.

Flip To Shhh

To enable Do not disturb mode, place your phone face down on a flat surface. You’ll feel a subtle vibration when do not disturb turns on. Toggle on Flip to Shhh to activate it.

And that’s it. Check out each one listed above settings to enable and use gestures in Android 10. What are your favorite features of Android 10? Let us know, in the comment section below.