How to enable trusted voice in Google assistant

Recently my moto G4 plus device updated marshmallow to android nougat 7.0. In android nougat 7.0 devices has great features including split screen mode, Google Assistant, doze mode, battery saver mode and more. By default turning off trusted voice in nougat devices. You can enable trusted voice in Google Assistant settings. When your device updated nougat, first of all enable Google Assistant in your device.

This trusted voice feature is useful to unlock your device when your voice match with OK Google voice model. After recording your voice when you say Ok Google, it will automatically recognizes your voice and unlock your android device. Some of the user’s issue of Google’s trusted voice turning off automatically or wrong voice detected. But you don’t worry, just follow below given step by step guide to enable trusted voice in Google Assistant.

Read this:

7 best Google Assistant tips and tricks you must know

Google Assistant My Day Feature 

How to enable trusted voice in Google Assistant android Nougat 7.0

Before enable trusted voice, enable Google Assistant in nougat device if disable. Unlock your android phone using this trusted voice feature of Google Assistant. Below you can see how to set up OK Google as trusted voice in android 7.0 nougat.

Step 1: Touch & hold home button to launch “Google Assistant” in Moto G4 plus and other device

Google Assistant Settings nougat 7.0 device

Step 2: Tap “Three vertical lines” & touch “Select

You can see Google Assistant settings in your nougat devices.

Tap OK Google detection under settings

Step 3: Tap “OK Googledetection, under adjust settings for this device

By default, disable say “OK Google” any time in your device.

Step 4: Enable “OK Google”

Recording OK Google three time to recognize your vocie

You can see the screen that says to record “OK Google” three times to recognize your voice when device is unlocked.  Speak “OK Google” three times to record your voice. When completed, you can see this message: Turn on trusted voice (See below screen).

Turn on trusted voice in Google Assistant

Step 5: Tap “Done

First of all enable say “OK Google” in your device after that you can enable trusted voice in Google assistant.

Enable say OK Google any time in nougat device

Step 6: Enable “OK Google” any time

Now this time disable trusted voice feature in your device. Before enable trusted voice, Google Assistant unable to unlock your android device.

Step 7: Enable “Trusted voice”

You can see message of: “OK Google” trusted voice

OK Google trusted voice settings in android nougat

Step 8: Tap “OK” to enable it

This Google Assistant trusted voice feature is less secure compare to pattern lock or password. If any other person is similar voice or recording of your voice could unlock your device easily.

enable trusted voice in Google Assistant

Step 9: Turn on Trusted voice in nougat 7.0

That’s all about trusted voice feature of Google Assistant.

OK Google voice model settings in android 7.0 nougat

In OK Google detection settings, you can see OK Google voice model also. In this voice model, you can retrain voice model and delete voice model from your android device. If you delete voice model, it will be permanently deleted. After use “OK Google”, you will need to retrain voice model to recognize your voice.

2nd Method: Enable trusted voice in Google Assistant (Moto G4 plus)

Google Assistant settings in android 7.0 nougat phone

Swipe left your Moto G4 plus screen > Menu > Settings > Google Assistant > Settings > OK Google detection > Enable say “OK Google” any time > Enable trusted voice

Do let us know above given tips to enable trusted voice in Google Assistant helpful to you. If you have any kind of trouble, let us know below comment box. For more such smart tips, stay connected with us via Twitter and Facebook.

4504 message not found error android: How to fix

Have your ever seen this 4504 message not found error android phone or tablet devices? This android device error causes of unknown address that send message to your device. Due to this android 4504 message not found error, you can not receive text messages properly and unable to know who send this message. Most of all this type of error occurs on Samsung galaxy S4, S5 or S6 device.

This message seen: “4504 message not found”. When seen who can send this message, there is nothing to see number and you think about spam message. To fix error 4504 message not found in android isn’t any particular solution to fix it. But you should try below given possible solutions to fix 4504 message not found error android phone or tablet.

Read This:

4 methods to fix 4504 message not found error android phone or tablet

Fix 4504 message not found error android phone

1st Method: Reboot your android phone

Step 1: Hold down power button in your device

Step 2: Tap “Restart

Now your device reboot and check fix 4504 message error in android device.

2nd Method: Remove battery from android device

Step 1: Hold down the power button in your android phone

Power off android phone to fix error 4504 in android

Step 2: Select “Power Off

After turn off your device, wait for at least 30 or 40 seconds.

Step 3: Remove the battery from your device

After few seconds, put battery and switch on your android device. This solution may be fix unknown address 4504: message not found issue in your Samsung galaxy and other android devices.

3rd Method: Reset SIM card to fix 4504 message not found error android

Step 1: Hold down the power button in your android phone

Step 2: Select “Power Off

After turn off your device, remove your SIM card from your device.

Step 3: Clean your phone SIM card

Step 4: Replace SIM card

Step 5: Restart your android device

If none of the above given methods fix error 4504 message not found in android, try below given last solution. I hope it will solve your error 4504 in android device.

4th Method: Factory Data Reset android phone

Step 1: Go to “Settings

Step 2: Under personal section, touch “backup & reset

Step 3: Touch “Factory data reset

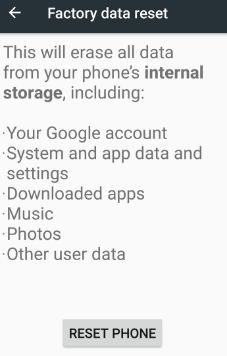
Factory reset andriod to fix 4504 message not found issue

Step 4: Tap “Reset phone

Step 5: Tap “Erase everything

End the list of troubleshooting methods to fix 4504 message not found error android phone. If you find it helpful, share this article with others. Stay connected with us for daily android tips.

How to add widgets to android phone home screen

Widget is one type of shortcut icon of any application which we set at home screen to directly use without open from app. You can add widgets to android phone home screen or lock screen. Also add one or more widgets to home screen. Widgets are available in different different size such as 4×4, 2×3, 3×3, 4×1, 4×2, 1×1, 4×3 and more. It’s quiet easy to add or remove widgets from Android device home screen.

In my Moto G4 plus (Android nougat 7.0) device include several widget shortcuts such as calendar, Chrome, clock, Google App, Google Play Music, Maps, WhatsApp and more. Adding a widget to android home screen is easy. You can download widgets for android device from Google Play Store and it will automatically added widget to your Android Nougat 7.1 device. In some of the application, by default added their widget when application installed. Follow below given method to add widgets to android phone home screen and lock screen.

Read This:

How to use Pixel 2 at a Glance Widgets

How to set up emergency info android lock screen

How to add weather widget to Pixel 2 home screen

How to add widgets to android phone home screen and lock screen

Step 1: Tap & hold the blank space of home screen

Tap Widgets to set home screen

Step 2: Touch “Widgets

You can see list of widgets on your android device screen.

Tap any widget want to set phone lock screen

Step 3: Touch & hold any widget 

add widgets to android phone home screen

After few second, it will automatically add to your android device home screen (See above screen). You can use this widget shortcut.

remove widget from android home screen

To remove widget from android home screen, just tap & hold widget you want to remove and drag & drop widget to “Remove”. Now remove widget from home screen in your android device.

Add widget to android phone lock screen:

Step 1: Switch off the display of your android device

Step 2: Switch it on again

Step 3: When view lock screen, swipe left or right

Step 4: Tap on “+” icon when seen on lock screen

You can view list of widgets on your device.

Step 5: Choose widgets from given list want to set lock screen

That end of steps to add widgets to android phone home screen and lock screen. You can also enable show updates on your android nougat 7.0 devices. It will see updates on your work, weather and local information in the home screen widget.

Read Also: How to fix weather not showing in Android 9 Pie lock screen

Follow below given steps to enable it in your android device.

Step 1: Touch & hold the blank space of home screen

tap settings to open widget settings

Step 2: Tap “Settings

You can view Google Assistant, home screen and search section in your nougat device.

Tap widget under search section

Step 3: Tap “Widget” under search section

Enable show updates in widget

By default disable show updates in your device.

Step 4: Enable show updates 

I hope above given information is enough to add widgets to android phone home screen and lock screen. If you find it helpful, don’t forget to share it with others. Share your thoughts related to this article in the comments if you like. Stay connected with us for daily latest android phone tips.

How to Get Turn by Turn Directions from Google Maps Android

Do you want to use voice direction on Google Maps on Android or Samsung Galaxy? Here’s how to use Google Maps to get navigation directions on your Android device. You can use the Google Map app, add a maps widget to the home screen to quickly search, and voice commands (Hey Google) to get directions without third-party apps. While driving, use GPS for turn-by-turn navigation on your Android phone or tablet. Also, search any area using the voice commands feature, and your phone navigates to that address easily.

People use Google Maps to quickly find places nearby, nearby traffic, and other directions you search. Also, control what location information your Android phone can use and which apps have accessed your location permission. Follow the below-given step-by-step guide to get directions on Google Maps Android devices.

How to Get Directions Google Maps App on Android Phone or Tablet

Check out the below-given methods to use Google Maps to find the directions in your search.

Use Google Maps App to Get Navigation Direction on Android

Step 1: Open the Google Maps app on your device.

If location is disabled on your device, you can see a message: Turn on location using Google’s location services.

Settings > Location > Toggle on Use location

Use Google Maps App to Get Navigation Direction on Android


Step 2: Tap on the Search box to search the place.

Step 3: Enter the destination, such as a restaurant, gas station, ATMs, theater, and more.

Step 4: You can see the Location of the destination you search for with the time to reach there (See the below image).

How to Get Turn by Turn Directions from Google Maps Android

Step 5: Tap on Direction.

Step 6: Enter your current location.

How to Get Directions Google Maps App on Android Phone


Step 7: Tap on the Start button at the bottom left corner.

Now on your Android device, you can hear Google Maps’ voice and see step-by-step directions to find your destination.

Use Voice Commands (Google Assistant) to Get Direction using Google Maps Settings Android

Before using, this method on your Android device, make sure to enable OK Google on your Android device. You can enable Hey Google or OK Google on the Android device using the below settings.

Use Voice Commands to Get Direction using Google Maps Settings Android

Settings > Google > Settings for Google apps > Search, Assistant, and Voice > Google Assistant > Hey Google & Voice search > Toggle on Hey Google – Android 12/Android 11/Android 10

Step 1: Say Hey Google or OK Google on your Android device.

Step 2: When launching the Assistant, speak the Address you want to get directions.

Use Google Assistant to get turn by turn directions from Google Maps

Step 3: Tap on Start.

Step 4: Enter your current location and see the direction.

Now your Android phone is navigating to an address. Using this Google voice command, you can call any person, send a message, set the alarm, sing a song, play favorite songs, check voicemail, and more.

How do I Turn On Voice Direction on Google Maps?

Step 1: Open the Google Maps app on your Android device.

Tap on Profile icon in Google Map App Android

Step 2: Tap on the Profile icon at the top right corner.

Google Maps Settings on your Android

Step 3: Tap on Settings.

Google Maps Navigation Settings

Step 4: Tap on Navigation settings.

How do I Turn On Voice Direction on Google Maps

Step 5: Make sure to toggle on Paly voice over Bluetooth, play voice during phone call options, and adjust the volume you want from Softer/Normal/Louder.

After that, tap Play test sound (Show above screenshot) to check the sound for navigation maps on your Android devices.

How to Delete Google Maps Activity on Android device

You can see all your Google Maps activity here. Also, choose the option to remove Google Maps activity.

How to Delete Google Maps Activity on Android Phones

Open Google Maps app > Profile icon at the top right corner > Settings > Maps history > Tap on Delete in drop-down box > Choose from Delete today/Delete custom range/Delete all time/Auto-delete (3 Month) > Delete > OK

Read Also:

Did you find the above steps help to get turn-by-turn directions with Google Maps for Android phones or tablets? If you have any trouble, let us know in the comment box. Don’t forget to share this trick with others.

Fix Error 413 in Google Play Store

While installing apps from the play store seen the error message “App could not be downloaded due to an error. (413). How to fix Google play store error 413 in android phone. You can see the app or game downloading process is running but not downloaded due to this error code 413. Sometimes big files cause not installing the app in your device.

To fix this issue, you should try clear cache of play store & Google play services, uninstall update of play store and check proxy settings & reset default APN settings in your device to fix error 413 in play store. Other common Google play store error codes are error 481, error 491, error 492, error 24, error 101, error 491, error 504, error 505 and more. In this tutorial, I will show you three different methods to fix Error 413 in Play Store android phones.

Related:

How to fix Google Play Error 413 While Installing Apps

fix Google play store error 413

Try below given troubleshooting guide to fix error 413 in Google play store.

1st Method: Clear cache of Google Play store

Step 1: Go to “Settings”.

Step 2: Under the device section, tap “Apps”.

List of installed apps seen in your device.

Step 3: Scroll down until finding the Google Play store and open it.

Tap storage in app info of play store

Step 4: Tap “Storage”.

Clear cache of Google play store to fix error 413

Step 5: Touch “Clear cache”.

If clear cache not worked then clear data Google play store to fix Google Play Store error 413.

Clear cache of Google Play Services in Android

Clear cache of Google play services to fix error 413

Settings > Device > Apps > Google Play Services > Storage > clear cache & clear data

2nd Method: Uninstall update of Google Play Store to fix Error 413

Step 1: Follow the above-given method steps 1 to 3.

Step 2: Tap “three vertical dots” from top of the right side screen.

Uninstall Google play store updates to fix error 413

Step 3: Touch “Uninstall updates”.

You can see this message: Replace this app with the factory version? All data will be removed.

Step 4: Tap “OK”.

Now try to downloading and installing the app from Google play store. I hope this solution fixes your play store 413 error issue.

3rd Method: Reset APN to fix Google Play Store error 413 code

Step 1: Go to “Settings”.

Various sections are available in phone settings.

Step 2: Under the Wireless & networks section, tap “More”.

Step 3: Tap “Cellular networks”.

If Dual SIM phone used, select SIM to want to reset APNs settings in android nougat and marshmallow device.

Access point names under cellular network settings

Step 4: Touch “Access point names”.

Tap more in APNs settings

Step 5: Tap “More”.

Reset APNs settings in android to fix error 413

Step 6: Touch “Reset to default”.

After restoring default APN settings in your android device, you can see this message on screen: Reset default APN settings completed.

Don’t forget to mention which method worked for you to fix Google Play Store error 413 in android device. If you find it helpful, share it with others. If you have any kind of trouble, let us know below comment box.

Fix Camera Not Working on Android Phone

Error message “Unfortunately, Camera has stopped” on the android phone while taking a picture. You can see this type of other errors in any app on your device. Using the camera, you can take photos or videos with high clarity. In today’s world, people are crazy about taking a selfie so always give first priority of High clarity camera that taking HD photo without blur if zoom photo. It’s quite easy to fix the camera app keep crashing Android devices.

You can download the best camera apps from the play store if not solved your camera issue in your device. A lot of people are annoying when the camera is not working correctly in android or other devices. Other camera problems you face are photo looks blurry, front or rear camera not working and accidentally removed camera photos. Follow the below-given step by step guide to fix the camera app not working issue on Android devices.

Read Also:

7 Methods to Fix Android Phone Camera Not Working in Nougat 7.0 and Marshmallow 6.0

Try below given possible solutions to fix “Unfortunately, the camera has stopped” on the android device.

1st Method: Reboot your android

One of the basic solutions of any android problem, reboot your android device and check the camera app is working on your device. Sometime restart your device fix android phone error.

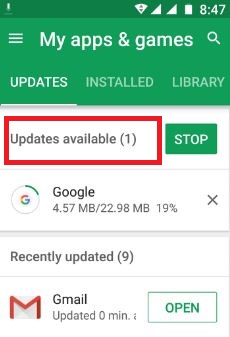
2nd Method: Check for Android system update

Update system in android 7.0 nougat to fix camera error

Check the latest software update available in your android device. If an update is available then update your device. The updated device may be a fixed android camera not working issue.

3rd Method: Clear app cache of the camera app to fix Camera Not Working on Android

Step 1: Go to “Settings”.

Step 2: Under the device section, tap “Apps”.

Step 3: Scroll down until seeing a camera and tap “Camera”.

Camera app not working android phone

Step 4: Touch “Storage”.

Clear cache of camera app in 7.0 nougat

Step 5: Tap “Clear cache

It will clear the cache of the camera app in the android device.

4th Method: Force stop camera app

Force stop camera in android 7.0 nougat

Settings > Device > Apps > Camera > Force stop

Read Also:

5th Method: Enable safe mode to check if any app cause problem

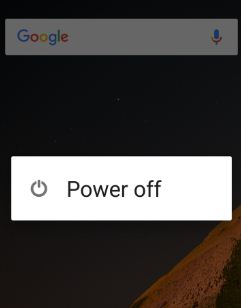
Step 1: Press & hold the power button on your android phone.

Touch Power off button to use safe mode in nougat 7.0

Step 2: Touch & hold the power off button.

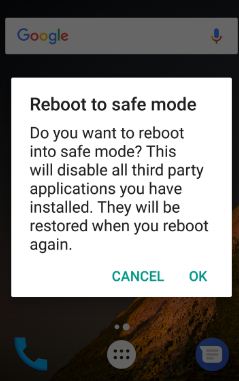
You can see this message: “Reboot to safe mode”.

Reboot to safe mode android 7 to fix camera issue

Step 3: Tap “OK”.

Your device will restart in safe mode. You can see the Safe mode icon at the bottom side screen. Now check your device camera working fine if working well then any third-party app causes this problem of camera app not working android. Uninstall recently downloaded the app one by one and check the camera error solve.

 6th Method: Reset app settings to fix can’t connect to camera error on Android

reset app preferences to fix camera app problem

Settings > Device > Apps > More > Reset app preferences > Reset apps

This reset app preference setting will disabled apps, background data restrictions for apps, disabled app notifications, any permission restrictions and more.

7th Method: Factory Reset Android 7.0 Nougat (Moto G4 plus)

Step 1: Go to “Settings”.

Step 2: Under the personal section, tap “Backup & reset”.

Step 3: Tap “Factory data reset”.

Reset nougat device to fix android phone camera not working

Step 4: Tap “Reset phone”.

Step 5: Tap “Erase everything”.

This factory reset android phone will delete all your personal information and downloaded apps from your device.

If none of the above methods worked for you then you should download camera apps from the play store to take photos or selfie in your android phone or tablet devices.

End the list of troubleshooting steps to fix camera app not working android phone or tablet. Don’t forget to mention which method worked for you. Do you have any alternative methods? Share it with us in below comment box.