How to Turn Off Keyboard Vibration in Google Pixel 2 and Pixel 2 XL

How to disable vibrating keyboard while typing in your Google Pixel 2 and Pixel 2 XL devices. The different device has slightly different settings to turn off keyboard vibration Pixel 2 devices such as Pixel, Google Pixel XL, Pixel 2 XL, Nexus 6P/5X and more. Also, disable dial pad tones, screen locking sounds, charging sounds, touch sounds, and touch vibration/Haptic feedback in Google Pixel 2.

Read Also:

How to Turn Off Keyboard Vibration in Pixel 2 XL and Pixel 2

First of all, let see steps to disable keyboard vibration on Google Pixel 2 and Pixel 2 XL.

How to Disable Keyboard Vibration on Pixel 2

Step 1: Open the app drawer & tap on the Settings app in your Google Pixel 2 & Pixel 2 XL.

Step 2: Tap on System.

Step 3: Tap on Language & input.

Pixel 2 virtual keyboard settings

Step 4: Tap on the Virtual keyboard under the keyboard & input section or On-screen keyboard under the keyboard section.

Here you’ll see Gboard, Google Indic keyboard, and Google voice typing options. Also, manage the keyboard in your Pixel 2 device.

Manage Google Pixel 2 keyboard settings

Step 5: Tap on Keyboard you want to turn off keyboard vibration.

Google Indic keyboard settings in Google Pixel 2 Oreo

Step 6: Tap on the Keyboard.

How to turn off keyboard vibration Pixel 2 and Pixel 2 XL

Step 7: Disable vibrate on keypress to turn off keyboard vibration Pixel 2.

Set Google Pixel vibration intensity

Here you’ll set Google Pixel vibration intensity or Pixel 2 vibration strength on keypress also. Just move the cursor right side to make vibrate stronger on Google Pixel 2 and Pixel 2 XL.

How to Turn Off Vibrate On Tap (Touch Vibration) on Pixel 2 & Pixel 2 XL

Step 1: Go to Settings in your Pixel 2.

Step 2: Tap on Sound.

Advanced settings in Google Pixel 2 sound settings

Step 3: Tap on Advanced.

Here you’ll see Google Pixel 2 sounds and vibration settings.

Turn off vibrate on tap on Pixel 2 XL Oreo

Step 4: Enable/disable vibrate on tap in Pixel 2 & Pixel 2 XL.

How to Turn Off Haptic Feedback on Google Pixel 2

Settings > System > Language & input > Virtual keyboard/On-screen keyboard > Gboard > Preferences > Key press > Enable/disable haptic feedback on keypress

You can also increase or decrease vibration strength of haptic feedback in Pixel 2 devices.

And that’s it. I hope this little tip helpful to turn off keyboard vibration Pixel 2 and Pixel 2 XL. If you have any kind of trouble, tell us in below comment box. Don’t forget to check out our other Pixel 2 tips and tricks.

Google Pixel 2 XL Not Getting Texts Messages From iPhone

Annoying by no longer send or receive text messages on Google Pixel 2 and Pixel 2 XL? We search the web and found some of the possible solutions to fix Google Pixel 2 can’t send or receive text messages or MMS issues. There are several reasons for unable to send or receive messages such as poor network signal, SIM card issue, and software updates. Also, make sure outgoing services in your device is not disables. If you recently switched from iOS device to Pixel devices and forgot to disable iMessage then also facing this issue. You can switch texting from iMessage to android. If you have no longer use the iOS device, just enter your mobile number to deregister from iMessage.

Several users facing the issue of Google Pixel 2 not getting text messages from iPhone also after Oreo updated. Also, wait for the next system update to fix Google Pixel 2 not sending text messages problem. After applying each method, check your Google Pixel will receive SMS messages or Pictures.

Read This:

How to Fix Pixel 2 Can’t Send Or Receive Texts Messages/ MMS

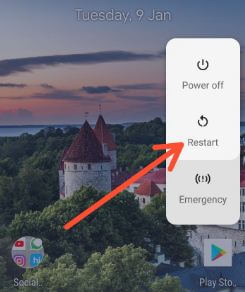
First of all restart or soft reset your Pixel 2 devices. Sometimes this soft reset Pixel 2 fixes your device issues. Press & hold the power button in your Pixel 2 and tap on the Power off option. After 15 seconds power on again and check to send a text message.

Poor network signal

Check network signal strength in your Google Pixel 2 and Pixel 2 XL device. Due to poor network signal, you can’t send or receive text messages in your Pixel 2 device. Wait for a good network signal or find a place where your device has a good signal. Also, turn on Airplane mode and off again and check network signals in your Pixel devices.

Remove the SIM card & Re-insert

First of all, switch off your device and remove the SIM card & reinsert the SIM card on your phone. Make sure properly SIM inserted or not. Now restart your device. It will help to fix send or receive text messages, phone calls or other SIM card related issues on Google Pixel 2.

Clear the cache & data of Messaging app Pixel 2

If any message files corrupt or messaging app related issue, you can fix it to clear the app cache to remove temporary data from that particular app. And clear app data will permanently delete the app’s data.

Step 1: Go to settings in your Pixel 2.

Step 2: Tap on apps & notifications.

Pixel 2 Oreo recently opened apps feature

Step 3: Tap on see all apps.

Select message app you want to clear the data

Step 4: Select the Messaging app & tap on it.

Step 5: Tap on storage.

Clear the cache & data in Pixel 2 messaging app

Step 6: Tap clear cache and after that clear data

Now reboot your android device and check to get texts on Pixel 2 or Pixel 2 XL device.

Reset Network Settings to Fix Pixel 2 not receiving texts messages

This Google Pixel 2 reset will reset all network settings including Wi-Fi, mobile data and Bluetooth. So if any network related issue then it will be solved after reset Pixel 2 network settings.

Step 1: Go to settings in your Pixel devices.

Step 2: Tap on System.

Step 3: Tap on Reset options.

Here you’ll see Reset Wi-Fi, mobile & Bluetooth, Reset app preferences and erase all data (Factory reset) options.

How to fix Pixel 2 not receiving texts messages

Step 4: Tap on Reset Wi-Fi, mobile & Bluetooth.

Reset settings on Pixel 2 XL Oreo

Step 5: Tap on Reset settings.

Confirm your pattern to continue.

Step 6: Again tap on Reset settings.

Network settings have been reset message view on the screen in your Google Pixel 2 and Pixel 2 XL. Now check to send or receive text messages or SMS on your Google Pixel phone. If none of the above methods worked, try a below-given solution.

Factory Reset Pixel 2 & Pixel 2 XL

It will remove all your phone data. So, make sure back up your important data to other devices or PC.

Step 1: Swipe down notification panel twice at top of the screen and tap Settings.

Step 2: Tap the System at the end of the page.

Step 3: Tap Advanced.

Step 4: Tap Reset options.

Google Pixel 2 XL Not Getting Texts Messages From iPhone

Step 5: Tap Erase all data (Factory reset).

Step 6: Tap Reset phone.

Step 7: Confirm your PIN or pattern lock or password to continue the process.

Step 8: Tap Erase everything.

Now check fix Pixel 2 can’t receive any text messaged from other android or iPhone devices.

The list ends here. Don’t forget to mention which method worked for you to fix Pixel 2 not receiving text messages. Do you have any other tips we missed above? Share with us in below comment box. Get more Pixel 2 tips and tricks.

How to Fix MMS Not Working on Pixel 2 XL/2/Pixel XL/Pixel

Here’s how to fix can’t send or receive picture messages on Google Pixel 2, Pixel 2 XL, and Google Pixel XL. Several users facing can’t send pictures on Google Pixel 2/2 XL after updating the system software. Also, he faces the issue of Google Pixel not receiving pictures even enabled on his devices. Sometimes sent messages but couldn’t receive any MMS messages. By default, allow auto-download MMS in Android devices such as Pixel 2, Pixel 2 XL, Google Pixel, etc. Have you ever faced Google Pixel 2 MMS issues? We surf the web and found some possible solutions to fix MMS not working on Pixel 2 XL, Pixel 2, and Google Pixel XL.

How do I Fix MMS in Google Pixels?

Most carriers have faced these MSS issues, including AT&T, Verizon Wireless, Sprint, and T-mobile services. Check out each one listed below methods in your Android devices.

How do I Enable MMS on Google Pixel 2?

To automatically receive MMS picture messages in android, first of all, check to enable automatically download MMS messages on android devices using the below settings in your device.

Step 1: Open the Messaging app on your devices.

Step 2: Tap on Three vertical dots at the top right corner.

Step 3: Select Settings.

Step 4: Tap on Advanced.

You’ll see Group messaging, auto-download MMS, SMS delivery reports, wireless alerts, SIM card messages, and more.

Fix Google Pixel 2 not receiving MMS after Oreo update

Step 5: Enable auto-download MMS if disabled.

Now send MMS to your device from other devices and check fix issues or not.

Note: It depends on your operator to allow outgoing MMS messages on your Pixels.

Remove the SIM Card & Re-insert

Make sure correctly SIM is inserted. Switch off your device and remove the SIM card & reinsert the SIM card. Now restart your device. It will sometimes fix send or receive text messages, phone calls, or other SIM card issues on Google Pixel 2.

Check Messages App Update

Make sure messaging app is updated to the latest version. If updates are available, then update it and check to solve the MMS problem or not.

Google Play store > Profile icon at the top right > Manage apps and device > See details > updates all

Clear MMS Cache to fix Google Pixel 2 Not Receiving MMS

By default, hide this MMS services option under application, find it, and clear cache & data using the below settings on your Android devices.

Step 1: Go to Settings on your devices.

Step 2: Tap on Apps & notifications.

Google Pixel 2 recently opened apps settings

Step 3: Tap on See all apps.

Step 4: Tap on Three vertical dots at the top right corner.

Show system in Pixel 2 Oreo

Step 5: Tap on the Show system.

Android Oreo MMS services

Step 6: Find MMS services and tap on them.

Step 7: Tap on Storage.

Google Pixel 2 not receiving MMS issue

Step 8: Tap on Clear cache (Delete unnecessary data).

Step 9: Tap on Clear Data (Delete app’s data permanently).

For Pixels running Android 12/Android 11: Settings > Apps > See all apps > Three vertical dots > Show system > Select MmsService > Storage and cache > Clear cache

Check to fix MMS issue on Google Pixel 2 and other updated devices. If none of the above methods worked, try the below-given solution.

Reset Network Settings to Fix Can’t Send or Receive Picture Messages on Google Pixel 2 & 2 XL

This Pixel 2 reset network settings will reset all your network settings, including saved Wi-Fi networks, mobile data, and Bluetooth. So if there is any network-related issue, then it will be solved.

Step 1: Go to Settings on your Pixel devices.

Step 2: Tap on System.

Step 3: Tap on Reset options.

Step 4: Tap on Reset Wi-Fi, mobile & Bluetooth.

Step 5: Tap on Reset settings.

Step 6: Again tap on Reset settings.

Factory Reset your Pixel 2/Pixel 2 XL

Make sure back up & restore important data before performing the Pixel 2 factory reset using recovery mode.

Step 1: Turn off your Pixel 2 and Pixel 2 XL.

Step 2: Press & hold the volume down button and the power button at the same time until the phone vibrates.

You can view the Android system recovery screen on your device. By default start button show on your device.

Step 3: Press the volume down button until view recovery mode.

Step 4: Press the power button to restart into recovery mode.

You can see the screen android robot exclamation mark with a red triangle icon on your Google Pixel 2.

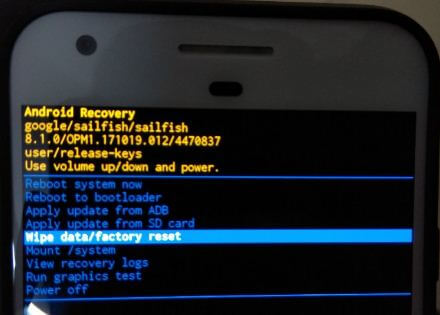
Step 5: Press & hold the power button and volume up buttons one time. Now, press the volume down button until the highlight Wipe data/factory reset, press the power button to select it.

This message see on your android Oreo screen: Wipe all user data?

Step 6: To confirm, press the volume down button to scroll to Yes and press the power button to select it.

Clearing the cache may take 2-4 minutes.

Step 7: Press the volume down buttons to scroll to reboot system now, press the power button to select it.

How do I Enable MMS Settings on Pixels Running Android 12/Android 11?

Open Google Messages app > Profile icon at the top right corner > Messages settings > Advanced > Toggle on MMS

Why is my MMS Messaging Not Working on Android Phones?

Make sure to enable an internet connection on your Android phone. Check your phone mobile data or Wi-Fi active to send MMS.

Mobile data: Settings > Network and internet >Tap on your SIM > Toggle on Mobile data

Wi-Fi: Settings > Network and internet > Internet > Toggle on Wi-Fi

Read Also:

And that’s it. End the list of possible solutions to fix Google Pixel 2 not receiving MMS after the update. Don’t forget to comment on which of the above-given method worked for you? Do you have any other tips? Could you share it with us? Check out other Pixel 2 tips and tricks here.

How to Remove Google Searches From History When Typing on Android Devices

Do you feel awkward while search web history on Google? Here’s a guide to remove Google searches on Android Oreo and other devices. In daily routine life, we search several things using Google search bar and all search stored on it. When tap on Google search bar, you’ll see the web search you search. You can quickly delete the Google search from your Android devices. You’ll find browsing history on the account page under your created Google account in your Android devices.

Read Also:

How to Remove Google Searches on Android Oreo 8.1/8.0

Google search bar below the apps on android Oreo 8.1

Step 1: Unlock your android Oreo & tap on Google search bar below the apps on Android Oreo 8.1.

Here you’ll see web search history you have searched in your device.

Google search history in android Oreo 8.0 device

Step 2: Tap & hold on the text you want to delete in your device.

You can see this message on screen: Delete this search from your history?

Remove Google searches on android Oreo 8.1 device

Step 3: Tap on Delete.

It will remove permanently from your all account in your android Oreo devices. Now again go to Google search bar and you can’t see web you deleted.

Let see other useful tips to add Google search bar on Android 8.1/8.0 Oreo devices.

Add Google Search Bar on Android Oreo 8.0/8.1

Step 1: Tap & hold the blank space in Android Oreo home screen.

Here you’ll see wallpapers, widgets, and home settings options.

Step 2: Tap on Widgets.

Google search bar widget in android Oreo

Step 3: Scroll down up to Google widget.

Remove Google search bar on android 8.1 Oreo

Step 4: Tap & hold the Google search bar.

You can see widget added to your Android device home screen. You’ll delete this added Google search bar from the home screen in your device. Do you have any idea about android 8.1 remove Google search bar from the home screen? Let us know in below comment section.

We hope this makes it clear how to remove Google searches on Android Oreo devices. Do you know any method to delete Google search bar from Android Oreo 8.0/8.1 home screen? Please share it with us in the below comment box.

How to Fix Samsung Galaxy Note 8 Charging Issue

There are several reasons for your Samsung Galaxy Note 8 won’t charge such as faulted battery, damaged USB port, software related issue, broken charging cable, and maybe your device has any hardware problem. Several users reported Galaxy Note 8 won’t turn on after battery goes dies. Have you ever facing this type of issue in your Note 8? Then don’t worry, here I will show you the possible solutions to fix Galaxy Note 8 won’t charge issue. If you have faced this Galaxy Note 8 won’t power on the issue, you’ll free repair or replace your Note 8 if it’s currently under warranty.

Read:

How to Fix Galaxy Note 8 Won’t Charge Issue

Fix Galaxy Note 8 wont charge issue

Check out each one listed method and see what the cause is behind your Samsung Galaxy Note 8 won’t turn on after charging 0%.

Check battery

First of all, make sure your device battery not damaged or any other fault. This is the main reason for your device not charging.

Verify charging cable & power outlet, Clean the Port

Check charging cable not broken or wall power outlet. Always use your device’s original charger for charging your Galaxy Note 8 device. Also, clear the charging port if any dust or tint.

Discharge your phone

Wait until completely discharging your phone. Put your phone into charging for 40-50 minutes using a different charging cord and wall charger. Also, use a wireless charger if available to quickly charge your phone. After that power on your device.

Forced Restart

Sometimes if any small software related issue, this reboot your device will fix the issue in your devices. Tap & hold the power button and volume down button at the same time until the Samsung logo appears.

Turn On Safe Mode

Step 1: Press & hold the Power button on your galaxy Note 8.

Step 2: Again press & hold the Power off button.

You can see this message: Reboot to safe mode.

Step 3: Tap OK

You can see the Safe mode icon at the bottom left side of the screen. Now, check your Samsung Galaxy Note 8 turn on. If you can’t find any issue, any third-party app causing the issue. Restart your phone to turn off safe mode. Now, remove one by one third party app and check to fix Samsung Note 8 won’t power on issues.

Factory Reset your Samsung Galaxy Note 8

Step 1: Go to Settings in your galaxy Note 8.

Step 2: Under the personal section, tap on backup and reset.

Here you can backup your Note 8 data to Google drive using your created Google account.

Step 3: Tap on Factory data reset.

Step 4: Tap on a Reset device.

Step 5: Tap on Delete all.

Now, check your Samsung Galaxy Note 8 problem fix. If not fix the issue, find the Samsung Galaxy Note 8 store near your area and contact with him.

And that’s it. I hope above given one of the solutions fix Galaxy Note 8 won’t charge issue. Do you have any tricky solutions you want to share with us? Tell us in below comment section. Don’t forget to check out our other Galaxy Note 8 tips and tricks.

How to Check Project Treble Support on Android Oreo 8.0 & 8.1

Google has already announced about Project treble at Google I/O 2017 event. What is project treble? This Project treble feature will give the vendors an interface that will give them access to hardware code from the Android framework to easily get the latest OS a person or company. By default, the treble will be built-in on new launch Android Oreo devices. You can check project treble support on Android Oreo using this tutorial. There are several Project treble devices such as Google Pixel, Pixel XL, Google Pixel 2, Pixel 2 XL, Galaxy S8/S8 Plus, Galaxy Note 8, Huawei Mate 9, Nexus 6P/5X, Google Pixel C, OnePlus 5T/5, OnePlus 3T/3, HTC U11, LG V30+, LG G6, Moto Z2 Force, Nokia 8, etc.

Read Also:

How to Check Project Treble Support on Android Oreo 8.1/8.0

To check your Android Oreo devices support Project treble, first of all, download a terminal app in your device. Download the Termux app from Google play store and install it in your Android Oreo devices. Now launch the app and enter the below command and press enter in your device.

Check project treble support on android Oreo 8.1

getprop ro.treble.enabled

How to check project treble support on android Oreo

If you get the True, it means your android device is supported Project treble. If get false, it means your device not supported Project treble. That’s it. It’s quite easy to check your android device support Project treble or not.

You can also check Project treble phones using ADB command. But using this terminal app, you can easily check which android phone supported Project treble feature.

Check Project Treble Support on Android Oreo Devices Using ADB

In this method, you can use the ADB command instead of a terminal app in your Oreo devices.

First of all, enable developer mode in your device and then enable USB debugging in Android Oreo. After enabled USB debugging, connect your device to laptop to PC and open command prompt in your PC and enter the below-given commands:

adb shell  

getprop ro.treble.enabled

If see the True, it means your android phone is supported Project treble. If see false, it means your device not supported Project treble.

I hope the above-given tutorial helpful to check project treble support on Android Oreo devices. If you have any kind of problem, tell us in below comment box. Does your Android device support Project treble?