How to Change Samsung S9 Plus Lock Screen Clock Style

Change the clock face on Samsung Galaxy S9 Plus? By default set always on display clock style and lock screen clock on Samsung S9 and S9 plus devices. You can change the lock screen clock on Galaxy S9 and Galaxy S9 Plus using lock screen & security settings. Also, change the always-on display clock style in galaxy S9 and galaxy S9 plus devices. If you don’t want colors, you can also change it.

You can set the image on always-on display in Samsung Galaxy S9 & S9 plus using clock & face widgets settings. Just choose the clock style from different styles you want to set on your galaxy device lock screen. Apply the below-given step by step process to change lock screen clock on Galaxy S9 and Galaxy S9 Plus.

Relevant:

How to Change the Clock on Samsung Galaxy S9 Lock Screen
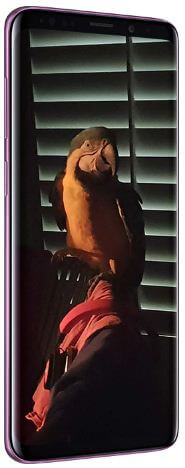
How to change lock screen clock on Galaxy S9 and Galaxy S9 Plus

Step 1: Go to settings or swipe down notification panel & tap on the Settings gear icon.

Step 2: Scroll down up to lock screen and security settings and tap on it.

Step 3: Tap on clock and face widgets.

Step 4: Tap on the Clock style.

By default set clock style and color in your galaxy S9 & S9 plus devices. Here you can change both Samsung S9 lock screen clock and always on display clock.

Step 5: Select the lock screen tab.

Step 6: Choose the clock from the list you want to set the clock on the galaxy S9 lock screen.

You can change the clock color on Galaxy S9 Always-on-display if you don’t like the default. Also, add music controller to galaxy S9 always-on display or lock screen using the above settings. To switch to music controller, double tap on the Always-on display in your galaxy S9 and S9 plus Oreo devices. Also, remove clock from lock screen S9 plus and S9.

Turn on Always-on display on Samsung S9 & S9 Plus

Step 1: Go to Settings.

Step 2: Tap on Lock screen & security.

Step 3: Tap on the Always-on display.

Here you’ll customize always-on display on your Samsung Galaxy S9 and S9 Plus devices.

And that’s it. Do you still have questions about the change lock screen clock on Galaxy S9 and Galaxy S9 Plus? Let me know in the below comment section. Stay and connected with us for the latest S9 tutorial.
How to change lock screen shortcuts on Galaxy S9 and S9 Plus

By default set left and right side apps on lock screen in your galaxy S9 plus and galaxy S9 devices. Here’s the complete guide to change lock screen shortcuts on galaxy S9 and galaxy S9 Plus Oreo. By default camera and phone apps set as default shortcuts in your Samsung galaxy devices. You can change lock screen app shortcuts on Samsung S9 & S9 plus using lock screen and security settings.

In Samsung galaxy S9 lock screen settings, you can turn on Always-on display, change lock  screen clock, hide notification from lock screen, show Bixby home on the lock screen and more. If you don’t want to see app shortcuts on lock screen, remove lock screen app shortcuts in Samsung S9 & S9 plus devices. Follow below given step by step guide to change lock screen shortcuts on galaxy S9 and galaxy S9.

You Might Like This:

How to take screenshots on Galaxy S9 & Galaxy S9 Plus: 3 Ways

How to use Smart capture on Galaxy S9 & S9 Plus

How to set or change lock screen shortcuts on galaxy S9 and galaxy S9 Plus Oreo

How to change lock screen shortcuts on galaxy S9 and galaxy S9 plus


It’s quite easy to change right and left apps shortcuts in your Samsung galaxy S9 and S9 plus lock screen.

Step 1: Go to settings or swipe down notification panel & tap on Settings gear icon

Step 2: Scroll down up to lock screen and security settings and tap on it

Step 3: Tap on App shortcuts

By default camera set as left shortcuts and phone as right shortcuts in your galaxy S9 & galaxy S9 plus devices.

Step 4: Tap on Left or Right app shortcuts you want to change

Step 5: Choose from list of apps view in your galaxy S9 device

You will turn off apps shortcuts in Samsung S9 & S9 plus if you don’t want to shortcuts on lock screen.

How to change lock screen notifications on Samsung S9 & S9 Plus Oreo

You can show/hide lock screen notifications in your galaxy S9 & S9 plus using lock screen and security settings. Also hide lock screen notification of individually apps in your Samsung galaxy devices.

Settings > Lock screen and security > notifications

And that’s it. I hope this little tip helpful to change lock screen shortcuts on galaxy S9 and galaxy S9 Oreo. If you have any question, tell us in below comment box. Don’t forget to check out our other galaxy S9 plus tips. Stay and connected with us for latest technology news.

How to Auto Rotate Screen on Samsung Galaxy S9 and S9 Plus

Want to enable landscape mode on galaxy S9 and galaxy S9 plus? Here’s the quick guide to turn on auto rotate home screen on Samsung Galaxy S9 and Galaxy S9 Plus devices. By default turn off home screen rotation on Samsung S9. So when you rotate the phone, home screen can’t rotate in our devices.

You can enable/disable home screen rotation on galaxy S9 plus using display settings. If you want to rotate the screen, just enable the auto-rotate screen in Samsung S9 & S9 plus directly from the notification panel. So automatically rotate the screen when rotating your device. Follow the below-given step by step process to rotate home screen on galaxy S9 and Galaxy S9 Plus.

Read Also:

How to Enable Landscape Mode on Samsung Galaxy S9 and S9 Plus

Step 1: Go to settings in your galaxy S9 & S9 plus.

Step 2: Tap on Display settings.

In galaxy S9 display settings, you can see screen resolution, home screen, full-screen apps, easy mode, icon frames, LED indicator, Navigation bar, and more settings.

Step 3: Tap on the Home screen.

Here you can see several galaxy S9 and galaxy S9 plus home screen settings such as home screen grid, app icon badges, add/hide apps icon to the home screen, portrait mode, hide app and more. By default enable landscape home screen on galaxy S9 & S9 plus.

Step 4: Turn on the Portrait mode toggle button.

Now disable landscape mode on galaxy S9 and galaxy S9 plus devices.

Quickly Turn Screen Rotation On or Off Galaxy S9 and S9 Plus

You can also switch portrait to landscape mode in your galaxy S9 & S9 plus using below settings.

Step 1: Swipe down notification panel in your galaxy S9 & S9 plus.

Step 2: Tap on Auto-rotate.

Enable home screen rotation on Android Oreo 8.1 & 8.0

Step 1: Tap & hold the blank space in your Oreo home screen.

Step 2: Select Home settings.

Here you can see some of the useful android Oreo home screen settings such as change icon shape, notification dots, home screen rotation, At a glance and more.

How to auto rotate home screen on galaxy S9 and galaxy S9 Plus Oreo

Step 3: Turn on the home screen rotation toggle button.

Turn on Auto-rotate screen on android Oreo 8.1 & 8.0

Settings > Display > Advanced > enable Auto-rotate screen

And that’s it. I hope this little tip helpful to auto-rotate the home screen on galaxy S9 and Galaxy S9 Plus. If you have any questions regarding this article, tell us in below comment box. Stay and connected with us for detail technology updates.

How to change video size on Galaxy S9 plus and Galaxy S9

Samsung galaxy S9 and galaxy S9 plus devices has awesome super slow motion video, 4K video recording at 30 fps or 60 fps, Hyperlapse video support, face detection and other video settings. In this tutorial, I’ll show you steps to change video size on galaxy S9 plus and galaxy S9 Oreo. This super slow motion video only supports HD resolution.

In galaxy S9 rear & front camera settings, you can change picture size, video size, timer, HDR, tracking AF and super slow-mo options. You can change camera resolution on galaxy S9 & S9 plus using this S9 camera setting. Follow below given complete guide to change video size on galaxy S9 plus and galaxy S9.

Read Also:

How to enable/disable fast wireless charging in galaxy S9 & S9 Plus

How to change camera video resolution on OnePlus 5T/5

How to capture 4K video in Google Pixel & Pixel XL

How to change video size on galaxy S9 plus and galaxy S9 Oreo

How to change video size on galaxy S9 plus and galaxy S9

Using below given settings, you can change front and rear camera settings in galaxy S9 and galaxy S9 plus devices.

Step 1: Open camera app in your galaxy S9 & S9 plus

In top of the screen you can see several galaxy S9 plus camera settings such as Live focus, Auto, location tags, super slow-mo, AR Emoji, panorama, Food and Hyperlapse.

Step 2: Tap on Settings gear icon at bottom left side

Here you can see a rear camera and front camera setting that includes picture resolution, video resolution, HDR and more settings.

Step 3: Tap on Video size you want to change of rear or front camera

By default set FHD (1920×1080) size in galaxy S9 plus rear camera settings.

Step 4: Choose from UHD (60 fps)/UHD/QHD/FHS (60 fps)/FHD/18.5.9/1:1/HD

Maximum you can set video resolution as 3840×20160 in your galaxy S9 plus devices. You can also enable high efficiency video in galaxy S9 plus device using this camera setting.

Note: Tracking AF and video effects not compatible with UHD (60 fps), UHD, QHD and FHD (60 fps) resolutions. Video stabilization isn’t available in UHD (60 fps) and 1:1 resolutions.

And that’s it. I hope this little tip helpful to change video size on galaxy S9 plus and galaxy S9 Oreo. Let us know in below comment if you have any more galaxy S9 plus camera tips. Don’t forget to check out our other Samsung galaxy S9 and galaxy S9 Plus tricks.

How to upload photos from gallery to Snapchat story android

Want to add pictures or video from camera roll to Snapchat story in android? Here’s the quickest guide to upload photos from gallery to Snapchat story android phone. You can add photos and videos from gallery to Snapchat story in android devices. Also send your Snap directly to a friend or Snapchat group you added.

Using this tutorial, you can put screenshots or video or pictures from your camera roll onto your Snapchat story in android devices. Also export Snap, edit snap and move snaps to My eyes only so they’re out of the way when you’re showing memories to your friends. Also automatically save Snaps to camera roll in android phone. Follow below given step by step process to upload photos from gallery to Snapchat story android device.

You May Like This:

How to block someone on Snapchat android device

How to add multiple photos to WhatsApp story in android

How to add GIF to Snapchat story android phone

How to upload photos from gallery to Snapchat story android phone

Step 1: Open Snapchat app in your android devices

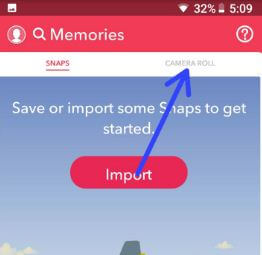
Tap on icon at bottom middle in Snapchat app in android

Step 2: Tap on icon below photo capture button (Show above screenshot)

Here you can save or import snaps from your camera roll in Snapchat story in android devices.

Upload pictures to snapchat story from camera roll without white border

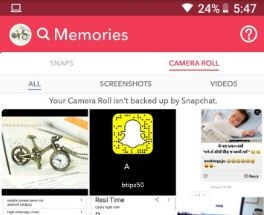
Step 3: Tap on Camera roll

Upload video from Camera roll in Snapchat android phone

In camera roll, you can see All, screenshots and videos options. You can upload or add pictures or videos to Snapchat story from camera roll in android device.

Step 4: Select from All/Screenshots/videos & choose photo you want to upload

upload photo to Snapchat story from camera roll in android

Step 5: Tap on Three vertical dots at upper right side corner

Here you can see several Snap settings.

How to create Snapchat story using camera roll in android

Step 6: Tap on Send Snap

Upload photos from gallery to Snapchat story android

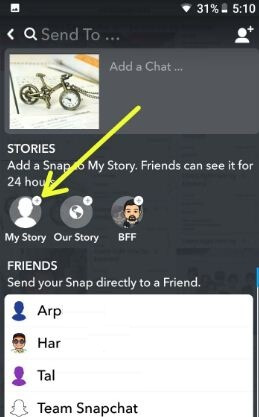
Step 7: Select My Story to add a snap to your Snapchat story. Also send you snap directly to a friend if you want.

How to upload photos from gallery to Snapchat story android

Step 8: Tap on Send button at bottom right side corner to add story

Now upload pictures or videos from gallery to Snapchat story in android devices. It’s quite easy to upload screenshot/photos or videos from camera roll to Snapchat story android phone. Do you know how to upload pictures to Snapchat story from camera roll without white border?

And that’s it. We hope this makes it clear how to upload photos from gallery to Snapchat story android phone. If you have any kind of trouble, tell us in below comment box. Don’t forget to check out our other social media tips. Stay and connected with us for latest technology news.

How to enable Gestures on galaxy S9 and galaxy S9 plus

Gestures are useful for easily quickly manage your Samsung galaxy devices functions such as take screen shot, make a call, quickly see notifications, camera, mute incoming calls and more. You can enable Gestures on galaxy S9 and galaxy S9 plus Oreo using advanced features settings.

In Galaxy S9 and galaxy S9 plus gestures, you can see Finger sensor gestures, easy mute, smart alert, palm swipe to capture, direct call and more. In most of the device, you can see fingerprint sensor gestures for access notification in your device. Follow below given step by step process to enable Gestures on galaxy S9 and galaxy S9 plus Oreo devices.

Read Also:

How to use Gestures on android 8.1 Oreo

How to customization navigation bar on galaxy S9 & S9 plus

How to enable Gestures on Galaxy S9 and Galaxy S9 plus Oreo

How to enable Gestures on galaxy S9 and galaxy S9 plus

Let see steps to enable and use gestures on galaxy S9 plus and galaxy S9 Oreo devices.

Step 1: Open settings or Scroll down notification panel & tap on settings gear icon in your galaxy S9 & S9 plus

Step 2: Select Advance features

Here you can see several settings such as Smart stay, One handed mode, Finger sensor gestures, smart capture, quick launch camera, multi window, swipe to call or send message gesture, dual messenger, Video enhancer and more. You can see below motions and gestures in your Samsung S9 & S9 plus.

Enable and use Gestures on galaxy S9 & S9 plus Oreo

Finger sensor gestures: By default disable finger sensor gestures in your galaxy S9 and S9 plus devices. To use this Samsung S9 gestures, enable it in your device. Swipe up or down on the fingerprint sensor to open or close the notification panel. But remember this gesture not working when the sensor is actively detecting your fingerprint.

Quick launch camera: To quickly open camera on galaxy S9 & S9 plus, press power key twice in your device.

Palm swipe to capture Gesture: Swiping the edge of your hand across the screen to take screenshot on Samsung galaxy S9 and galaxy S9 plus.  You can’t use this galaxy S9 gesture while the on-screen keyboard is showing

Direct call: Bring your galaxy S9 & S9 plus close to your ear to call the contact whose message or contact details are currently on the screen in your S9.

Smart Alert: Enable smart alert in your galaxy S9 & S9 plus. Your phone will vibrate when you pick it up after missing calls or receiving messages in your Samsung S9 & S9 plus.

Easy Mute: To mute your galaxy S9 incoming calls & alarms, just putting your hand over the screen or turning your phone face down. To use it enable easy mute gesture in galaxy S9 & S9 plus.

Swipe to call or send messages: Open the number and swipe it right side to make a phone call and swipe left to send message in your Samsung galaxy devices.

Direct share: You can directly share content with specific person from the sharing panel in any app. If app is compatible with this direct share feature, the icons will appear at the top of the sharing panel.

The list ends here. I hope these little tips helpful to enable Gestures on Galaxy S9 and Galaxy S9 plus. Do you know other galaxy S9 gestures we missed above? Share with us in below comment box.