How to Fix Google Pixel 3 Battery Draining So Fast

Want to extend battery life on Google Pixel 3 XL and Pixel 3? Here’s how to fix Pixel 3 battery life problems. There are several solutions that will fix bad battery life problems such as reduce brightness, turn off Ambient display, screen sleep time, close background running apps that not use, live wallpaper & screen saver, disable auto-sync and more settings. Also, use Adaptive battery, Adaptive brightness, Battery saver, and dark theme settings to fix battery drain problems on Pixel 3 and Pixel 3 XL.

Read Also:

How to Improve Battery Life on Pixel 3 XL and Pixel 3

First of all enable below given new Android 9 Pie features that extremely helpful to extend battery life on Pixel 3 and Pixel 3 XL.

How to enable Adaptive battery on Android 9 Pie

How to enable Adaptive brightness in android 9 Pie

How to enable Battery saver in Android 9 Pie

Adjust screen brightness & reduce sleep time

Adjust screen brightness on Pixel 3 XL Pie

Step 1: Swipe down the notification panel two times from any screen on your Google Pixel 3.

Step 2: Move slider left side to decrease screen brightness.

In the latest android OS, automatically adjust the screen brightness that relevant to your environment or lights.

Reduce screen time out time on Pixel 3 & 3 XL

Reduce screen time out time on Pixel 3

Step 1: Go to settings in your Google Pixel 3 and 3 XL.

Step 2: Tap Display.

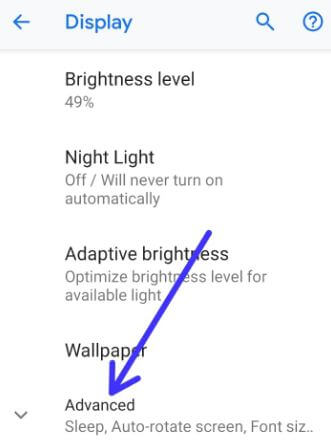
Step 3: Tap Advanced.

Step 4: Tap Sleep.

Step 5: Choose 15 seconds or 30 seconds.

Turn off Ambient display on Pixel 3 & Pixel 3 XL

When ambient display turned on in your Google Pixel 3 & Pixel 3 XL, your device screen wake up whenever get any new notifications. It will reduce battery life whole day in your phone.

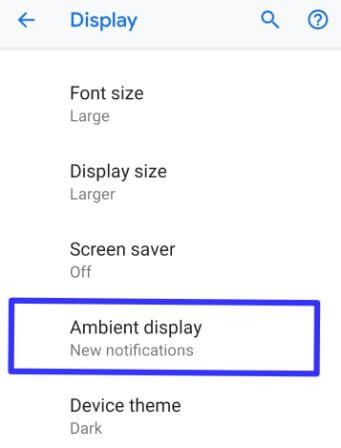
Turn off Ambient display on Pixel 3 & Pixel 3 XL Pie

Settings > Display > Advanced > Ambient display > Turn off new notifications toggle

Set Dark Theme to improve Pixel 3 battery life

You can manually set Pixel 3 theme as dark or light mode you want using display settings. The dark theme uses less battery compare to the light theme. Enable dark theme on Pixel 3 and Pixel 3 XL using below given settings. It will save battery life on Google Pixel 3 devices.

How to improve Pixel 3 battery life

Settings > Display > Advanced > Device theme > Dark

Also remove screen saver and live wallpaper that quickly drain battery life of Pixel 3 and Pixel 3 XL. You’ll simply set black wallpaper on Pixel 3 lock screen and home screen to save battery life.

Long press on blank space in your Pixel 3 home screen > Wallpapers > Select wallpaper > Set wallpaper > Home screen or lock screen or Both

Read Also: How to enable a dark mode on the latest Android OS

Restrict background data in Google Pixel 3

Several apps running on the background even not use in our phone. To improve battery life on Pixel 3 XL, close background running apps. We already discussed about restrict apps on Google Pixel 3 devices. Also clear app cache or force stop apps if app causing issue of Pixel 3 speed slow or app crashing or freezing problem to occur.

Turn off GPS, Wi-Fi, mobile data, and other services while not activate

Disable location, Wi-Fi network, Bluetooth and other services when not use in your Pixel or other android devices.

Turn off vibration to Fix Pixel 3 battery draining issue

Turn off all notifications and ring vibration and all other touch vibration in your phone to save battery life on Google Pixel 3 XL and Pixel 3.

Step 1: Go to settings.

Step 2: Tap Accessibility.

Step 3: Tap Vibration under Interaction controls.

Step 4: Tap Ring & notification vibration and choose off.

Step 5: Tap the back button.

Step 6: Tap Touch vibration and choose off.

You can turn off sounds and vibration in Pixel 3 also.

Settings > Sound > Advanced > Other sounds and vibrations > touch vibrations (Haptic feedback)

Close running apps on Google Pixel 3 & 3 XL

Improve battery life on Google Pixel 3 XL

Step 1: Tap recent apps button on Pixel 3 Pie from any screen.

Swipe screen right side to view the most recently used apps list. You can individually close app or close all apps at same time in your device.

Step 2: Swipe right side screen up to view clear all.

Step 3: Tap Clear all.

Turn off auto sync in Pixel 3 & Pixel 3 XL

By default activate auto sync in your android phone. So sync each account data manually and update it automatically when available. So it will consume more battery in your Google Pixel 3. To improve battery life in Pixel 3 XL and Pixel 3, disable it.

Step 1: Go to Settings.

Step 2: Tap Accounts.

Step 3: Toggle off Automatically sync data.

And that’s all. End the list of possible solutions to improve Pixel 3 battery life. If you know any other ways to extend battery life on Pixel 3 XL, let me know in the comment section. I’ll add it to the list.

How to Change Google Assistant Language on Android [2023]

Do you want to change the language in Google Assistant on Android and Samsung Galaxy devices? Here’s how to change Google Assistant language on Android phones and tablets. By default, set English (Depending on your Country) as the Assistant language in your Android 13/Android 12/Android 11/Android 10 and Samsung Galaxy devices. You’ll add a language for speaking to your Assistant on your Android device. Add up to 2 languages on your device using your Google Assistant settings. If you want to change the language back to English, again launch Google Assistant and say Change language to English. Google Assistant supported languages list includes English (US), Hindi, German, Japanese, Deutsch, English (Canada), English (UK), English (Australia), Français (Canada), Français (France), Chinese, Korean, Spanish, Italiano, Espanol and more.

Read Also: How to change Google Assistant voice on an Android device

How to Change Google Assistant Language on Android

Android devices have slightly different settings to change the language in Google Assistant on Android devices. In this tutorial, I’ll show you how to add and set new languages to the default Assistant language.

How to Change Google Assistant Language using Google App on Android 13/Android 12/Android 11/Android 10 & Samsung One UI

Step 1: Open the App drawer in your stock Android or Pixels and tap on the Google app.

Open the Google app to change the language of Assistanton Android phone and tables

Step 2: Tap on the Profile icon at the top right corner.

Open Assistant settings on Google App in Android Phone

Step 3: Tap on Settings.

Open Google assistant settings on Android device

Step 4: Tap on Google Assistant.

Google Assistant Language Change using Google App on Android

Step 5: Tap on Languages.

How to Change the Language on Google Assistant Android Phone

Step 6: Tap on Default language.

Change Google Assistant Language in Android

Step 7: Choose a Language you want to be set as default.

How to Add a Language using Google Assistant Settings on Android 12/Android 11/Android 10 – Google Home App

Step 1: Open the app drawer and tap on the Google Home app.

Open Google home app to change assistant language on Android

Step 2: Tap on the Profile icon in the upper right corner.

Change language using Google assistant settings on Android

Step 3: Tap on Assistant settings.

Tap on Google Assistant Language to Change it using Google home app

Step 4: Tap on Languages.

Add a Language using Google Assistant Settings on Android

Step 5: Tap on Add a Language.

Step 6: Choose a Language you want to add.

Read More:

How to Quickly Change Assistant Language on Android 12/Android 11 Stock OS

Step 1: Open Google Assistant and say, change the language to English (US)/Spanish or any other you want to set.

How to Remove Languages from Google Assistant on Android Device

You can remove the second language only from Google Assistant languages on your Android.

Step 1: Unlock your phone and say, hey Google open assistant settings.

Step 2: Tap on Languages.

Remove the Language on Google Assistant in Android Smartphone

Step 3: Tap on the Second language.

Remove Languages from Google Assistant on Android

Step 4: Choose None.

You can see removing the language from the list. Now, you can add a new language again to your device.

For Android 8.1 (Oreo) and 9.0 (Pie)

Step 1: Press the home button or say OK Google to access Google Assistant on your Android.

Access Google Assistant on android Pie

Step 2: Tap Icon to explore the settings (Shown above-given screenshot).

Google Assistant supported languages

Step 3: Tap Three vertical dots (Menu) on the upper right side.

Google Assistant settings on android Pie 9

Step 4: Select Settings.

Preference settings for Google Assistant android

Step 5: Tap Preferences under account subheadings.

Here you can see changes Assistant voice, weather temperature, Assistant language and enable continue the conversation on your Android phone or tablet device.

Change Assistant languages on android Pie device

Step 6: Tap Assistant Languages.

Change language of Google Assistant android Pie

Step 7: Tap Add a language.

A list of Google Assistant languages supported appears on the screen.

How to change Google assistant language on android phone

Step 8: Choose a language you want to set.

Now enjoy our favorite language with Google Assistant on your Android device.

How to Change the Google Assistant Language on Android 7.1.2 (Nougat)

Step 1: Tap & hold the home screen button on your device screen (From any screen) to launch the Assistant.

Step 2: Tap the More button and Touch Settings.

Now see Google Assistant settings on your device.

Step 3: Tap Assistant language under the adjust settings for this device.

Step 4: Click Go to Language Preferences.

Step 5: Tap + Add a language.

Step 6: Tap English in all languages.

Here you can see below given two types of languages on your phone.

Step 7: Choose a language from the suggested or All language list.

Now add this language to your language preferences. It will set a second language. To change the language of Google Assistant, move the language to the first position.

Step 8: Tap & hold the language and drag it to the first position.

And that’s all. I hope this tutorial is helpful to change the Google Assistant language on Android. If you have any questions, please tell us in below comment box.

Read More:

How to Fix Galaxy Note 9 Battery Draining So Fast

Do you want to extend battery life on Samsung Galaxy Note 9? Let see some possible ways to improve battery life on Galaxy Note 9. Galaxy Note 9 has 4000mAh huge battery, so not big issues related to battery life. But there are several reasons that consume more battery in your devices such as background running apps, live wallpaper & screen saver, Always-on display, more brightness, and more.

One of the most common issues is apps running in the background even we don’t use it. Galaxy Note 9 has a wireless charger that quickly charges your device. Apply below given different methods to fix Samsung Note 9 Battery Draining issue.

Read Also:

How to Improve Battery Life on Samsung Galaxy Note 9

How to improve battery life on Galaxy Note 9

Check out below given different methods to fix battery life issues on Samsung Note 9.

Minimize screen time out time & screen brightness

Screen time-out time

Set screen time-out time as 15 seconds to extend battery life in your device.

Settings > Display > Screen timeout > Choose 15 seconds/30 Seconds

Screen brightness level

Set lower screen brightness to increase battery on your Samsung device. Auto brightness is helpful to automatically adjust brightness using lighting conditions.

Settings > Display > Brightness/Auto-brightness

Close Running Apps to fix Samsung Note 9 Battery Draining issue

Open recent apps > Swipe right side until seeing close all > Close all

Turn off Always-on display

It will drain less battery compared to other features. When you get any messages, automatically wake up screen on your device that consuming battery power in your Note 9.

Settings > Lock screen > Toggle off Always-on display

Turn off GPS, Wi-Fi, Bluetooth, and other services

Turn off GPS, Wi-Fi, Bluetooth, and other services while not use in your Samsung Note 9 to save battery life.

Disable App Background Data Usage

Several apps running on the background that quickly drain the battery on your Note 9. Disable unnecessary apps background data.

Settings > Apps > Tap app > data usage > disable background data

Remove screensaver if set

If using screen saver on your Samsung Note 9, remove it from the lock screen to extend battery life. Also, remove live wallpaper from your phone.

Settings > Display > Screen saver

Enable Power Saving Mode to Improve Battery Life on Galaxy Note 9

You’ll use medium power-saving mode or maximum power-saving mode in galaxy Note 9 to extend battery life up to 22 hours to 2 days. In galaxy Note 9 power saving mode settings, you can disable background network usage, Always-on display, screen resolution, and other settings in one place.

Settings > device maintenance > Battery > Max (Maximum power saving mode)/MIN (Minimum power-saving mode)

Enable performance mode

It will use to reduce battery life on Galaxy Note 9 to automatically adjust screen display or screen resolutions on your phone. Also, change settings for game and entertainment mode to save battery life on Galaxy Note 9.

End the list of possible solutions to improve battery life on Galaxy Note 9. Do you have any other tips you want to share? Let me know in the comment section below.

How to Enable and Customize Edge Panels on Galaxy Note 9

Here’s how to customize Edge panels on Galaxy Note 9. You can find Note 9 Edge panels under display settings on your phone. You’ll quickly access Edge panels to drag the Edge panel handle from your device home screen. It will useful to instantly access the apps you use the most on the Edge screen. Let see how to enable Galaxy Note 9 Edge panels.

Also, use the galaxy Note 9 app pair feature to use two apps at the same time as a Split-screen multitasking in your Samsung devices. Check out below given different settings to customize Edge panels and Edge lighting on Galaxy Note 9.

Read Also:

How to Customize Galaxy Note 9 Edge panels

How to customize Galaxy Note 9 Edge panels

Here, I’ll show you how to change Edge panels settings on galaxy Note 9 such as add new apps or tasks, download apps, adjust transparency, and more settings.

Step 1: Swipe down the notification shade and tap the Settings gear icon.

Step 2: Tap Display.

Step 3: Tap Edge screen.

Here you can see Edge panels and Edge lighting options.

Step 4: Turn on toggle “Edge panels”.

Now you can see Edge panel handle on your Note 9 right side screen. You can add or remove Edge panels on the Galaxy Note 9 device.

How to Add a Task on Edge Panels

You can add new apps or your daily routine task on the Edge panel to quickly access from the home screen. Let see the process.

Step 1: Drag the Edge panel handle to see Edge panels.

Step 2: Tap Settings gear icon at the bottom left corner.

Here you can view default added apps on the screen such as Weather, Calculator panel, Apps edge, and more. Add your favorite apps to this list. You can maximum add 9 panels at one time in your galaxy Note 9.

Step 3: Tap + icon to add your task or apps use a daily routine.

Step 4: Select the app from a list you want to add.

You’ll quickly open apps that added to edge panel in your Samsung Note 9 device.

Don’t Miss This:

How to Reorder Edge Panels on Galaxy Note 9

If you want to change Edge panel order in your Samsung Note 9, drag the icon <> to the left side to reorder Edge panels.

Settings > Display > Edge screen > Edge panels > Three vertical dots (More) upper right corner > Reorder

How to Download Apps Edge Panels

Here you can see list of apps that compatible with your Edge screen when it is turned on in your Samsung Galaxy Note 9.

Drag the Edge panel handle to see Edge panels > Tap Settings gear icon at bottom left corner > Three vertical dots from upper right corner > Download > Select app > Install

Now appear paid, free and new apps such as Edge lighting, Edge maps, Messages pro, Spotify Edge panel, and more third-party apps.

Galaxy Note 9 Edge Panel Handle Settings

You can enable/disable Edge panel handle move on the screen settings. When turn on “move from any screen”, just drag up or down to change the position of the Edge panel handle in your galaxy Note 9. Set Edge panel handle as left or right side of the screen. Also, adjust transparency of the Edge Panel handles on Note 9 using below given settings.

Settings > Display > Edge screen > Edge panels > Three vertical dots from upper right corner > Edge panel handle > Transparency > Move slider to set low or high transparency

Also, adjust the Edge panel handle size on the Galaxy Note 9 device. It’s quite easy to customize Galaxy Note 9 Edge panels settings.

How to Open All Edge Panels Quickly on Note 9

You can easily see all 9 Edge panels on your device without scroll right side every time in your device using below given settings.

Drag the Edge panel handle from the left or right side to see Edge panels > Tap Three horizontal lines at bottom of the screen

Now appear Edge panels screen with your entire 9 added task in your Samsung Note 9.

And that’s all. We hope this makes it clear how to customize Galaxy Note 9 Edge panels. If you have any questions, tell us in below comment box. Stay and connect with us for the latest updates.
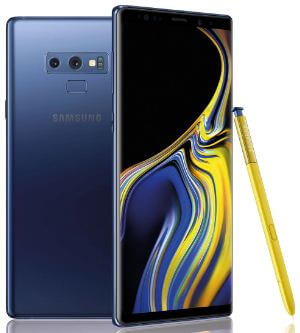
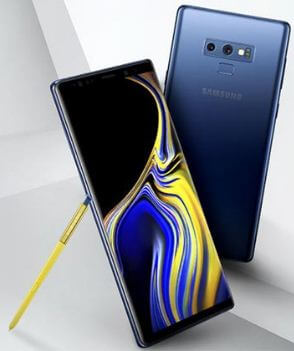
How to Turn on Edge Lighting on Samsung Galaxy Note 9

Here’s how to turn on and use Edge lighting on Samsung Galaxy Note 9. You can enable Edge lighting on Samsung Note 9 in the Edge screen section under the display settings. You can set show Edge lighting and change Edge lighting style on Note 9. When the screen is on, Edge lighting replaces regular notification pop-ups. Also, manage Edge lighting notifications of apps to select which apps you want to use with Edge lighting.

Read Also:

How to Set Up Edge Lighting Galaxy Note 9

How to turn on Edge lighting Galaxy Note 9

This Edge lighting Note 9 will use to change how to display notifications to minimize screen interference. You can enable and customize Edge lighting Note 9 using below given process.

Step 1: Swipe down the notification panel and tap the Settings gear icon.

Step 2: Tap Display.

In galaxy Note 9 display settings, you can see auto-brightness, Blue light filter, Screen mode, Screen resolution, Full-screen apps, Icon frames, Edge screen, Status bar, Navigation bar, and more settings.

Step 3: Tap Edge screen.

Here you can see Note 9 Edge panels and Edge lighting options.

Step 4: Enable Edge lighting.

Step 5: Tap Edge lighting.

You can see below-given settings for Edge lighting Note 9.

Show Edge Lighting

Here you can set when show Edge lighting on your Samsung Note 9. Choose from when the screen is on/when the screen is off/always.

Edge Lighting Style

By default basic effect set in your device. Choose your favorite lighting style to change the Edge lighting style on galaxy Note 9.

Manage App Notifications

Turn on app toggle you want to use Edge lighting on galaxy Note 9. You can individually select the app or enable all apps at once also in your device. When you receive notifications from the apps you selected, the Edge screen will light up in your Note 9.

Samsung Galaxy Note 9 Edge lighting not working if turned off notifications in your device. Also, some of the notifications may not cause the edged screen to light up.

Settings > Display > Edge screen > Edge lighting > Manage notifications > All available apps/Enable individually apps

And that’s all. We hope this makes it clear how to turn on Edge lighting Galaxy Note 9. If you have any questions, tell us in below comment box. Do you know how to change Note 9 Edge lighting colors? If yes, share it with us.

How to Restrict App Background Data in Pixel 3 and Pixel 3 XL

Annoying by Apps using a lot of background data on Pixel 3 XL and Pixel 3? Here’s how to restrict background data in Pixel 3 and Pixel 3 XL. Several apps running in the background even we don’t use them. You’ll check mobile data usage and Wi-Fi data usage on Google Pixel 3 using network and internet settings. To limit Pixel 3 using a lot of data usage, you’ll set data limit & warning that use to stop data usage when reaching the limit.

You can turn on the data saver on Pixel 3 to reduce mobile data on your phone. By default enable usage of mobile data in the background in your Pixel 3 XL and Pixel 3. Follow the below-given step by step process to stop android apps from using mobile data.

Read Also:

How to Prevent Apps From Using Background Data in Pixel 3 and Pixel 3 XL

To stop background data usage and close background apps in Pixel 3, apply below-given steps in your devices.

Step 1: Swipe down the notification panel and tap the Settings gear icon.

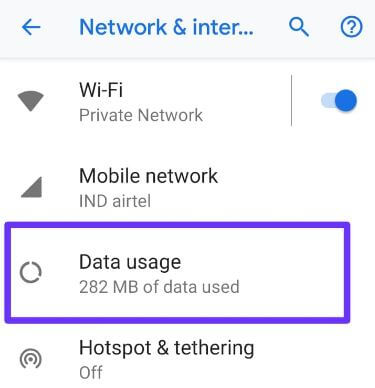
Step 2: Tap Network & internet.

You can see Wi-Fi, Mobile network, Data usage, Hotspot & tethering, Airplane mode, VPN and Private DNS settings.

Google Pixel 3 data usage settings

Step 3: Tap Data usage.

Here check app data usage and Wi-Fi data usage.

Pixel 3 App data usage

Step 4: Tap App data usage under the mobile section to see used Google Pixel 3 app data usage.

List of all apps usage data is available in your Google Pixel 3 and Pixel 3 XL (Show below given screenshot). You’ll restrict background data for individual apps in your android device.

Background data usage by apps on Pixel 3 XL

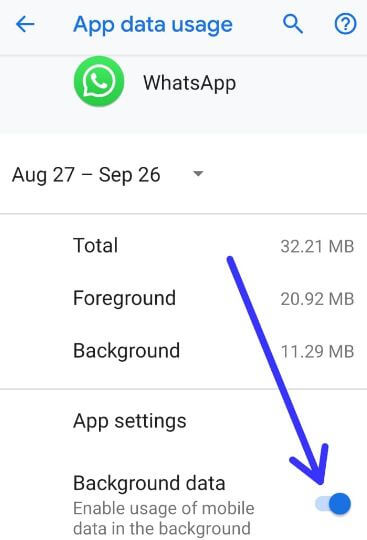
Step 5: Tap app you want to turn off background data.

How to restrict background data of Wi-Fi on Pixel 3 XL

By default activate background data in your Pixel 3 and other android devices.

How to restrict background data in Pixel 3

Step 6: Toggle off “Background data” of the app in your device.

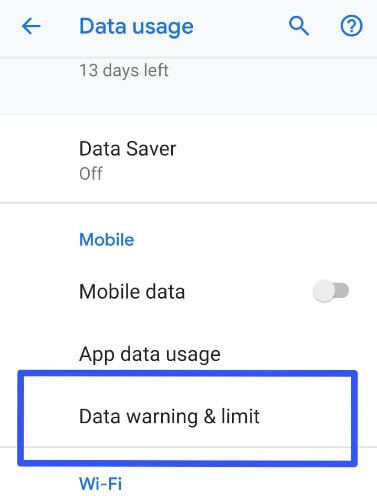
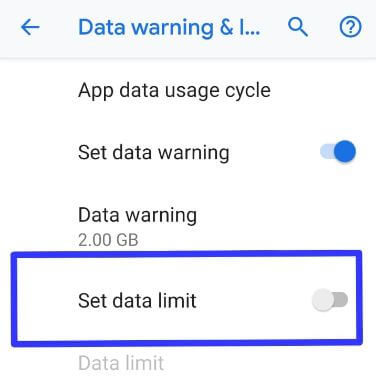
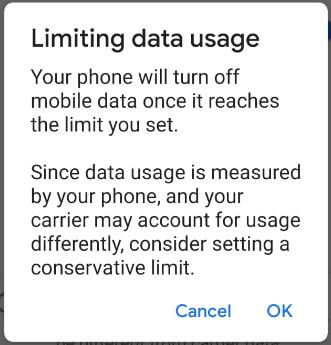
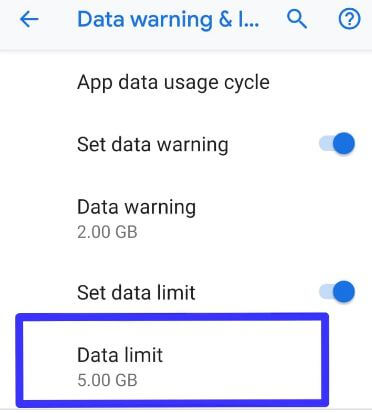
Also, turn on unrestricted data access when the data saver is on Pixel 3 XL and Pixel 3. If you don’t want to disable app background data usage, you can set data limit & warning using below given settings to automatically disable mobile data when reaching the app limit you set.

Set a Data Usage Limit on Pixel 3 and Pixel 3 XL

Settings > Network & internet > Data usage > Data warning & limit > Toggle on Set Data limit > Ok > Tap on Data limit > Set data usage limit in GB/MB > Set

How to Restrict Background Data of Wi-Fi on Pixel 3 & Pixel 3 XL

Check below settings to restrict Wi-Fi data usage on the Pixel 3 device.

Restrict background data of Wi-Fi on Pixel 3 XL Pie

Settings > Network & internet > Data usage > Wi-Fi data usage > Tap app you want to disable app data usage on background > Turn off toggle background data

To save data, enable data saver on your Google Pixel 3, Pixel 3 XL and other android devices.

Close All Apps Running in the Background on Pixel 3 and Pixel 3 XL

Swipe up from the bottom of the screen to open recent apps > Swipe screen right side until see Clear all > Tap on Clear all

How to Turn On Data Saver on Pixel 3 and Pixel 3 XL

Settings > Network & internet > Data usage > Data saver > Toggle on “Use data saver”

And that’s all. We hope this makes it clear how to restrict background data in Pixel 3 and Pixel 3 XL. If you have any questions, tell us in below comment box.