How to Fix Bluetooth Keeps Stopping on Pixel 3 and Pixel 3 XL

Annoying by Google Pixel 3 XL Bluetooth issues with the car? Here’s how to fix Bluetooth not working on Pixel 3 XL and Pixel 3. There are several different types of Bluetooth problems like Bluetooth won’t connect to pair, can’t pair with a car or can’t make or receive calls in the car and other Bluetooth accessories. Several users reported can’t pair with Wear OS or other accessories related problems also.

Bluetooth connection is helpful to share device data and also pair & connect a Bluetooth accessory with a car. After pairing with your phone or tablet, your devices automatically connect with each other next time. Have you been ever facing these types of Bluetooth problems in your Google Pixel 3 XL? If you have found any issue, try out below given different methods to fix Bluetooth not working on Pixel 3 XL.

Read Also:

How to Fix Bluetooth Stop Working on Pixel 3 and Pixel 3 XL

Check out below-given troubleshooting methods to fix Google Pixel 3 Bluetooth issues or Bluetooth has stopped working issue.

Reboot the phone

Long press the power button and tap Restart to reboot the Pixel 3 XL and Pixel 3. After rebooting the phone, check the fix problem.

Turn off Bluetooth and then on again

Turn off Bluetooth in your Pixel devices. After 30 seconds, turn on Bluetooth again and try to pair with a car or other Bluetooth accessories.

Google Pixel 3 XL Bluetooth issues

Swipe down notification shade > Tap Bluetooth or Settings > Connected device > Bluetooth > Turned on

Remove existing BT connection to fix Pixel 3 Bluetooth issues

Remove all connected Bluetooth headphones and other devices from a paired list. Now turn on Bluetooth and re-adding only your headset you want to connect Bluetooth with Pixel 3 & 3 XL.

Make sure the device paired and connected

Make sure your Pixel 3 device paired with the same Bluetooth you want to connect. If already connected but Bluetooth not working on Google Pixel 3 XL, delete the paired device and again add in your device.

How to fix Bluetooth not working on Pixel 3 XL

Settings > Connected device > Bluetooth > Tap paired device > Settings > Forget

Now restart your phone and try again to pair with Pixel 3 & Pixel 3 XL.

Set Bluetooth Audio Codec as LDAC

To change Bluetooth audio codec settings, make sure to turn on developer mode on your Pixel 3 & 3 XL. Apply below steps to change settings:

Settings > System > Advanced > Developer options > Networking > Bluetooth audio codec > LDAC

I hope your Bluetooth will work and not disconnect again.

Google Pixel 3 Bluetooth issues with a car 

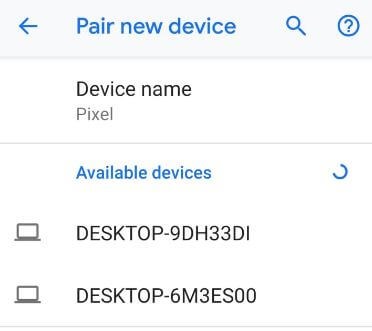
If your Pixel 3 can’t pair with a car, clear all connected devices list from your car’s Bluetooth and phone’s Bluetooth also. After clear all lists, refresh the device list, and then pair Pixel 3 XL Bluetooth with a car.

Connect pair phone

Settings > Connected device > Bluetooth > Three vertical dots (More) > Refresh > Car’s name

Pair settings for the car

Open car’s Bluetooth > tap your phone’s Bluetooth name > Confirm PIN if asked > Accept

If your phone can’t pair with accessories, refresh the accessory list. If you need a password, try 0000 or 1234 to connect with your device.

Can’t make or get calls on car’s Bluetooth

If your Pixel 3 Bluetooth is connected with the car’s Bluetooth, you can make or get calls using the car’s Bluetooth. If you’re facing a problem making or get calls on the car’s Bluetooth, clear the car’s Bluetooth pair list and again try to connect with your device. Also, play music by Bluetooth in your car if pair with your Google Pixel 3 & Pixel 3 XL.

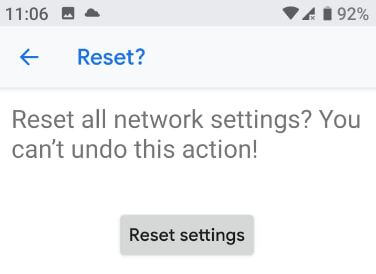
Reset network settings to fix Pixel 3 XL won’t pair with Bluetooth

Settings > System > Advanced > Reset options > Reset Wi-Fi, mobile & Bluetooth > Reset settings

It will reset all saved passwords of Wi-Fi, Bluetooth, and mobile data. To use Wi-Fi and pair with Bluetooth, again enter a password in your Google Pixel 3 device.

In the Reddit forum, several users reported the Uninstall YouTube app will fix Bluetooth issues some of the Pixel devices. You’ll try it if none of the above-given methods fix Pixel 3 Bluetooth issues.

And that’s all. I hope one of these above-given methods useful to fix Bluetooth not working on Pixel 3 and Pixel 3 XL. If you know any other ways, let me know in the comment section.

How to Fix NVIDIA SHIELD Controller Not Working After Update

Annoying from NVIDIA SHIELD Controller not working on Android or Desktop PC after update or charging? In the starting controller working perfectly on my laptop or desktop device, suddenly stop working. When this happens, first of all, make sure the SHIELD controller is unplugged or power off. You can connect your TV with SHIELD TV/SHIELD tablet. Sometimes SHIELD controller not working when streaming games or turn on after charging fully.

You can connect the SHIELD controller to a TV using this page. To connect your TV with a controller, use the NVIDIA button on the SHIELD controller. It will automatically connect to your TV after a few minutes and an LED flashlight turn on. If not flash, charge your controller. Follow below-given troubleshooting steps to fix NVIDIA SHIELD Controller not working on PC after charging.

Related Article:

5 Methods to Fix NVIDIA SHIELD Controller Not Working

NVIDIA SHIELD Controller not working

Check Android TV version of steam link app & steam controller

Open play store and check for the apps update available for stream controller app or steam link app. If available then update it, and the stream controller worked again.

Check for software update

Check any latest software update for your SHIELD controller. If the update available then updates it and try to connect with PC.

Restart your SHIELD to fix NVIDIA SHIELD controller not working

SHIELD home screen > Power button > Restart

Check controller is not unplugged

Make sure the SHIELD controller is plugged with your TV.

SHIELD Controller turns off after charging

You can connect your TV with a controller. Sometimes fully charging your device is the cause to a controller not working. If not working after charging then press the NVIDIA button of the SHIELD controller for 30-40 seconds and release it. Again tap the NVIDIA button and check its working.

You can check the controller is charged or not using the below settings.

SHIELD Home screen > SHIELD accessories > SHIELD controller

Reset NVIDIA SHIELD controller or Connecting SHIELD controller

Unplug your entire devices that connect with the controller. After few times connecting controller on your TV using the below steps.

SHIELD controller > NVIDIA button > Turn on LED Flash

If not turn on the LED light, charge your controller and try again connecting it.

I hope the above given possible solution fix NVIDIA SHIELD Controller not working problem. If you have found this article helpful then share it with your friends on social networks.

How to Fix Low Call Volume on Galaxy S9 and S9 plus: 6 Solutions

Annoying by can’t hear voice during phone calls on galaxy S9 & galaxy S9 plus Oreo? Complete guide to fix low call volume on Galaxy S9 and Galaxy S9 plus. You can face several issues while running phone calls such as low call volume, call dropping, people can’t hear your voice, black screen, turn on Dolby Atmos and more. Most of this galaxy S9 & galaxy S9 plus call volume low issue occur due to bad or poor network signal.

If facing poor sound call quality issues on galaxy S9 & S9 plus, you can use a microphone or a wired headset to fix it. One of the simplest solutions to fix galaxy S9 low call volume issue is to check your device volume settings and make sure volume is full in your galaxy S9.

Read Also:

How to Fix Low Volume During Calls on Galaxy S9 Plus and Galaxy S9

How to fix low call volume on galaxy S9 and Galaxy S9 plus

Check out each one listed below given troubleshooting methods to fix low call volume on galaxy S9 and galaxy S9 plus devices.

Check galaxy S9 & S9 plus phone volume is full – Increase volume

Check volume settings on your Galaxy S9 & galaxy S9 plus devices.

Settings > Sound > Adjust volume settings

Turn on Dolby Atmos on Galaxy S9 Plus and S9

Settings > Sound and vibration > Sound quality & effects > Dolby Atmos

Also, check to adapt sound turn it off in your device using this setting: Settings > Sound and vibration > Sound Personalization > Adapt sound

Restart your Galaxy S9 & Galaxy S9 plus

One of the easiest solutions to fix bugs in your Galaxy S9 and any other devices. Restart your galaxy S9 & galaxy S9 plus devices. Now make a phone call and check fix problem or not.

Check network signal strength to fix low call volume on galaxy S9 plus

If a bad network signal in your galaxy S9 device, you can’t hear voice even use a speakerphone. To fix low sound call quality on galaxy S9 & S9 plus, find a nearby place that good network signal.

If you can’t see any signal in your device, turn on Aeroplane mode in galaxy S9 plus device and after 10 seconds turn off again. Now you can see full network signal in your devices. Several times this solution is work for users to fix signal strength issues.

Check Microphone or Wired headset is no damage

Wired headset: Check wired headset is inserted properly into the headset jack. If not working perfectly, try after remove the galaxy S9 case.

Microphone: Check nothing is in-front of microphone that causing to poor sound call quality on Samsung Galaxy S9 & S9 plus devices.

Factory reset Galaxy S9 & S9 plus

It will reset all your personal data and downloaded apps. Before resetting galaxy S9 & S9 plus phone, back up your S9 important data.

Step 1: Go to settings in your galaxy S9.

Step 2: Tap on Backup and reset.

Step 3: Tap on Factory data reset.

Step 4: Tap on reset.

Unlock the screen if set PIN number, password or pattern lock.

Step 5: Tap on delete all.

Now restart your galaxy S9 device and check to fix poor quality call issue or not.

That ends the possible solutions. Do you know any other solutions to fix low call volume on galaxy S9 and Galaxy S9 plus? Share with us in below comment box. Stay and connect with us for the latest Galaxy S9 tips.
How to Fix My Phone Not Receiving Calls on Android and Samsung?

Annoying by phone not receive calls on Android or Samsung Galaxy but can make them (Outgoing calls)? Several reasons for a phone can’t receiving calls and texts messages include a faulted SIM card, block number, can’t answer a ringing call, poor network connection, enable Do not disturb mode, third-party app issue, etc. Here’s how to fix Android phone not receiving calls issues.

How to Fix my Phone Not Receiving Calls on Android and Samsung?

Try the below given possible solutions to fix my phone not receiving incoming calls from Verizon, Vodafone, LTE, AT&T, T-Mobile, and other network carriers.

12 Solutions to Fix Why Can’t I Receive Calls on my Phone?

Restart your Phone

Restart your Android device

Sometimes restarting your device will fix minor bugs in your Android phone. Long press the power button and tap on Restart to reboot your device.

Samsung Phone: Long-press the power button > Restart > Restart.

Turn Airplane Mode Off

Phone can't receive calls but can make them on Android when enable airplane mode

Make sure to turn off airplane mode on your Android device. Swipe down the notification panel at the top and tap on Airplane mode in the quick settings tiles to enable or disable it. Also, go to Settings > Network & internet > Toggle off Airplane mode.

Turn Off Do Not Disturb

You can’t get calls and notifications on your Android phones if you activate DND mode. Make sure to disable do not disturb mode.

How do I Fix my Phone Not Receiving Calls

Settings > Notifications > Do not disturb. 

Alternative Way: Swipe down the notification panel > Tap on Do not disturb in the quick settings tiles if enabled.

Check Network Issue

Fix Android Phone Can't Make or Receive Calls

Ensure your device network signal (Status bar) is good enough to make or receive a call. You can’t make or receive calls on your de if you have a poor network connection. Find a nearby place that has a network to fix this issue.

Check if the number is blocked to fix the Phone not Receiving Calls or Texts

If the number is blocked by mistake, you can’t receive phone calls and text messages from that number on your Android devices. Click here to view how to block or unblock a number on your Android phone.

Read More: How to Block or Unblock a Number on Samsung

Phone App Update

Make sure your phone app is updated with the latest version.

Check for App Update on your Android Phones


Open the Play store > Profil icon at the top right corner > Manage apps and device > See details > Update or Update all.

Remove SIM Card

Remove the SIM card and restart your phone. Now, insert the SIM card again and try to make a call on your device. Also, check your SIM card for another phone. That will help you check if there is a SIM or phone error.

Clear Phone App Cache

It will delete unnecessary data from your phone app, which will help you speed up and perform faster.

Step 1: Go to Settings.

Step 2: Tap on Apps.

Step 3: Tap on See all apps.

Step 4: Scroll down and tap on the Phone app.

Storage and cache settings on your Android device

Step 5: Tap on Storage and cache.

Clear Phone App Cache to fix phone not receiving calls and texts

Step 6: Tap on Clear cache.

Samsung Phone: Settings > Apps > Phone app > Storge > Clear cache at the bottom right.

Enable Safe Mode on Android

Using safe mode, you can check if any third-party apps (Malware) are causing the problem in your Android device. When you activate safe mode, it will disable downloaded apps on your device. You can only view the system default. If you are still facing issues in safe mode, it means hardware or OS-related issue. If your phone is working without any problem in safe mode, any downloaded app is causing this problem. Find the app causing the issue and remove it from your device.

Read More: How to Turn On Safe Mode on Samsung

Reset Network Settings to Fix Why Can’t I Receive Calls on Android

It will reset all network settings, including saved wifi networks, Bluetooth connections, and mobile network settings on your Android device.

Reset network settings on your Android Phones

Settings > System > Reset options > Reset Wi-Fi, mobile & Bluetooth > Reset settings 

Samsung Phone: Settings > General management > Reset > Reset network settings > Reset settings > Unlock your Samsung phone > Reset.

Reset APN Settings on Android

It will reset the access point of your network connection.

Reset APN Settings on Android Device

Settings > Network & internet > SIMs or Carrier > Access point names at the end of the page > Three vertical dots (More) > Reset to default

Factory Reset your Phone

This factory reset will delete all your phone data, including downloaded apps, Google accounts, photos, music, and other data. Before resetting your phone, back up data in your Android device.

Read More: How to Factory Reset your Samsung

Contact your Carrier

If none of the above-given solutions worked for you, contact your carrier customer care to fix this issue.

All possible solutions given above help fix Android phones not receiving call issues. Don’t forget to mention which way worked for you. If you know other alternative methods to solve can’t make calls on Android devices, please share them with us.

Related:

FAQs:

Why say the Number you have reached is not in Service on my Android?

When you make a call and listen the number you have reached is not in service, you need to check if the phone number is correct. Sometimes, you can’t connect to that person due to a poor network signal. Also, check if the phone number is disabled, like a change in the mobile number or a switch to a new carrier. If none of the solutions worked, try contacting the person using email or social media and get the phone number. In the end, contact your service provider to fix you have reached non-working number problem.

Why are my Calls going Straight to Voicemail Android?

Several reasons for your phone calls going straight to voicemail on your Android device include the Do not disturb mode turned on that directs calls to the voicemail, software bugs, a problem with the carrier/any network outages issue, technical faults, accidentally blocking a person who is trying to call you. Also, disable call forwarding on your Android device to transfer your phone calls to another number or voicemail. If none of the methods work, please get in touch with your nearby carrier.

Why am I not Getting Incoming Calls?

There are several reasons you can’t get incoming calls, such as airplane mode being turned on, DND mode being turned on, or blocking a number in your device to not receive calls and text messages on your device. You need to turn off airplane mode (Settings > Network & internet > Toggle off Aeroplane mode), turn off DND mode (Settings > Notifications > Do not disturb > Turn off now), and unblock a number (Phone app > Three vertical dots > Settings > Blocked numbers > × icon of the number you want to unblock > Unblock).

What happens when someone calls you on Airplane mode?

When someone calls you in Airplane mode, you can’t receive a phone call, text messages, or other network-related settings. Also, turn off WiFi, mobile data, and Bluetooth. You’ll not receive notifications of phone calls. All your phone call are automatically redirected to voicemail. When you turn off the Airplane mode on your device, you can see notifications of all missed calls.

Does Airplane Mode Block Calls?

Yes, Airplane mode blocks all incoming and outgoing calls on your Android devices. Also, you can’t send or receive text messages while turned on Airplane mode.

How do I Enable Incoming Calls on my Android Phone?

To enable incoming calls on your Android devices, go to Settings > Apps > See all apps > Tap on Phone app > Notifications > Make sure to Toggle on Incoming calls.

Why say Not Accepting Calls at this time while making a call?

When you call someone on your phone and listen to this person not accepting calls at this time, it means that the person you call has either manually rejected your call or has a weak network connection that stops them from receiving your call. Also, possible if that person is turned on DND mode to stop receiving phone calls. Finally, confirm if the person you call may have blocked your number.

Why are incoming calls not showing but phone is ringing?

If you’re experiencing an issue of incoming calls not showing but your phone is ringing, check your phone’s screen is turned off or locked your phone. Unlock your phone, swipe down the notification panel, and check to view the phone call notification. Make sure your phone is updated with the latest software update. Check your phone call settings to answer all your incoming calls automatically. You can’t receive incoming call notifications, but your Android phone ring silently if enable the DND mode.

Where is Call Settings on Android?

If you have Android 12 devices, go to App drawer > Phone app > Three vertical dots > Settings > Calls. These Android call settings include calling accounts, fixed dialing numbers, wifi calling, Call forwarding, and Additional settings (Caller ID and Call waiting).

How to fix galaxy S9 battery drain problem

Annoying by quickly draining battery life on galaxy S9 and galaxy S9 plus Oreo 8.1 and Pie 9.0? Check out the top best tips for fix galaxy S9 plus and galaxy S9 battery drain problem. There are several reasons for poor battery life on Galaxy S9 including screen brightness, screen time out time, auto-update apps, auto-sync apps data, running unnecessary background apps, live wallpaper & screen saver, Always-on display and more.

You can enable data saver on galaxy S9 plus & galaxy S9 to extend battery life. Sometimes a problem maybe with a device battery, so the battery does not charge and quickly drain the battery. Just replace the battery from the Samsung store. Also overheating issue occurs due to fast battery draining. Follow the below-given step by step process to fix galaxy S9 battery drain problem.

Read Also:

How to fix galaxy S9 and galaxy S9 sound not working

Fix Samsung Galaxy Note 10 Bluetooth issues 

Fix app crashing or freezing on galaxy S9 & S9 plus

How to improve battery life on OnePlus 7 Pro

How to fix Galaxy S9 battery drain problem: Galaxy S9 plus

How to fix galaxy S9 battery drain problem

Check out each one listed below methods to fix the poor battery life issue on galaxy S9 plus and galaxy Oreo 8.1.

Turn off Wi-Fi scanning on Galaxy S9 Pie 9.0

Settings > Biometrics and security > Privacy > Location > Improve accuracy and turn off WiFi scanning

You need to disable Bluetooth scanning on your Samsung S9 Snapdragon devices. Also, check for Wi-Fi control and find apps that have automatically turn on Wi-Fi. Find an app that you think would have nothing to do with activating wifi and disable Wi-Fi control.

Turn off Google Location services on Galaxy S9 Plus & S9

Find Google maps or other apps that use high accuracy location to turn on Wi-Fi scanning in your device. But disable Google maps permission for better accuracy to fix battery life issues on S9 plus.

Reduce screen display time

Reduce screen display time and set it 15 seconds / 30 seconds to quickly turn off the display and save battery in galaxy S9 & S9 plus.

Settings > Device > Display > Sleep > 15 seconds / 30 Seconds

Decrease screen brightness to fix galaxy S9 battery drain problem

Scroll down the notification panel from any screen and reduce screen brightness to improve battery life on Samsung Galaxy S9 & S9 plus.

Remove live wallpaper

If you use live wallpaper on your Galaxy S9 & S9 plus device, remove it from your devices.

Turn off ambient display

An ambient display function is helpful to see a notification on your lock screen without unlocking your phone. It will automatically wake up when any notifications received.

Settings > Display > Ambient display

How to turn on power saver mode galaxy S9 and galaxy S9 plus

Notification panel > settings > device maintenance > battery > power-saving mode

Also, enable ultra power saving mode in galaxy S9 and galaxy S9 plus devices.

Force stop apps unnecessary running to fix galaxy S9 battery drain problem

If suddenly battery drain on galaxy S9 plus & S9, find background app that consumes more battery and high RAM used using battery settings. After found that app, force stops that individual app.

Settings > Battery > Tap on App to view details

Force stop apps on galaxy S9 & S9 plus:

Settings > Apps > Tap on app want to force stop > Force stop > OK

Factory reset Galaxy S9 & S9 plus

It will remove your entire galaxy S9 & S9 plus internal storage data such as downloaded apps, Google account, Samsung account and more. So backup & restore important phone data in your device before factory reset data.

Step 1: Go to Settings in your galaxy S9 & S9 plus

Step 2: Tap on Backup & reset

Step 3: Tap on Factory data reset

Step 4: Tap on Reset Phone

Step 5: Tap on Erase everything

Now restart your galaxy S9 device and check fix battery life issue on galaxy S9 and galaxy S9 plus.

Other solutions you’ll try such as check system software updates, turn off GPS, Wi-Fi & Bluetooth and disable auto-update apps in your galaxy S9 & S9 plus devices to increase S9 battery life.

And that’s it. End the list of possible solutions we found on web surfing to fix galaxy S9 battery drain problem. Do you have any other tips you want to share? Share with us in below comment box.
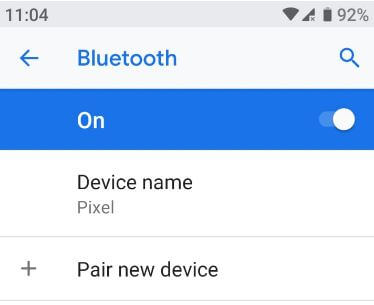
How to fix Samsung Galaxy A50 Bluetooth issues

Galaxy A50 can’t pair with phone’s Bluetooth or car Bluetooth? This tutorial explains you possible methods to fix Samsung Galaxy A50 Bluetooth issues. Several Samsung A50 users reported Bluetooth can’t pair with Samsung Galaxy Watch, Gear S3, Wireless Earbuds, car audio, Fitbit watch, etc.

We use Bluetooth to connect two devices and transfer photos, contacts & share an internet connection using tethering. Also, pair with the car’s Bluetooth to make or receive calls using the car’s audio system and enjoy your phone’s music on a car. Check out below-given troubleshooting methods to fix Samsung Galaxy A50 Bluetooth issues.

Read Also:

How to fix Samsung A50 Network Problem

Fix Wi-Fi not working on Samsung Galaxy A50

How to fix Samsung A50 apps keep crashing

How to fix Samsung Galaxy A50 Bluetooth issues

You can fix the phone or car’s Bluetooth connection problems on Galaxy A50 using the below possible methods. First of all, reboot your A50 and check the fix issue.

1st Method: Turn Bluetooth on and off

Turn Bluetooth off and then on again in your A50 or Galaxy A70.

Step 1: Go to settings

Step 2: Tap Connection

Step 3: Turn off Bluetooth toggle

How to fix Samsung Galaxy A50 Bluetooth issues

Step 4: Turn on Bluetooth toggle

Now search nearby Bluetooth devices and try to pair with the phone or car’s Bluetooth. Make sure your devices are paired and connected.

2nd Method: Can’t pair with a car or Bluetooth accessory to fix Samsung Galaxy A50 Bluetooth issues

If you have Samsung Bluetooth pairing problems with the car, you need to clear paired devices from your phone’s or car’s Bluetooth.

Settings > Connection > Bluetooth > Tap paired device > Remove or Forget

Remove phone paired with your car’s manual

Bluetooth > List of paired device view > Tap “Delete”, next to each paired device name

If you paired your Samsung A50 and car before, clear your device. Now refresh the device, and then pair from your phone or car. Check that your car’s Bluetooth view and ready to use.

Phone Settings > Connection > Bluetooth > Pair new device > Tap Car’s name

Allow access to your phone contacts and call history when pairing from your car.

3rd Method: Clear Bluetooth app cache

Step 1: Go to settings

Step 2: Tap Apps

Step 3: Select three vertical dots on the upper side

Step 4: Tap Show system app

Step 5: Tap Bluetooth from list

Step 6: Tap Storage

Bluetooth connection problems on Galaxy A50

Step 7: Tap Clear cache

4th Method: Reset the network settings on Samsung Galaxy A50

It will reset all Wi-Fi connection, Bluetooth paired mobile data and other network settings to their defaults.

Step 1: Go to settings

Step 2: Scroll down and tap General Management

Step 3: Tap Reset

Step 4: Tap Reset network settings

Step 5: Tap Reset settings

Samsung Bluetooth pairing problems with car

Step 6: Tap the Reset button again

Now try to pair your phone with another Bluetooth connection or car’s Bluetooth.

End the list of possible methods to fix Samsung Galaxy A50 Bluetooth issues. Do you have any alternative methods? Share with us in below comment box. Stay and connect with us for the latest problems.