How to Record a Phone Call on Samsung Galaxy A50

Record calls on Samsung A50? By default, auto-recording turned off. This article explains to you to record a phone call on Samsung Galaxy A50. When enabling call recording on Samsung Galaxy A50, you need to select which calls will be automatically recorded. Choose from all numbers, unsaved numbers, or selected numbers only from the contacts list.

You can enable or disable notifications for receive notifications after calls are recorded. Also, add an unknown number or choose contacts from recants calls or contacts list to record a call. Follow the below-given step by step process to record a phone call on Samsung Galaxy A50, Galaxy A70, Galaxy A30 etc.

Don’t Miss This:

How to hide caller ID on Samsung Galaxy A50

How to fix network problem on Samsung A50

How to block a number on Galaxy A50

How to record a phone call on Samsung Galaxy A50, A70, A30

You can enable and call recording for Samsung Galaxy A50 using below given phone app settings.

Step 1: Open phone app in your Samsung Galaxy A50

record calls Samsung A50

Step 2: Tap Three vertical dots (More) at the top right corner

Call recording on Samsung

Step 3: Select Settings

Call recording for Samsung Galaxy A50

Step 4: Tap Recording calls

Enable auto record numbers in Samsung A50

Step 5: Turn on Auto recording toggle

Step 6: Tap Confirm

Step 7: Tap Auto recording

Below given three options are available on your device.

How to record a phone call on Samsung Galaxy A50

All numbers: It will automatically record all calls in your device.

Unsaved numbers: Even unknown number calling you, record that phone call.

Record calls on Samsung A50

Selected numbers: Here you can see enable auto record numbers in Samsung A50. Add a mobile number, choose numbers from recent numbers or contacts (Show below-given screenshot).

Auto record number on galaxy A50 

Find recorded calls on Samsung Galaxy A50

You can see all recorded calls under-recorded call settings or phone gallery also in your Samsung galaxy A50 devices.

Phone app > More > Settings > Recording calls > Recorded calls

If you don’t want to record calls Samsung A50, turn off the auto-recording toggle using below settings.

Phone app > More > Settings > Recording calls > Turn off Auto recording toggle

And that’s all. We hope this makes it clear how to record a phone call on Samsung Galaxy A50. Do you still have any questions? Tell us in below comment box. Stay and connect with us for the latest updates.

How to Fix OnePlus 6 Battery Draining So Fast

Several users reported camera app freezing and OnePlus 6 battery draining so fast issues after updated Oxygen OS 5.1.8. Most of the battery drain by device screen and quickly reduce battery life in OnePlus 6. There are other reasons for drain battery such as running background apps, live wallpaper, screen brightness & sleep time, Ambient display, and more. Not all users facing this problem.

Have you been ever facing this poor battery life issues after updated your OnePlus? If yes, check out these possible methods to fix OnePlus 6 battery life degrading issues that will use to improve battery life in your device.

Read Also:

How to Fix OnePlus 6 Battery Drain issues After Updates Oxygen OS 5.1.8

How to fix OnePlus 6 battery drain issues

Enable Adaptive Brightness

It will optimize the brightness level for available light. Also, manually adjust the brightness if you want.

Settings > Display > Toggle on Adaptive brightness

Minimize Screen Sleep Time

Set sleep time 15 seconds or 30 seconds helpful to extend battery life in OnePlus 6 Oreo 8.1. After set sleep time, automatically turn off-screen display when reach.

Settings > Display > Screen > Sleep > 15 seconds/30 seconds/1 min/2 min/5min/10 min/30 minute

Remove live wallpaper if set and use dark wallpaper

If set live wallpaper in your OnePlus 6, remove it. To reduce battery life in OnePlus 6, you’ll set dark wallpaper in your device.

Long press on the blank space in your device home screen > Wallpapers > Select wallpaper > Set wallpaper

Force stop apps running in the background

You can see individually app usage data in the background using OnePlus 6 battery settings. Find app usage more data and force stop it. Also, activate battery saver in OnePlus 6 to save battery life.

Settings > Apps & notifications > See all apps > Select the app from list > Force stop

Disable Apps Running in the Background in OnePlus 6

Settings > Apps & notifications > See all apps > Select the app from list > Mobile data & WiFi > Toggle off Background data

Turn Off Ambient Display

Settings > Display > Ambient display > Toggle off New notifications and Lift up display

Disable Auto-Sync to fix OnePlus 6 Battery Draining So Fast

Settings > Accounts > Toggle off Auto-sync personal data

Disable Wi-Fi, GPS, Bluetooth when not use

Turn off several services whenever not use in your devices such as Wi-Fi, GPS, Bluetooth, or other location services. You’ll also turn off phone vibration, Activate battery saver mode of gaming while playing games, turn off auto-update, disable the always-on display, Adaptive battery on, Disable mobile data when turning on Wifi, and other settings that quickly improve battery life in OnePlus 6/6T.

And that’s all. We hope the above-given tutorial helpful to fix OnePlus 6 battery drain issues. Do you know any alternative methods? Feel free to comment in the below box.

How to Fix Google Pixel 3 XL Not Charging Issues

Annoying by Google Pixel 3 XL won’t charge after getting wet or the battery died issues? Let see possible methods to fix Pixel 3 XL not charging problems. There are several reasons for Google Pixel 3 XL and Pixel 3 not charging such as faulted charger, damage port, USB cable lose, dirt in charging port and more. Also, try leaving the phone plugged into a charger that is not connected to the wall.

Several Pixel users also reported charging issues after updated Pixel devices to the latest Android 9 Pie OS. Google says a fix this android 9 Pie fast charging problems. Sometimes users facing charging problems after security patch updated also. But don’t worry, here’s the list of troubleshooting guide to fix Pixel 3 XL not charging after a drop in water.

Read Also:

How to Fix Google Pixel 3 XL Won’t Charge Issues

How to fix Pixel 3 XL not charging issues

To fix a Google Pixel 3 XL won’t charge or charging issue, try holding the power button in your device and restart it if the power menu appears on the screen.

Clean Pixel 3 Charging Port if dust or lint

Pixel 3 & 3 XL XL not charging with OEM charger. A lot of lint can prevent your phone from charging. Try using compressed air or toothbrush to clean it. Make sure nothing in your device’s port, like dust or lint to fix the Pixel 3 charging port issue.

Change wall outlet to fix Google Pixel 3 Not Charging Issue

Try to get up and remove your charger from the outlet and go to another outlet and it starts charging. To check the outlet is working, try to plug other devices or lamps and confirm it.

Check your Pixel 3 battery charge

Plugged your Google Pixel 3 and Pixel 3 XL with original charger, cable, and outlet and wait until 1 minute.  After 1 minute, if you see a battery icon, your Pixel 3 XL is powered off and is charging. You can reboot right away.

If you see a red light, your phone battery is fully discharged. Charge your Pixel 3 XL for at least 30 minutes and after that restart your phone to press & hold the power button for 3-5 seconds. Then, tap the restart icon.

Use original charger & cable

Make sure to use the original charger and cable that came with your Pixel 3 and Pixel 3 XL. Try your device charger to another device to check that the cable & charger are working. Check that the cable is securely connected to the charger and your device.

Restart even plug-in your phone

Please plug in, and restart your Pixel 3 with it still plugged in, it reads the charger.

Completely discharging the phone

Wait until complete discharge or battery drains to zero on your Google Pixel 3 and Pixel 3 XL. Now plugging it to an original charger, with no power to the outlet and I hope to charge works just fine.

Remove cases, cover or battery pack

If use cases, battery packs or cover that causing your Pixel 3’s sensors or press its buttons. Remove accessories that facing the problem for Pixel 3 XL charging problem.

Rotate the charging cable

You can rotate the charging cable head. Try RMA on your phone to fix Pixel 3 XL won’t charge or charging issues.

Pixel 3 XL blank screen issues

If you don’t see a red light or battery icon on your device after plug-in Pixel 3 XL and Pixel 3, the problem could be Pixel 3 XL screen or blank screen issues.

Step 1: Press the power button for 20-30 seconds and wait until your Pixel device power on.

Step 2: Now check your device is ring or silent. Also, try to call your number with another device.

End the list of possible solutions to fix Pixel 3 XL not charging issues. Do you have any other tips to fix Google Pixel 3 XL won’t charge problems? Share with us in below comment box.

How to Fix Google Pixel 6 Pro Won’t Turn On Issue

Annoying that your Pixel 6 Pro won’t power on? Reasons for your Google Pixel won’t turn on like faulted charger, wall outlet or power outlet issue, discharged Pixel battery, or third-party app causing the problem. Don’t worry, here’s the list of possible solutions to fix Google Pixel 6 Pro won’t turn on or won’t charge issues.

One of the standard methods you should try is to force reboot your Pixel 6 and check to fix the problem. If you are still facing problems, apply the below-given possible methods to fix Google Pixel 6 Pro, and the Pixel 6 won’t turn on issue.

Related:

How to Fix Google Pixel 6 and Pixel 6 Pro Won’t Turn or Died

Fix Google pixel wont turn on after charging

Force Reboot your Pixel 6 & Pixel 6 Pro

Long pressing the power key for 15 or 20 seconds until it automatically turns on your Pixels screen.

Check your Pixel 6 Pro Charger & Power Outlet

Make sure your Pixel charge is working correctly. Sometimes faulted charge will damage your Phone or won’t power on your phone. Charge your Pixel 6 Pro device with another charger to find the issue.

Sometimes, if the wall outlet is damaged or does not reach power, your Google Pixel device won’t charge. Try another wall outlet and check it.

If Pixel 6 Pro Discharge Battery

If you find a low battery or red battery icon on your Pixel screen while connecting to the charger, you need to put your Pixel into charging for 30-40 minutes. After charging the phone, long press the power button until Pixel turns on. If your device won’t turn on, apply the below-given methods.

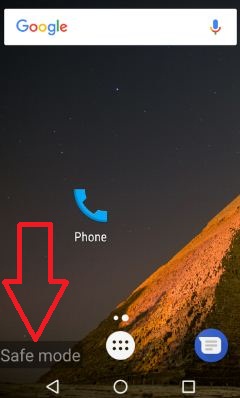
Enable Safe Mode to Check Any Third Party App Causing the Problem

Step 1: Make sure to Power off your Pixel devices.

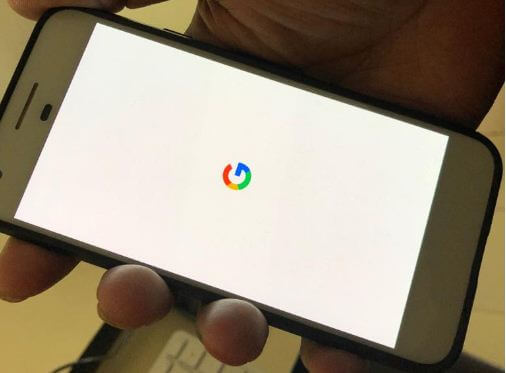
Step 2: Long press the power key until the Google logo appears on the screen.

Step 3: While the Google logo appears, release the power key and long-press the volume down key until you view Safe mode on the bottom left corner of the screen.

If your Pixel turns on in safe mode, it means any downloaded app is causing the problems. Find that app and delete it from your Pixel. Restart your Pixel device to exit safe mode.

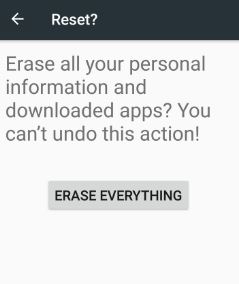
Wipe Data/Factory Reset to fix Google Pixel 6 Pro Won’t Turn On or Power On

Make sure to back up your important data before applying factory reset using recovery mode on your Pixels. It will remove all your phone data and reset Pixels to factory default settings.

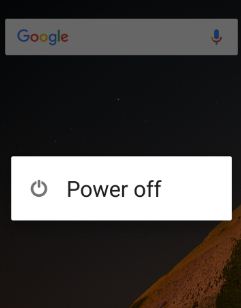
Step 1: Long press the power button until you view the power menu and tap on Power off.

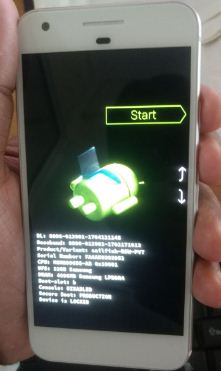
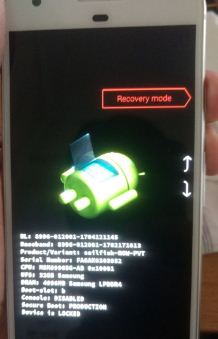
Step 2: Touch & hold the power & volume down key simultaneously until view the Start button.

Step 3: Press the volume down key until Recovery mode views.

Step 4: Press the Power key to enter Pixel 6 and Pixel 6 Pro into recovery mode.

Step 5: Now, the Android Robot exclamation mark with a No command icon appears on the screen.

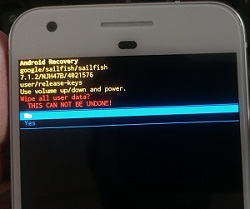
Step 6: Long press the power key & press the volume up key once only to view the Android recovery screen menu.

Step 7: Press the volume down button until it highlights the Wipe data/factory reset.

Step 8: Press the Power key.

This message view: Wipe all user data? This cannot be undone!

Step 9: Press the volume down key to highlight Factory data reset.

Step 10: Press the Power button to access it.

Step 11: Press the Power key to reboot the system in your Pixels.

That’s all. End the list of possible solutions to fix Google Pixel 6 Pro that won’t turn on after charging. Do you know any other alternative methods? Let us know in below comment box.

How to Fix Call Volume too Low on Samsung Galaxy S8, S8 Plus

Samsung Galaxy S8 users reported poor sound call quality during phone calls or low call volume. Various problems occur during phone calls, such as calls dropping, black screen, people can’t hear your voice on calls, low call volume, and more. Sometimes this error occurs due to a poor network connection or hardware issues. This tutorial explains possible methods to fix call volume too low on Samsung Galaxy S8 and S8 Plus. If you set a low call volume on your Samsung phone, adjust the phone volume using the volume button.

Several users face low call volume after system updates or extremely low earpiece call volume. You can use a wired headset or microphone while poor sound quality on calls in your Samsung Galaxy S8 phone. Because of a poor network signal, you can’t hear or make a call. Try the below-given step-by-step guide to fix low call volume on Samsung Galaxy S8 and S8 Plus.

Read More: How to Fix Samsung Galaxy Can’t Send or Receive MMS Messages

How to Fix Samsung Galaxy S8 Plus Call Volume is Low

Low call volume on samsung galaxy S8, S8 plus


Can’t hear your phone call volume to other side people, and then again & again ask you to repeat yourself.  Try the below given possible solution to fix the low call volume on Samsung Galaxy S8 & Galaxy S8 phones.

Clean Speaker with an Electric Toothbrush or Soft Cloth

You need to clean the Samsung S8 speaker grill & ports with an electric toothbrush for at least 5-10 minutes, and it starts working again. Alscleanned the grill on the earpiece if there is a problem.

Turn your Galaxy S8 Off & On

Turn off your Samsung Galaxy S8 & Galaxy S8 phone. After a few seconds, switch on your device again and try to call someone and check issues are fixed or not.

Check Extra Volume

Call your number from other devices, receive the call, tap on Extra volume, and set it. Now reboot your device without stopping the call.

Clear Phone App Cache & Data

Settings > Apps > Find Phone app and open it > Storage > Clear cache.

If clearing the cache can’t fix the problem, remove the data by clearing the phone app data.

Settings > Apps > Find Phone app and open it > Storage > Clear data or Clear storage > OK.

Read More: How to Clear App Cache on Android

Check the Wired headset/Microphone issue to Fix the Galaxy S8 Volume too Low  

Wired headset: Check wired headset is inserted perfectly into the headset jack in your device. If using a Samsung Galaxy S8 case or cover, remove it. If not fix the issue, try a new headset.

Microphone: Check that nothing is in front of a microphone causing low-volume issues on your Galaxy S8 and other Android devices.

Check Network Signal Strength 

While using a speakerphone or Bluetooth headset and facing this issue of volume not working, check the signal strength in your device. If the low network, find a nearby location with good signal strength.

Check System Software Update on Samsung

Settings > Software Update > Download and Install.

Turn On Safe Mode Samsung Galaxy S8 & S8 plus

Step 1: Press & hold the power button on your phone

Step 2: Touch & hold the Power off

You can see this message: Reboot to safe mode

Step 3: Tap OK

You can see the safe mode icon at the bottom left corner. Now see your phone call volume perfectly working while talking with other people. If resolving problems, it means any third-party apps causing this problem. To find this app, remove recently downloaded apps one by one and check to fix poor sound quality call issues or Galaxy S8 low hearing problems.

If none of the above-given methods solve Samsung Galaxy S8’s low call volume problem, try the below-given way.

Reset the Samsung Galaxy S8 & S8 Phone

Step 1: Go to Settings.

Step 2: Tap Backup & reset.

Step 3: Tap Factory data reset.

Step 4: Tap on the Reset device.

Step 5: Tap on Delete All.

It will reset all your Samsung Galaxy S8 phone data. If this does not solve your phone’s low call volume issue, clear the cache partition on Samsung Galaxy S8 & S8 Plus devices.

Did the above-given solutions fix the low call volume on the Samsung Galaxy S8 problem for you? If you know some other tricks to fix this issue, please share them with us. Read more about Samsung Galaxy S8 and Galaxy S8

Read More:

How to Fix Bluetooth Not Working Issues on Android 9 Pie

Several Pixel, Pixel 2 XL users reported Bluetooth connectivity problems after updated android 9 Pie OS. Here are the possible ways to fix Bluetooth issues after the Android 9 Pie update. Also facing Bluetooth problems in a car for both media and phone calls. Wi-Fi and Bluetooth problems are common when updating the device to the latest OS or new launch device.

In Android Pie Bluetooth issues, user-facing can’t pair with the accessory, can’t make or get calls or Bluetooth accessory isn’t connecting, can’t pair with a car and other android Pie Bluetooth problems. Check out below given step by step process to fix Bluetooth issues after the Android 9 or 10 update.

Read Also:

How to Fix Bluetooth Issues After Android 9 Pie update  

After updates Pixel devices to the latest Android Pie OS, different types of Android 9 Pie common problems occur such as Wi-Fi & Bluetooth problems, fast charging, camera blank, gesture control issues, and more. But here’s the solution to fix android 9 Bluetooth issues.

Turn Bluetooth off and on again

Turn off Bluetooth in your Pixel devices. After 20-30 seconds, Bluetooth turns on again and try to pair with other Bluetooth accessories or car accessories.

How to fix Bluetooth issues after Android 9 Pie update

Settings > Connected device > Connection preferences > Bluetooth > Turned on

Forget device and rediscover it

Make sure your update Android 9 Pie phone is paired with the same Bluetooth device you want to connect. If connected but still facing android Pie Bluetooth issues, delete a paired device, and try again connecting with your device.

Android 9 Pie Bluetooth problem

Settings > Connected device > Connection preferences > Bluetooth > Tap paired device > Settings > Forget

Now reboot your phone and try again to pair with your android 9 Pie.

Clear app cache and try to connect again

If you facing a particular app related issue, clear the app cache and try to reconnect it with Bluetooth.

Settings > Apps & Notifications > Select app > Storage > Clear cache

Can’t pair with a car to fix Bluetooth issues after Android 9 Pie update

If your Android Pie can’t pair with a car or other accessories, clear all connected list from your car’s Bluetooth and your Pixel’s Bluetooth also. After clear all list, refresh the list and then again try to pair android 9 Pie Bluetooth with a car.

Pair settings for the car

Car’s Bluetooth > Tap your Pixel’s Bluetooth name > Confirm PIN if asked > Accept

Connect pair with Pixel, Pixel 2 XL

Settings > Connected device > Bluetooth > Three vertical dots (More) > Refresh > Car’s name

If your device can’t pair with accessories, refresh the accessory list. If you need a password, try 0000 or 1234 to connect with Bluetooth.

Can’t make or get calls on car’s Bluetooth

You can make or receive calls using a car’s Bluetooth is connected. If you’re facing Android 9 Bluetooth issues to access calls on the car’s Bluetooth, clean the car’s Bluetooth pair list and try again to connect.

Change Bluetooth AVRCP Version 1.3 instead of 1.4

Change Bluetooth ACRCP Version to fix Android Pie Bluetooth issue

Settings > System > Advanced > Developer options > Bluetooth AVRCP Version under the networking section > Choose AVRCP 1.3

Reset Network Settings to Fix Android Pie Bluetooth issues

Fix Bluetooth issues after android 9 Pie update

Settings > System > Advanced > Reset options > Reset Wi-Fi, mobile & Bluetooth > Reset settings > Reset settings

It will reset all Pixel 9 Pie device saved passwords including Wi-Fi, Bluetooth, and mobile data. If you want to use again Wi-Fi or Bluetooth or other connectivity, re-enter the password again.

And that’s it. End the list of possible solutions to fix Bluetooth issues after Android 9 Pie update. If you have any kind of trouble, tell us in below comment box. Stay and connect with us for the latest updates.