How to Factory Reset Android 11

Do you want to reset your Android phone to factory settings? Here are the 2 ways to perform a factory reset on Android 11 stock OS devices. When you reset your Android smartphones, it will erase all your phone data including your Google account, third-party apps, photos & videos, and more. Before factory reset, make sure to back up your data. Also, hard reset your Android 11 using the power & volume button if forgot password/PIN/Pattern, unresponsive touch screen, black screen of death, and other issues.

Read Also:

How to Perform Factory Reset on Android 11

Before resetting your Android 11, click here to back up & restore your data.

Step 1: Swipe up from the bottom of the screen to access the app drawer and tap on the Settings app.

Step 2: Scroll down and tap the System.

Advanced settings on stock Android 11

Step 3: Tap on Advanced.

How to Perform Factory Reset on Android 11

Step 4: Tap the Reset options.

Factory Reset Android 11

Step 5: Tap on Erase all data (Factory reset).

By default check the box of erasing downloaded SIMs. You can uncheck it.

How to Factory Reset Android 11

Step 6: Tap Erase all data button at the bottom right corner.

Step 7: Confirm your pattern.

All of your personal information will be deleted.

Erase all data on Android 11

Step 8: Tap the Erase all data to delete all.

You will wait until deleting all your phone data.

How to Factory Reset/Hard Reset on Android 11 Stock OS Using Hardware Key

You can use this method when your Android phone locked or factory reset Android without a password. It will delete all your data. Back up your data before performing a hard reset.

Step 1: Make sure to Power off your Android device.

Step 2: Press & hold the power key & volume down key simultaneously until the Start menu appears in your stock Android 11 (Pixel devices running Android 11).

Step 3: Press the volume down key until Recovery mode menu view.

Step 4: Press the Power key once.

Step 5: You can see No command message on the screen.

Step 6: Long press the power button and press the volume up button once only to enter into Android recovery mode.

Step 7: Press the volume down button until select Wipe data/factory reset.

Step 8: Press the Power button once.

Step 9: Press the volume down button to select Factory data reset.

Step 10: Press the Power button once.

Have you ever needed to perform a factory reset Android 11 stock OS? Which method do you use to reset Android smartphones? Tell us in below comment box.

How to Reset Network Settings Android 11

You can reset network settings on Android 11 using system settings. Resetting network will delete all network settings including WiFi networks, cellular data, Bluetooth paired, and other network related settings. To fix the Wi-Fi connection, Bluetooth can’t pair, mobile data not working, and other network issues, you need to try resetting all network settings in your stock Android 11 OS.

Read Also:

How to Reset Network Settings on Android 11

Step 1: Swipe down the notification panel from the top and tap on the “Settings” icon.

Step 2: Scroll down and tap the System.

Resettings network on Android 11 using system settings

Step 3: Tap on Advanced.

Reset options on Android 11

Step 4: Tap the Reset options.

Reset Network Settings on Android 11

Step 5: Tap Reset Wi-Fi, mobile & Bluetooth.

This will reset all network settings, including Wi-Fi, Mobile Data, and Bluetooth. By default check the box of Erase downloaded SIMs. Uncheck the box if you want.

How to Reset Network Settings Android 11 OS

Step 6: Tap on Reset settings at the bottom right corner.

Step 7: Confirm your screen lock.

Reset all network on stock Android 11

Step 8: Tap the Reset settings at the bottom right corner.

How to Turn On WiFi Automatically on Android 11

It will automatically turn on high quality saved WiFi network near you like a home or office network.

Step 1: Go to Settings.

Step 2: Tap the Network & internet.

Step 3: Tap Wi-Fi.

Step 4: Tap the Wi-Fi preference.

Turn On WiFi Automatically on Android 11

Step 5: Toggle on Turn on Wi-Fi automatically.

That’s it. Have you ever needed to reset network settings on your Android or Samsung Galaxy? Tell us in below comment box. Stay and connect with us for the latest updates.

How to Stop Apps from Running in the Background Android 11

By default several apps running in the background even we don’t use them. Here’s how to stop apps from running in the background Android 11. You can close all open apps at once using recent apps and individually disable app background data in your Android or Samsung Galaxy devices. First of all, check which apps usage more battery or view all running services on your Android 11 stock OS.

Read Also:

How to Stop Apps Running in the Background on Android 11

There are several apps we forgot to close after opening them. That all apps running in the background on your device. You can close all apps at once using the below settings in your stock Android 11.

How to Close All Running Apps in Stock Android 11

Step 1: Open the Recent apps in your stock Android.

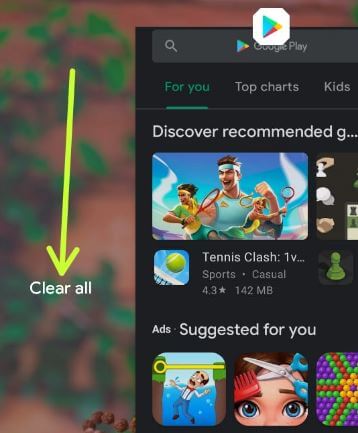
Step 2: Swipe screen right side until last App view.

Close All Running Apps in Stock Android 11

Step 3: Tap Clear all to close all apps at once.

How to Stop Running Services on Android 11

Make sure to enable developer mode in your stock Android 11. Click here to activate developer options if disabled on your phone.

Step 1: Swipe up from the bottom to open the App drawer.

Step 2: Tap on the Settings app.

Step 3: Scroll down and tap the System.

Step 4: Tap Advanced.

Go to Developer options on Android 11 to stop background running apps

Step 5: Tap Developer options.

Stop Running Services on Android 11

Step 6: Tap Running services.

You can see the list of apps with the running processes.

How to Stop Running Services on Android 11

Step 7: Select the App that using more RAM.

How to Stop Apps from Running in the Background Android 11

Step 8: Tap on Stop.

How to Restrict App Use Battery in Background on Android 11

Step 1: Go to Settings.

Step 2: Tap on Battery.

Androdi 11 battery setting to stop background data

Step 3: Tap on Three vertical dots at the top right corner.

Battery usage by Apps on Android 11

Step 4: Tap the Battery usage.

App usage battery on Android 11 OS

Step 5: Select the App usage more battery.

Stop background restriction Android 11 Stock OS

Step 6: Tap the Background restriction.

How to Restrict App Use Battery in Background on Android 11

Step 7: Tap on Restrict.

How to Disable App Background Data on Android 11

Step 1: Go to Settings.

Step 2: Tap on Apps & notifications.

Step 3: Tap on See all apps.

Step 4: Select the App usage more cellular data.

To check app usage data, go to Settings > Network & internet > Mobile network > App data usage > Show app usage data

How to Disable App Background Data on Android 11 OS

Step 5: Toggle off Background data.

And that’s all. Do you have any alternative methods to stop apps running in the background on Android 11 stock OS? Share it with us in below comment box.

How to Turn On Dark Mode in Android Phone

Do you want to enable an automatic dark theme on your Android devices? Here’s how to turn on dark mode in Android 14, Android 13, and other Android devices. You can turn your Android into dark mode using display settings. Also, set a schedule to automatically activate dark mode/dark theme for sunset to sunrise or set the custom time you want to enable it. The dark theme uses a dark background to help extend battery life in your stock Android devices.

Related: 

How to Turn On Dark Mode Android 14, 13, 12, 11, 10

Android device has slightly different settings to turn on or off dark mode (Dark Theme) on your phone.

Set a Schedule to Turn On Dark Mode on Your Android Device

Step 1: Swipe up from the bottom to open the app drawer and tap on the Settings app.

Display setting on stock Android 11 to enable dark mode

Step 2: Tap Display.

How to Turn On Auto Dark Mode in Android 11

Step 3: Make sure to toggle the Dark Theme button to activate it.

Now, see the dark background on your Android devices.

How to Activate Dark Theme on Android 11

Step 4: Tap on the Dark theme.

Set schedule to activate dark mode stock Android 11

Step 5: Tap Schedule.

The options below are available here.

None: By default, selected.

Turns on at custom time: Enter the start and end times to turn the dark theme on automatically.

Turns on from sunset to sunrise: Ensure the device location is turned on.

Turns on at bedtime (Android 13 Version): When enabling bedtime mode, it will silence your phone, dim the wallpaper, and set the screen to black & white at bedtime.

Enable automatic dark theme in your Android 11

Step 6: Select the option you want to use to set the schedule to dark mode.

Read More: How to Enable Instagram Dark Mode

How to Activate Dark Theme on Android Using Notification Panel

Step 1: Pull down the notification panel twice from the top.

How to Enable Dark Mode in Android 11

Step 2: Tap the Dark theme to enable dark mode.

Step 3: Tap and hold a dark theme to change the dark mode settings.

How to Turn Off Dark Mode on Android

Swipe down the notification panel at the top and tap on Dark theme.

OR

Settings > Display > Toggle off the Dark theme in the Appearance section.

Do you set up auto-dark mode on Android phones? Tell us in the comment box below. Stay with us for the latest Android tips and tricks.

Related:

How to Take a Screenshot on Android 11

Here’s how to take a screenshot on Android 11. You can capture screenshots on Android 11(Google Pixel devices) stock OS using the recent apps menu. Other methods are using the power and volume down button and Google Assistant. You can’t capture scrolling screenshots on stock Android devices. Also, edit and share screenshots directly without open them after taken. Taken screenshots are available in your phone gallery. I missed the Android 10 OS power menu screenshot option to capture the screen.

Read Also:

How to Capture a Screenshot on Android 11

Check out the given methods below to take a screenshot on stock Android 11 OS.

How to Take a Screenshot Using Recent Apps in your Android 11

Step 1: Open the Recent apps menu in your stock Android 11 devices.

Step 2: Swipe the screen right side until you open the App or screen you want to capture the screen.

How to Take a Screenshot on Android 11

Step 3: Tap on the Screenshot to capture it.

Now, the taken screenshot is the view at the bottom left corner.

Share or Edit screenshot on Android 11

Step 4: Tap on Share to share screenshots or Edit to edit screenshots in your stock Android OS.

You can find a screenshot in your gallery.

How to Capture Screenshot on Android 11 Using Power & Volume Down Key

Step 1: Open the Screen or Page you want to capture the screen.

Step 2: Press & hold the power button and volume down button at the same time to capture it.

How to Screenshot on Android 11 Using Google Assistant

Step 1: Open the Screen on your device.

Step 2: Say Hey Google or OK Google to launch the Google Assistant.

How to Capture a Screenshot on Android 11

Step 3: When launching the assistant, say Take a screenshot.

It will automatically capture the screens that open in your device.

End the list of methods to take a screenshot on Android 11. Do you have any alternative methods? Share it with us in below comment section.

How to Change the Home Screen Layout on Galaxy S22 Ultra/S22+/S22/S21 Ultra/S21+/S21

Here’s how to set or change the home screen layout on Samsung Galaxy S22 Ultra 5G/Galaxy S22 Plus/Galaxy S22/Galaxy S21 Ultra 5G/Galaxy S21/Galaxy S21. You can organize your home screen on your Samsung by add widgets, organizing apps, app & home screen grid size, folder grid, show apps button on the home screen, add new apps to the home screen, create a folder, etc.  If you don’t want to change the home screen settings, you need to enable the lock home screen layout on your Samsung Galaxy devices.

How do I Change Home Screen Layout on my Samsung Galaxy One UI (4.1)?

How to Set Home Screen Layout on Galaxy S21 Ultra

Step 1: Press & hold the blank space on Home Screen.

Step 2: Tap on Home screen settings or Settings.

Step 3: Tap the Home screen layout.

Step 4: Select from Home and apps screens/home screen only.

Step 5: Tap on Apply button.

How to Change Home Screen Grid on Samsung Galaxy

Step 1: Press & hold the blank space on Home Screen.

Step 2: Tap on Home screen settings or Settings.

Step 3: Tap the Homs screen grid.

Step 4: Select from 4×5/4×6/5×5/5×6 and tap on Save.

How to Change Apps Screen Grid on Samsung Galaxy

Step 1: Touch & hold the blank space on Home Screen.

Step 2: Tap on Home screen settings or Settings.

Step 3: Tap the Apps screen grid.

Step 4: Select from 4×5/4×6/5×5/5×6 and tap on Save.

How to Enable Swipe Down for Notification Panel

You can access the notification panel by swiping down anywhere on the home screen of your Samsung Galaxy device.

Long-press on the blank area of the home screen > Settings > Toggle on Swipe down for notification panel

Alternative Way: Settings > Home screen > Toggle on Swipe down for notification panel.

How to Turn On Lock Home Screen Layout on Samsung Galaxy Ultra

Step 1: Press & hold the blank space on Home Screen.

Step 2: Tap on Home screen settings or Settings.

Step 3: Toggle on the Lock Home screen layout.

How to Show Apps Screen button on Home Screens on Samsung Galaxy 

Long-press on the blank area of the home screen > Settings > Toggle on Show app screen button on home screen 

How to Add New Download Apps icon to Home Screen

Long-press on the blank area of the home screen > Settings > Toggle on Add new apps to home screen

How Do I Rearrange Apps on S22 Ultra 5G?

You can rearrange apps on S22 Ultra 5G to go App drawer > Three vertical dots at the top right corner > Sort > Choose from Custom or Alphabetical order.

Read Also:

And that’s all. Have you ever customized the home screen layout on your Samsung Galaxy devices? Tell us in below comment box.