How to use separate app sound Galaxy S9 and Galaxy S9 plus

Samsung galaxy S9 and galaxy S9 has several awesome features such as super slow motion video, quickly translate text with Bixby voice, improve camera, AR Emoji, Dolby Atmos, Send GIFs with friends and more. But in this tutorial, I’ll show you step by step process to enable and use separate app sound galaxy S9 and galaxy S9 plus.

Using this galaxy S9 & S9 plus audio settings, you can set different notification sound for different apps android or Samsung galaxy S9, S9 plus and other devices.  Galaxy S9 separate app sound only works when the audio device you select is different from your galaxy S9’s main audio output device. Follow below given complete guide to enable and use separate app sound galaxy S9 and galaxy S9 plus.

You Might Like This:

How to use Dolby Atmos in Galaxy S9 and Galaxy S9 Plus

How to Add or remove Edge panel on Galaxy S9 and Galaxy S9 Plus

How to enable and use separate app sound galaxy S9 and galaxy S9 plus Oreo

Step 1: Go to settings or scroll down notification panel and tap on Settings gear icon

Step 2: Tap on Sounds and vibration

Step 3: Scroll down at the end of the page and tap on Separate app sound

By default turn off separate app sound in galaxy S9 and S9 plus devices. Here you can see apps and audio device settings. You can turn on separate app sound in galaxy S9 and S9 plus here.

Step 4: Tap on Apps

How to use separate app sound galaxy S9 and galaxy S9 plus

You can see list of multimedia apps or separate app sound on galaxy S9 and S9 plus Oreo devices. Now select an app to play its sound on a separate audio device.

Step 5: Choose app and tap on Change

Now enjoy different notification sound for different apps Samsung galaxy S9, S9 plus and other android devices.

Step 6: Tap on Audio device

The audio device you selected for this app is the same as the main audio output devices. To separate sound for this selected app, the main audio output device needs to be changed to your galaxy S9/S8 device.

After select app and audio device, turn on separate app sound in Samsung galaxy S9 and galaxy S9 plus devices.

And that’s all. We hope this makes it clear how to use separate app sound galaxy S9 and galaxy S9 plus. Several galaxy S8 users reported separate app sound not working? If you have facing this kind of issue, tell us in below comment box.

How to change Bluetooth audio codec on Galaxy S9 and S9 Plus

Here’s the complete guide to change Bluetooth audio codec on galaxy S9 and galaxy S9 plus Oreo. To set Bluetooth audio codec on Samsung S9 & S9 plus, make sure turn on developer option in your devices. It will change the Bluetooth music quality when changing audio codec on galaxy S9 and S9 plus devices.

Galaxy S9 and galaxy S9 plus supports several Bluetooth audio codec including SBC, AAC, aptX, LDAC, Samsung HD, scalable Codec, All codec and default codec. Several galaxy Note 8 and other users reported can’t connect with car Bluetooth or media audio not supported. Follow below given step by step guide to set or change Bluetooth audio codec on galaxy S9 and galaxy S9 Plus.

You May Like This:

How to add signature to text message on Samsung S9 and S9 Plus

How to disable display over other apps on Galaxy S9 and S9 Plus

How to set or change Bluetooth audio codec on galaxy S9 and galaxy S9 Plus Oreo

To set Bluetooth audio codec on Samsung galaxy S9 and S9 Plus, first of all make sure enable developer mode in your device. You can enable it using below settings.

Step 1: Go to settings in your galaxy S9 & galaxy S9 plus devices

Step 2: Tap on About phone

Step 3: Tap on build number 7 times until see developer mode is enable on your S9 screen

Step 4: Go to settings > system > developer options

By default disable developer options on galaxy S9 & galaxy S9 plus devices.

Step 5: Enable developer mode on galaxy S9, S9 Plus

Step 6: Tap OK to enable it

Set or change Bluetooth audio codec on galaxy S9 and galaxy S9 Plus 

Step 1: Go to settings

Step 2: Tap on about phone

Step 3: Tap on Developer options

Step 4: Tap on Bluetooth audio code under networking section

How to change Bluetooth audio codec on galaxy S9 and S9 Plus

Step 5: Select option you want to set as Bluetooth audio codec

You can also change Bluetooth audio channel mode, Bluetooth AVRCP version, Bluetooth audio sample rate, Bluetooth audio Bits per sample and more.

And that’s it. Do you still have questions about change Bluetooth audio codec on galaxy S9 and S9 Plus? Let us know by leaving a comment below section.

How to Add Signature to Text Messages on Samsung Galaxy S10 Plus, S10, S9 Plus, S9, S8 Plus

Do you know how to add a signature to text messages on Galaxy S9 and Galaxy S9 Plus? You can add a signature to every text message on Samsung S9 & S9 plus. While you add your signature to any message, you’ll need to type the text you want to send. A signature is automatically added to every text message you send when enabling signature in galaxy S9 and galaxy S9 plus (Available on Galaxy S10, S10 Plus, S10e, S8, S8 Plus).

We already discussed put a signature on the galaxy Note 8 and S8 device. Also, create an Email signature for mail someone from your PC or laptop. Follow the below-given step by step guide to add a signature to text messages on galaxy S9 and galaxy S9 plus device.

Read Also:

How to Put Signature on Text Messages Samsung Galaxy S9 And S9 Plus

How to add signature to text messages on galaxy S9 and S9 Plus

Step 1: Open app drawer in your Samsung S9 and S9 plus.

Step 2: Tap on settings.

Step 3: Find language & input settings and tap on it.

Step 4: Tap on the Samsung keyboard.

Step 5: Scroll down up to labeled as text shortcuts and tap on it.

Step 6: Tap Add at the upper right corner.

Step 7: Add text string script

Now enter text in the quick access field, you want to put signature in galaxy S9 and galaxy S9 plus device. Also, add another text to extend signature, this added text will automatically view after entered the text.

Step 8: Tap on save.

Now automatically added your signature to each text message you send from your Samsung Galaxy S9 and S9 plus.

Add a signature to text message on stock Android messages app

Below given settings not available for several Android devices. Check your luck if it works for your android devices.

Messages > Three vertical dots (Menu) at upper right corner > Settings > Add signature to messages > Edit signature text > OK

How to change message app notification importance control in Samsung S9 and S9 plus

Step 1: Open messages app in your Samsung Galaxy S9 and S9 plus.

Step 2: Tap on Three vertical dots at the upper right corner.

Step 3: Select settings.

Step 4: Tap on Notifications.

Step 5: Tap on New messages under the categories section.

You can see importance, sound, vibrate, do not disturb, app icon badges and other settings.

Step 6: Tap on Importance.

You can see Urgent, High, Medium and Low level for message importance controls.

Step 7: Choose from the above-given option in S9.

And that’s it. I hope this tutorial helpful to add a signature to text messages on Galaxy S9 and Galaxy S9 Plus. If you have any kind of trouble, tell us in below comment box.

How to change transition animation scale on Galaxy S9 and S9 plus

Want to speed up galaxy S9 and S9 plus performance? Reduce animation speed on your Samsung galaxy S9 plus and galaxy S9 device to speed up your device. You can change transition animation scale on galaxy S9 and S9 plus under developer options. By default set 1x as animation scale in galaxy S9 and S9 plus Oreo.

In galaxy S9 & S9 plus developer mode settings, you can see Windows animation scale, Transition animation scale and Animation duration scale. Just set windows and transition animation speed as 0.5X to improve galaxy S9 performance. Follow below given step by step guide to change transition animation scale on galaxy S9 and S9 plus.

You Might Like This:

How to use Edge panels on Samsung galaxy S9 and S9 Plus

How to improve battery life on galaxy S9 and galaxy S9 Plus

How to reduce mobile data usage on galaxy S9 and S9 Plus

How to change transition animation scale on galaxy S9 and S9 plus Oreo

How to change transition animation scale on galaxy S9 and S9 plus

First of all make sure enable developer mode in galaxy S9 and galaxy S9 plus devices. If disable, enable it using below settings.

Step 1: Go to settings in your galaxy S9 & galaxy S9 plus devices

Step 2: Tap on About phone

Step 3: Tap on build number 7 times until see developer mode is enable on your S9 screen

Step 4: Again go settings > system > developer options

By default disable developer options on Samsung galaxy S9 & galaxy S9 plus devices.

Step 5: Enable developer mode on galaxy S9, S9 Plus

Step 6: Tap OK to enable it

In galaxy S9 and galaxy S9 plus developer mode settings, you can see several hidden features such as stay awake, running services, picture color mode, auto update system, USB debugging, select app to debug, Buffer size for logging, USB configuration, Bluetooth audio codec and more.

How to reduce or change animation speed galaxy S9 and galaxy S9 plus

Step 1: Enable developer mode using above given steps

After turn on developer option follow below steps.

Step 2: Scroll down up to drawing section in developer mode settings

Here you can see Windows animation scale, Transition animation scale and Animation duration scale in galaxy S9 and S9 plus. By default set 1X as animation scale in all three.

Step 3: Tap on Transition animation scale

Step 4: Choose from Animation off/0.5X/1X/1.5X/2X/5X/10X

Step 5: Choose transition Animation scale 0.5X to speed up your galaxy S9 & S9 plus

And that’s it. I hope this little tip helpful to change transition animation scale on galaxy S9 and S9 plus. If you have any question, tell us in below comment box.

How to use edge panel on Galaxy S9 and Galaxy S9 Plus

Customize edge panel on galaxy S9 and galaxy S9 Plus devices. You can add or remove edge panels under edge screen settings. In Samsung galaxy S9 & S9 plus Edge screen, you can see Edge panels and Edge lightning settings. Let see how to use edge panel on galaxy S9 and galaxy S9 plus Oreo devices.

You can move edge panel handle anywhere on right or left side of the screen in your Samsung S9 and S9 plus devices. Also change edge panel handle on S9 under edge screen settings. Follow below given step by step process to enable and use edge panel on galaxy S9 and galaxy S9 Plus.

Read Also:

How to translate text with Bixby on galaxy S9 and S9 plus

How to disable Bibxy button on Galaxy S9 and Galaxy S9 Plus

How to enable and use edge panel on galaxy S9 and galaxy S9 Plus Oreo

There are two ways to access edge panels on galaxy S9 and galaxy S9 plus devices. Let see one by one method to use galaxy S9 edge panels.

1st Method: Quickly access edge panels from home screen in galaxy S9 & S9 plus

Step 1: Go to home screen and drag the edge panel handle left side to view your Edge panels

How to use edge panel on galaxy S9 and galaxy S9 Plus

Step 2: You can see edge panel screen on your S9 & S9 plus

Step 3: Tap on Settings gear icon at bottom left corner

Now enable/disable edge panels settings in your Samsung S9 & S9 plus. If you don’t want to use edge panel or edge screen in galaxy S9, disable it in your devices. You can see below given several edge panels.

Smart select: You can take the portion of the screen as animation or photo that you can share or PIN to the screen.

Apps edge: Add apps to edge screen on galaxy S9 to instantly access from home screen. Also use two apps at same time using app pair under apps edge screen.

Weather: Check weather updates and details

Step 4: Add or remove panels on galaxy S9 & S9 plus

Now enjoy edge panel feature in your Samsung S9 and S9 plus devices. You can also download your favorite edge panels from store.

2nd Method: Use edge panel on galaxy S9 and galaxy S9 plus using Display settings

Step 1: Scroll down notification panel and tap on settings gear icon

Step 2: Tap on Display settings

Step 3: Scroll down up to Edge screen and tap on it

Here you can see Edge panels and Edge lightning options.

Step 4: Tap on Edge panels

Now customize edge panels on galaxy S9 and galaxy S9 plus devices.

Step 5: Choose Edge panels you want to use home screen

You can maximum add 9 panels at once in your galaxy S9 and S9 plus screen.

Step 6: Tap on Three vertical dots (Menu) at upper right corner for edge panel settings

Here you can see reorder, uninstall and edge panel handle settings.

Reorder panel: Drag the option to the right or left to reorder edge panels on galaxy S9 and galaxy S9 Plus devices.

How to change edge panel handle on galaxy S9 and galaxy S9 Plus

Settings > Display > Edge screen > Edge panels > Three vertical dots (Menu) > Edge panel handle

Here you can change the position of the edge panel handle on galaxy S9 plus from left or right. And drag edge panel up to down from any screen.

Also change edge panel size as small or large and set transparency as low or high in your Samsung S9 and S9 plus Oreo devices.

How to uninstall edge panel on Samsung galaxy S9 & S9 plus

If you don’t use downloaded or other edge panels, you can remove edge panel using below settings.

Settings > Display > Edge screen > Edge panels > Three vertical dots (Menu) > uninstall > select edge panel > OK

How to quickly access panel from home screen on galaxy S9 & S9 plus

Step 1: Drag the edge panel handle left side to view your Edge panels

Step 2: Scroll panel one by one or Tap on Three horizontal lines

Step 3: Here you can access all edge panels in your S9

And that’s all. I hope this tutorial helpful to enable and use edge panel on galaxy S9 and galaxy S9 Plus. If you found it helpful, don’t forget to share with others on social media. Stay and connected with us for latest galaxy S9 tips.

How to create custom GIFs on Galaxy S9 and Galaxy S9 Plus

Want to make you own or create custom GIFs on galaxy S9 and galaxy S9 plus Oreo? You can create animated GIF on galaxy S9 under display settings. Also share GIF with friends on galaxy S9 and S9 plus devices. We already discussed about create AR Emoji on galaxy S9 & S9 plus.

In galaxy S9 and galaxy S9 plus, you can set animated GIF as lock screen or always-on-display. You can also create your own GIF and send GIFs galaxy S9 plus and galaxy S9 Oreo. Let see step by step process to create custom GIFs on galaxy S9 and galaxy S9 Plus.

Read Also:

How to translate text with Bixby on Samsung galaxy S9 & S9 Plus

How to add GIFs to Snapchat story android phone

How to create custom GIFs on galaxy S9 and galaxy S9 Plus Oreo

How to create custom GIFs on galaxy S9 and galaxy S9 Plus

Step 1: Go to settings or scroll down notification panel and tap on Settings gear icon

Step 2: Tap on Lock screen and security

Step 3: Tap on clock and face widgets

Here you can see clock style, roaming clock and face widgets settings.

Step 4: Tap on Clock style

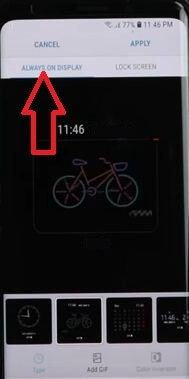
Now Always on display and lock screen tab view in your device.

Step 5: Tap on ADD GIF at bottom screen

Step 6: Tap on + button inside the screen            

Step 7: Go into gallery or Album you want to select GIF

If you don’t like any other GIFs, you can also create your own GIF on S9 and S9 plus.

Step 8: Choose GIF you want to create

Step 9: Tap on Apply button at upper right side

You can see this message on screen: GIF loading

Now lock your galaxy S9 and galaxy S9 plus device and you can see created GIF set as galaxy S9 lock screen or Always on display.

How to share or send GIFs S9 plus and galaxy S9

Step 1: Open camera in your galaxy S9 device

Step 2: Tap on GIF from gallery or camera photos you want to share

Step 3: Now play GIFs in your galaxy S9 & S9 plus

Step 4: Tap on screen and select create GIF button (Third from left to right) at screen

This create AGIF provide a 5-6 second video clip as an animated GIF type for non commercial and personal use only.

Step 5: Tap on Confirm

Step 6: Tap on Share at upper right side

And that’s all. I hope you will enjoy viewing create custom GIFs on galaxy S9 and galaxy S9 plus Oreo. If you have question regarding this trick, let us know be leaving comment below section. Please share the article of you found it helpful. Do you have any alternative methods?