How to take a selfie on Galaxy S9 and Galaxy S9 Plus

Samsung galaxy S9 and galaxy S9 plus has several awesome camera settings such as super slow motion video, AR Emoji, Selfie focus and more. But in this tutorial, I’ll show you how to take a selfie on Galaxy S9 and Galaxy S9 Plus Oreo. There are 3 shooting methods to capture selfies on galaxy S9 and galaxy S9 plus devices.

You can find this three different shooting methods for selfie on Samsung galaxy S9 and galaxy S9 plus camera settings. One of the favorite is take palm selfie on galaxy S9 plus and galaxy S9. Follow below given step by step guide to take a selfie on Galaxy S9 and Galaxy S9 Plus.

You May Like This:

How to take screenshots on galaxy S9 and galaxy S9 Plus

How to use Dual messenger on galaxy S9 and galaxy S9 Plus

How to take a selfie on Galaxy S9 and Galaxy S9 Plus Oreo

How to take a selfie on Galaxy S9 and Galaxy S9 Plus

First of all let see 3 shooting methods to capture selfies on galaxy S9 and galaxy S9 plus devices.

Step 1: Open camera app in your Samsung S9 & S9 plus

By default Auto mode set.

Step 2: Tap on Settings gear icon at bottom left side

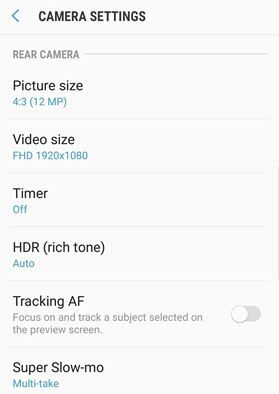
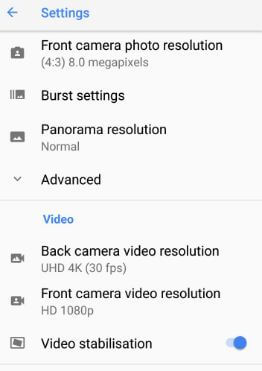
Here you can see front and rear camera settings for galaxy S9 & S9 plus such as picture size, video size, super slow-motion, HDR, timer and tracking AF.

Step 3: Tap on Shooting methods under front camera section

Here you can see below given three shooting methods to take a selfie on galaxy S9 and galaxy S9 plus devices.

Tap screen: Open the camera and tap the screen to take selfies in galaxy S9 & S9 plus.

Show palm: To take palm selfie on galaxy S9 and galaxy S9 plus, show your palm to the camera to automatically take a picture. To use this feature, enable show palm in your S9 & S9 plus.

Sometimes several users facing issue of palm selfie not working. Have you been ever facing this type issues on your previous Samsung galaxy devices?

Tap heart rate sensor: Touch heart rate sensor to take a selfie on your devices.

You can also use selfie focus mode on galaxy S9 and galaxy S9 plus.

How to use selfie focus on galaxy S9 and galaxy S9 plus

Step 1: Open camera app in your S9 & S9 plus

Step 2: Now touch switch camera to use self portraits

You can see several shooting modes list in your galaxy devices.

Step 3: Select selfie focus

Step 4: Adjust the front camera and take a picture to pressing camera button

And that’s all. Please share the tutorial if you found it helpful to take a selfie on Galaxy S9 and Galaxy S9 Plus. If you know some other methods, share with us in below comment section. Read more about best galaxy S9 plus tips.

How to Change Keyboard On Galaxy S9 And S9 Plus

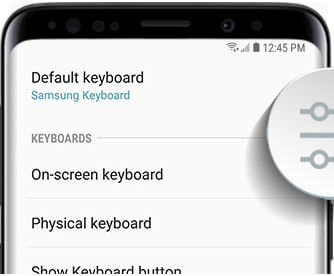
Samsung keyboard is set as a default keyboard on your Samsung Galaxy S9 and Galaxy S9 plus. Here you can see the process to change the keyboard on Samsung S9, S9 plus and other latest Samsung Galaxy devices. You can download third-party keyboards with funny style from the Galaxy Apps and Google Play store. Also quickly switching between keyboard using navigation bar button on galaxy S9 and S9 plus.

You can change the default keyboard on galaxy S9 and galaxy S9 plus under language and input settings. Also directly change the keyboard from the messaging app. Also, change the keyboard language on galaxy S9 and galaxy S9 plus devices. Follow the below-given step by step guide to set or change keyboard on galaxy S9 and Galaxy S9 Plus.

Read More:

How to Change the Galaxy S9 Keyboard Settings

How to change keyboard on Galaxy S9 and Galaxy S9 Plus

There are two ways to change the default keyboard on Samsung Galaxy S9 and Galaxy S9 Plus devices.

1st Method: Change on-screen keyboard on Samsung S9+ using phone settings

Step 1: Swipe down the notification panel and tap on the Settings gear icon.

Step 2: Tap on Language and input.

Here you can see several sections including keyboards, input assistance, speech, mouse/trackpad and more.

Step 3: Tap on the Default keyboard.

You can see Gboard, Google voice typing, Samsung keyboard, and Samsung keyboard Neural Beta.

Step 4: Select the keyboard you want to set as default on S9.

2nd Method: Quickly change keyboard on Galaxy S9 and Galaxy S9 Plus

Step 1: Open any messaging app in your galaxy S9 & S9 plus.

Step 2: Tap on the Keyboard icon at the bottom right side corner on Samsung S9 & S9 plus.

Step 3: Select the keyboard from a list you want to set.

You can also enable/disable the show keyboard button on galaxy S9 and S9 plus using this setting.

Also, change Samsung keyboard settings on galaxy S9 and S9 plus including change keyboard size & layout, custom symbols and change the keyboard color to improve visibility using enable high contrast keyboard. In galaxy S9 and S9 plus keyboard size and layout settings, you can see below given three settings.

Number keys: Add number to your selected keyboard.

Alternative characters: See alternative characters in the galaxy S9 keyboard.

Keyboard size: You can adjust the keyboard size on galaxy S9 and S9 plus to drag the handles on the sides of the keyboard.

Also, reset or change keyboard on galaxy S9 and galaxy S9 plus devices.

Change Keyboard Language on Samsung S9 Plus

Settings > General management > Languages and input > Virtual keyboard > Samsung keyboard > Languages and types > Manage Input languages > Toggle on Language you want to download on your phone and set

And that’s all. Did you find the above tutorial helpful to change the keyboard on galaxy S9 and Galaxy S9 Plus? Do you have any other tips? Tell us in below comment section. Don’t forget to check out our other best galaxy S9 tips.

How to enable and use Game launcher Galaxy S9 and Galaxy S9 plus

By default disable game launcher on Samsung galaxy S9 and galaxy S9 plus Oreo devices. Here’s complete guide to enable and use Game launcher galaxy S9 and galaxy S9 plus. This Samsung S9 and galaxy S9 plus game launcher app is very useful who loves playing games.

You can set up game launcher on Galaxy S9 under advanced feature settings. Some of the AT&T users reported game launcher not enabled on Samsung galaxy S9 plus. Have you been facing this type of issue on your galaxy S9+ & S9? Follow below given step by step process to enable and use Game launcher galaxy S9 and galaxy S9 plus.

You Might Like This:

How to change AOD clock style and color on Samsung galaxy S9 & S9 Plus

How to change storage location to SD card on Galaxy S9 and S9 Plus

How to enable and use Game launcher galaxy S9 and galaxy S9 plus Oreo

How to enable and use Game launcher Galaxy S9 and Galaxy S9 plus

Step 1: Go to settings or swipe down notification panel and tap on Settings gear icon

Step 2: Tap on Advanced features

Step 3: Tap on Game launcher

You can manage useful features while you play games on galaxy S9 & S9 plus. By default turn off Game launcher toggle button in your galaxy S9 and other devices.

Step 4: Turn on Game launcher toggle button

You can see pop-up screen of Add to Home screen

Step 5: Tap on Add automatically

Game launcher automatically set all your games in one place and provide additional feature that are useful for playing games.

Step 6: Now open galaxy S9 app drawer and tap on Game launcher

Now follow on screen instruction to set up Game launcher on galaxy S9 and galaxy S9 plus Oreo devices.

Step 7: Now you can see Game launcher settings in your galaxy S9

Here you can see several game launcher settings such as mute game, save power and more. All installed games will be shown in game launcher app. Also see games played and videos recorded in my games settings.

Enable/disable app notifications from Game launcher on galaxy S9 & S9 plus

Step 1: Open app drawer and tap on Game launcher

Step 2: Tap on Three vertical dots (Menu) at upper right side corner

Here you can add a game and see Game launcher settings in galaxy S9 and S9 plus.

Step 3: Select Settings

By default enable app notifications game launcher in Samsung galaxy S9 and S9 plus.

Step 4: Turn off app notification toggle button if can’t get notification

You can also see marketing information option for game launcher.

In particular game settings, you can see several options including no alerts during game, hard press home button lock, edge touch lock and auto brightness lock options. While turn on no alerts during game in S9, Most alerts, except incoming calls will be blocked and Bixby key won’t work on galaxy S9 and S9 plus.

And that’s it. I hope this article helpful to enable and use Game launcher galaxy S9 and galaxy S9 plus. If you have any kind of trouble, tell us in below comment box. Stay and connect with us for latest galaxy S9 and S9 Plus tips.

How to enable smart stay on Galaxy S9 and Galaxy S9 Plus

Samsung galaxy S9 and galaxy S9 plus has several awesome advanced features such as Game launcher, one handed mode, smart stay, finger sensor gestures, quick launch camera, multi window, smart capture and more. But in this tutorial, I’ll show you how to enable smart stay on galaxy S9 and galaxy S9 plus Oreo devices.

You can enable or disable smart stay on Samsung galaxy S9 plus and galaxy S9 under advanced feature settings. When turn on smart stay on galaxy S9 and S9 plus, it will keep the screen on while you’re looking at it by using the front camera to detect your face. Follow below given step by step process to enable smart stay on galaxy S9 and galaxy S9 Plus.

You Might Like This:

How to change Always on display clock style and color on galaxy S9 and galaxy S9 Plus

How to use Smart capture on Samsung Galaxy S9 and S9 Plus

How to enable smart stay on galaxy S9 and galaxy S9 Plus Oreo

How to enable smart stay on Galaxy S9 and Galaxy S9 Plus

Step 1: Go to settings or scroll down notification panel and tap on Settings gear icon

Step 2: Tap on Advanced features

Step 3: Tap on Smart stay

By default disable this feature.

Step 4: Turn on Smart stay toggle button in Samsung galaxy S9 and galaxy S9 plus

This Samsung galaxy S9 and galaxy S9 plus smart stay feature works perfect when you hold your galaxy S9 upright & steady, you’re in a well-lit place but not direct sunlight and the front camera isn’t being used by another app.

Important advanced features galaxy S9 and galaxy S9 plus Oreo

Finger sensor gestures: First of all enable Finger sensor gestures on galaxy S9 & S9 plus. Swipe up or down on the fingerprint sensor to open or close the notification panel.

Quick launch camera: Turn on quick launch camera and Press the power key twice to quickly launch galaxy S9 and S9 plus camera.

Swipe to call or send messages: Open the number and swipe it right side to make a phone call and swipe left to send message in your Samsung galaxy devices.

Palm swipe to capture Gesture: Swiping the edge of your hand across the S9 screen to take screenshot on galaxy S9 and galaxy S9 plus.

Read More: 3 easy ways to take screenshots on galaxy S9 and galaxy S9 plus

Easy Mute: To mute your entire Samsung galaxy S9 & S9 plus incoming calls & alarms, just putting your hand over the screen or turning your phone face down.

Smart Alert: Enable smart alert in galaxy S9 & S9 plus. Your phone will vibrate when you pick it up after missing calls or receiving messages in your S9 device.

And that’s it. We hope this tutorial helpful to enable smart stay on galaxy S9 and galaxy S9 Plus and other advanced features. If you know any other useful S9 advances features, let me know in the comment section.

How to change always on display clock style Galaxy S9 and S9 Plus

In galaxy S9 and galaxy S9 plus has several always on display settings. We already discussed about change AOD wallpaper and customize AOD on Samsung S9 and S9 plus. But in this tutorial, I’ll show you guide to change always on display clock style galaxy S9 and galaxy S9 Plus Oreo.

You can change clock on galaxy S9 lock screen and always on display screen. Also change always on display clock color and add GIF to Always on display in galaxy S9 and galaxy S9 plus devices. Download several AOD styles for your device. Check out below given step by step process to set or change always on display clock style galaxy S9 and S9 Plus.

Read Also:

How to move apps to SD card on galaxy S9 and galaxy S9 plus

How to create custom GIF on Samsung S9 and S9 Plus

How to change always on display clock style galaxy S9 and galaxy S9 Plus Oreo

How to change always on display clock style Galaxy S9 and S9 Plus

Let see complete process to change AOD clock style, AOD color and animated GIF.

Step 1: Go to settings or Swipe down notification panel and tap on Settings gear icon

Step 2: Tap on Lock screen and security

Step 3: Tap on Clock and FaceWidgets

You can see clock style, roaming clock, face widgets and contact information settings.

Step 4: Tap on clock style

Here you can see Always on display and Lock screen tab.

Step 5: Tap on Always on display

In the bottom of the screen, you can see type, color and Add GIF for color conclusion. There are several AOD clock style, clock color and GIF available in your Samsung galaxy S9 and galaxy S9 plus devices.

Step 6: Select clock type and color you want to set as galaxy S9 AOD clock

Step 7: Tap on Apply at upper right side

Now lock your galaxy S9 and galaxy S9 plus and you can see always on display clock with color you set.

And that’s it. Do you still have questions about change always on display clock style galaxy S9 and S9 Plus? If you have any other idea, you can share with us in the below comment section. Stay and connect with us for latest Samsung galaxy S9 and galaxy S9 Plus tips.

How to change always on display wallpaper Galaxy S9 and S9 Plus

Set or change always on display background image on Samsung galaxy S9 and S9 plus. Here’s the complete guide to change always on display wallpaper galaxy S9 and S9 Plus. In galaxy S9 and galaxy S9 plus Oreo devices, you can easily customize always on display settings. You can show AOD on the home button and clock or other information such as date, time, notification and battery life.

You can change the clock styles, widgets or colors under clock and facewidgets settings. Also set image or add always on display background images on galaxy S9 plus and galaxy S9. Follow below given step by step guide to change always on display wallpaper galaxy S9 and S9 Plus.

You May Like This:

How to change lock screen app shortcuts on Galaxy S9 and S9 Plus

How to change galaxy S9 and galaxy S9 Plus launcher

How to change always on display wallpaper galaxy S9 and galaxy S9 Plus Oreo

Step 1: Go to settings or Swipe down notification panel and tap on settings gear icon

Step 2: Tap on Wallpapers and themes

Step 3: Tap on AOD at bottom right side corner

You can see by default installed wallpaper in your Samsung galaxy devices.

Step 4: Tap on View all

My always on display screen view in your galaxy S9 and S9 plus devices.

Step 5: Select your favorite wallpaper from list you want to set as AOD background wallpaper

You can see this message on S9 screen: Set as the default always on display?

Step 6: Tap on Apply

Now set Always on display wallpaper on Samsung galaxy S9 plus and galaxy S9.

You can also change always on display clock style and color galaxy S9 using below settings.

How to change always on display clock style on galaxy S9 and galaxy S9 plus

Step 1: Swipe down notification panel and tap on Settings gear icon

Step 2: Tap on Lock screen and security

Step 3: Tap on Clock and Facewidgets

You can see clock style, roaming clock, face widgets and contact information settings.

Step 4: Tap on clock style

Here you can set clock style for AOD and lock screen also.

How to change always on display wallpaper Galaxy S9 and S9 Plus

Step 5: Tap on Always on display

Step 6: Select clock type you want to set

Step 7: Tap on Apply at upper right side

You can also change clock color and add GIF to Always on display in Samsung S9 and S9 plus devices.

And that’s it. We hope this makes it clear how to change always on display wallpaper galaxy S9 and galaxy S9 Plus. If you have any kind of trouble, tell us in below comment box. We’ll respond as soon as possible. Do you know any other S9 AOD tips? Share with us in below comment box.