How to Enable Parallel Apps on OnePlus 6, 5T, 5, 3T, 3

OnePlus 6 has come with several new features and one of them we discuss here is how to use parallel apps. Using this OnePlus 6 parallel apps feature, you can use a single app with multiple accounts in your device such as WhatsApp, Twitter, Facebook and more. By default disable parallel apps OnePlus 6 devices.

You can find parallel apps OnePlus 6 feature under apps settings in your device. It’ll save time to switch on & switch off the account if you use a different account. Also, access your personal and work-related account in your device at the same time. Follow the below-given step by step process to enable and use parallel apps on OnePlus 6 Oxygen OS.

Read Also:

How to Use Parallel Apps in OnePlus 6 Oxygen OS

How to enable and use parallel apps on OnePlus 6

Step 1: Swipe down the notification panel and tap settings gear icon in OnePlus 6.

Step 2: Tap apps under the personal section.

Here you’ll see several OnePlus 6 apps settings including app permissions, default apps, parallel apps, and special app access.

Step 3: Tap Parallel apps.

You can see a list of supported parallel apps.

Step 4: Turn on the toggle button of apps you want to use as parallel apps OnePlus 6.

When enabling parallel apps, you can see this message on your device: Parallel Facebook/WhatsApp has been created.

In this OnePlus 6 apps setting, you can manage app permission individually and change default apps in OnePlus 6 Oreo such as a home app, browser app, phone app, SMS app and more.

How to change default apps on OnePlus 6 Oxygen OS

Step 1: Go to settings in your OnePlus 6.

Step 2: Tap Apps under the personal section.

Step 3: Tap Default apps.

You can see a list of by default set apps such as a home app, phone app, SMS app, browser app, camera app, calendar app and more.

Step 4: Tap the App to change the default.

Step 5: Set an app as default from the list.

And that’s all. We hope this makes it clear how to enable and use parallel apps on OnePlus 6 Oxygen OS. If you have any kind of trouble, tell us in below comment box. Stay and connect with us for the latest OnePlus 6 Oxygen OS updates.

How to Set Up Lock Screen on OnePlus 6T

Want to change the lock screen method to unlock your OnePlus 6T/6? Here’s how to set up a lock screen on OnePlus 6T Oxygen OS. You can see different screen lock in your OnePlus 6T device such as none, swipe, pattern, PIN, and password. Also, use biometrics security like fingerprint security and face unlock method to quickly unlock the device.  You can change the lock screen in your OnePlus devices using security & lock screen settings. PIN or Password is the strongest secure lock screen to secure your personal data.

Read Also:

How to Set Up Lock Screen in OnePlus 6T Oxygen OS

How to set up screen lock in OnePlus 6T

You can use the smart lock feature also to unlock your OnePlus 6T device. Set up the OnePlus 6T lock screen and other features using the below-given settings.

Step 1: Swipe down the notification shade from the top of the screen and tap the Settings gear icon.

Step 2: Scroll down and tap on Security & lock screen.

Here you can see find my device, screen lock, lock screen preferences, fingerprint, face unlock, location, and other settings.

Step 3: Tap Screen lock under the device security section.

Step 4: Choose from None/Swipe/Pattern/PIN/Password you want to set.

Step 5: We select Pattern. Draw a pattern and tap on Next.

Step 6: Draw a pattern again and tap on Confirm.

Step 7: Now your OnePlus 6T device use lock screen security. Lock your OnePlus 6T and unlock it with the PIN or password you set.

How to Hide Pattern Lock on OnePlus 6T

Settings > Security & lock screen > Tap Settings gear icon in-front of Screen lock > Toggle off Make pattern visible

How to Remove Screen Lock in OnePlus 6T/OnePlus 6

When you select screen lock security “None”, both PIN and fingerprint added remove from your list.

Settings > Security & lock screen > Screen lock > Draw your pattern or enter password > None

All lock screen security removed from your OnePlus 6T device.

How to Add Fingerprint to OnePlus 6T 

OnePlus 6T launched with the in-display fingerprint. You can set up a fingerprint in OnePlus 6T using the given settings.

Settings > Security & lock screen > Device security > Fingerprint > Add fingerprint

You can also change the fingerprint animation effect in OnePlus 6T using this setting. Choose from Cosmos/Waves/Stripe animation you want to use in your device.

And that’s it. Do you still have a question about set up the screen lock in OnePlus 6T? If you have any kind of trouble, tell us in below comment box. Stay and connect with us for the latest updates.

7 Best Google Pixel 3 and Pixel 3 XL Tips and Tricks

Have you purchase Google Pixel 3 or Pixel 3 XL? Both Google devices have the same features and settings, the only difference is screen size and battery. Let see the best Google Pixel 3 tips and tricks. One of the most important features is the Google Pixel 3 camera. This Pixel 3 and Pixel 3 camera include the feature of Top Shot, Night Sight, Group selfie, Super res zoom, Playground or Playmoji and more.

In Google Pixel 3 hidden features, you can see Lockdown, Digital Wellbeing, Always on ambient display, device theme, App action, Overview selection and more. Check out below given top best Google Pixel 3 tips and tricks.

Relevant:

Google Pixel 3 Tips and Tricks: Pixel 3 XL hidden tips

Google Pixel 3 and Pixel 3 XL device has almost the same phone settings. So you can apply this entire hidden feature to both devices. Best Google Pixel 3 XL tips and tricks.

Device theme

Pixel 3 dark theme

You’ll manually set a Pixel 3 and Pixel 3 XL theme as dark or light you want using display settings. By default set theme as based on the wallpaper you set.

Settings > Display > Advanced > Device theme > Automatic based on wallpaper/light/Dark

Digital Wellbeing – Best Google Pixel 3 tips and tricks

Best Google Pixel 3 tips and tricks

One of the most important and best Google Pixel 3 and Pixel 3 XL tips and tricks. It includes Dashboard, Winddown, Do not disturb, Flip to Shhh and other settings. This Google Pixel 3 Digital wellbeing features useful to view how many notifications you’ve received, how many minutes you’ve used your Pixel 3 per day, how long you’ve used each app and more data.

Settings > Digital wellbeing > Dashboard/Wind down/DND/Flip to Shhh

Read Also:

Lockdown – Best Google Pixel 3 tips and tricks for security

Google Pixel 3 hidden feature Lockdown

This is the new Pixel 3 hidden feature that first of all introduce android 9 Pie version. When turning on lockdown on Pixel 3 XL and Pixel 3, you can unlock your device using PIN or Password only. You can’t unlock your device using fingerprint and other Google smart lock.

Settings > Security & location > Device security > Lock screen preferences > Turn on show lockdown option > Long press power button > Tap Lockdown

Now try to unlock your Google Pixel 3 and Pixel 3 XL using fingerprint. You can see a Password or Pattern lock option you set.  Just one time enter PIN or Password, after you can use fingerprint to unlock your Pixel 3 and 3 XL.

Adaptive battery & Adaptive brightness

To improve battery life on Pixel 3 and Pixel 3 XL, turn on this feature in your device. Adaptive battery is useful to limit battery usage by apps that unnecessary running or you don’t use often.

Adaptive battery Pixel 3

Settings > Battery > Adaptive battery > turn on “Use adaptive battery” toggle

Adaptive brightness is useful to optimize your device brightness automatically based on the available light.

Google Pixel 3 tips and tricks

Settings > Display > Adaptive brightness > Turn on “Adaptive brightness” toggle

Driving Mode & Android Auto 

Driving mode Pixel 3 XL Pie

When you enable driving mode on Pixel 3 XL and Pixel 3, it will automatically turn on Do not disturb mode and android auto in your devices. You can find Driving mode under the connected device settings on your Pixel 3 and Pixel 3 XL. One of the most useful Google Pixel 3 and Pixel 3 XL tips and tricks.

Settings > connected devices > Connection preferences > Driving mode

Google Pixel 3 and Pixel 3 XL is the world’s best camera Smartphone. Now let see the list of best camera settings for Pixel 3 XL and Pixel 3 devices.

Group Selfie: Best Google Pixel 3 tips and tricks camera

Best camera settings for Pixel 3 XL

Google Pixel 3 and Pixel 3 XL camera features including Top Shot, Night sight, Group selfie, Photobooth, Super Res Zoom, Motion autofocus, Live lens, Face retouching in portrait mode, and more. But here I’ll show you how to take a group selfie on Pixel 3 XL and Pixel 3.

You can easily capture a group selfie in your android devices. Because of more people, sometimes take time to adjust for capture perfect shot. Pixel 3 and Pixel 3 XL has super res zoom feature that can help you to zoom screen up to 184 wider, so you can zoom out the screen you need and easily taken group selfie.

Relevant Article:

Top shot

Google Pixel 3 top shot feature use

Have you ever missed a great moment picture even captured photo? When we capture a photo, sometimes facing a problem of blocked faces, blinking eyes, turned heads, etc. So you miss your important moment picture when attending a birthday party, wedding and other events. Don’t be disappointed, using this Pixel 3 and Pixel 3 XL Top shot feature, you can solve this type of problem when taken a picture.

Using this Google Pixel 3 and Pixel 3 XL top shot feature, you can easily find your best photo from that taken photo even blurred or closed eyes or other hurdles. It will automatically recommend the best photo of a moment or you can manually select also.

End the list of Best Google Pixel 3 tips and tricks. Which phone should you buy??? Do you have any other Google Pixel 3 and Pixel 3 XL tips you want to share? Stay and connect with us for the latest updates.

How to Enable Performance Mode on Galaxy Note 10 Plus, Note 9

Here’s how to use performance mode on galaxy Note 9 device. This Samsung Galaxy Note 9 performance mode is useful to improve Note 9 battery life and adjust the screen resolution in your phone. You can see game and entertainment mode also in performance mode settings.

Using this Note 9 performance mode settings, automatically adjust display settings with high quality that may help to reduce battery life. You’ll also access performance mode under galaxy Note 9 battery settings. Follow the below-given step by step process to use performance mode on galaxy Note 9.

You May Also Like:

How to Use Performance Mode on Galaxy Note 9 Oreo 8.1

How to use Dolby Atmos on Galaxy Note 9


You can turn on high-performance mode on Samsung Galaxy Note 10 & Note 10 plus using below-given settings.

Enable Samsung Note 10 Plus High Performance Mode

Step 1: Go to settings.

Step 2: Click on Device Care.

Step 3: Click on Battery.

Step 4: Click on Power Mode.

Step 5: Choose High performance and tap on the Apply button.

There are two ways to access galaxy Note 9 performance mode settings on your phone. Let see one by one.

1st Method: Quickly access Performance mode on Note 9 from the notification bar

Step 1: Swipe down the notification panel and long press “Performance mode

Here you can see below given four different options for performance mode settings.

Optimized

It will useful to balance Note 9 battery life and screen resolution.

Game

Enhance your gaming experience by making games run more smoothly.

Entertainment

Enjoy music and videos with ultra high-quality sound and enhanced images.

High-performance mode

Best to improve battery life on Galaxy Note 9 to adjust highest quality display settings.

Step 2: Choose from above-given options

Now this setting will help to improve your Samsung Galaxy Note 9 battery life.

2nd Method: Enable Performance Mode on Galaxy Note 9 using phone settings

Step 1: Swipe down the notification panel and tap the Settings gear icon.

Step 2: Tap device maintenance.

Here you can see battery, performance mode, storage, memory, and device security settings.

Step 3: Tap Performance mode.

Step 4: Choose from the list you want to use.

And that’s it. I hope this little tip helpful to use Performance mode on Galaxy Note 9. If you have any kind of trouble, tell us in below comment box. Stay and connect with us for the latest updates.

How to Fix Google Pixel 2 Black Screen After Drop

Annoying by Google Pixel 2 black screen or won’t turn on issue?  When operating your phone and suddenly show a black screen in your Pixel 2 phone. Several users facing the Pixel 2 black screen issue during incoming calls. First of all check your Google Pixel 2 phone screen isn’t damaged or cracked. You can’t make anything with your device.

Also sometimes Pixel 2 and Pixel 2 XL won’t turn on after fully charging. Other problems related to this are Pixel 2 screen isn’t responding or dead screen on Pixel 2. Check out below given each method to fix Google Pixel 2 black screen issue.

Related:

Fix Black Screen Issue on Google Pixel 2: Pixel 2 XL

Fix Google pixel 2 black screen issue

Check out the below given possible ways to fix Google Pixel 2 black screen issues.

Enable safe mode on Pixel 2

To find apps that causing the issue, turn on safe mode on Google Pixel 2 using the below steps.

Step 1: Press and hold the Power button until the Google logo appears on the screen then release.

Wait until 5-7 seconds for the logo to appear.

Step 2: With the Google logo still on screen, press and hold the Volume down button.

Step 3: Continue to hold the Volume down button until “Safe mode” appears in the bottom left corner of the screen.

It may take 30-50 seconds to reboot your device.

Now check your Google Pixel 2 and Pixel 2 XL device is working normally or not. If not found any issue, it means any third party downloaded app causing these issues. Delete one by one third-party app and find the app that causing a problem. Delete it from your device.

To exit safe mode on Google Pixel 2 phone, press and hold the power button and tap the Restart button.

Clear cache partition on Pixel 2 & Pixel 2 XL

Step 1: Turn off your Google Pixel and Pixel XL.

Step 2: Press & hold the volume down button and the power button at the same time until the phone vibrates.

You can view the Android system recovery screen on your screen. By default start button show on your device.

Step 3: Press the volume down button until view recovery mode.

Step 4: Press the power button to restart into recovery mode.

You can see the above screen of the android robot exclamation mark with a red triangle icon on your Google Pixel phone.

Step 5: Press & hold the power button and volume up buttons one time only. Now press the volume down button until select wipe cache partition, press the power button to select it.

This message view on your Google Pixel 2 & Pixel 2 XL screen: Wipe all user data?

Step 6: To confirm, press the volume down button to scroll to Yes and press the power button to select it.

Clearing the cache may take 4-5 minutes.

Step 7: Press the volume down buttons to scroll to reboot system now, press the power button to select it.

Did you find the above steps helpful to fix the Google Pixel 2 black screen issue after the drop? If you have any kind of trouble, tell us in below comment box.

How to Clear App Cache in OnePlus 6T/6

Clear app cache on OnePlus 6/6T device is free up space and improves your phone performance and speed. You can individually clear cache in OnePlus 6 using apps & notification settings. This clear cache doesn’t remove or disable app in your OnePlus 6/6T Oxygen OS devices. If an app crashing or freezing problem occurs on your device, then try to force stop app to fix the issue. A clear system cache is a totally different process compared to a clear app cache. This OnePlus 6 clear system cache or wipe cache partition will remove all your phone data including Google account, photos, videos, internal storage, and more.

Read Also:

How to Clear App Cache on OnePlus 6/6T

How to clear app cache on OnePlus 6 Oreo 8.1

How to Clear App Cache in OnePlus 6T/6 Using Apps Settings

Step 1: Swipe down the notification panel twice from the top and tap the Settings gear icon.

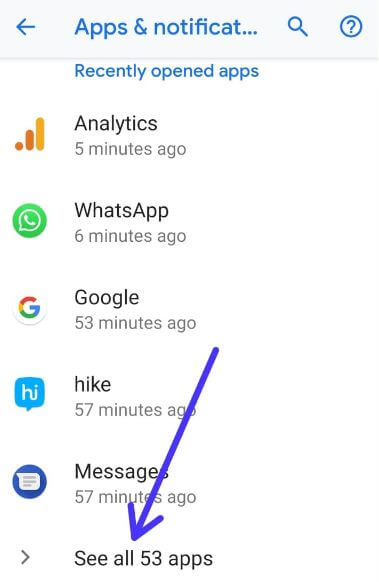
Step 2: Scroll down and tap on Apps & notifications.

Step 3: Tap See all apps.

A list of applications is the view on your OnePlus device.

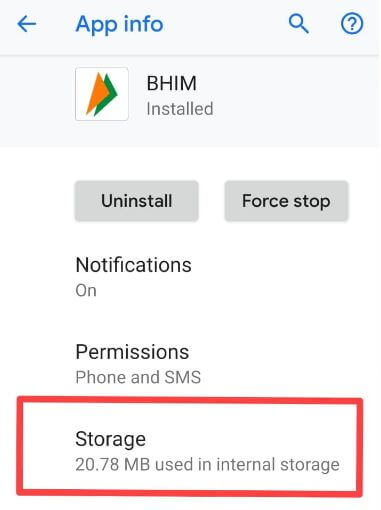
Step 5: Find the app and tap on it to clear the app cache & storage.

Step 6: Tap Storage & cache.

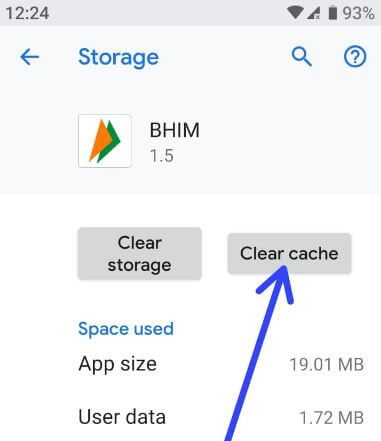
Step 7: Tap on Clear cache.

Now clear app cache in your device. It’ll help to speed up the OnePlus 6 and free up storage also.

How to Change App Location Permission on OnePlus 6/6T Oxygen OS

Step 1: Go to Settings in your OnePlus 6/6T.

Step 2: Scroll down and tap on Location.

Step 3: Tap App permission.

Step 4: Tap the App you want to change the location permission.

Step 5: Select from Allow all the time/Allow only while using the app or Deny.

You can also clear app data using the above settings in your OnePlus 6 devices.

And that’s all. Did you find the above article helpful to clear the app cache on OnePlus 6? If you found it helpful, don’t forget to share it with others. Stay and connect with us for the latest updates.