How to turn off app background in Windows 10

Wan to disable all background apps at once in Windows 10 PC or Laptop? By default several apps running in the background on Windows 10/8/7 even we don’t use it. You can individually stop apps from running in the background or close all background apps at once in your Windows PC using this tutorial.

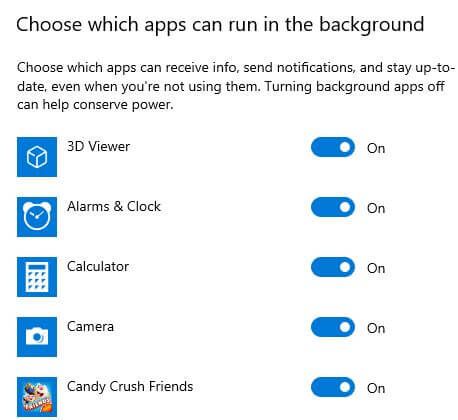
You need to select which apps can send notifications, receive info, and stay up-to-date, even when you’re not using them. These disable background apps in Windows 10 will useful to save power in your PC. Follow below given step by step process to turn off app background in Windows 10.

You May Like This:

How to move app to another drive or SD card in Windows 10

How to turn off notifications Windows 10

How to show hidden files and folder in Windows 10

How to turn off app background in Windows 10 PC

Several unnecessary apps running in the Windows 10 background that reduces power level of your desktop or laptop. Check out below given both methods to stop background apps in Windows 10.

1st Method: Stop Windows 10 apps from running in the background

Step 1: Tap Windows start icon

Step 2: Tap Settings gear

Step 3: Tap Privacy

Here you can see Windows permission and app permission section.

Stop apps from running in the background Windows PC

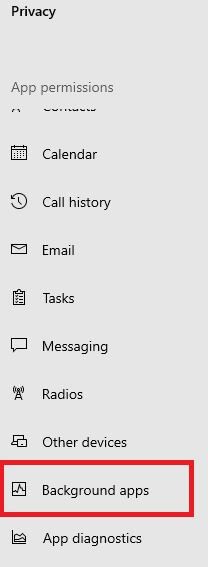
Step 4: Tap Background apps under app permissions section

By default all apps running in the background activity. Now enable or disable background apps in Windows 10/8/7 desktop.

How to turn off app background in Windows 10

Step 5: Turn off apps toggle you want to stop apps running in the background individually

Turn off app background in Windows 10 PC

Step 6: Turn off toggle “Let apps run in the background

It will stop all apps from running in the background on Windows 10 PC or laptop.

2nd Method: Turn off app background in Windows 10

Using this tip, you’ll individually close background apps in Windows 10 device.

Step 1: Open Windows 10 settings

Step 2: Tap Apps

Step 3: Select app under apps & feature section

Here you can disable Windows 10 background running apps in your PC.

Disable all background apps at once in Windows 10

Step 4: Tap Advance options

Disable Windows 10 background running apps

Step 5: Turn off background apps toggle

Now this app can’t running in the background in your Windows desktop or laptop devices.

And that’s it. We hope this makes it clear how to turn off app background in Windows 10. If you have any kind of trouble, tell us in below comment box. Stay and connect with us for latest updates.

How to move Windows 10 apps to another drive

Want to move installed apps or programs to another drive or hard disk or SD card or other computer? Here’s how to move Windows 10 apps to another drive. You can move apps or games to another drive to free up particular Windows drive in your device. Most of all apps installed on drive C, you can move programs from system drive to another drive in your Windows PC.

You can easily move app location folder in Windows 10 using app settings. Move app or programs from C drive to D drive in Windows PC using this tutorial. Follow below given step by step process to move Windows 10 apps to another drive on your desktop or Laptop.

You May Like This:

How to check for Windows 10 update

How to change download location on Chrome browser in Windows 7

How to change default app mode on Windows 10

How to move Windows 10 apps to another drive

To change default apps and games location, you need to move apps from one drive to another drive or SSD or hard drive.

Step 1: Tap Windows symbol

Step 2: Tap Settings gear icon

Step 3: Tap Apps

List of installed application and games are view in your Windows PC or laptop device.

Move apps from one drive to another drive

Step 4: Select game or app you want to install apps to SD card or USB drive

Move installed apps or programs to another drive Windows 10

Step 5: Tap Move

How to move Windows 10 apps to another drive

Step 6: Select drive from list you want to move games to another drive

Step 7: Tap Move (Show above given screenshot)

Now moving app or program from one drive to another in your Windows PC. Wait until complete process in your device.

Step 8: After complete process, open apps and you can see the default storage location changed

Change default apps in Windows 10 PC

By default set Windows 10 apps including Email, Maps, Music player, Web browser, photo and other applications. Also choose default apps by file type or programs in your Windows PC or laptop.

Windows icon > Settings > Apps > Default apps > Select app you want to change Windows 10 default apps > Choose an app from list

If you don’t comfortable with changed app settings, you can anytime reset to the Microsoft defaults apps settings.

And that’s it. Hope these solutions worked for you to move Windows 10 apps to another drive. Have you ever move app to another drive on Windows PC? Let us know in the comments below! Don’t forget to check our other Windows 10 tips and tricks.

How to uninstall apps on Windows 10

By default installed built in apps and program on your Windows computer or laptop. Several unnecessary programs installed even we don’t use. To free up space, you need to remove or uninstall apps on Windows 10 PC using apps settings. You can move, Modify or uninstall built in apps in Windows 10.

Not all apps or programs are removed from your Windows PC. You can search, sort, and filter app using this app & feature settings. When you uninstall pre-installed apps on Windows 10, it will remove this app and its related information from your desktop. Check out below given step by step process to uninstall apps on Windows 10.

Don’t Miss This:

How to set app priority notification level in Windows 10

How to change font settings in Windows 7

How to change default apps in Windows 10  

How to uninstall apps on Windows 10 PC or Laptop

You can remove or uninstall Windows 10 apps or programs such as mail app, game app, mail & calendar, Maps, Microsoft Edge, News, Snip & sketch, weather, sticky notes and more.

Step 1: Tap Windows start icon

Step 2: Tap Settings gear icon

Step 3: Tap Apps

Here you can see list of installed Windows 10 programs and apps list.

Windows 10 preinstalled apps and programs

Step 4: Select program or app you want to uninstall or remove

Uninstall apps on Windows 10

Step 5: Tap Uninstall

This pop-up message appear on the screen: “This app and its related info will be uninstalled

Step 6: Tap Uninstall again

Step 7: Tap Yes

You can see this message: Are you sure you want to uninstall this application?

How to uninstall apps on Windows 10 PC

Step 8: Tap Uninstall

Step 9: Tap Finish after Windows 10 app un-installation completed

Now this app removed from apps list in your Windows PC or laptop device.  Also you can modify program or move apps from one drive to other in Windows 10/8/7 PC using below given settings.

Move programs to another drive Windows 10 PC

By default installed apps and programs in C drive in your Windows device. Move program or apps location folder in Windows 10 drive.

Windows symbol > Settings gear icon > Apps > Apps & feature > Select app or program > Move > Select drive > Move

Now move installed programs or apps to another location in Windows 10 Desktop or laptop devices.

And that’s all. I hope above given tip useful to uninstall apps on Windows 10 PC. Do you still have any question regarding this tutorial? Tell us in below comment box. Stay and connect with us for latest updates.

How to change keyboard layout in Windows 10

Want to change default keyboard input language in Windows 10? Here’s how to change keyboard layout in Windows 10 PC. You can add a keyboard you want in your Windows desktop such as US (QWERTY), United States (Dvorak), Dutch, Denish etc. Also change keyboard language shortcuts in Windows 10/8/7.

We already discussed about change Windows display language. You can add a keyboard layout using time & language settings. Add your favorite input languages to your Windows or laptop such as HP, Dell, Asus, Samsung, Lenovo etc. Follow below given step by step process to set or change keyboard layout in Windows 10 PC.

You may interest this:

How to install new language on Windows 10

How to make pendrive bootable Windows 7

How to pause updates in Windows 10 up to 35 days

How to change keyboard layout in Windows 10 Desktop

You can change default keyboard language in windows 10 PC or laptop using below given process.

Step 1: Tap Windows symbol from bottom left corner

Step 2: Tap Settings gear icon

Step 3: Tap Time & language

Several settings appear here including date & time, language, region, and speech settings.

Step 4: Tap Language

Here you can see installed language pack list.

Windows 10 language settings for keyboard

Step 5: Select language you want to change keyboard language shortcut or keyboard layout

Change default keyboard input language in windows 10 PC

Step 6: Tap Options

Change keyboard layout in Windows 10

Step 7: Tap + Add a keyboard at the end of the page

How to change keyboard layout in Windows 10

Step 8: Select keyboard from list

Now add a new keyboard layout in your Windows 10/8/7 devices. Add multiple keyboards you want.

Quickly switch input language in Windows 10

Switch input language in Windows 10

Step 1: Left click on ENG from taskbar or Press Windows key & space

You can see Language preference settings and other install keyboards.

Change default keyboard language in windows 10

Step 2: Select keyboard language you want to set

Also switch language from windows 10 log in screen in your laptop or PC.

And that’s it. I hope above given settings useful to change keyboard layout in Windows 10. Do you still have any question regarding this tip? Tell us in below comment box. Don’t miss out our other Windows 10 tutorial.

How to set app priority notification in Windows 10

Want to change app notification priorities in Windows 10 action center? Here’s how to set app priority notification in Windows 10 desktop. By default set priority of notification in your Windows PC. Choose app priority level as top / high / normal using notification and action settings.

You can individually set notification priority to show notifications in action center. Also hide notification banners or hide notification in action center. Follow below given step by step process to set app priority notification in Windows 10 PC or Laptop devices.

You May Like This:

How to pause Windows 10 update for 35 days

How to change Windows 7 password

How to change spotlight background images in Windows 10

How to set app priority notification in Windows 10

You can change Windows 10 app notification priority levels using below given settings.

Step 1: Tap Windows icon

Step 2: Tap Settings gear icon

Different Windows settings available here.

Step 3: Tap System

Step 4: Tap Notifications and actions

Here you can see three sections including quick actions, notifications and get notifications from these senders.

Change Windows 10 app notification priority levels

Step 5: Select sender to change app priority under get notifications from these senders section

You can see priority of notifications in action center settings at the end of the page.

Top: Show at the top of action center

High: Show above normal priority notifications in action center

Normal: Show below high priority notifications in action center

How to set app priority of notification in Windows 10

Step 6: Choose app priority level from Top / High / Normal

How many notifications show in action center in Windows 10

If you annoyed by several notifications show in action center, you can reduce the number of notifications in your Windows PC. Choose how many app notifications visible in Windows 10 action center.

Set notifications show in action center in Windows 10

Windows settings > System > Notifications & actions > Get notification from these senders > Number of notifications visible in action center > 1/3/5/10/20

Also show or hide notifications on the lock screen & enable or disable notifications from apps in Windows 10.

Do let us know whether you liked this tutorial to set app priority notification in Windows 10 laptop? We are waiting for your valuable feedback. To get more Windows tips, visit our Facebook page or our Twitter feed.

How to turn off notifications Windows 10

By default show notifications on the lock screen in Window 10. Want to change Windows 10 notification settings? Here’s how to turn off notifications Windows 10 PC or laptop. Also view  sender & apps notifications, show reminders & incoming voIP calls on the lock screen and more settings.

You can customize notifications in Windows 10 using notifications & actions settings. When you receive new notification, automatically action center pop-up on the screen in your Windows PC. Want to get rid of Action center pop-up in Windows 10? Apply below given step by step process to disable or turn off notifications Windows 10.

Read Also:

How to change default apps in Windows 10

How to change default Windows 10 language

How to change App mode on Windows 10

How to turn off Notifications Windows 10 PC or Laptop

You can stop Windows 10 notification pop ups from action center using below given settings.

Step 1: Tap Windows start icon

Step 2: Tap Settings gear icon

Step 3: Tap System

Windows 10 system settings include display, sound, notifications & actions, focus assistant, tablet mode, multitasking, remote desktop and other settings.

Windows 10 notifications and actions center settings

Step 4: Tap Notifications and actions

Here you can see quick actions, notifications and get notifications from these senders sections. By default turned on all notifications in your device.

How to turn off Notifications Windows 10 PC

Step 5: Turn off toggleshow notifications on the lock screen

Now hide notifications from Windows action center. Also disable apps notifications, stop Windows 10 update notifications, and other notifications settings.

Turn off notification banners from senders in Windows 10

Some senders might have their own notification settings such as show notification banners, keep lock screen notification private, set priority of notifications in action center and more settings. Turn on or off notifications from senders using below given settings.

Change Windows 10 notification settings

Windows icon > Settings gear icon > System > Notifications & actions > Get notifications from these senders > select sender > Turn off show notification banner toggle

Also enable/disable other sender notifications and set number of notifications show in action center in Windows 10 PC or laptop.

And that’s it. If you have any questions about this turn off notifications Windows 10, let us know in the comments below! We’ll do our best to help you out! Don’t miss out our other Windows 10 tips and tricks.