How to make instagram account private android

Instagram is the popular social networking app to allow you to edit & share photos and videos and linked accounts with Facebook, Twitter, Swarm, Tumblr, Flickr, VKontakte and Ameba. Make instagram account private android phone or tablet. By default, your instagram account is public so anyone will be able to see your photos and video on instagram. You will no longer need to approve followers.

It’s quite simple to set photos and videos private on instagram account android phone or tablet. Set your instagram account as private so only people you approve can see your photos and videos. Your existing followers won’t be affected this private account settings. Follow below given steps to make instagram account private android lollipop (5.1.1) device.

You might like this:

How to see time spent on Instagam Android

How to add YouTube account on Android

How to turn off instagram push notifications

How to make Instagram account private android lollipop 5.1.1, KitKat, marshmallow

Step 1: Download & install instagram app on your android lollipop and other device

Step 2: Log in with facebook account or sign up with new account

Tpa on profile icon on instagram

Step 3: Tap on “Profile” icon from the below right side corner

Tap on three vertical dots to go instagram settings

Step 4: Tap on “three vertical dots” from the top of the right side corner

Instagram account public android

You can see the above screen on your android device. By default turn off toggle button of private account means your instagram account public, so anyone can see your instagram profile photos & videos.

How to make instagram account private android lollipop

Step 5: Under account settings, Enable or turn on the toggle button of “private account” to make instagram account private android phone or tablet

Now your instagram account is private so your profile photos and videos private only you approve people can see, comment and like it. That’s it.

If you have any concern or question regarding above steps to make instagram account private android device, feel free to let us know on below comment box. Would be pleasure to help you and connect with us for daily latest updates.
How to Turn On/Turn Off Auto Sync Android 8.1

By default, turn on auto-sync Android devices. Here’s how to turn on/turn off auto sync in Android (Oreo) devices. Turning on auto-sync in your Android will automatically sync app data, contacts, SMS, Drive, Gmail, and other data to your Google account. This auto-sync feature reduces battery life to update apps & other data regularly in the background. You’ll individually turn off sync on your Android devices. Just enable the items you want to sync with your Google account.

Read More: How to Add Google Account on Android

How to Turn On/Turn Off Auto Sync Android 8.1 (Oreo)

There are two ways to disable auto-sync in Android 8.1 devices.

Disable Automatically Sync Data in Android Oreo 8.1 & 8.0

Step 1: Open Settings in your Android 8.1.

Step 2: Tap on Users & Account settings.

Turn on automatically sync data in android Oreo

Step 3: Toggle off Automatically sync data.

You can see this pop-up message on the screen: Turn auto-sync data off?

How to turn off auto sync android 8.0 Oreo

Step 4: Tap on OK to disable it.

To back up recent data in your Google account, you’ll need to manually enable sync in your Android Oreo 8.1 and other devices.

Enable/Disable Sync in Android 8.1 (Oreo)

Step 1: Open Settings in your Android 8.1.

Step 2: Tap on Users & Account settings.

Open Google account you want to disable auto sync data

Step 3: Tap on the Account name you want to disable sync.

Here you can see your Google account settings, such as account preferences, personal info & privacy, Account sync, and more. Also, disable WhatsApp contact sync in these settings.

Account sync in android 8.1 Oreo

Step 4: Tap on Account Sync.

A list of items syncs with your Google account view on your Android phone or tablet.

Turn off auto sync android 8.0 Oreo

Step 5: Disable sync if you don’t want to sync.

And that’s all. Did you find the above article helpful to turn off auto-sync Android 8.1 Oreo? If you have any problem, please tell us in below comment section. We will respond as soon as possible.

Read Also:

How to Clear Default Apps on Google Pixel Devices

By default set default apps in your Google Pixel, Pixel 2, Pixel 2 XL, Pixel 3, 3 XL, Pixel 3a, 3a XL, Pixel 4, 4 XL, and other latest Android devices. If you have changed the system default app and want to set back the default app settings again, you need to clear default apps on your Pixel devices. If you don’t want to use default apps, change default apps on your Pixel like browser apps, home apps, camera apps, phone apps, music apps, and more using apps and notifications settings.

Recently installed android P Beta on my Google Pixel device and I’ll see clear default apps options in my device. Follow the below-given step by step process to clear default apps on Google Pixel (9.0) devices.

Read Also:

How to Clear Default Apps on Google Pixel

Step 1: Swipe down the notification panel and tap the Settings icon.

Step 2: Tap Apps & notifications.

Step 3: Tap See all apps in your Android Oreo 8.1 & Android P 9.0 if installed.

A list of installed apps is a view in your Google Pixel and other devices.

Open message app in Pixel 9.0

Step 4: Tap App you want to clear default apps settings.

Advanced settings in Google Pixel 9.0

Step 5: Tap Advanced.

Clear default apps on Google Pixel 9.0

Step 6: Tap Open by default.

How to clear default apps on Google Pixel 9.0

Step 7: Tap Clear defaults.

Now it’ll clear all default app settings in your Google Pixel device. And automatically set by default selected apps in your android devices.

How to Change Default Apps in Google Pixel (Android 8.1 Oreo & 9.0)

Step 1: Swipe down the notification panel and tap the Settings icon.

Step 2: Tap Apps & notifications.

Step 3: Scroll down and Tap Default apps.

Here you can see browser app, home app (Pixel launcher), phone app, SMS app, music app, camera app, calendar app, and more.

Step 4: Select the app you want to change default settings.

Step 5: Choose the app from the list to set the app as default in Google Pixel.

How to Clear Default Apps on Android 10

How to Clear Default Apps on Google Pixel Devices

Settings > Apps & notifications > See all apps > Select the app > Advanced > Open by default > Clear defaults

How to Change Default Apps on Android 10

Android 10 Default Apps Change

Settings > Apps & notifications > Advanced > Default apps > Select the app > Choose app you want to use as default app

And that’s all. Did you find the above tutorial helpful to change or clear default apps on Google Pixel? If you have any questions, tell us in below comment box. Don’t miss out to check our other Google Pixel tips and tricks.

How to Delete WhatsApp Block List Contacts on Android Phone

Do you want to permanently delete blocked contacts from WhatsApp Android phones and tablets? Here’s how to delete WhatsApp block list contacts on Android phones. You can individually delete WhatsApp block numbers on your Android device. When you permanently block a number on WhatsApp, you can’t receive messages or calls from that phone number. Also, blocked contacts will no longer view the last seen changes to your WhatsApp profile photo, status updates, and other activities.

Read Also:

How Can I Delete My Blocked List on WhatsApp Android Phone?

You can see all your blocked contacts in WhatsApp account settings. The only way to remove blocked contacts is to unblock them.

How to Delete Blocked Numbers from Blocked List on Android

Step 1: Open the WhatsApp app on your Android phone and tablet.

Tap on more in top right side corner

Step 2: Tap on the More (Three Vertical Dots) at the top right corner.

Tap on Settings

Step 3: Tap on Settings.

Tap on account under settings

Step 4: Tap on Account.

Tap on privacy under account

Step 5: Tap on Privacy.

Under messaging tap on blocked contacts

Step 6: Scroll down and tap on Blocked contacts.

How to remove blocked contact from WhatsApp

Step 7: Tap any Blocked contacts.

You can see a list of blocked phone numbers. You can’t delete all contacts at once.

How to Delete Blocked WhatsApp Contacts From Android Phone

Step 8: Tap on any contact and tap on Unblock.

How to Delete WhatsApp Blocked Contacts using WhatsApp Contact List

Step 1: Open WhatsApp on your Android phone and tablet.

How to Delete Blocked Numbers from Blocked List on Android


Step 2: Tap on the Contacts icon at the bottom right corner & find the blocked contact.

How to Delete WhatsApp Block List Contacts on Android Phone


Step 3: Long-press the blocked contact and tap on Unblock.

Now, you can able to call or send messages to this contact.

Permanently delete blocked contacts from WhatsApp Android

Alternative Way: Open the WhatsApp app > Tap on the Search icon at the top right > Search the blocked name or contact number > Tap on it > Tap on “Tap to unblock” in blocked person chat > Unblock

How Can I Delete Blocked Contacts on WhatsApp Without Unblocking on Android or iPhone? 

If you want to remove contacts from WhatsApp without unblocking them, you need to remove that blocked contacts from your Android or iPhone device. Even after deleting the number from your phone, that phone number is still blocked.

How Can I Delete Blocked Contacts on WhatsApp Without Unblocking on Android

Open Phone app > Tap Contacts tab from bottom right > Select contact from list > Three vertical dots (More) > Delete > Delete

Now, open the WhatsApp app and refresh your contact list. You can’t see the removed blocked number.

And that’s all. Do you still have any questions about removing or delete WhatsApp block list contacts on Android Phones and tablets? Tell us in the below comment section.

How to Block Someone on WhatsApp Android

Irritated by any WhatsApp contact number? Here’s how to block WhatsApp contact on your Android devices. You can send messages, share photos & videos, and see the online status and profile pictures of any WhatsApp contact if your phone book added the contact number of that person. When you block someone on WhatsApp Android or iPhone, you can’t receive WhatsApp messages, voice call & video calls from that specific number. Also, blocked contact can’t see your profile picture, status, and last seen time. You can block multiple contacts on WhatsApp.

When you unblock someone on WhatsApp Android, that user can see your WhatsApp status, profile picture, last online time, send messages and make a video call or voice call. You can’t get those messages sent by blocked contact. If you want to remove a contact from WhatsApp, you need to delete their phone number from your phone.

Read Also:

How to Block WhatsApp Contact Android Phone

Check out below given method to block or unblock someone on WhatsApp Android devices.

WhatsApp Block Number Not in Contacts

When an unknown number or person is not on your contact list is send a message on your number, you can directly block that person from your device.

Block WhatsApp contact on your android devices

You can see the above screen when unknown number send you first time WhatsApp message, tap on the “Block”.

Tap on OK to block contacts on WhatsApp

Now tap on “OK” to block that contact.

Block WhatsApp Contact Android in Your Contact List

Step 1: Open “WhatsApp”.

Tap On More Option in the top Right Corner

Step 2: Tap on Menu (Three vertical dots) option.

Select Settings option

Step 3: Choose the “Settings” option.

Tap On Account Options

Step 4: Tap on “Account”.

Tap On Privacy Option

Step 5: Tap on “Privacy”.

How to block WhatsApp contact android

Step 6: Tap on “Blocked Contacts” under the messaging section.

Tap On Contact Plus button to block WhatsApp contact android

Step 7: Tap on the “Add contact” icon at the top right side corner

You can one by one block the contacts in WhatsApp.

How to Block Someone on WhatsApp Android

Step 8: Tap the contact to block.

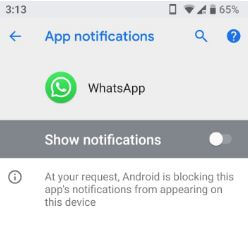
When you blocked WhatsApp contact on your devices then blocked contacts will no longer be able to call you or send you messages, not receive any notification and also not seen last timestamp and your online status.

Method 2:

You can also block or unblock a contact on WhatsApp using below steps on your android mobiles or tablets.

Step 1: Open “WhatsApp”.

Step 2: Open any “Contacts” which you want to block.

Step 3: In the right side corner click on the “Menu” option.

block WhatsApp contact android lollipop

Step 4: Choose the “More” option.

block WhatsApp contact android

Step 5: Tap on “Block”.

Block number on WhatsApp

Step 6: Press “OK” to block WhatsApp contact Android.

Unblock WhatsApp Contact Android

Unblock Someone on WhatsApp Android

WhatsApp > Menu > Settings > Account > Privacy > Blocked Contacts > Long Press the WhatsApp contact that you unblock from your list > Unblock

WhatsApp > Chats > Tap the blocked contact > Unblock

Above you can see perfect steps for block WhatsApp contact Android phones and tablets. If you have any questions or query, please post them in the comment section.

How to Reset Voicemail Password on Samsung Galaxy S8, S8 Plus

Forgot voicemail password on Samsung Galaxy S8 or Galaxy S8 plus? Here’s how to reset voicemail password on Samsung S8 plus. To use the voicemail feature on your Galaxy S8 device, you must have set up voice mail. You can set up voicemail on Samsung S8 plus by selecting a phone icon from the home screen, now press & holding 1 Key, enter voicemail password want to set and follow step by step process. If forgotten voicemail password, you will not able to access voicemail.

Also, change voicemail messages and phone numbers on your Samsung S8 and S8 plus. When your friends or family member does not pick up your call, you can send him a message via voicemail. So whenever he sees your message, it will respond as soon as possible. Try below given possible solutions to reset voicemail password on galaxy S8 and galaxy S8 plus devices.

Related:

How to Reset Forgot Voicemail Password on Samsung S8 and S8 Plus

Step 1: Tap the “Phone app” from the home screen on your Samsung Galaxy S8 & Galaxy S8 plus.

Visual voicemain icon on samsung galaxy S8 phone

Step 2: Tap “Visual voicemail icon” from below the left side screen.

You can view visual voicemail settings.

Visual voicemail settings on galaxy S8 phone

Step 3: Touch “Three three vertical dots” and select “Settings”.

In galaxy S8 and galaxy S8 plus voicemail settings, you can see options of voicemail greeting, auto-save messages, notifications, and change passwords.

reset voicemail password on galaxy S8 and galaxy S8 plus

Step 4: Touch “Change password”.

Now follow the instruction on your device screen to change voicemail password on galaxy S8 and galaxy S8 plus phone. You can also change the voicemail password using the voicemail IVR method. But in this trick, you must know the current voicemail password. Otherwise not access voicemail on your Samsung Galaxy S8 devices.

Set up voicemail Android Lollipop 5.1.1 and Marshmallow 6.0

Set up voicemail number on samsung galaxy S8

Phone app > More > Setting > voicemail > voice mail settings > voicemail number > mobile number > OK

You can change voicemail number, change voicemail sound and enable vibrate so while any voicemail comes your device vibrates also.

That’s all. Did you find the above process helpful to change or reset voicemail password on galaxy S8 and galaxy S8 plus devices? If you have any kind of trouble regarding this trick, let us know in below comment box. It would be a pleasure to help you. Don’t miss single tips of Samsung galaxy S8 and galaxy S8 plus.