How to Set Up and Use Standby Apps in Android 9.0 Pie

Here’s how to use standby apps in Android 9.0 Pie devices. You can find standby apps in developer options on your phone. The main purpose of Android Pie stand by apps bucket is to improve power management and extend the battery life of your devices. It will use to save battery to manage the apps thay depends on how you use the particular app. You can see four categories including Active, Working Set, Frequent and Rare options. By default set each apps standby bucket in Android Pie 9.0 devices. Also, manually set up standby apps in Android Pie 9.0 devices. You can control unnecessary running apps in the background in Android Pie 9.0 using App standby buckets.

Read Also:

How to Use Standby Apps in Android Pie 9.0

To change the standby apps category in Android 9.0 Pie devices, first of all enable developer options in your android P devices.

Step 1: Swipe down the notification shade and tap Settings in your android Pie.

Step 2: Scroll down and tap the System.

Step 3: Tap About phone.

Step 4: Tap Advanced at the end of the screen.

Step 5: Scroll down until the end of the page and tap on Build number 7 times or Tap Build number until seeing the below the message.

Now you can view this message: You are now a developer!

Let see steps to use standby buckets in Android 9.0 Pie devices.

Android 9.0 P developer options

Step 1: Go to Settings > System > Advanced > Developer options.

Step 2: Scroll down up to the Apps section at the end of the page in developer options.

Android P stand by apps bucket

Step 3: Tap Standby apps.

You can see a list of apps (Show below screenshot) and it’s by default set App Standby status.

Change Standby bucket in android P

Step 4: Tap any app you want to change the Standby bucket in Android Pie 9.0.

Now you can see below given four options with all apps standby status in your devices.

Active

Already using this app in your android devices set this Active bucket.

Working Set

You can use app for your work only that including in this android P Standby bucket such as camera, clock, Google chrome and more.

Frequent

This android P frequent bucket added apps that you working on regular intervals but not a daily basis.

Rare

Set apps that you can’t use often in your device. You can use this bucket type of apps after a long time in your devices.

How to use Standby apps in android P 9.0

Step 5: Choose options from above given four categories you want to set.

Now manually change standby bucket apps in Android Pie 9.0 devices.

And that’s it. I hope you will enjoy viewing the use of standby apps in Android Pie 9.0. If you are facing any kind of trouble then just comment it below section. Feel free to share this android Pie trick with your friends.

How to Change Google Assistant Voice on Android Phones and Tablets

Do you want to change the assistant voice on your Android or Samsung Galaxy devices? Here’s how to change Google Assistant voice on Android phones (Android 12/Android 11/Android 10) and tablets. You can find Google assistant voice settings in the Google app or Google Home app on your Android and Samsung Galaxy One UI devices. Choose an Assistant voice and speech output from the male (Orange) or female (Red) to respond to you. This setting is available for Android devices, Google Home, tablets, and smart displays. This change in the voice settings will apply to all assistant devices. Also, retain the assistant voice model to recognize your voice using Google Assistant voice recognization settings. Do you know how to set celebrity voices for Google Assistant? If you have used Alexa as a voice assistant on your Android or Samsung, you can set a celebrity voice as an assistant voice.

How to Change Google Assistant Settings for Voice on Android Phone

First of all, make sure to turn on Google Assistant on your Android phone or tablet for easily Google Assistant to recognize your voice.

How to Change Google Assistant Voice Settings on Android 12/Android 11 Stock OS Using Google App

Step 1: Open the App drawer in your stock Android or Pixels and tap on the Google app.

Open the Google app to change Assistant voice on Android phones and tables

Step 2: Tap on the Profile icon at the top right corner.

Open Google Assistant settings on Google App Android Phone

Step 3: Tap on Settings.

Open assistant settings on Android phone

Step 4: Tap on Google Assistant.

Change Google Voice Assistant Settings on Android

Step 5: Scroll down and tap on Assistant voice & sounds or Assistant voice in all settings sections.

How to Change Google Assistant Voice on Android Phones

Step 6: Choose the Assistant voice from Female (Red) or Male (Orange).

How to Change Assistant Voice on Android 12/Android 11 Using Google Home App – Speaker or Smart Display

Step 1: Open the app drawer and tap on the Google Home app.

Open Google home app to change assistant voice on Android phone

Step 2: Tap on the Profile icon in the upper right corner.

Google assistant voice settings on Android Phone

Step 3: Tap on Assistant settings.

Step 4: Scroll down and tap on Assistant voice & sounds or Assistant voice in all settings sections.

Step 5: Choose the Assistant voice from Female (Red) or Male (Orange).

Now, check your Google assistant works or not.

Quickly Change Assistant Voice using Hey Google Voice Match Feature

Make sure to set up or turn on Google Assistant on your Android device. You can launch Google Assistant by long-pressing the power button if using full-screen gestures or pressing the home button if using 3-button navigation.

Step 1: Unlock your phone and say hey Google open Assistant settings.

You can see directly open Google Assistant settings on your Android or Samsung devices.

Step 2: Scroll down and tap on Assistant voice.

Step 3: Choose the Assistant voice Female (Red) or Male (Orange).

How to Change Google Assistant Voice on Samsung Galaxy (One UI 4.1)

Step 1: Open the Google app on your Samsung Galaxy devices.

Step 2: Tap on the Profile icon in the upper right corner.

Step 3: Select Settings.

Step 4: Tap Google Assistant.

Step 5: Scroll and tap on the Assistant voice.

Step 6: Choose the Voice for your Assistant.

How to Turn Off Google Assistant Speech Output on Android 

Step 1: Unlock your phone and say hey Google open assistant settings.

Step 2: Scroll down and tap the Assistant voice.

Step 3: Tap on the Phone at the end in the speech output section.

Step 4: Choose Hands-free only.

How to Change Google Assistant Settings using Voice in Android 8.1 (Oreo), 7.1.2 (Nougat)

Step 1: Unlock your Android phone or tablet.

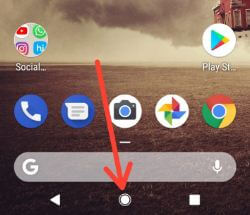
Tap and hold home button to open Google Assistant in android

Step 2: Tap & hold the home button or Say OK Google to open the Google Assistant app.

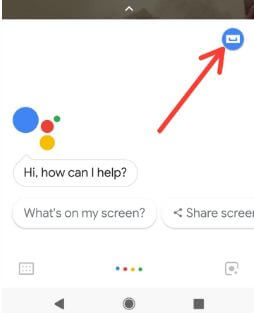
Access Google Assistant from android screen

Step 3: Touch the Blue button in your Assistant screen’s upper right-side corner.

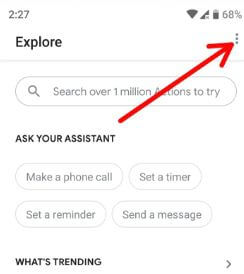
Google Assistant settings in android smartphone

Step 4: Tap Three vertical dots (Menu).

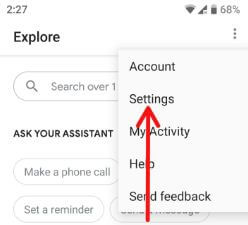
Tap Settings in Google Assistant android tablet

Step 5: Select Settings.

Change Google Assistant voice to Male or female in android

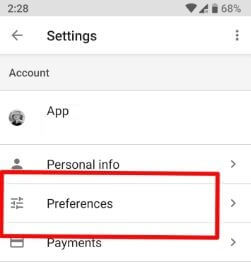
Step 6: Tap Preference under the Account section.

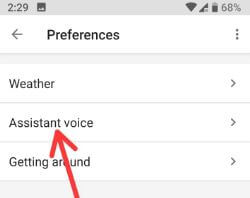
Here you can see Weather, Assistant voice, and Get around settings.

Change Google Assistant voice on android phone

Step 7: Tap the Assistant voice.

List of 8 voices available for your Google Assistant to respond to you.

How to change Google Assistant voice on android phone

Step 8: Choose the Voice for Google Assistant will use to respond to you.

Now enjoy this newly added voice with Google Assistant on your android phone or tablet device.

How to Change Google Assistant Accent on Android 7.1.2 (Nougat), 8.1 (Oreo)

Step 1: Long-pressing the home button or say OK Google to launch Google Assistant on your Android.

Step 2: Tap on Three vertical dots.

Step 3: Click on Settings.

Step 4: Tap on Assistant language.

Step 5: Tap on Go to Language preferences.

Step 6: Tap + Add a language.

Step 7: Choose an Assistant language from the Suggested language or All language list

We hope this little tip is helpful to change Google Assistant voice on Android phones or tablets. Do you know how to Google Assistant voices download? If yes, please share it with us in below comment box. Stay and connect with us for the latest Android tips and tricks.

Read Also:

How to Use Adaptive Battery in Android Pie 9.0

By default turned on adaptive battery in Android Pie 9.0 devices. This Android Pie adaptive battery feature is useful for limiting battery usage by app’s background activity. It’ll automatically restrict apps that have been using the battery in the background. When you restrict the app, the app may not work properly and notifications may be delayed. You can use adaptive brightness, Adaptive battery, Dark theme, battery saver, and other features to extend battery life in your Android 9 Pie devices.

Read Also:

How to Enable and Use Adaptive Battery in Android Pie 9.0

You can enable/disable adaptive battery in Android 9.0 Pie devices using battery settings.

Step 1: Swipe down the notification shade from any screen and tap the Settings icon.

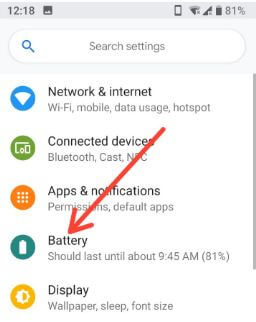
Android P Battery settings

Step 2: Tap Battery.

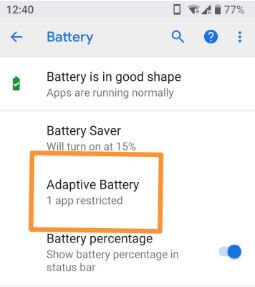
Adaptive battery in android P

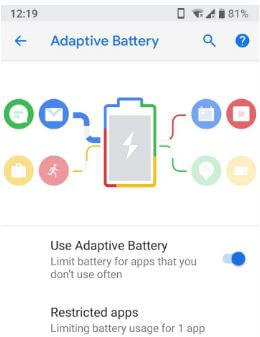
Step 3: Tap Adaptive Battery.

How to use adaptive battery in android P 9.0

By default activate adaptive battery in your Android Pie 9.0 devices.

Step 4: Toggle off “Use adaptive battery” if you don’t want to use it.

Step 5: Tap Restricted apps

Here you can see a list of apps that consuming more battery in the background. Also, turn on battery saver in Android Pie 9.0 to improve battery life. This Android Pie battery saver feature will disable some of the features and restricted apps. Let see other useful Android Pie battery settings.

How to Turn On Battery Saver on Android 9.0 Pie

Step 1: Go to Settings in your device.

Step 2: Tap Battery.

Step 3: Tap Battery saver.

Battery saver in android P

Step 4: Tap Turn on now.

By default turn on automatically battery saver while you’re Android Pie device battery is 15% or lower. You can individually set the battery percentage for automatically enable batter saver in Android 9.0 Pie.

How to Show/Hide Battery Percentage in Android Pie 9.0

Step 1: Go to Settings in your device.

Step 2: Tap Battery.

By default show battery percentage in status bar in the Android Pie 9.0 device.

Step 3: Toggle off “Battery percentage” if you don’t want to show the battery percentage in the Android Pie status bar.

And that’s all. We hope this makes it clear how to enable and use adaptive battery in Android Pie 9.0. If you have any trouble, tell us in below comment box. Stay and connect with us for the latest Android Pie 9.0 tips and tricks.

Watch YouTube Video Here

How to Take a Screenshot in Android 9.0 Pie

Here’s how to take screenshots in Android Pie 9.0. 3 different ways to capture screenshots including hardware key (Power & Volume down), Power menu, and Google Assistant in your Android Pie devices. You can also use other tricks to easily take a screenshot of the page you want without using the power & volume down button. You can directly share a screenshot with your friends without opening the taken screenshot in Android 9.0 Pie devices. Also, edit or drawing on the screenshot in Android Pie.

Read Also:

How to Take Screenshots in Android Pie 9.0

Different android device has slightly different settings to capture screenshot of any web page or other activity.

Using Hardware key

Press and hold the power button and volume down button at the same time to take a screenshot in Android Pie 9.0.

Using Power Menu

Step 1: Open the screen in your device you want to capture screenshots.

Step 2: Long press power button in your Android Pie 9.0.

Here you can see Power off, Restart, Screenshot, and Emergency options.

How to take screenshots in android P 9.0

Step 3: Tap Screenshot.

Step 4: Now automatically capture screenshot of the page opened in your device.

Capture screenshot in android P 9.0

Step 5: You can see screenshot saved pop-up on your device upper left side.

Step 6: Tap on the screenshot to view it.

You can also share, edit and delete screenshot directly without open in your Android 9.0 Pie devices.

Using Google Assistant

Launch the Google Assistant to long-press the home button or if already set up then say Ok Google and say “Take a screenshot“.

Now, capture the screenshot automatically you open the page on your phone.

And that’s all. I hope this little tip helpful to take screenshots in Android Pie 9.0. Do you know any alternative methods? Share it with us in below comment box.

How to Change Simulate Display With Cutout on Android

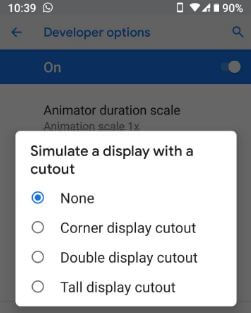
Here’s how to change simulate display with cutout on Android and Samsung Phones. You can find this simulated display cutout in Android under the drawing section of developer settings. By default, disabled simulate display cutout/Notch. Android devices support a notch on the status bar, including a corner display cutout, double display cutout, and tall display cutout.

Read More: How to Install Unknown Sources (Apps) on Android

How to Change Simulate Display With Cutout on Android 13, Android 12, and Android 11 (Google Pixel)

Step 1: Go to Settings.

Step 2: Scroll down and tap on System.

Open Developer option settings on your Android and Samsung

Step 3: Tap on Developer options.

Change simulate display with cutout on Android and Samsung

Step 4: Scroll down and tap on Display cutout in the drawing section.

How to Change Simulate Display With Cutout on Android 13, Android 12, and Android 11

Step 5: Choose a Display cutout you want to display on your phone.

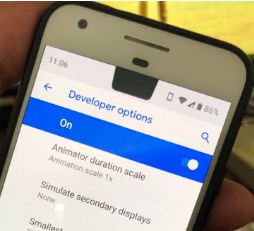
How to Change Simulate Secondary Displays on Google Pixel

You can see the small screen at the top of your phone.

How to Change Simulate Secondary Displays on Google Pixel

Settings > System > Developer options > Simulate Secondary Displays > Choose a display you want to set.

How to Set Simulate Display With Cutout on Samsung Galaxy

Step 1: Go to Settings.

Step 2: Scroll down at the bottom end of the screen and tap on Developer options.

Step 3: Scroll down and tap Simulate display with cutout.

How to Change Simulate Display With Cutout on Samsung Galaxy

Step 4: Choose from Default, Corner cutout, Double cutout, Punch Hole cutout, Tall cutout, or Waterfall cutout.

How to Change Simulate Display With Cutout in Android 9 (Pie)

First, make sure to enable developer options on your Android 9 devices.

Settings > System > About phone > Advanced > Scroll down and tap on Build number 7 times.

You can see this message on the screen: You are now a developer!

Now let’s see how to display Notch on Android 9.0 devices.

Step 1: Swipe down the notification panel and tap the Settings icon.

Step 2: Scroll down up to the end of the page and Tap System.

Step 3: Tap Advanced.

Android P developer options


Step 4: Tap Developer options.

Simulate a display with a cutout in android 9.0


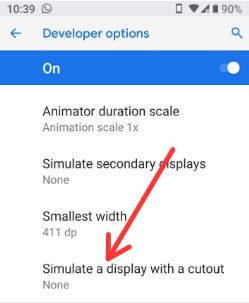
Step 5: Scroll to the drawing section and tap Simulate a display with a cutout/Notch.

By default, set None as simulate Notch on Android 9.0 (Pie). Below are three options for your Google Pixel and other devices.

Corner Display Cutout/Notch

Corner Display cutout in android P 9.0

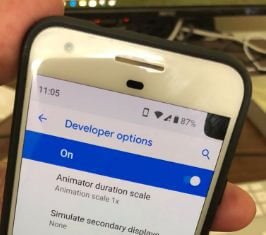
You can see simulated Notch in Android 9 devices in the upper right corner.

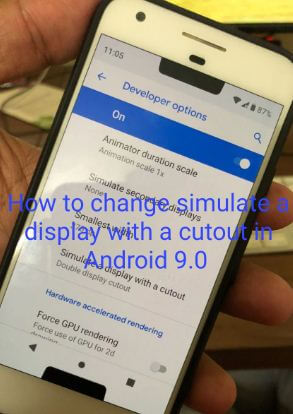
Double Display Cutout/Notch in Android 9.0

How to change simulate a display with a cutout in android P

You can see a double Notch in your Android 9 (Pie) upper and lower middle of the screen.

Tall Display Cutout/Notch

Android P Notch

This Android 9 notch is tall compared to others; you can see it in the top middle of the screen.

How to change simulate a display with a cutout in android P 9.0

Step 6: Choose from the above-given options to set Display Notch in Android 9.0

Also, check out the below settings to display Notch using display settings.

Settings > Display > Advanced > Device theme > Narrow display cutout/Pixel/Tall display cutout/Wide display cutout.

And that’s it. Do you still have questions about the change to simulate a display with a cutout in Android? Let me know what you think about our findings. Don’t forget to share with others if you found it helpful.

Read Also:

How to Use Adaptive Brightness in Android 9.0 Pie

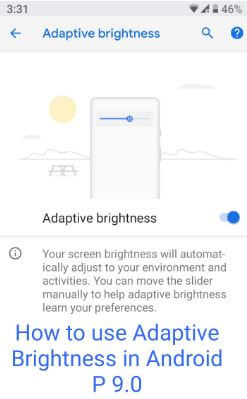
Let see how to enable and use adaptive brightness in Android 9.0 Pie. Android Pie adaptive brightness feature is useful to optimize the brightness level for available light and condition. When enabling adaptive brightness, your device screen brightness will automatically adjust to your environment and activities. You can move the slider manually to increase or decrease adaptive brightness in your Android 9.0 Pie. By default turned on adaptive brightness. Also, reset Adaptive brightness on Android 9 Pie using apps & notification settings.

Read Also:

How to Use Adaptive Brightness in Android Pie 9.0

You can enable/disable adaptive brightness in Android 9.0 Pie using display settings. Check out below settings.

Step 1: Swipe down notification shade from the any screen and tap Settings icon.

Step 2: Tap Display.

Android P Adaptive brightness settings

Step 3: Tap Adaptive brightness.

How to use adaptive brightness in android P 9.0

By default turned on Adaptive brightness in your Google Pixel and other supported Android Pie devices. It will help to improve battery life in Android Pie 9.0 devices.

Step 4: Toggle off Adaptive brightness if you don’t want to use it in your device.

You can also adjust screen brightness from notification shade and display settings in your Android Pie devices.

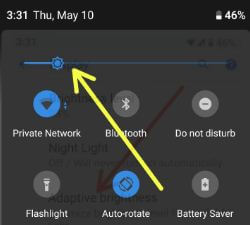
Quickly Adjust Brightness Level in Android 9.0 Pie

Step 1: Swipe down notification shade in your devices.

Adjust brightness level in android 9.0 P

Step 2: Move slider left or right to set screen brightness in Android Pie.

Change Screen Brightness in Android 9 Pie Using Display Settings

Step 1: Swipe down the notification shade from any screen and tap Settings icon.

Step 2: Tap Display.

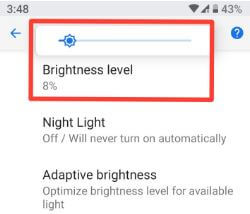
Step 3: Tap Brightness level.

Change screen brightness in android P

Step 4: Adjust the brightness level you want to set.

How to Reset Adaptive Brightness Data on Android 9 Pie and Android 10

It will clear the battery statistics and adaptive brightness data in your latest Android devices.

Reset Adaptive Brightness on Android 9 Pie and Android 10

Settings > Apps & notifications > See all apps > Scroll down and tap Device health services > Storage & cache > Clear storage > Clear all data > OK

And that’s it. We hope this makes it clear how to enable and use adaptive brightness in Android Pie 9.0. If you have any question, tell us in below comment box. Stay and connect with us for the latest Android Pie tricks.

Watch YouTube Video Here