How to Fix WiFi Connection Issues on Google Pixel 4 and Pixel 4 XL

WiFi says connected but doesn’t work on Pixel 4 XL and Pixel 4? Here’s how to fix WiFi connection issues on Google Pixel 4 and 4 XL. A different type of WiFi problem occurs such as WiFi authentication, WiFi saved not connected, or WiFi keeps disconnecting. First of all find the problem type from phone, network or Internet-related issues. Make sure WiFi is on.

If your phone connects to the WiFi network but you still have no internet, the problem is most likely with your internet connection. Also check whether your phone can connect to another WiFi network, like a public network or office’s network or friend’s house. If your phone can connect elsewhere, the issue is most likely with the network. Apply below given possible methods to fix WiFi connection issues on Google Pixel 4 and 4 XL.

Read Also:

How to Fix Pixel 4 XL and Pixel 4 WiFi Issue

Check out below given troubleshooting methods to fix Google Pixel 4 and Pixel 4 XL WiFi stopped working suddenly issues. After apply each method, test whether each solution works.

Make sure turn on WiFi 

Make sure WiFi is on. Then turn it off and on again to reconnect. You can connect to WiFi network on your Pixel 4 XL and Pixel 4 phone using below steps.

Step 1: Open the Settings app.

Step 2: Tap Network and internet.

Step 3: Tap on WiFi.

How to fix WiFi connection issues on Google Pixel 4 and 4 XL

Step 4: Turn on Use WiFi.

Step 5: Tap a network you want to connect.

Step 6: Enter a password to connect WiFi Pixel 4 XL.

You can also set your phone to automatically turn on WiFi near saved networks.

Check for System update

Check if any update available in your Pixel device.

Step 1: Go to Settings.

Step 2: Tap on System.

Step 3: Tap on Advanced.

Step 4: Tap on System update.

Step 5: Tap Check for update.

If available update, update it and check to fix the issue.

Airplane mode on and off again

Pixel 4 XL WiFi stopped working

Make sure Airplane mode is off. Then turn it on and off again to reconnect WiFi network in your android device. It will useful if you’re device have poor network related problem.

Swipe down notification panel twice from top of the screen > Tap Airplane mode

Check if phone problem to fix WiFi connection issues on Google Pixel 4 and 4 XL

Try connecting to the WiFi network with another device, like a computer or friend’s device. If other devices can use the network, the problem is most likely with your phone.

Delete WiFi network & re-add again

Remove connected WiFi network from your device using below given settings.

Step 1: Open the phone’s settings app.

Step 2: Tap Network and internet.

Step 3: Tap WiFi.

If needed, enable WiFi in Pixel 4 and 4 XL.

Step 4: Tap the Saved network.

Step 5: Select the network you want to delete.

Fix WiFi connection issues on Google Pixel 4

Step 6: Tap Forget.

Now add the WiFi network again to reconnect Google Pixel 4 WiFi using below settings.

Settings > Network and internet > WiFi > Add network > Enter SSID & other security > Save

You can check for problems apps that you download. Reboot your Google Pixel 4 and Pixel 4 XL into safe mode to find third party app that causing issues.

Restart the router & modem to fix WiFi connection issues on Google Pixel 4 and 4 XL

Unplug the router and modem’s power cords from the wall outlet for 10 seconds. Plug the power cords back in. Make sure all cables are perfect working. Wait a few second, until the lights of the modem and router blinking. If the lights aren’t working, you could have an issue with the router, modem, or internet connection. Contact the network administrator or your internet service provider.

Reset Network Settings Pixel 4 XL and Pixel 4

If none of the method fix Google Pixel 4 wifi not working issues, reset all network settings on Google Pixel 4 and 4 XL using below steps.

Step 1: Go to Setting.

Step 2: Scroll down and tap the System.

Step 3: Tap on Advanced.

Step 4: Tap Reset options.

Step 5: Tap Reset WiFi, mobile & Bluetooth.

This will reset all network settings, including Wi-Fi, Mobile data and Bluetooth.

Step 6: Tap on Reset settings.

Draw pattern lock or other set lock screen security to unlock screen.

Google Pixel 4 wifi not working issues

Step 7: Tap Reset settings again.

Network settings has been reset message appear in your device screen. To use WiFi on Pixel 4 and 4 XL, enter WiFi name and password again.

If none of the above methods solved Google Pixel 4 Wi-Fi issue, the factory reset your Pixel 4 and 4 XL. Make sure back up apps & other data before performing a factory reset or hard reset your device.

And that’s it. End the list of possible solutions to fix WiFi connection issues on Google Pixel 4 and 4 XL. Do you know some other methods to fix Pixel 4 XL WiFi not working issue? Let us know in the comments section below.

How to Change the Background Theme of Gboard Keyboard

Recently my Android device gets updated with new settings to change the theme of Google’s keyboard background photo. We already know how to change the keyboard theme on Android devices.  Using this new feature, you can change the background theme of the Gboard keyboard or Google new keyboard. It includes 12 landscape pictures like nature, sunset, atmosphere, and more.

To set the Google keyboard background theme on an Android device, include various 15 colors of keyboard themes to set the background. You can set the Google keypad border on your device. Also, select a custom theme on Google Keyboard from your device gallery. Follow the step-by-step guide below to change the Gboard keyboard’s background theme.

Read More: How to Change Gboard Theme on Android

How to Change the Background Theme of Gboard Keyboard/Google Keyboard: 12 Landscape photos

change background theme of Gboard keyboard

Step 1: Tap on Apps on your Android device.

Step 2: Go to Settings.

Tap on Languages and input method under personal

Step 3: Under the personal section, tap on Languages & Input.

Virtual keyboard in android phone

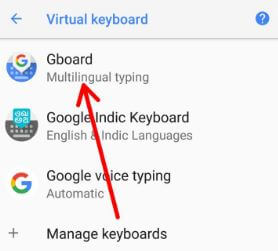
Step 4: Tap the Virtual keyboard under the Keyboard and input method section.

You can show Gboard and Google voice typing options.

Tap on Gboard under virtual keyboard settings in nougat

Step 5: Touch Gboard.

You can change the Gboard keyboard language using this setting on your Android phone.

Gboard Keyboard theme settings on Nougat

Step 6: Tap on Theme.

You can view color themes and 12 new landscape photos to change Google keyboard background photos on your Android or tablet device.

Change Google keybaord theme android phone or tablet

Step 7: Tap on Landscape.

Set landscape photo on Google keyboard background theme

You can view 12 different landscape photos.

Change Gboard Keyboard background theme

Step 8: Select any photo you like most and set the Gboard keyboard background theme on Android. Your keyboard background looks like the above screen.

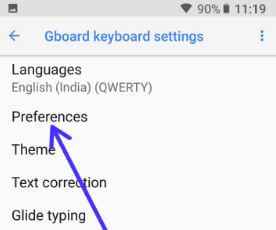
You can add a custom theme on the keyboard from your device gallery photo, camera, and another folder. This set landscape photo on a Google keyboard background looks splendid. You can use Gboard keyboard settings to change the keyboard language, preferences, text correction, voice typing, glind typing, and more. That’s all.

Did you find the above steps helpful to change the background theme of the Gboard keyboard? If you find it useful, then don’t forget to share it with others. If you have any questions related above steps, let us know in the comment box.

Read Also:

How to Link Instagram to Facebook on Android phone

Do you want to directly share your Instagram posts or story to Facebook on Android phones? Here’s how to connect Instagram to Facebook on Android devices. You can directly share your uploaded Instagram photos or video to other social networking sites without log in such as Twitter, Tumblr, Flickr, etc. Also, directly linked accounts with Facebook, swarm, VKontakte, Ameba, and other social accounts from your android devices. You can easily link or unlink Instagram account to Facebook account using account settings on your Instagram app. You can share any unknown person or group URL and send it as a message to any Instagram user.

It’s easy to share the Instagram link with Facebook on your Android phone. You can also share from Instagram to a Facebook page you manage on your android phone. When you take photos or videos on Instagram, you can set a photo sharing feature of social networks. Follow the below-given steps to link your Instagram account to Facebook on your Android phone.

Read Also:

How to Share Instagram Link to Facebook Android

Step 1: Log in with facebook on your Instagram account.

click-on-profile-icon-instagram-account-phone

Step 2: Tap on the “Profile” icon from the bottom of the right side corner.

login-instagram-account-android

Step 3: Tap on “Three vertical dots” from top of the right side corner.

linked-accounts-on-instagram-app

Step 4: Scroll down until settings section, tap on “Linked accounts”.

share instagram link facebook android

You can see a list of all social network sites. This linked accounts screen looks like the above screen on your android phone

Step 5: Tap on Facebook.

Step 6: Now enter the email or phone and password of your Facebook account and log in it.

share-instagram-link-facebook-android-phone

You can see the above screen on your device. You can see this message: Instagram would like to manage your pages.

Step 7: Tap on “OK

Now your Instagram account linked with your Facebook account. By default set your Instagram photos or video on facebook timeline if you want. Whatever you uploaded on Instagram will share on your Facebook account.

How to Link Instagram to Facebook on Android phone

Alternative Way (Latest Instagram): Log in your Instagram > Profile icon at the bottom right > More > Settings > Linked accounts > Facebook > Log in with your Facebook account > Start sharing to Facebook

Unlink Instagram Account to Facebook on Android

Step 1: Open Instagram and log in with your account.

Step 2: Tap the Profile icon at the bottom right corner.

Step 3: Tap Three horizontal lines at the top right corner.

Step 4: Tap Settings at the last.

Step 5: Tap Account.

Connect Instagram to Facebook on Android

Step 6: Tap Linked accounts.

Step 7: Tap Facebook.

Here, you can enable or disable share your story to Facebook and share your posts to Facebook.

Unlink Instagram Account to Facebook on Android

Step 8: Tap Unlink.

Link or unlink Instagram account to Facebook account

Step 9: Tap Yes, Unlink.

Remove the link from your Facebook account.

Above you can see the steps to share Instagram link facebook android phone. Did you find above process helpful? Let us know on below comment box. Don’t forget to share this Instagram trick with your friends on social networks.

How to Turn Off Chat in Facebook Android App

Here’s how to turn off Facebook chat Android mobile or tablet. If you want to hide your online status from your friends then disable Facebook chat and easily chat with your favorite person. When you turn off active status on your Facebook messenger app on android device, your friends not see you’re online. Also, turn on Facebook chat for only selected friends using chat sidebar settings on your android device.

But if any of your friends send messages then those messages will automatically go to your inbox and you can read when the open account or log in. This enable or disable Facebook chat option is perfect for the chat with your favorite person individually.

Read Also:

How to Disable Facebook Chat Android Phone or Tablet

Check out below given two different methods to turn Facebook chat on or off in your Android devices.

Turn Off Active Status on Facebook Messenger app

Step 1: Sign in with Facebook messenger app in your Android device.

Turn Facebook Chat on or off Android phone

Step 2: Tap profile icon at the top left corner.

Turn Off Active Status on Facebook Messenger on your Android device

Step 3: Tap Active status under profile section.

How to Turn Off Chat in Facebook

Step 4: Toggle off “Show when you’re active“.

Turn off chat on messenger for one person

Step 1: Open the Facebook messenger app in your android phone and log-in with your account.

Step 2: Tap People at the bottom right corner.

Turn Off Facebook Chat on Android Smartphone

Step 3: Tap Active tab at the top right.

Step 4: Toggle off button to disable chat.

Turn Off Facebook Chat on Android phone

Step 1: Log in your Facebook account on your android device.

Tap on three horizontal line in android

Step 2: Tap on “Three horizontal lines”.

Tap on app settings under help & settings category

Step 3: Under the help & settings section, tap on “App settings”.

How to turn off facebook chat android mobile & tablet

You can see the above screen on your android device. By default, turned on Facebook chat on your android phone or tablet.

Step 4: Toggle off “Facebook chat”.

Now, none of the friends saw you online. If they send messages, which will automatically go your inbox. So you can read when login or open Facebook account.

Turn Facebook Chat on or off Android phone or tablet

Step 1: “Sign in” your Facebook account.

Tap on contanct icon from top of the right corner

Step 2: Tap on “Contact icon” from the top of the right side corner.

Tap on settings button in top of the screen

Step 3: Tap on “Settings icon” from the top of the right side corner.

Turn off facebook chat on android mobile

You can see above screen on your device. By default, activated Facebook chat on your android phone or tablet.

Step 4: Tap on the “Right-click icon” of Facebook chat.

Now turn off chat. That’s all.

Above you can see the process to turn off Facebook chat android phone & tablet. Did you find the above process helpful? Don’t hesitate to let me know on the below comment box. It would be a pleasure to help you. Connect with us for daily latest updates!

How to Delete Facebook Page on Android and PC (Laptop)

Here’s how to permanently delete my Facebook page 2020 via Android phone and PC or laptop. To delete the Facebook page, you have the admin of that Facebook page. Remember that once you remove the Facebook page or account, you will have 14 days to restore it in case you change your mind. Also, nobody will be able to see or find it. If you don’t want to remove the Facebook page, you can hide page visibility option or unpublish Facebook page using your Facebook page general settings. It means that only admins will be able to see your page.

Read Also:

How to Delete My Page on Facebook via Android and Laptop/PC

Let see one by one method.

How to Delete a Facebook Page on Android in 2020

Step 1: Open the Facebook app in your Android devices.

Open your Facebook page settings on Android

Step 2: Tap Three horizontal lines (More) at the top right corner.

Delete a Facebook Page on Android in 2020

Step 3: Tap Pages.

Permanently delete my Facebook page

Step 4: Tap your Facebook page name.

Facebook Page settings on Android

Step 5: Swipe option until see More and tap on it (Show above screenshot).

Open Settings to remove Facebook page on Android

Step 6: Scroll down and tap Settings under the page controls section.

Facebook page general settings

Step 7: Tap General.

How to Delete Facebook Page on Android and PC

Step 8: Scroll down until see remove page section and tap Delete your Page name?

If you delete your page, you will still be able to restore it within 14 days. After that, you will be asked to confirm that you want to permanently delete it.

This pop-up message appears on the screen: Are you sure you want to begin the process of deleting your page?

How to Delete My Page on Facebook Android

Step 9: Tap Delete page.

Unpublish Facebook Page on Android

Unpublish Facebook Page on Android

Open the Facebook app > Three horizontal lines > Pages > Tap your Facebook page > More > Settings under page controls > General > Tap Unpublish under the page visibility

Using PC/Laptop

Step 1: Log in to your Facebook account.

Tap on your created facebook page

Step 2: Tap on your Facebook page.

Tap on settings

Step 3: Click on “Settings” from your page.

How to delete facebook page

Step 4: Tap on “Delete your page” under the general section.

remove facebook page from account

Step 5: You can see the message of “Permanently delete My”, tap on it.

How to delete facebook page permanently

Step 6: Tap on “Delete”.

Delete facebook page

Step 7: You can see above the screen, Press “OK”.

That’s all. Remove your Facebook page from your account. You can also “unpublish Facebook page” if you don’t want to delete it. Follow the below-given steps to hide the page visibility option or unpublish the page.

How to Unpublish a Facebook Page via PC/Laptop

Step 1: Log in to your Facebook account.

Step 2: Open Facebook page want to unpublish.

Step 3: Tap on “Settings” of your page.

Step 4: Under the general category, tap on “Page visibility”.

Unpublish facebok page

You can see the above screen on your desktop or laptop. By default uncheck the box of “unpublish page”.

Step 5: Check mark the box of “unpublish page” and click on the “Save changes” button.

Now, no one can see or find your page, only admins can see it.

Did you find the above process of delete Facebook page permanently on PC or Laptop helpful? Feel free to let us know on the below comment box. It would be a pleasure to help you. Connect with us for daily latest updates.

How to Reduce Facebook Data Usage on Android

Want to reduce data consumption on Facebook App on your Android devices? Here’s how to reduce mobile data usage in the Facebook app on android phone. Several factors consuming more data usage on Facebook like upload HD photo & video, continue notifications, autoplay facebook video, etc. When using the Facebook app on Android or iPhone, it consumes more internet data compare to other apps. Sometimes we are busy using the Facebook app and don’t remember about a data limit.

Facebook is one of the most using social networking apps to connect with your friends or family members. You can also set a mobile data limit on your android phone to automatically stop mobile data on your phone when reaching the limit you set and save data. Check out below given possible solutions to reduce Facebook data usage on Android devices.

Read Also:

How to Reduce Mobile Data Usage on Facebook App on Android phone

App background data is one of the main reasons to consume more data in your android device. You need to disable unnecessary app background data in your android devices.

Turn on data saver on Facebook

Step 1: Log in your Facebook account in your device.

Tap on more in facebook app

Step 2: Tap on Three horizontal lines from the top of the right side corner.

Reduce mobile data usage in facebook on Android phone

Step 3: Tap on data saver under the help & settings section.

By default disabled data saver mode on Facebook.

Enable data saver on facebook app in android phone


Step 4: Toggle on “Data saver on” on Facebook.

Disable background data on the Facebook app in Android

Step 1: Go to Settings in your android device.

Step 2: Tap on Apps under the device section.

Step 3: Scroll down up to Facebook and tap on it.

Tap on data usage in facebook app

Step 4: Tap on Data usage.

Disable facebook app background data in android

By default enable usage of mobile data in the background in your android device.

Step 5: Toggle off Background data on the Facebook app.

Alternative Way: Settings > Apps & notifications > See all apps > Facebook > Mobile data & WiFi > Toggle off Background data

Turn off Facebook notifications

Step 1: Go to Settings.

Step 2: Tap on Notifications under the device section.

Step 3: Scroll down up to Facebook and tap on it.

Trun off facebook notifications on android device

Step 4: Toggle on Block all to never show notifications from this app.

Alternative Way: Settings > Apps & notifications > See all apps > Facebook > Notifications > Toggle off Show notifications

Turn off Auto-play videos on the Facebook App in Android

This auto-playing video in the Facebook timeline consumes more mobile data.

Step 1: Sign in your Facebook account.

Step 2: Tap on Three horizontal lines from top of the right side corner.

Tap on app settings in facebook app

Step 3: Tap on App settings under the help & settings section.

Tap on autoplay video in facebook app

Step 4: Tap on Autoplay.

Set never autoplay videos on facebook app in android phone

Step 5: Select Never autoplay videos or on Wi-Fi connection only.

Set photo and video upload quality limit

If uploading more and high-quality photos and videos on Facebook, it will use more data. Turn off photo and video upload quality limits to reduce mobile data usage on Facebook on Android.

Step 1: Sign in your Facebook account.

Step 2: Tap on Three horizontal lines from the top of the right side corner.

Step 3: Tap on App settings under the help & settings section.

turn off uplaod photos and videos in HD

Step 4: Toggle off upload photos in HD and upload videos in HD.

That’s all. Do you know any alternative methods to limit Facebook data usage on Android phones? Share with us in below comment box.