How to Block a Number on Galaxy A53, A52, A52s and A50

Permanently block a number on Samsung Galaxy A53, A52, A52s and A50? This tutorial teaches you how to block a number on Galaxy A50 and A70. What happens when you block a number on Samsung or Android devices? When you block an unknown number on Samsung, you can’t receive phone calls or text messages from that number. Also, hide your phone number from others using the caller ID feature in your Samsung Galaxy devices.

You can block someone from calling you or a specific number from the contacts list to avoid calls & messages. Add one or more unknown numbers that annoyed you. Follow the steps given below to block a number on Galaxy A53, A52, A52s, and A50.

Check More | How to Block a Number on Samsung Z Fold 3 and Z Fold 2 [3 Ways]

How to Block a Number on Galaxy A53, A52, A52s

Open the Phone App from the App Drawer > Three Vertical Dots > Tap on Settings > Block Numbers > Add a number you want to block.

How to Block a Number on Galaxy A50

You can add specific phone numbers to the block list if you don’t want to get a call or text on Samsung devices.

Step 1: Open the Phone App in your Samsung Galaxy A50.

Step 2: Tap Three Vertical Dots (More) at the top right corner.

Step 3: Tap Settings.

Here, you can see block numbers, Caller ID & spam protection, Record calls, Call alerts & ringtones, Answering & ending calls, show calls in pop-ups, Wi-Fi calling, etc.

Block a number on Samsung A50

Step 4: Tap Block Numbers.

How to block a number on Galaxy A50   

Step 5: Tap ‘+’ Add a Phone Number.

Step 6: Enter the Phone Number and tap Block.

Also, choose a contact from the recants or contacts list. You can block calls from unidentified callers on your device.

Unblock a Number on Samsung Galaxy A53, A52 and A52s

Follow the above-given steps till Block Number > Then Tap On the ‘-‘ icon > Unblock.

Unblock a Number on Samsung Galaxy A50

Step 1: Follow the above-given method in steps 1 to 4.

Step 2: Tap × icon of the number you blocked.

Step 3: Tap Unblock.

Now, you will receive text messages and calls from those numbers on your phone.

And that’s it. I hope the above little tip helps block a number on Galaxy Devices. Do you still have any questions? Tell us in below comment box. Don’t forget to check our other tutorials.

Read Also:

How Do I Change My WhatsApp Wallpaper on Android?

Want to change the chat background in WhatsApp on Android devices? This tutorial explains to you how to change WhatsApp wallpaper on Android devices. You can set a custom wallpaper for individual contacts on Android 12/Android 11 or iPhone. Choose your favorite WhatsApp chat wallpaper from dark wallpaper, light wallpaper, phone gallery, solid color, and default WhatsApp wallpapers. Change WhatsApp theme color (System default, Dark, or Light) and chat color on your Android phones and tablets. Also, download live wallpaper for WhatsApp background and WhatsApp 4K wallpaper from the Google play store.

Read Also:

How to Change the Background on WhatsApp Chats Android

Step 1: Open WhatsApp on your phone.

Open WhatsApp app settings on your Android device


Step 2: Tap on Three vertical dots (More) at the top right corner.

WhatsApp settings on your Android devices


Step 3: Choose Settings.

Open WhatsApp Chat Settings on your Android phone


Step 4: Tap on Chats.

Change the Background on WhatsApp Chats Android device


Step 5: Tap on Wallpaper.

How to Change the Background on WhatsApp Chats Android

Step 6: Tap on Change.

You can see the below-given options for Change WhatsApp chat wallpaper on Android phones and tablets.

  • Bright: Select the bright or light wallpaper you want to set.
  • Dark: Choose a dark wallpaper.
  • Solid colors: Select a solid color as a WhatsApp chat background.
  • My photos: Choose your favorite picture from your phone gallery.
  • Default wallpaper: Set default WhatsApp wallpaper as background.


How Do I Change My WhatsApp Wallpaper on Android

Step 7: Choose any category (We Choose Dark) from the list above.

WhatsApp chat background wallpaper on Android phones


Step 8: Select the Wallpaper from the list.

Change the chat background in WhatsApp Android devices


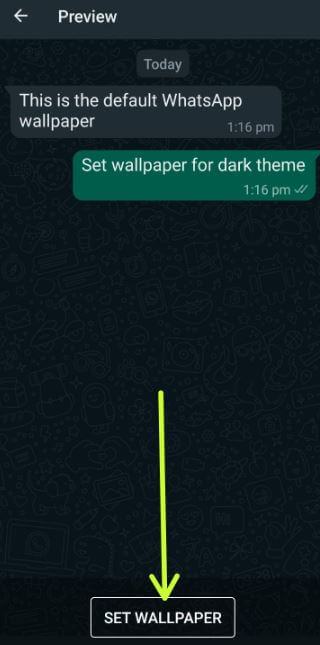
Step 9: Tap on Set wallpaper at the bottom.

Open any WhatsApp chat & group, and you can see the new background chat wallpaper on the WhatsApp Android phone.

How Can I Set Wallpaper Background for One Contact in WhatsApp?

You can set a custom wallpaper for different WhatsApp chats on your Android device using the below-given settings.

Step 1: Open the WhatsApp app on your device.

Tap on any contact you want to change WhatsApp chat background on Android

Step 2: Tap on Any contact you want to change the WhatsApp background.

set a custom wallpaper for individual contacts on Android

Step 3: Tap on Three vertical dots (More) in the upper right corner and tap on Wallpaper.

Step 4: Tap on Change.

Step 5: Choose a Category from the list.

Step 6: Choose a Wallpaper from the list.

Step 7: Tap on Set wallpaper at the bottom.

How Can I Set Wallpaper Background for One Contact in WhatsApp

Step 8: Choose For this chat and tap on OK.

Does the WhatsApp Wallpaper Change for Everyone?

No, only your device’s WhatsApp chat background will change.

How to Set Default WhatsApp Chat Wallpaper on Android 12/Android 11

Step 1: Open WhatsApp on your device.

Step 2: Tap on More at the upper right.

Step 3: Tap on Settings.

Step 4: Tap on Chats.

Step 5: Tap on Wallpaper.

Step 6: Tap on Change.

How to Change Default WhatsApp Chat Wallpaper on Android


Step 7: Tap on Default wallpaper.

Set Default WhatsApp Chat Wallpaper

Step 8: Tap on Set wallpaper.

How Do I Style Text on WhatsApp Android?

Step 1: Open the Chat on WhatsApp.

How Do I Style Text on WhatsApp Android


Step 2: Type any message and long-press the text. Tap on Three vertical dots.

Change text style on WhatsApp Android

Step 3: Choose a font style from Bold, Italic, Strikethrough, and Monospace.

Step 4: You can see WhatsApp text style will be changed.

How Can I Change WhatsApp Theme?

You can change the WhatsApp theme as the system default, dark or light.

Step 1: Open WhatsApp on your Android device.

Step 2: Tap on Three vertical dots (More) at the top right corner.

Step 3: Tap on Settings.

Step 4: Tap on Chats.

Change the WhatsApp theme on Android

Step 5: Tap on Theme.

How Can I Change WhatsApp Theme

Step 6: Choose from System default/Light/Dark and tap on OK.


How to Change WhatsApp Profile Picture on Android in 2022

Step 1: Open the WhatsApp app on your device.

Step 2: Tap Three vertical dots (More) at the top right corner of the screen.

Step 3: Select Settings.

Step 4: Tap the Profile icon.

How to Set WhatsApp Profile Picture on Android

Step 5: Tap the Camera icon of your profile picture.

Step 6: Choose from Gallery or Camera.

Step 7: Select a photo from the gallery and tap Done.

You can also choose a photo from your camera to set as a default WhatsApp picture on an Android phone or tablet.

How to Delete WhatsApp Chat Background Wallpaper Android (Older Version)

Delete WhatsApp Chat Background Wallpaper Android

WhatsApp > Three vertical dots (More) at the top right corner > Settings > Chats > Wallpaper > No wallpaper

Above, you can see the perfect steps for change the WhatsApp chat wallpaper on Android devices. Please comment below if you have any queries or trouble with the above steps changing WhatsApp wallpaper.

How to Recover Deleted WhatsApp Messages on Android

Want to restore deleted WhatsApp messages without backup on Android? Here is the guide to recover deleted WhatsApp messages on Android phones and tablets. If you have accidentally deleted WhatsApp messages on your android device, its’ quite easy to restore deleted WhatsApp messages (Within 7 days) using WhatsApp chat settings. This will retrieve deleted WhatsApp messages on your Android. WhatsApp automatically backs up chats every day at a specific time. Also, change WhatsApp chat backup to Google drive from Daily/Weekly/Monthly/Only when I tap “back up”/Never.

WhatsApp is a recently most used messaging app compare to other social media apps on android, iOS, Windows, and other smartphones. You can easily send text messages, photos, video calls, etc with friends, families, and others. Below you can see different 2 methods to restore deleted WhatsApp messages on android devices without Android data recovery software.

Read Also:

How to Recover Deleted WhatsApp Messages on Android

WhatsApp automatically backs up your WhatsApp chat history at a set time on your android device. You can manually backup your recently WhatsApp chat history using the “Back up chats” option before uninstalled WhatsApp.

How to Restore Deleted WhatsApp Messages or Chat History Within 7 days

Step 1: “Uninstalled or Delete WhatsApp” from your Android phone or tablet.

Step 2: Go to the Play store and “Reinstall WhatsApp” on your phone.

Step 3: Enter your phone number and verify it.

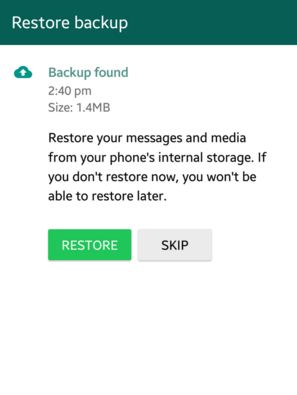
A below given pop-up message appears:

How to recover deleted WhatsApp messages on android

Step 4: Tap on “Restore” to back up your WhatsApp messages history or restore your messages and media from your phone’s internal storage

How to Restore Old WhatsApp Messages on Android (More than 7 days)

Step 1: “Uninstalled WhatsApp”.

Step 2: Open your android device SD cards or Device storage > WhatsApp > Database.

Step 3: Rename “msgstore-201…5.1.db.crypt8” to “newmsgstore-201…5.1.db.crypt8”.

Step 4: Select the backup file that you want to restore lost WhatsApp messages.

Step 5: Rename “msgstore-201…5.1.db.crypt8” to “msgstore.db.crypt”.

Step 6: “Reinstall WhatsApp” on your android device and then asks to restore then tap on it.

recover deleted WhatsApp messages on android

When tapping on restore then you can see above screen on your android phone and tablet. Now restore all your deleted data on your device.

How to Change the Default WhatsApp Backup Time on Android

Step 1: Open the WhatsApp app in your Android devices.

Step 2: Tap Three vertical dots at the top right corner.

Step 3: Choose Settings.

Step 4: Tap Chats.

Step 5: Tap Chat backup at the end of the screen.

Restore deleted WhatsApp messages without backup on Android

Step 6: Tap Back up to Google Drive.

Change the Default WhatsApp Backup Time on Android

Step 7: Choose from Never/Only when I tap “back up”/Daily/Weekly/Monthly.

Also, choose Google account and change WhatsApp backup over WiFi or WiFi/Cellular settings.

Above you can see different two methods to recover deleted WhatsApp messages on android lollipop and KitKat devices without data recovery software. If you have any trouble then post a comment on the below box.

How to Use Bitmoji Keyboard On Android or Samsung Galaxy

Here’s how to get the Bitmoji keyboard on Android devices. Bitmoji is one type of personal Emoji that includes different styles of stickers. You can send Bitmoji on any android or iOS devices. Easily switch to Bitmoji keyboard from Google keyboard anytime. Also, change Bitmoji style Male to Female on your latest android or Samsung Galaxy devices. Have you ever use Bitmoji keyboard for android in Google keyboard?

You can add Bitmoji to Google keyboard on Instagram, Snapchat, WhatsApp and other messenger apps in your android or iOS devices. Also, use Bitmoji to WhatsApp android phone. Follow the below-given step by step process to set up and use Bitmoji in the android keyboard.

Read Also:

How to Set Up and Use Bitmoji in Android Keyboard or Gboard keyboard

To get the Bitmoji keyboard for android, follow below given complete process.

Step 1: Download Bitmoji – Your Personal Emoji app from the play store.

Step 2: Now install the app in your android devices.

Step 3: Go to settings in your android or Samsung Galaxy device.

Step 4: Tap System settings.

Step 5: Tap Language & input.

Step 6: Tap Virtual keyboard under the keyboard & input section.

Step 7: Tap Manage keyboard.

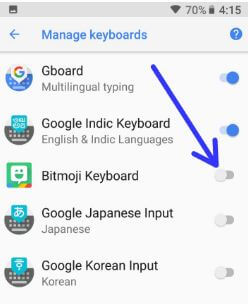
Bitmoji keyboard in android Smartphone

Here you can see the Bitmoji keyboard option in your devices. By default disable Bitmoji keyboard in android.

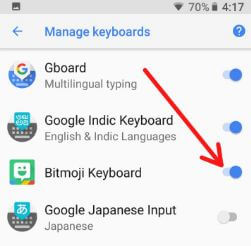
Step 8: Enable the Bitmoji keyboard toggle button.

Step 9: Tap OK.

Note: After a reboot, this Bitmoji app can’t start until you unlock your phone.

Use Bitmoji keyboard in Google keyboard

Step 10: Turned on Bitmoji keyboard in the android device.

Now finished Bitmoji set up process in your device. Click here to see how to use Bitmoji for Samsung Keyboard or get the Bitmoji keyboard on Android or Samsung. To remove Bitmoji keyboard android, just toggle off the button. Let see how to use Bitmoji keyboard in android phone or tablet devices.

Read Also:
How to Use Bitmoji in Gboard Keyboard or Android Keyboard

Step 1: Open Facebook or WhatsApp app in your android device.

Step 2:  Tap contact you want to send Bitmoji stickers.

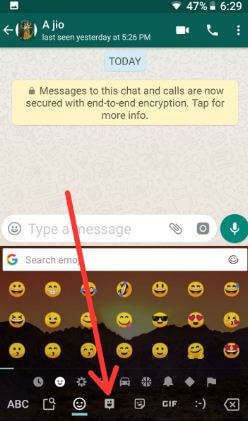
Step 3: Tap & hold the Emoji icon on the Google keyboard.

How to use Bitmoji in android keyboard

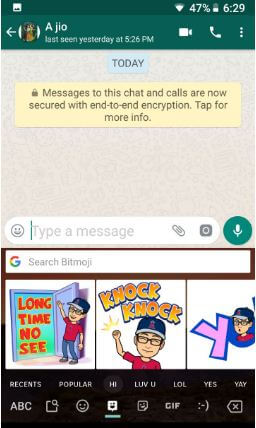
Step 4: Tap the Bitmoji icon on the keyboard.

Here you can view different types of Bitmoji stickers like as Thank you, Miss u, Emoji, Sad, Birthday and more.

Use Bitmoji in android keyboard

Step 5: Tap Bitmoji Sticker you want to send.

Step 6: Tap the Send button.

You can also quickly switch to Bitmoji keyboard android or iOS devices.

And that’s it. We hope this makes it clear how to set up and use Bitmoji in android keyboard. Did you find the above tutorial helpful? Tell us in below comment box.

How to Hide Caller ID Samsung A50

Make your number private on Samsung Galaxy A50? Here’s how to hide caller ID Samsung A50, A70, A30, A20, and other galaxy devices. Turned off caller ID and spam protection on your Galaxy A50 by default. You can turn this feature on or off in settings at any time. Useful to identify spam and scam callers. It will show you the names and profile picture of callers and message senders who aren’t in your contacts list.

The caller ID and spam protection feature identifier’s phone numbers that aren’t stored in your contacts and alerts you when an incoming call may be spam. This feature supported for all incoming & outgoing calls, except while roaming.

Read Also:
How to Show or Hide Caller ID Samsung A50

You can easily hide the number on Samsung A50 or private number Samsung galaxy using the below settings.

Step 1: Open the Phone app in your Galaxy A50.

Step 2: Tap Three vertical dots (More) at the upper right corner side of the screen.

Step 3: Touch Settings.

By default disable this setting. Turn this feature on or off at any time using this article.

How to Hide Caller ID Samsung A50

Step 4: Turn on Caller ID and Spam protection toggle.

It will use Hiya to show you the caller’s name and photo of callers and message senders in your device even aren’t in your phonebook. You can also enable share name and number so other people can see your phone number and name when you call or message them.

Step 5: Turn on Share name and number toggle.

Stop Using Caller ID & Spam Protection on Galaxy A50, A70, A30, A20

If you don’t want to use caller ID & Spam protection on your A50, disable it using the below steps.

Step 1: Open the Phone app.

Step 2: Tap Three vertical dots.

Step 3: Select Settings.

Step 4: Tap Caller ID and Spam protection.

Step 5: Tap Three vertical dots (More).

Stop Using Caller ID & Spam Protection on Galaxy A50

Step 6: Touch Stop using service.

This pop-up screen appears: Stop using caller ID and spam protection?

Step 7: Tap Stop using service.

If you are annoyed by an unknown number of spam calls, block phone numbers on your Samsung galaxy A50 and other devices.

And that’s all. We hope this makes it clear how to hide caller ID Samsung A50 and Galaxy A70. Do you still have any questions? Tell us in below comment box. Don’t forget to share this article with others if you found it useful.

How to turn off auto update in Windows 7

How to turn off auto update in Windows 7 PC. When the internet is turned on in our Windows PC, it can automatically check for Windows updates and install them using your selected Windows Settings options. You have four options to choose Windows update settings including install update automatically, download updates but choose whether to install them, check for system updates but choose whether to download & install them and never check for updates. Choose from the above-given update settings in your Windows 7 or other Windows PC.

Sometimes turn on auto update in Windows PC useful to improved reliability, operating speed, smoothly work, security against unknown spammers, etc. You have also allowed other users to install updates on this Windows computer / PC to tickmark checkbox below update settings option in Windows 7. Follow below-given steps to turn off auto update in Windows 7 / Windows PC.

Check Also:

How to upgrade Windows 7 to Windows 10 Pro free

How to uninstall apps on Windows 10

How to pause update in Windows 10 for 35 days

How to turn on Wi-Fi in Windows 7

How to turn off auto update in Windows 7 or Windows PC

Step 1: Click on the “Start” button on your Windows 7 PC

Step 2: Tap on “Control Panel”

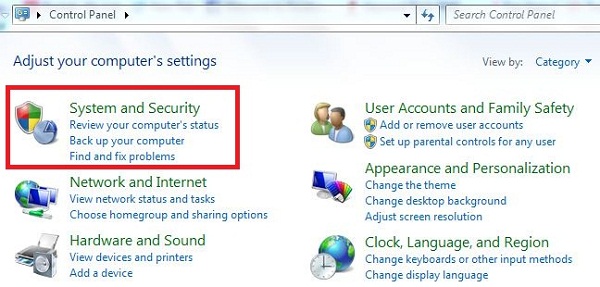
Tap on system and security

Step 3: Tap on “System and security” category

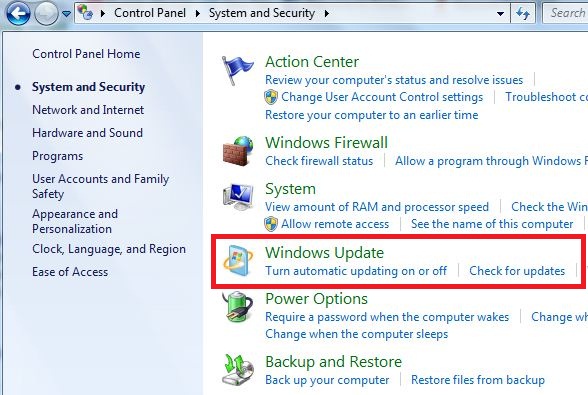
Tap on Windows update on Windows 7

Step 4: Tap on “Windows update”

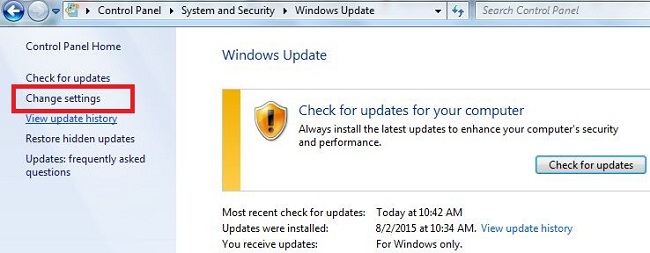
turn off auto update in Windows 7

Step 5:  Tap on “Change Settings” from the top left side corner sidebar

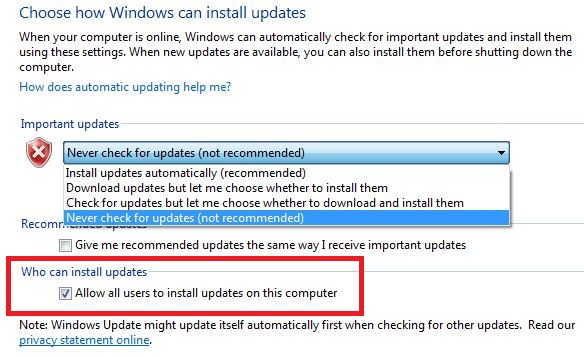
How to turn off auto update in Windows 7

Step 6: You can see the above screen on your Windows 7 / Windows PC. Choose the “Never check for updates” to turn off auto update in Windows 7 /Windows PC

Step 7: Press “OK”

Install updates in Windows 7

You have also allowed other users to install updates on this Windows computer / PC to tick mark the checkbox of “allow all users to install updates on this computer” under update settings in Windows 7.

Did you find the above process helpful to turn off auto update in Windows 7 or Windows PC? Don’t hesitate to let me know, would be a pleasure to help you.