How To Enable Android Autofill Service in Oreo 8.0

Here’s how to use Autofill Android password manager on Android 8.0 Oreo devices. You can easily use Google autofill password android Oreo 8.0 using language & input settings. This android Oreo autofill feature saves your account passwords and login account with entering a password. When you first time enters credentials, it will ask you to save a password.  Now open any application and you will see, it will show your username & password.

Android Oreo 8.0 launched with many cool features and one of them is Autofill service. Before Android Oreo launched, most people use different password managers such as LastPass, Dashlane and more. Using the LastPass app, change default autofill manager to apps.  This autofill with Google uses the saved password using Google smart lock via the Chrome browser. Follow the below-given step by step guide to set autofill manager in android Oreo 8.0 devices such as Pixel 2, Pixel 2 XL, Pixel, Pixel XL, Nexus 6P, Nexus 5X, HTC, LG, Moto Z/Z play, One Plus 5/3T/3, Nokia 6/5/3, etc.

Read Also:

How to enable or disable instant apps on Android Oreo

How to use Smart lock on Android Oreo

How to use Smart manager in Android Lollipop

How to enable install unknown apps on android 8.0 Oreo

How To Set Autofill Manager In Android Oreo 8.0

By default autofill with Google set in your android Oreo device if you don’t have installed another app. Check below-given settings to use autofill manager in android 8.0 Oreo devices.

Step 1: Go to settings in your android Oreo device.

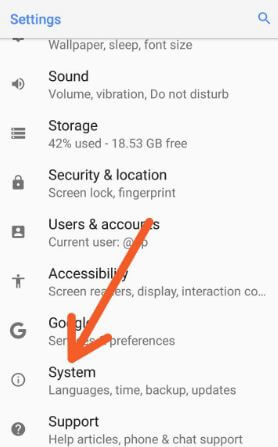
Step 2: Tap system.

Android Oreo language and input settings under system


Step 3: Tap Language & input.

Advanced in languge & input settings on Oreo device

Step 4: Tap advanced.

Use Autofill service in android Oreo 8.0 device

Step 5: Tap settings icon of Auto-fill service under the input assistance category.

Set autofill manager in android Oreo 8.0

Here you can see auto-fill with Google option only. You will add personal information, addresses,

Credit cards and saved passwords. You can easily set autofill manager in android Oreo using the above settings.

Let see the example to use autofill on Twitter or Instagram application in your android 8.0 Oreo devices.

Step 1: Open the Instagram app in your Oreo device.

Step 2: Enter username, email or phone number.

How to set autofill manager in android Oreo 8.0

You will see this message on the screen: Save password to auto-fill with Google?

Step 3: Tap Save to use the autofill feature on Android Oreo.

Step 4: Now open the Instagram login page.

Use autofill manager on android 8.0 Oreo

Step 5: Tap on username & then tap the password

You will see your username and password on your screen. Google will automatically fill your login details to just tap on it. Now log in your Instagram or Twitter account without entering a password in your android 8.0 Oreo devices.

You will use android Oreo’s autofill feature with the password manager app also. When you select a third-party app instead of autofill with Google, a pop-up show for confirmation to trust this app or not. After confirming it, it will automatically use autofill API in your Oreo device.

Switch Autofill service on Android 9 Pie and Android 10 

You can change android autofill service on your latest android devices using below given settings.

Settings > System > Langauge & input > Autofill > Autofill service > Add service > Choose from available Android Password Manager you want to set

Also download other Google password managers from play stores such an Enpass Password Manager, LastPass Password Manager, 1Password-Password Manager, and more.

And that’s all. Do let us know you liked this tutorial to set autofill manager in android Oreo 8.0 device. Tell us in below comment box. For more such smart tips, stay connected with us via Facebook, Google Plus and Twitter.

How to enable full screen apps on Galaxy Note 8

Galaxy Note 8 has several app settings such as change default app, enable full screen apps, install app from unknown source, clear notification badge and control app permission. But in this tutorial, I will show you complete details to enable full screen apps on Galaxy Note 8 device. This full screen app is one of the best app features in galaxy Note 8 device. Many apps not open in full screen mode, you can change this setting in your Note 8.

Galaxy Note 8 devices has 18.5:9 display resolutions. In most of all Smartphone is regular display 16:9 screen to watch movies and videos. You will force apps into full screen on the Galaxy Note 8 using display settings. Also full screen mode on galaxy S8, galaxy Note 7 and LG G6 device. Follow below given step by step process to enable full screen apps on Galaxy Note 8 device.

More: How to change lock screen app shortcuts on Galaxy Note 8

How to enable full screen apps on Galaxy Note 8

Enable full screen apps on Galaxy Note 8

By default several apps turn on this feature and other apps disabled. Not all apps will supported this force full screen apps features. Check below given step by step guide to enable it.

Step 1: Go to settings in your galaxy Note 8

Step 2: Tap display

Step 3: Tap full screen apps

This settings force apps into full screen mode on Samsung galaxy Note 8 device. Here you will see both enable and disable app on your galaxy Note 8.

Step 4: Tap app and turn on toggle button to enable full screen mode on galaxy Note 8

Now open any app want to enjoy full screen in your galaxy Note 8 and other device.

Let see other important galaxy Note 8 apps settings.

Change default apps on galaxy Note 8:

Settings > Apps > Menu > Default app > Change home / browser / messages / phone app

Clear Notification badges on galaxy Note 8:

This Notification badge feature is useful to show how many notifications you have missed for that particular app. To disable it, long press on the app icon and tap clear badge. Now remove notification from that app icon.

Install apps from unknown sources:

Install third party downloaded apps on your galaxy Note 8 device. You can’t install an app manually in your device. Enable unknown source on galaxy Note 8 to install third party apps.

Settings > Lock screen & security > unknown sources > Turn on

In latest android Oreo 8.0 devices, this unknown source option removed. You will manually enable install from unknown sources on android Oreo.

Control app permission on galaxy Note 8:

You can individually change app permission on your galaxy Note 8 using below settings.

Settings > Applications > select app > App permission > Enable permission

You will see several options in app permission such as body sensor, camera, calendar, contacts, location, SMS, Microphone, storage and more.

And that’s all. Let me know what you think about this article to enable full screen apps on Galaxy Note 8 device. Is there something we should have covered we missed? Tell us in below comment box. Stay connected with us for latest galaxy Note 8 tips and tricks.

How to change lock screen shortcuts on Galaxy Note 8

Samsung galaxy Note 8 has several lock screen settings. But in this tutorial, I will show you complete guide to change lock screen shortcuts on galaxy Note 8 device. By default two app shortcuts on the lock screen for quick access. You will change left shortcut and right shortcut app on galaxy Note 8 using lock screen & security settings.

In most of device camera and phone app set as left & right shortcut icon. Add WhatsApp, Instagram or other app to your lock screen shortcuts. You will customize the lock screen app shortcuts on galaxy Note 8. Different device has slightly different settings to change lock screen app on galaxy Note 8 and other device. Follow below given step by step instruction to change lock screen shortcuts on Galaxy Note 8 device.

Read This: How to enable screen mode on galaxy Note 8

How to change lock screen shortcuts on Galaxy Note 8

Step 1: Go to settings in your galaxy Note 8

Step 2: Tap lock screen & security

Here you will see several options list.

Step 3: Tap app shortcuts

You will see left app shortcut and right app shortcut option. Set your regular use app icon on lock screen to operate it from home screen in your device.

Change lock screen shortcuts on Galaxy Note 8

Step 4: Tap left shortcut or right shortcut

To change app shortcut icon on galaxy Note 8 lock screen, choose app icon from list you want to set.

If you can’t see any app shortcut on lock screen, turn off them in your device.

Samsung galaxy Note 8 Security:

In Samsung galaxy Note 8 device, you will set screen lock using above settings. Galaxy Note 8 include 3 biometric security including Iris scanning, Fingerprint sensor and Face recognition. You can set this biometric security using below settings in your galaxy Note 8.

Settings > lock screen & security > Iris scanning / Face recognition / Fingerprint sensor

Instant lock on galaxy Note 8:

Just press the stand by button, your phone lock instantly.

Settings > lock screen & security > secure lock settings > lock device

Smart lock on galaxy Note 8:

Settings > lock screen & security > secure lock settings > Smart lock

In galaxy Note 8 notifications settings, you can set only show notifications as app icons on lock screen in your Samsung galaxy Note 8 device. Also set app priority and disable pop-up notifications on an app in galaxy Note 8 device.

Did you find above article helpful to change lock screen shortcuts on Galaxy Note 8 phone? Do you have any other lock screen tips want to share? Tell us in below comment section. Don’t miss our single Samsung galaxy Note 8 tricks.

How to Enable or Disable Safe Mode on Samsung Galaxy Note 8

Here’s how to get into safe mode on Samsung Galaxy Note 8. When turning on safe mode, you can check if any third party app causing the issue on your phone. App crashing or freezing issue is slow down your Galaxy Note 8 performance and speed. To fix the app issue, turn on the safe mode galaxy Note 8 and check the issue. If you have found any specific app related issue, then clear the app cache on your Galaxy Note 8 device.

When enabling safe mode, your device works with only by default installed apps. You can use only system apps. After exit safe mode, automatically enable downloaded apps. Check out below given a complete guide to turning on safe mode Galaxy Note 8.

Read Also:

How to Turn On Safe Mode Galaxy Note 8

Turn on safe mode Galaxy Note 8

To find any third party downloaded apps that causing issue of app crashing or freezing, enable safe mode on galaxy Note 8 using below steps.

Enable Safe Mode Galaxy Note 8

Step 1: Press & hold the Power button on your Samsung Note 8 until seeing the power menu.

Step 2: Long press the Power off button until see “Safe mode“.

You can view this message on the screen: Reboot to safe mode

Step 3: Tap OK.

Step 4: You can see the Safe mode icon at the bottom of the left side screen.

Now, boot into safe mode Samsung note 8.  All downloaded apps are disabled from your device. If you can’t find any problem in safe mode, it means any downloaded apps causing the issue on your phone. Restart your phone to disable safe mode on Note 8. Now, remove recently downloaded apps one by one and check to fix the issues. After the fix, re-install other apps. If you still facing issues in safe mode, it means hardware or OS related issues.

Turn Off Safe Mode

Step 1: Long press the power button until seeing the power menu.

Step 2: Tap Restart.

If you have any specific app related issue on your Galaxy Note 8 device, clear the app cache on galaxy Note 8 using below settings.

Clear the App Cache on Samsung Galaxy Note 8

Step 1: Go to Settings in your galaxy Note 8.

Step 2: Tap Apps.

Step 3: Tap App manager.

Step 4: Find the app & tap on it.

Step 5: Tap Storage.

Step 6: Tap Clear cache.

I hope above given one of these method fix galaxy Note 8 app crashing or freezing issue. If none of the methods fix problems, hard reset your Samsung Galaxy Note 8.

Did you find the above method turn on safe mode Galaxy Note 8 helpful? If you have any kind of trouble, let us know in below comment box. We will respond as soon as possible. Stay connected with us for daily updates.

How to set up and use Facial recognition on Galaxy Note 8

Samsung galaxy Note 8 has several awesome features, but it offers several security options including Facial recognition, Fingerprint scanner and Iris scanning. In this tutorial, I will show you complete guide to set up and use facial recognition on galaxy Note 8. In galaxy Note 8, you can use either Facial recognition or Iris scanner.

To unlock your galaxy Note 8 device, hold your phone in front of your face. This facial recognition is not secure compare to fingerprint or Iris scanner. Anyone can be unlock your device if picture of you. You will use your favorite biometric security from options. Follow below given step by step guide to set up and use facial recognition on Galaxy Note 8 device.

Relevant Article: How to use Iris scanning on Galaxy Note 8

How to set up and use Facial recognition on Galaxy Note 8

Set up and use Facial recognition on Galaxy Note 8

Facial recognition is quickly unlock your galaxy Note 8 device compare to other security. Let see how to set up facial recognition on galaxy Note 8 device.

Step 1: Go to settings in your galaxy Note 8

Step 2: Tap lock screen & security

Here you will see several security options.

Step 3: Tap Facial recognition under phone security section

Step 4: Create PIN number/ Pattern lock / Password

Select from above options to unlock your galaxy Note 8 before set up biometrics security.

Now follow on screen instruction and after that tap continue.

Step 5: Hold you phone in front of your face and set it inside circle of screen

Step 6: After scanned face, turn on facial recognition on your device

Now customize facial recognition settings on your galaxy Note 8 device, so your device automatically unlock when you look at phone screen. It’s quiet easy to set up and use Facial recognition on Galaxy Note 8 device.

Samsung galaxy Note 8 has other security features to unlock your device such as instant lock, smart lock, unlock your galaxy Note 8 with home button, Bluetooth unlock etc. Also set automatically factory reset galaxy Note 8 if unlock your device 10-12 times by unknown person.

And that’s it. Are you using the facial recognition feature on your galaxy Note 8 or other device? Do you have still questions about set up and use facial recognition on Galaxy Note 8. Tell us in below comment section. Don’t forget to check out our other Galaxy Note 8 tips and tricks.

How to enable gesture on Galaxy Note 8

Let see how to enable and use moves gesture on Samsung galaxy Note 8 device. Gesture feature is helpful to quickly see notifications, palm swipe to capture photo, making a call or sending a text, power off phone and other shortcut tricks. In Galaxy Note 8, you can see special gesture to zoom in and out of picture. You can enable gesture on Galaxy Note 8 using advanced feature section.

Galaxy Note 8 has several awesome features such as live messages, S Pen, Biometric security, Water & dust resistant, 6.3 inch infinity display and more. Check out below given handy tips to enable gesture on Galaxy Note 8 device.

Read This: How to enable screen mode on Galaxy Note 8

How to enable Gesture on Galaxy Note 8

Enable gesture on Galaxy Note 8

You can see below given list of gestures on your Samsung galaxy Note 8 device. To enable this galaxy Note 8 gesture, Go to settings > Advanced features > Select gesture and turn on or off you want.

Palm Swipe

When turn on palm swipe gesture, swiping the edge of your hand across more than half of screen display and the screen will be captured screenshots.  You can enable palm swipe gesture on galaxy Note 8 using below settings.

Settings > Advanced features > Palm swipe > Turn on toggle button

Easy Mute

Annoying by phone calls sound on your galaxy Note 8? Enable easy mute gesture on your Note 8. When screen is on, place your hand on the screen to mute calls and alarms.

Settings > Advanced features > Easy mute

Mute Audio

Just cover the phone screen with your hand to mute audio on your galaxy Note 8.

Making a call or sending a text

To use this gesture, swiping over the contact name want to make a call or sending a text message.

In galaxy Note 8, use one handed mode to resizing and moving the screen around with your thumb. In gesture features, you can access all shortcuts to swipe or tap the screen in your Note 8 device. You can easily enable and use gesture on galaxy Note 8.

How to take screenshot on Galaxy Note 8

Galaxy Note 8 device has slightly different settings to take screenshot compare to galaxy Note 7 (uses a both stand by button + home button). To take screenshot on galaxy Note 8, press volume and the standby button on the right hand side at the same time. And the screenshot captured in your device. You will also take screenshot on galaxy Note 8 using palm swipe gesture and smart select.

And that’s all. I hope above given article helpful to enable gesture on galaxy Note 8 phone. Do you know any gesture which missed above? Tell us in below comment section. Stay connected with us for Samsung galaxy Note 8 tips.