How to Use Audio Tuner Settings on OnePlus 6T, 6, 5T, 5

Here’s how to enable and use audio tuner settings on OnePlus 5T. You can set equalizer in OnePlus 5T after select earphone type in your device. This Audio tuner is helpful for a better musical experience with your plugged earphones. You can set up your favorite audio profiles you want to listen to. By default disable audio switch in your device. You can enable it after plug your earphones.

OnePlus 5T has several awesome features and one of them we discuss here’s the Audio tuner. Also, use Bluetooth audio codec (SBC/aptX/aptX HD) and OTG storage-related sound settings. This audio tuner feature doesn’t work on Bluetooth audio. Do you have any idea about how audio tuner work over Bluetooth streaming? Follow the below-given step by step process to set audio tuner or use audio tuner settings on OnePlus 5T.

Read Also:

How to Enable and Change Audio Tuner Settings on OnePlus 5T/OnePlus 5
How to use audio tuner settings on OnePlus 5T

You can easily change audio tuner settings on OnePlus 6T/5T using the below settings.

Audio Tuner OnePlus 6T: Latest Oxygen OS

Step 1: Go to Settings in your OnePlus 6T/6.

Step 2: Tap on Sound & vibration.

Here you’ll see Do not disturb mode, Earphone, Ringtone, and more.

Step 3: Tap on the Audio tuner under the earphone section.

Step 4: Toggle on Enable Audio Tuner.

Also, change OnePlus 6T audio tuner settings including Sound enhancement, equalizer settings, and preset options.

How to Change Sound Enhancement on OnePlus 6T/6

Settings > Sounds > Audio tuner > Sound enhancement > Choose from list you want to use

For OnePlus5T/5:

Step 1: Go to Settings in your OnePlus 5T/5.

Step 2: Tap on Sounds & vibration under the device section.

Here you’ll see four sections including volume, ringtone, vibration, and system.

Step 3: Scroll at the end of the page and tap on the Audio tuner under the system section.

By default turn off this audio tuner setting in your OnePlus 5T device.

Step 4: Now plug headphones into your device to enable an audio tuner switch.

Step 5: Turn on the toggle button of the Audio switch.

Here you can see Earphone types and Equalizer settings in your OnePlus 5T/5 devices.

Earphone types:

By default set earphone types in your device. You’ll choose from OnePlus Bullets/ OnePlus Bullets (V2)/OnePlus Icons/Feat. JBL E1+.

Equalizer settings:

Preset:

In OnePlus 5T audio tuner settings, you can choose preset from Pop/Rock&roll/Jazz/Classic/Blues/Hip-hop and more. Which equalizer are you using?

When you unplugged your earphones with your device, disable audio tuner settings in your OnePlus 5T device.

Do you still have questions about use audio tuner settings on OnePlus 5T? Are you using the Audio tuner feature on your OnePlus 5T? Tell us how you’ve customized audio tuner settings in your device. Share your thoughts in below comment box. Don’t miss out to check our other articles.
How to Change Bluetooth Audio Codec on OnePlus 5T

OnePlus 5T has several amazing features including Reading mode, Gaming Do not disturb, vibration pattern & vibration intensity, parallel apps, Shot on OnePlus watermark, and more. But in this tutorial, I will show you steps to change Bluetooth audio codec on OnePlus 5T/OnePlus 5. This Bluetooth audio codec feature is helpful to improve sound quality in your device.

It is simple to change the audio codec in your OnePlus 5T. This Bluetooth audio codec can give you better audio experience when using your device. You can use this feature without install TWRP in your OnePlus 5T. After connecting your Bluetooth device with the phone, fully enjoy music using your selected Bluetooth audio codec. Follow the below-given step by step guide to change Bluetooth audio codec on OnePlus 5T.

Read Also:

How to Change Bluetooth Audio Codec on OnePlus 5T/OnePlus 5

Change Bluetooth audio codec on OnePlus 5T

Step 1: Go to settings in your OnePlus 5T/5 devices

Step 2: Tap on Advanced under System settings

Here you’ll see several options such as Accessibility, pocket mode, OTG storage, Recent app management, Gaming Do Not disturb, Bluetooth Audio codec.

Step 3: Tap on Bluetooth Audio codec

By default set SBC as Bluetooth audio codec.

Step 4: Choose from SBC/aptX/aptX HD for your headphone supported.

Now enjoy better sound quality to compare to previous sound.  Before selected options from the list make sure your android device must be capable of aptX/aptX HD Bluetooth headphones.

In the Android Oreo 8.1/8.0 devices, you can choose Bluetooth audio codec from several options to compare to OnePlus 5T/5.

How to Change Bluetooth Audio codec on Android Oreo 8.1/8.0

Settings > System > Developer options > Networking > Bluetooth Audio codec > Choose from SBC/AAC/aptX/aptX HD/LDAC/Enable optional codecs/disable optional codecs

And that’s it. I hope this little tip helpful to change Bluetooth audio codec on OnePlus 5T. If you find it useful, don’t forget to share it with others. Do you have any OnePlus 5T tips and tricks you want to share? Tell us in below comment box.

How To Customize Google Feed On Android

This tutorial explains you personalize Google Feed on Android devices. You’ll add your interest topics to Google Feed on Android devices. Google feed is useful to see the latest information about your interesting topics on the main page in your android devices. In Google feed, you can customize topics you like to get daily updates. Different android device has different settings access Google feed.

This Google feed is a part of Google App. You can remove Google feed and enable/disable recent pages that you visit in your Google feed. Follow the below-given step by step guide to change the Google discover feed on android devices.

Related:

How To Personalize Google Discover Feed On Android devices    

Let see how to customize and use Google feed/Google now in your android devices. In Nexus and Google Pixel devices by default installed Pixel launcher, you can simply swipe the screen to the right side from home screen to open Google feed. There are 2 ways to customize Google discover on android devices.

1st Method:

Step 1: Swipe screen left side from the home screen to access Google feed on Google Pixel & Nexus devices.

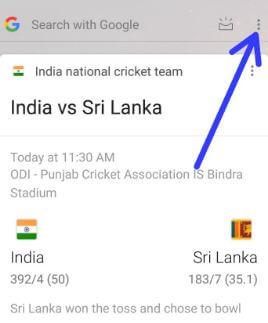
Tap three vertical dots in Google Now feed

Step 2: Tap on three vertical dots at the top right side corner.

Customize Google feed on Pixel, Nexus and android

Step 3: Tap on the Customize feed.

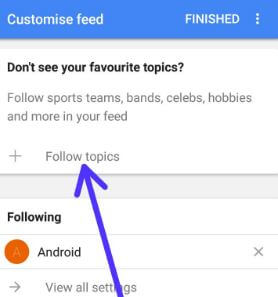
Here you’ll see several topics you want to see on Google feed.

Follow topics to add in Google feed android

Step 4: Tap on Follow topics.

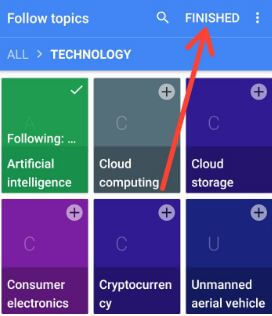
Now choose from sports, TV, films, musicians, athletes, actors, business, technology, lifestyle and more.

Step 5: Tap on one of them you want to add topics on Google feed.

Step 6: Tap on + icon in the right corner of the topic you add.

Also, search your favorite topics and add them to your favorite list.

How to customize Google feed on Pixel and Nexus

Step 7: Tap on Finished at the top right side.

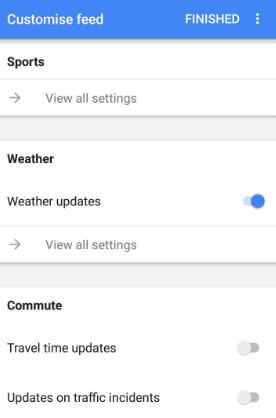
Customize feed in android phone

You can also customize more topics such as sports, weather, commute, sources, flights, and more.

2nd Method:

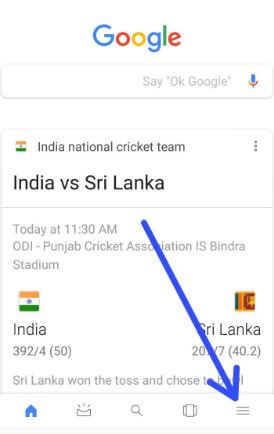
If you’re using another device, open Google App in your device.

Customize Google feed on android phone

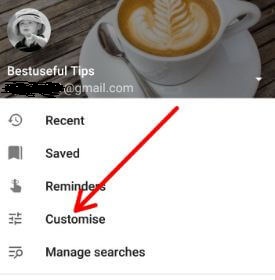
Step 1: Open Google app & tap on three horizontal lines in the bottom right side corner.

How to customize Google feed in android device

Step 2: Select Customize.

Step 3: Follow the above-given method steps 4 to 7

You can also control specific topics contained in your feed using the below settings.

Read Also:

How To Hide/Block/Customize specific topics in feed Android device

Step 1: Swipe screen left side from the home screen to open Google feed.

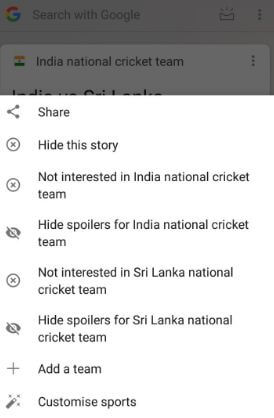
Step 2: Tap Three vertical dots of content you want to control.

Hide Google now feed in android phone

Step 3: Hide feed, block, or customize feed of individual topics.

Turn Off Google Feed Android 8.1, 9 Pie, 10

Swipe screen left to the right side on home screen > Feed icon at top right corner > Recent feed button at the bottom side > Scroll feed to the upside to remove Google feed individually

Alternative Way: Google App > Three horizontal lines at bottom right corner > Settings > Your feed > Toggle off the show feed

And that’s all. I hope this tutorial helpful to customize Google feed on Pixel, Nexus, and other android devices. If you have any kind of trouble, tell us in below comment box. We will respond as soon as possible.

How to enable show notification channel warnings on android 8.1

Notification channel feature is useful to manage notifications in your android Oreo 8.1. And also customize channel for notification type you want to display. You can create instant notification channel and change notification channel importance on android 8.1 Oreo. To enable show notification channel warnings on android 8.1, make sure enable developer mode in your android 8.1 device such as Pixel 2, Pixel 2 XL, Google Pixel, Pixel XL etc.

You can find this show notification channel warning under apps section in developer mode. This apps section also includes background process limit, inactive apps, force allow apps on external, background check, don’t keep activities and more. Follow below given step by step process to enable show notification channel warnings on android 8.1.

Read Also:

How to enable/disable display over other apps on android Oreo 8.1/8.0

How to hide apps running in background notification on android 8.1/8.0

How to enable show notification channel warnings on android 8.1/8.0     

First of all check turn on developer option in your device. If not turned on, enable it using below settings in your device.

Turn on developer options in android 8.1:

Step 1: Go to settings in your android 8.1 Oreo devices

Step 2: Tap on system

Step 3: Tap on about phone

Step 4: Scroll down at the end of page and tap on Build number 7 times

You can see this message in your device screen: You are now a developer!

To see developer mode go to Settings > system > Developer options

In developer options, you can see several useful settings such as memory used by apps, running services, OEM unlocking, USB debugging mode, debug app, USB configuration, background process limit and more. But in this tutorial, I will show you steps to turn on show notification channel warnings on android 8.1 Oreo.

Step 1: Go to settings in your android device

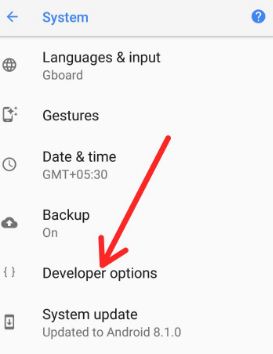
Step 2: Scroll down page and tap on System

Android 8.1 Oreo developer option settings

Step 3: Tap on Developer options

Step 4: Scroll down up to last section “apps”

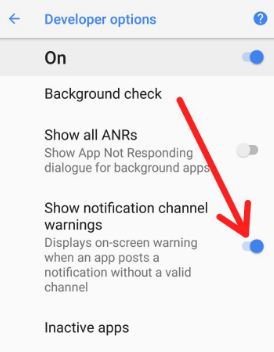
Show notification channel warning on android Oreo

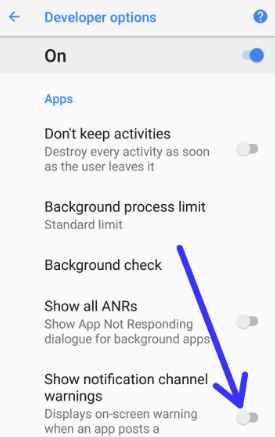
Here you can see show notification channel warning option in your Oreo devices. By default disable this option.

Enable show notification channel warnings on android 8.1

Step 5: Turn on toggle button of show notification channel warnings

Now display on-screen warning when an app posts a notification without a valid channel.

And that’s it. I hope this little tip helpful to enable show notification channel warnings on android 8.1/8.0. If you have any kind of trouble, tell us in below comment box. We will respond as soon as possible.

How to Change Android 8.1 Home Screen Settings

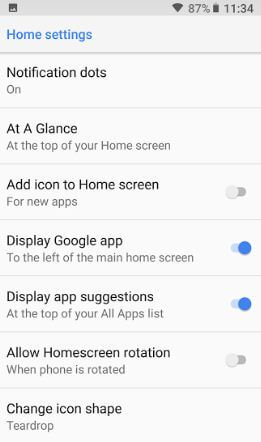
Here’s how to customize or change home screen settings in Android 8.1 Oreo. Android 8.1 Oreo home screen settings include notification dots, at a glance, add icon to home screen, display Google app, display app suggestion, allow home screen rotation, and change icon shape. Recently updated my Google Pixel to Android 8.1 Oreo via OTA. In the latest Android 8.1 Oreo updates, you can see Google search bar at the bottom screen, change the theme using wallpaper, at a glance widget on the home screen, recently opened apps, per app notification sound alert, and more features.

Read Also:

Android 8.1 Home Screen Settings

There are several Android 8.1 home screen customization settings available, let see one by one important setting.

Step 1: Tap & hold the blank screen in your Oreo (Pixel) home screen.

You’ll see wallpapers, widgets and home screen settings.

Android 8.1 home screen customization

Step 2: Tap on Home settings.

Android 8.1 Home screen settings

You can see the above-given list of Android 8.1 Oreo home screen customization settings in your device.

Notification Dots

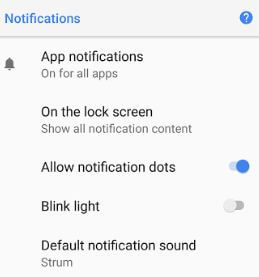
Notification dots on android 8.1 Oreo

By default enable notification dots on Android 8.1 Oreo. It will help to remember unread app notifications on your device. You can see the dots icon on the app you missed read messages. Disable it if you don’t want to use it.

More: How to use notification dots on Android Oreo  

At a glance

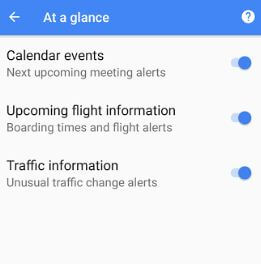
This is the newly added home screen settings. By default, you can see day, date, and time on the home screen. Also, enable/disable calendar events, upcoming flight information, and traffic information on the home screen.

Enable/Disable at a Glance on Android 8.1 Oreo

Disable at a glance in android 8.1 Oreo

Tap & hold the blank area of home screen > Home settings > At a glance > Enable/disable events you want from a list

Add Icon to The Home Screen

Whenever install a new app in your Android 8.1 Oreo, that app icon add to the home screen if enable add icon to home screen in your device. Disable it, if you don’t want to add a new downloaded app icon to the home screen.

Display Google App

In your Android 8.1 home screen, swipe screen right side to display Google app in your device. Here you can see your favorite topics latest news daily using Google customizes feed settings. Also, search with Google, remove Google feed, and enable/disable recent pages in your Android 8.1 Oreo device.

Display Google app in your android 8.1

Enable/Disable Google News Page From Home Screen

Tap & hold the blank screen > Home settings > Toggle off “Display Google app”

Now swipe screen right side in your device, you can’t see the Google news app page.

Allow Home Screen Rotation

When your phone is rotated, your Android 8.1 home screen rotated. Enable/disable home screen rotation in Android 8.1 Oreo devices. Remember that home screen rotation and auto-rotate screen both are different.

Enable Auto-Rotate Screen Android 8.1 Oreo

Settings > Display > Advanced > Auto-rotate screen

In this settings home screen not rotate when you rotate your Android devices.

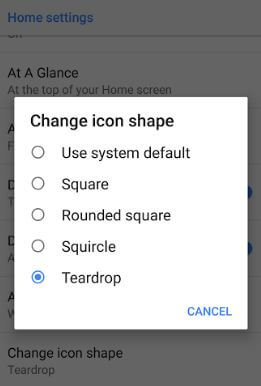
Change Icon Shape Android 8.1 Oreo

Change icon shape on android 8.1

By default set system icon shape in your device. You’ll choose from Square, Rounded Square, Squircle, and Teardrop icon shape.

And that’s it. Did you find this Android 8.1 Home screen settings helpful? Do you know any Android 8.1 tips and tricks? Share with us in below comment box. Check out our other Android Oreo tips and tricks.

How to Delete Apps on LG V30

Do you want to remove unwanted apps on the LG V30 device? By default installed many apps in your device. There are several apps you’ll never use in your LG V30 device. You can easily delete apps on the LG V30 device. This removes apps on LG V30 is free up space in your device. So remove unnecessary apps from your device to make your phone faster. Also, uninstall or disable pre-installed apps in your devices.

Sometimes several apps are harmful to your device and slow down your LG V30 device. Also, many apps run on the background and quickly drain the battery of your LG V30 device. Follow below given two different ways to delete unwanted apps on LG V30.

Read Also:

How to Remove Unwanted Apps on LG V30

How to delete unwanted apps on LG V30

There are two handy ways to delete pre-install apps on the LG V30 device.

Delete Apps on LG V30

Step 1: Go to Settings in your LG V30 device.

Step 2: Tap on Apps.

List of installed apps views in your android devices.

Step 3: Select the app you want to delete.

Step 4: Tap on uninstall at the top of the screen.

Step 5: Tap on OK to remove it from your device.

Now, remove or disable unused apps on the LG V30 device.

Disable Pre-installed (System apps) apps on LG V30

Step 1: GO to Settings.

Step 2: Tap Apps.

Step 3: Tap Three vertical dots at the top right corner.

Step 4: Select the Show system.

Step 5: Tap on the app from the list.

Step 6: Tap Disable.

Step 7: Tap Disable app.

Delete Unwanted Apps on LG V30

Step 1: Go to the App drawer.

Step 2: Tap on the Menu icon.

Step 3: Select the app to delete it.

Step 4: Tap Cross icon on the app to remove.

Now delete pre-installed apps on LG V30 device.

How to Add Icon to LG V30 Lock Screen

Step 1: Go to Settings in your LG V30.

Step 2: Tap Lock screen under the display section.

Step 3: Select a shortcut menu.

You’ll see + buttons for the empty icon.

Step 4: Tap any + button.

Step 5: Choose the app from the list.

Now selected apps will added to your LG V30 lock screen.

And that’s all. I hope this tutorial helpful to delete unwanted apps on LG V30. If you have any kind of trouble, tell us in below comment box. Do you know any other LG V30 tips want to share with us? Don’t miss check out our latest android tips and tricks.