How to Change Theme on Pixel 3 and Pixel 3 XL: Enable Dark Mode

You can manually change the Pixel 3 theme as dark or light you want. By default device theme set as automatically based on wallpaper you set. Set black wallpaper if you want to set the dark theme on Pixel 3 XL & Pixel 3, or if set light theme, then set white wallpaper in your Google Pixel 3. If you have the latest updated Pixel 3 & 3 XL (Android 10), you can automatically turn on a dark theme using display settings and swipe down the notification panel from the top of the screen and tap on the Dark theme.

Android Pie has several new added features such as Adaptive battery & Adaptive brightness, Navigation gestures, App actions, Digital wellbeing, Device theme, overview selection, cutout notch and more. But in this tutorial, I’ll explain your process to change the theme on Pixel 3 XL and Pixel 3.

Read Also:

How to Turn on Dark Mode in Google Pixel 3 and Pixel 3 XL

You can find the dark theme option under display settings on your Google Pixel 3 and Google Pixel 3 running the latest Android 10 OS.

How to enable dark mode on Pixel 3 and Pixel 3 XL (Android 10)

Step 1: Go to Settings in your Pixel devices.

Step 2: Tap on Display.

Enable dark mode on Pixel 3 and Pixel 3 XL

Step 3: Tap on Dark theme.

Set schedult to automatically enable dark theme Pixel 3 XL

Step 4: Tap on Schedule.

How to Change Theme on Pixel 3 and Pixel 3 XL

Step 5: Tap on Turns on from sunset to sunrise to automatic activate dark mode in Pixel 3 and Pixel 3 XL.

How to Change Google Pixel 3 Themes

Alternative Way: Swipe down notification panel at top of the screen > Tap on Dark theme

For Pixel 3 & 3 XL (Android 9 Pie)

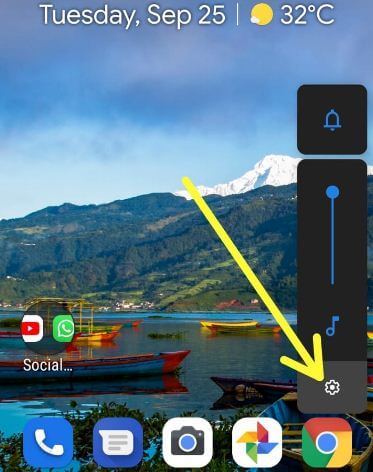
Step 1: Swipe down the notification panel at the top of the screen and tap the Settings gear icon.

Step 2: Tap Display.

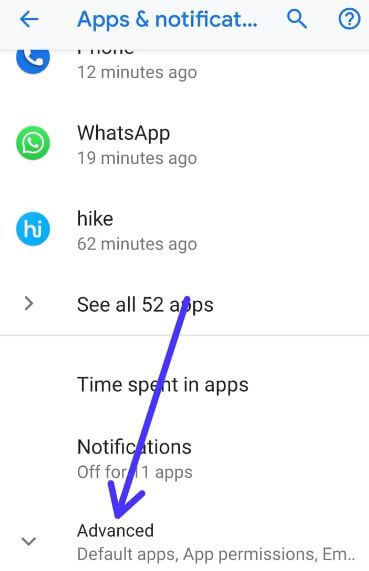
Google Pixel 3 Advanced settings for change theme

Step 3: Tap Advanced.

Device theme in Pixel 3 XL

Step 4: Tap the Device theme at the end of the page.

Change theme on Pixel 3 Pie

Step 5: By default set Automatic (Based on wallpaper) device theme in your android 9 Pie devices.

How to change theme on Pixel 3 XL Pie

Step 6: Choose dark if you want to set dark mode on Pixel 3.

Manually change Pixel 3 theme as dark or light

Step 7: Choose light if you want to set a light theme on Pixel 3.

You can also use the Pixel launcher to manually change the Pixel 3 dark theme or light theme in your device.

To change theme mode, change the wallpaper on your Pixel 3 to see the effect on your phone.

How to change Pixel 3 theme using wallpaper

Step 1: Long press the blank space on your Pixel 3 Pie home screen.

You can see home settings, widgets and wallpapers options.

Step 2: Tap Wallpapers.

A different category wallpapers for Pixel 3 and Pixel 3 XL. Also set gallery photo as Google Pixel 3 wallpaper to set dark mode or light mode.

Change Pixel 3 theme using wallpaper

Step 3: Select black wallpaper for dark mode or white wallpaper for the light theme.

Step 4: Tap Set wallpaper at the upper right corner of the screen.

Step 5: Choose from Home screen or Lock screen or Both.

Now change your Pixel 3 status bar theme, app drawer background, and your phone background effects.

And that’s it. We hope this makes it clear how to change the theme on Pixel 3 and Pixel 3 XL. Stay and connect with us for the latest updates.
How to Change Wallpaper on Pixel 3 XL and Pixel 3

Here’s how to change the wallpaper on Pixel 3 XL and Pixel 3. By default, set the home screen and lock screen wallpaper on Pixel 3 XL and Pixel 3 devices. There are two ways to change the wallpaper on your Pixel devices. Several wallpapers are available on your Pixel, such as live earth, Landscape, Art, Life, Textures, and solid colors, and you can also choose from your gallery. You can also download Pixel 3XL wallpapers that have already leaked.

You can change the home screen and lock screen wallpaper on Google Pixel 3 XL and Pixel 3 to look at your Pixel 3 backgrounds awesome. Follow the below-given step-by-step process to change Google Pixel 3 lock screen wallpaper.

Read More: How to Change Accent Color in Google Pixel

How to Change Google Pixel 3 Lock Screen Wallpaper

Let’s see two methods to change wallpaper on Pixel 3 and Pixel 3 XL lock screen and home screen.

Change Pixel 3 Backgrounds using Wallpaper & Style Settings

How to Change the Wallpaper on Pixel 3 and Pixel 3 XL using Wallpaper and Style Settings

Step 1: Long-press the blank space on the home screen and tap Wallpaper & style.

Step 2: Tap Change wallpaper.

Step 3: Tap My photo to select a picture from your phone gallery or Tap on the Default category from the list.

Change wallpaper on Pixel 3 and Pixel 3 XL Device

Step 4: Select a Photo and tap on the Right arrow icon at the bottom right corner.

Set Pixel 3Xl Wallpapers

Step 5: Choose set wallpaper on the Home screen, Lock screen, or Home and Lock screens.

Alternative: Settings > Wallpaper & style > Change wallpaper > Select a picture > Right arrow icon at the bottom right > Select Hom screen, Lock screen, or Home and Lock screens.

1st Way: Change Home Screen & Lock Screen Wallpaper on Pixel 3, 3 XL (Older Android Version)

Step 1: Long press the Blank space in your Pixel home screen.

Lock screen wallpaper on Google Pixel 3 XL

Step 2: Tap Wallpapers.

List of different categories of Google Pixel 3 and Pixel 3 XL wallpapers available. Also, change the Pixel 3 wallpaper using a gallery photo.

Set wallpaper Google Pixel 3 and Pixel 3 XL

Step 3: Select wallpaper from the category list.

Change wallpaper on Pixel 3 lock screen and home screen

Step 4: Tap Set wallpaper at the upper right side.

How to change wallpaper on Pixel 3

Step 5: Choose from the Home screen, Lock screen, or Both.

Now apply the selected wallpaper as Google Pixel 3 home screen and lock screen wallpaper.

2nd Way: Change the Pixel 3 Wallpaper using Display Settings

Step 1: Swipe down the notification shade at the top of the screen and tap the Settings gear icon.

Step 2: Tap Display.

Google Pixel 3 wallpaper settings

Step 3: Tap Wallpaper.

Step 4: Select the wallpaper.

Step 5: Tap Set wallpaper at the upper right corner.

Step 6: Choose a home screen/lock screen/both.

Now change the wallpaper on the home screen and lock screen. It’ll change your Pixel 3 backgrounds look.

How to Turn On Dark Mode in Pixel 3 and 3 XL

Settings > Display > Dark theme in appearance section > Toggle on Use dark theme or Swipe down the notification panel at the top and tap on Dark theme to turn it on/off

And that’s it. I hope this little tutorial helps change the Pixel 3 lock screen and home screen wallpaper. If you have any questions, please tell us in below comment box. Stay and connect with us for the latest updates.

Related:

How to Change Button Order in Galaxy Note 9 Quick Settings Panel

Do you want to add a button to the notification panel? Here’s how to change the button order in Note 9 quick settings panel. We use a quick settings panel in our Samsung Galaxy or other android devices to quickly access features. By default set Note 9 button grid size and button order in your device. If you want to change Galaxy Note 9 button order positions, it’s quite simple to change position. Also, add other settings to simply drag a button to the above area to add them to the quick settings panel. If you have the latest updated Note 9 One UI 2.0 (Android 10), you can see the status bar (Hide/Show notifications & enable battery percentage) in quick settings options.

In Samsung Galaxy Note 9 quick settings panel, you can see Wi-Fi, Auto-rotate, Do not disturb, Wi-Fi calling, Mobile hotspot, S Pen remote, Smart view, Power saving, and other settings. Follow the below-given step by step process to change the button order in Note 9 quick settings panel.

Read Also:

How to Use Quick Settings Panel to Change the Button Order on Samsung Note 9

How to change button order in Note 9 quick settings panel

You can customize quick settings on galaxy Note 9 to change button grid size and button order on your phone.

Step 1: Swipe down the notification panel at top of the screen.

Step 2: Tap Three vertical dots (More) at the upper right corner of the screen.

Here you can see the button order and button size in your Samsung Galaxy Note 9 device.

Step 3: Tap Button order.

Step 4: Now tap & hold the feature and move it other position you want to set. Also, add new features to the quick settings panel by drag buttons to the below area and add to the above.

Step 5: Tap Done after arranging quick settings panel Note 9,

Now, customize quick settings on your Galaxy Note 9. You can anytime reset quick settings panel if you don’t comfortable with changes you made using same steps.

Open quick settings panel > Three vertical dots > Button order > Reset

How to Change Button Grid Size in the Galaxy Note 9

By default set Note 9 quick settings panel button grid size 4×3. You can choose from 3×3 / 4×3 / 5×3.

Step 1: Swipe down the notification panel at top of the screen.

Step 2: Tap Three vertical dots at the upper right corner.

Step 3: Tap Button Grid.

By default set 4×3 grid size in your Samsung Galaxy Note 9 device.

Step 4: Choose from 3×3 / 4×3 / 5×3.

You can easily customize quick settings panel on galaxy Note 9 including button positions, button grid and brightness settings also. Turn on show control on top to show the brightness control above the notification panel on your Samsung galaxy note 9 devices.

And that’s it. I hope this little tip useful to change button order in Note 9 quick settings panel. If you have any questions, tell us in below comment box. Stay and connect with us for latest updates.

How to Enable and Use Feature Flags in Android 9 Pie

This is a hidden Android Pie feature. This tutorial teaches you how to enable feature flags in Android 9 Pie devices. You can use feature flags to back Oreo settings for given options such as battery display, Bluetooth while driving, about phone, and more. You can find this setting under the developer mode settings. This newly added feature flags are already available on the Google Chrome browser.

Android Pie 9.0 has several new features such as Adaptive Battery, Adaptive brightness, Digital wellbeing, App actions, overview selection, feature flags, cutout Notch display, and more.

Read Also:

How to Use Feature Flags in Android 9 Pie   

You can see 7 commands for change settings of Android Pie. First of all, make sure to enable developer options in Android 9 Pie device to use this feature flags.

Step 1: Swipe down the notification shade and tap the Settings gear icon.

Step 2: Tap System.

Step 3: Tap About phone.

Step 4: Scroll down the end of the page and tap the Build number 7 times or tap until view “you are now developer! message.

Step 5: Now enable developer mode in your device.

How to Enable Feature Flags Android 9 Pie

Step 1: Go to Settings on your phone.

Step 2: Tap System.

Advanced settings in android 9 Pie

Step 3: Tap Advanced.

Android 9 Pie developer mode settings

Step 4: Scroll down at end of the page and tap Developer options.

Here you can see several useful android Pie developer settings such as OEM unlocking, running services, USB debugging, logger buffer size, Windows animation scale, simulate secondary display, and more.

Android 9 Pie’s feature flags

Step 5: Tap Feature flags under the Debugging section.

You can see below given a list of options in android 9 Pie’s feature flags. By default disable only two feature flags, one is settings_bluetooth_while_driving and another settings_battery_display_app_list.

How to use feature flags in Android 9 Pie

settings_about_phone_v2

It will change your android Pie device UI of about phone section.

settings_bluetooth_while_driving

When enabling this option on your phone, it’ll automatically connect with your car Bluetooth or other accessories while driving.

settings_data_usage_v2

Currently not found any change while turn on this option.

settings_audio_switcher

Same here you can’t found any change when set as true or false.

settings_systemui_theme

Now found any change when enable or disable features flags Android 9 Pie.

settings_zone_picker_v2

It will add automatic time zone settings under date & time settings in your android 9 Pie devices.

settings_battery_display_app_list

You can see app usage battery since fully charge in the battery settings when enabling feature flag on Android Pie 9.0.

Feature Flag Android 10

Settings > System > Advanced > Developers > Feature flags under the Debugging section

Here, you can’t see any options on your Android 10.

And that’s all. I hope this little tutorial useful to enable and use feature flags in Android 9 Pie. Do you know any other hidden android 9 Pie tips you want to share? Tell us in below comment box.

How to Turn On Accessibility Menu in Android 11, Android 10, Android 9

Do you want to quickly access settings from any screen on Android 9 Pie? Here’s how to turn on accessibility menu (Services) in Android 11, Android 10, and Android 9 (Pie) devices. Using this Android accessibility service, you’ll quickly access settings such as Google Assistant, media volume, notifications, screenshots, Accessibility settings, recent apps, and more. When turning on the accessibility menu, you can see the accessibility icon on the bottom right corner of your device. This will provide a large on-screen menu to control your phone. You can manage gestures, hardware buttons, navigation, and more.

Read More: How to Enable One-Handed Mode on Android

How to Turn On Accessibility Menu in Android 11, Android 10, Android 9

To use the accessibility feature on Android devices, check the below-given settings on your phone.

How to Turn On Accessibility Menu Android 11 and Android 10

Step 1: Go to Settings.

Step 2: Tap Accessibility.

Step 3: Tap the Accessibility menu.

Step 4: Toggle on Accessibility Menu Shortcut.

Step 5: Tap OK.

How to Turn On Accessibility Service Android 9

Step 1: Swipe down the notification panel and tap the Settings gear icon.

Android Pie accessibility settings

Step 2: Scroll down and tap Accessibility.

Android Pie accessibility menu

Step 3: Tap the Accessibility menu under the Interaction Controls section.

Use accessibility feature on android Pie 9

By default, disable the accessibility service on your Android 9 and other devices.

Step 4: Toggle on Use service.

You can see a pop-up message on the screen: Use accessibility Menu?

Turn on accessibility menu android 9 Pie

Step 5: Tap OK to activate it.

How to turn on accessibility service Android 9

Now you can see the Accessibility icon (Show the above screenshot) at the bottom right corner of your device.

How to turn on accessibility service android 9 Pie

Step 6: Tap the Accessibility icon to see several settings for quick access from any screen.

How to Turn Off Accessibility on Android 11

Settings > Accessibility > Accessibility Menu > Toggle off Accessibility Menu Shortcut.

How to Turn Off Accessibility Menu on Android 9 (Pie)

Step 1:  Go to Settings > Accessibility > Interaction controls > Accessibility menu.

Step 2: Toggle off Use service.

Now the pop-up screen appears: Stop Accessibility Menu?

Stop Accessibility Menu android 9 Pie

Step 3: Tap OK to turn off accessibility.

Now remove the accessibility icon from your Android device’s bottom right-side corner.

Using one or more switches, you can also turn on switch access settings to control your Android phones and tablets. Use switches to select items, enter text, scroll, and more. Also, assign buttons, display & sound, and other switch access settings on Android 9.0.

Settings > Accessibility > Interaction controls > Switches Access.

In other Android Pie accessibility settings, you can see talkback, select to speak, accessibility shortcuts, Magnification, remove animations, Dwell timing, and more settings.

And that’s all. We hope this article is clear on how to turn on accessibility to Android devices. If you have any trouble, please tell us in below comment box. Don’t forget to share with others if you find it useful.

Read Also:

How to Turn Off System UI Notification in Android 9 Pie

Annoying by some system UI notifications on your Android? Here’s how to turn off system UI notifications in Android 9 Pie devices. You can enable/disable notifications of battery, storage, general messages, screenshots, and more. Also, change settings for certain apps on your all Pixel devices. If you don’t want to disable system UI notification on android 9.0 Pie, silence your device with Do Not Disturb.

Using this android Pie system UI notification settings, you’ll control Android system notifications on your Pixel devices such as Google Pixel, Pixel 3, Pixel 3 XL, Pixel 2 XL, and other supported devices.

Read Also:

How to Disable System UI Notifications in Android Pie 9.0

By default hidden system UI on android Pie 9.0 and other devices. Check out below given settings to find and turn off system UI on android 9 Pie.

Step 1: Swipe down the notification panel twice and tap the Settings gear icon on your Pie.

Step 2: Tap Apps & notifications.

Here you can see recently opened apps list.

Android Pie apps and notifications settings

Step 3: Tap See all apps.

Step 4: Tap Three vertical dots (More) at the upper right corner.

Hidden system UI on android Pie 9

Step 5: Select the show system.

Android Pie system UI notification settings

Step 6: Scroll down up and tap on System UI.

How to turn off system UI notification on Android 9 Pie

Step 7: Tap Notifications.

You can see System UI settings for android 9 Pie devices. By default, only two settings turn on (Show below-given screenshot) in my Google Pixel running 9.0 Pie device.

Battery: You can’t get alert about battery draining and other notifications if disable.

Screenshot: If you don’t want to show a screenshot on a screen when taken, disable it. After that, you’ll only open a screenshot from the gallery only.

How to turn off system UI notification on Android 9

Step 8: Uncheck the Battery and screenshot square box.

Now disable system UI notification on android Pie 9 for battery and screenshot related. Also, enable/disable notifications dots if you want.

And that’s all. We hope this makes it clear how to turn off system UI notification on Android 9 Pie. If you have any questions, tell us in below comment box. Stay and connect with us for the latest updates. Don’t forget to share with others if you found this tutorial helpful.