How to Change WhatsApp Font Size For Android

Here’s how to change the font size on WhatsApp Android Phones. When you change the WhatsApp font size on Android or iPhone, it will change the text format of the chat message only. By default WhatsApp font size for android device is “medium”. You can increase the font size in WhatsApp messages Android using chat settings to set as Small/Medium/Large. If you want to change the WhatsApp app settings font size & font style, you can change it using phone display settings.

WhatsApp is one of the most useful messaging apps to send & receive unlimited messages, videos, and audio to your friends or groups without any pay. This android messenger app supports all smartphones including Android, iPhone, Windows Phone, Blackberry, Nokia, etc.

Read Also:

How to Change WhatsApp Font Size For Android Phone or Tablet

Step 1: Launch the “WhatsApp” on your android devices.

Launch WhatsApp app

Step 2: Tap on “Menu (Three vertical dots)” at the top right corner.

Select Settings option

Step 3: Choose “Settings”.

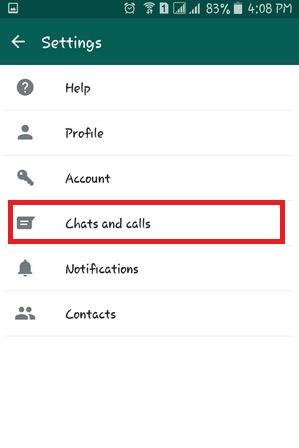
Tap on Chats and Calls option

Step 4: Tap on “Chats and Calls”.

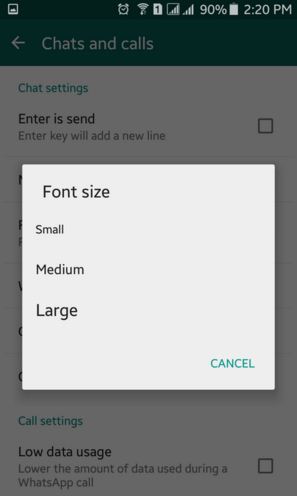
Tap on Font Size on android phones

Step 5: Tap on “Font size”.

You can see the default WhatsApp font size on an Android Lollipop 5.1.1 device is Medium.

How to change WhatsApp font size for android

Step 6: Tap any option from small or large font size to change WhatsApp font size for android phones and tablets.

change WhatsApp font size for android phones

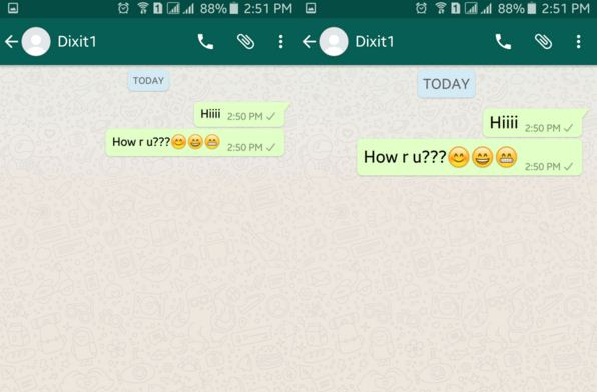
After the increase or decrease the font size on WhatsApp, you can see the above screen on your Android Devices.

Increase font size on android phones

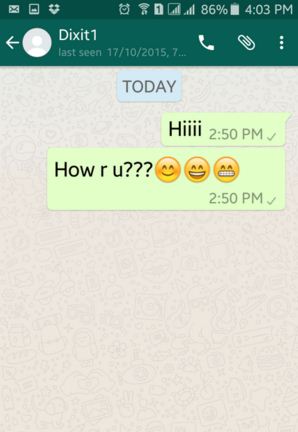
After change or set a large font size on android, you can see the above screen on your device.

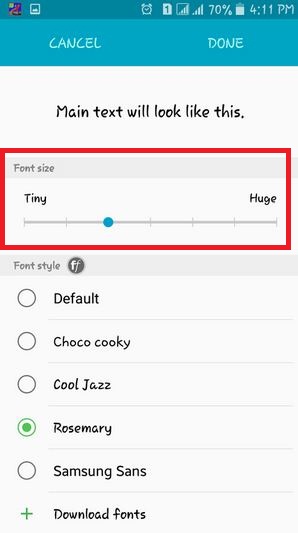
How to Change the Font Size on the latest Android – It will change WhatsApp App Font Settings (Not change in chat font)

Settings > Display > Advanced >  Font size > Set from Small/Default/Large/Largest

How to Change the Display Size on the latest Android

Settings > Display > Advanced >  Display size > Set from Small/Default/Large/Larger

Now set or change WhatsApp font size for android phones and tablets whatever you comfort and easily chat with your friends or groups.

You can easily change the font size on your android device not only WhatsApp but default phone font size using the above image on your android phones. Move the slider to the right side to increase the font size. To make the font size smaller, slide the slider to the left side.

Increase or Decrease font size on android mobile

We hope the above-given tutorial is useful to change WhatsApp font size for android phones and tablets. Do you know any other ways to change the font size on WhatsApp then please share with us. Stay and connect with us for the latest WhatsApp tips and tricks.

How to Hide Navigation Bar in Huawei P30 Pro, P20 Pro, P20 Lite, Mate 20 Pro

Get rid of the navigation bar on your latest Huawei devices? Here’s how to remove or hide the navigation bar in Huawei P20 Pro, P20 and P20 Lite. Easy to customize navigation bar in Huawei P20 Pro device. You can hide navigation keys or change the navigation buttons on Huawei P20 Pro using system navigation settings. By default, you can see back, home screen and recent app key in your devices.

Compatible with Huawei P30 Pro, P20 Pro, P20 Lite, Mate 20 Pro, and more. In Huawei P20 Pro navigation bar settings, you can set an off-screen navigation button, on-screen navigation key, virtual navigation bar, and navigation dock options. Follow the below-given step by step process to change or hide the navigation bar in Huawei P20 Pro.

Relevant Article:

How to Remove Navigation Bar Huawei P20 Pro and P20 Lite

How to hide navigation bar in Huawei P20 Pro

Check out the below-given process to hide or change the navigation button on Huawei P20 Pro and P20 Lite.

Step 1: Swipe down the notification panel and tap the Settings icon.

Step 2: Scroll down up to the System and tap on it.

Here you can see system update, system navigation, language & input, date & time, simple mode, data transfer, back up & restore, reset and more.

Step 3: Tap System navigation.

List of below-given options views in your device. By default set virtual navigation bar in Huawei P20 Pro & P20.  Now customize the navigation bar in Huawei devices you want.

Off-screen navigation button:

Now you can use fingerprint sensor gestures to back instead of navigation button and touch & hold for directly back to the home screen in your device. To view recent apps, just slide left or right side. And slide up to open Google app in your Huawei P20 Pro & P20.

On-screen navigation button:

It’ll hide the navigation bar in Huawei P20 Pro and P20 device. While choosing on-screen navigation in your device, you’ll see a single button on-screen instead of a navigation key. Now hide navigation key on Huawei P20 Pro & P20 device and use only a single key for navigation. Now enable gesture navigation in Huawei P20 Pro.

Back: Touch the navigation key

Home screen: Touch & hold the navigation key

Recent apps: Swipe left or right

Google Assistant: Swipe up from the bottom of the screen

Virtual Navigation bar:

By default set this navigation system in your device. So you can see back, home and recent task button in your device.

Navigation dock:

By default turn off navigation dock in your device. Enable navigation dock in Huawei P20 Pro & P20 phone. You can see round circle on a home screen called navigation dock. Now use navigation dock on Huawei P20 Pro instead of the navigation key. Also, enable hide navigation bat option using this setting. To show the navigation bar on Huawei P20 Pro, swipe up from the bottom of the screen.

Back: Touch navigation dock button

Home screen: Release aftertouch & hold navigation dock

Overview: Hold & slide

Move Position: Drag the navigation dock

Step 4: Choose from above-given option to change navigation bar style on Huawei P20 Pro & P20

Hide Apps on Huawei P30 Pro, P20 Pro, Mate 20 Pro

Step 1: Quickly pinch zoom on the home screen in your Huawei devices.

You can see the hidden application menu.

Step 2: Tap Add.

A list of installed applications appears in the hide application menu.

Step 3: Check the box of apps you want to hide from your screen or app drawer.

Step 4: Tap OK.

Find Hidden Apps on Huawei P20 Pro and other devices

Pinch zoom to the home screen > Add icon > Uncheck the apps box to show on app drawer or home screen

And that’s all. We hope this tutorial helpful to hide navigation bar in Huawei P20 Pro and P20. If you found it helpful, don’t forget to share it with others. Stay and connect with us for the latest updates.

How to Factory Reset Galaxy Note 8

How to hard reset Samsung Galaxy Note 8 using recovery mode. Irritate of Samsung Galaxy Note 8 is an unresponsive touch screen or won’t power on? When your galaxy Note 8 is stopped working or black screen issue, you need to perform a factory reset Samsung Galaxy Note 8. But remember one thing, this reset Note 8 will delete all your Samsung data including the Samsung account, the third party downloaded apps, Google Account, photos, videos, and more. So back up and restore your galaxy Note 8 important data using the Gmail account.

In specific app-related issues, clear the app cache or use safe mode to find a third-party app that causing issues in your Note 8. Follow the below-given step by step guide to master reset Samsung Galaxy Note 8.

Read Also:

How to Hard Reset Samsung Galaxy Note 8

Hard reset Samsung galaxy Note 8 phone

Step 1: Turn off your Samsung Galaxy Note 8.

Step 2: Press and hold Volume up and Power button at the same time until view the android recovery screen.

Step 3: Press the volume down button until highlight wipe data/factory reset.

Step 4: Press the Power button.

Step 5: Press the volume down button until select Yes then press the power button to start a factory reset process.

Wait until you see the data wipe complete message on the bottom left corner of the screen.

Step 6: Use the volume down button to select reboot system now and press the power button to restart your Samsung Note 8.

Now, you reset your Galaxy Note 8 to factory default settings.

Factory Reset Samsung Galaxy Note 8 using phone settings

It will erase all your phone data so backup your important data first and then perform factory reset data on galaxy Note 8.

Step 1: Go to Settings in your galaxy Note 8 device

Step 2: Scroll down and tap General management.

Step 3: Tap Reset under the reset section.

Step 4: Tap Factory data reset.

Step 5: Tap on the Reset button.

Unlock the galaxy Note screen if set password.

Step 5: Tap delete all.

That’s all. I hope the above-given tips hard reset Samsung Galaxy Note 8 is helpful to fix issues. Do you have any methods want to share with us? Let us know in below comment box. Stay connected with us for the latest Samsung devices tips and tricks.

How to Reset Samsung Galaxy Note 8 – Hard Reset and Soft Reset

Annoying of Galaxy Note 8 black screen of death or frozen or won’t turn on the issue? If your Android or Samsung devices are not responding after all troubleshooting steps, you’ll try hard reset Samsung Note 8 using hardware keys. Here’s how to factory reset Samsung Galaxy Note 8 using power, Bixby, and volume down button. Different Android devices have slightly different settings to factory reset Galaxy Note 8/Galaxy Note 5. It will remove all your phone data so make sure back up your important data before applying this method.

One of the basic solutions to solve your galaxy Note 8 issues is restart your device. If not fix the issue then check system software update for your Note 8. If none of the methods worked to solve the problem, reset Samsung Galaxy Note 8 using below given two different methods.

Read Also:

How to Factory Reset Samsung Galaxy Note 8/Galaxy Note 5

How to master reset Samsung galaxy Note 8

This hard reset galaxy Note 8 fixes various issues such as Note 8 black screen, slow internet speed, app crashing, forget screen lock, can’t make a call, can’t send or receive messages, poor sound call quality and more. Remember one thing, this trick use when you don’t have options to fix the issue. It will erase all your phone data. Before resetting your device, backup and restore galaxy Note 8 data.

Reset Galaxy Note 8 When Phone Won’t Turn On or Black Screen of Death

Step 1: Turn off your Samsung Galaxy Note 8.

Step 2: Press and hold Volume up and Power button at the same time until view the android recovery screen.

Step 3: Press the volume down button until highlight wipe data/factory reset.

Step 4: Press the Power button.

Step 5: Press the volume down button until select Yes then press the power button to start a factory reset process.

Wait until you see the data wipe complete message on the bottom left corner of the screen.

Step 6: Use the volume down button to select reboot system now and press the power button to restart your Samsung Note 8.

Now, you reset your Galaxy Note 8 to factory default settings.

Factory Reset Samsung Note 8 using phone settings

It will erase all your phone data so backup your important data first and then perform factory reset data on galaxy Note 8.

Step 1: Go to Settings in your galaxy Note 8 device

Step 2: Scroll down and tap General management.

Step 3: Tap Reset under the reset section.

Step 4: Tap Factory data reset.

Step 5: Tap on the Reset button.

Unlock the galaxy Note screen if set password.

Step 5: Tap delete all.

Wipe or Clear Cache Partition Galaxy Note 8

This will remove temporary files and unnecessary app data from your device. You’ll apply this method when your phone is frozen, unresponsive touch screen, restart your phone, etc.

Step 1: Turn off your Samsung Galaxy Note 8.

Step 2: Press and hold the Volume up, Bixby key, and Power button at the same time until seeing the android system recovery menu on your device.

Step 3: Press the volume down button until highlight Wipe cache partition.

Step 4: Press the power button to apply it.

Step 4: Press the volume down button until Yes select then press the power button to start the wipe cache on galaxy Note 8.

You can see this message on the bottom left of the screen when complete: Cache wipe complete.

Step 5: Use volume up or down button until the highlight reboot system now and press the power button to restart your Samsung Note 8.

That’s all. Check out each one above listed tips to master reset Samsung Galaxy Note 8. Do you have any other tips you want to share with us? Hit the comments in the below box.

How to Fix Google Play Store Error 192

Can’t update any apps from Google Play store on your Android device? You can fix Google play store error 192 using this article. When trying to update the app from the play store, this message show: “Carrier services” can’t be updated. Error code 192 play store. Sometimes view error code 924 also. There are various reasons to occur this issue such as software bug, poor internet connection, update play store, etc.

After update the play store, can’t download apps from the play store via Wi-Fi. When using mobile data, download & update apps in my Pixel XL device. To fix error code 192 play store, check update for Google play services and Google Play store. Try below-given troubleshooting methods to fix Google Play store error 192 in Google Pixel phone.

Related:

How to Fix Error Code 192 on Google Play Store

fix Google Play store error 192 in android phone

Check out each one listed method to fix the error 192 play store.

1st Method: Clear the cache & data of Google Play Store

Step 1: Go to Settings.

Step 2: Under the device section, Tap on Apps.

Step 3: Scroll down until view Google Play Store and tap on it.

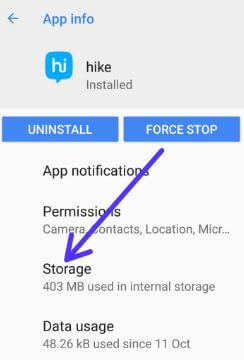
Step 4: Touch Storage.

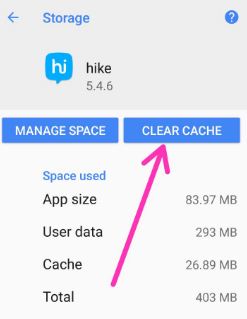
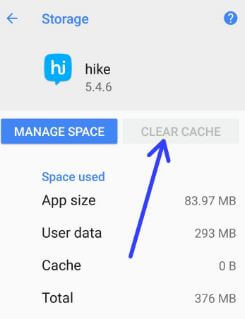
Step 5: Tap on Clear cache and tap on Clear data.

Clear the cache of Google play services in your device:

Settings > Device > Apps > Google Play Services > Storage > Clear cache

2nd Method: Uninstall Google play store updates to fix Google Play store error 192

Step 1: Go to Settings.

Step 2: Tap on Apps under the device section.

Step 3: Touch Google play store.

Step 4: Touch More.

Step 5: Tap on Uninstall updates & Touch OK.

Now try to download or install apps from the play store. Check to fix Google play error 192.

3rd Method: Check play store version – latest updated or not

Step 1: Open Google Play Store app.

Step 2: Tap Three horizontal lines from the top of the left side corner.

Step 3: Touch Settings.

Step 4: Tap Play Store version under about section.

If the latest version installed then view this message: Google play store is up to date.

You can download Google Play store latest APK version:

Download Google Play Store APK latest version

4th Method: Remove Google account to fix Google Play Store Error 192

Step 1: Go to Settings.

Step 2: Under the Personal section, Tap on Accounts.

Step 3: Tap on Google.

Step 4: Tap on More from top of the right side corner.

Step 5: Touch Remove account.

Step 6: Again touch Remove account.

After removing your Google account, sign in again and try to download or update apps. If not fix error 192 play store in android, try a below-given trick.

Read Also:

5th Method: Factory reset data on Android

Before hard reset, your android phone, back up & restore android phone data.

Step 1: Go to Settings.

Step 2: Under personal section, tap on Backup & reset.

Step 3: Tap Factory data reset.

Step 4: Touch Reset phone.

Step 5: Touch Erase everything.

It will erase all your android phone data, photos, videos, music and third party downloaded apps from your device.

That’s all. End the list of possible solutions to fix Google Play store error 192 in android phone. Do you know some other tricks to fix this issue? Let us know in below comment box.

How To Wipe Cache Partition Samsung Galaxy S7 And S7 Edge

Here’s how to wipe cache partition Samsung Galaxy S7 and Galaxy S7 edge. If your galaxy S7 & galaxy S7 edge is freezing or unresponsive, black screen, touch screen not working, and more issue. After applying all methods if your phone is still not working, you’ll be trying to hard reset Galaxy S7 edge and also wipe the cache or clear cache S7 edge.

If you have any app-related issues, you can clear the app cache using app settings in your Galaxy S7 devices. Also, use safe mode to find the downloaded app that causes any issue on your phone. Check out the below-given settings to Samsung S7 clear cache partition using hardware keys in your Verizon, T-mobile, AT&T, Sprint, and more.

Read Also:

How To Samsung Galaxy S7 Clear Cache Partition

Wipe cache partition on Samsung galaxy S7 edge

If your Galaxy S7 and Galaxy S7 edge phone running slow or touchscreen not working, try the below-given methods.

How to Clear Cache Samsung Galaxy S7 Edge using Hardware Key

Step 1: Turn off your Samsung Galaxy S7 & S7 edge phone.

Step 2: Press & hold the volume up button, home button, and power button at the same time until the Galaxy S7 turns on.

You can see the Android system recovery option on your device screen. By default “Start” button view on your phone.

Step 3: Press the volume down button until you see the recovery mode.

Step 4: Press the power button to restart in recovery mode.

You can view a screen of the android robot with a red exclamation mark on the screen. Tap & hold the power button and press the volume up button one time only. Now, you can see the S7 recovery mode screen.

Step 5: Press volume buttons to scroll to Wipe data/Factory reset, press the power button to select it.

You can show this message: Wipe cache?

Step 6: To confirm, use volume buttons to scroll to Yes and press the power button to select it.

Clearing the cache data may take a few minutes.

Step 7: Use the volume buttons to scroll to reboot the system now, press the power button to select it.

Now check to fix your Samsung Galaxy S7 and Galaxy S7 edge problems.

How to Clear Cache on Samsung S7 Edge – Individual App

Settings > Apps > Make sure select All apps in drop-down menu > Select the app > Storage > Clear cache

How to Clear Cookies on Samsung S7 Edge – Chrome Browser

Open Chrome App > Menu > Settings > Privacy under advanced section > Clear browsing data > Clear cookies > Clear 

How to Factory Reset Samsung S7 edge When a Phone is Unlocked

It will delete all your S7 information including your Samsung account, Google accounts, downloaded apps, photos, videos, music, and more. Before performing the Samsung S7 factory reset, back up & restore your Samsung Galaxy S7 & S7 edge data.

Step 1: Go to “Settings”.

Step 2: Under the personal section, Tap on “Backup & reset”.

You can backup your data using this setting.

Step 3: Tap on “Factory data reset”.

Step 4: Tap on “Reset phone”.

If set Pattern lock or PIN or Password or Fingerprint in your galaxy S7 & S7 edge device, confirm it to unlock your device. Before deleting all data, back up your android device data safely.

Step 5: Tap “Erase everything”.

It will delete all your personal information, Samsung account, Google account, music, photos, third-party apps, and other data from your device.

That’s all. Did you find the above methods helpful to Wipe cache partition on Samsung Galaxy S7 and Galaxy S7 edge? Let us know in below comment box. Stay connected with us for the latest Galaxy S7 and Galaxy S8 tricks.