How to Change Wallpaper in Google Pixel 6 Pro

Here’s how to change wallpaper in Google Pixel 6 Pro and Pixel 6. By default set home screen and lock screen wallpaper on Pixel 6 Pro and Pixel 6. When you change the wallpaper on your new Pixel 6 Pro, it will also change the accent color you choose from selected wallpaper colors or basic colors. This wallpaper & style settings include a dark theme, themed icons, and app grid settings. Also, enable themed icons on your Pixel devices (Running Android 12).

Read Also:

How to Change the Wallpaper on Pixel 6 and Pixel 6 Pro

Check out the below-given methods to set wallpaper on lock screen and home screen on your Google Pixel devices.

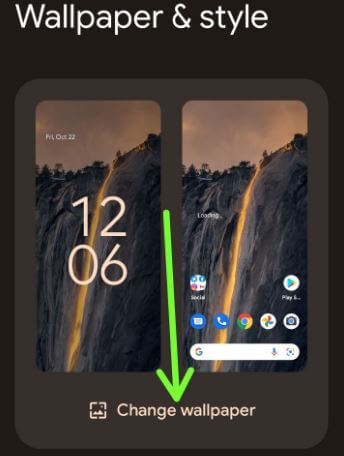
Step 1: Long press on the blank area of the home screen and tap on Wallpaper & style.

Step 2: Tap on Change wallpaper.

Step 3: Tap on My photos if you want to select a picture from the phone gallery or Wallpaper category from the list.

Step 4: Select the Wallpaper from the list.

You can see a preview of how to look wallpaper on the home screen and lock screen.

Step 5: Tap on the Right arrow icon at the bottom right corner.

How to Change Wallpaper in Google Pixel 6 Pro and Pixel 6

Step 6: Set wallpaper on the Home screen/Lock screen/Home and lock screen you want to set.

You can see a Wallpaper set successfully appear on the screen.

Alternative Method: Swipe down notification panel twice > Settings gear icon > Wallpaper & style > Change wallpaper > Choose the wallpaper category > Right arrow icon Lock screen

How to Change Lock Screen Wallpaper on Pixel 6 Pro using Google Photos or Phone Gallery

Step 1: Open the Google photos app in your Pixel.

Step 2: Tap on the Picture you want to set.

Step 3: Tap on Three vertical dots at the top right corner.

Step 4: Tap on Use as.

Step 5: Choose Photos or Contacts (Set specific contact photo).

Step 6: Tap the Right arrow icon.

Step 7: Choose from Home screen/Lock screen/Home and lock screen.

How to Enable Themed Icons on Pixel 6 Pro/Pixel 6

You can enable or disable theme icons on your Google Pixel devices (Running Android 12) using wallpapers and styles settings.

Long press on the blank space > Wallpaper and style > Toggle on Themed icons And that’s all.

Do you like these new wallpaper and styles settings on your Google Pixel 6 and Pixel 6 Pro? Which is your favorite Pixel 6 Pro feature? Tell us in below comment box.

How to Take a Long Screenshot Pixel 6, 6 Pro, 7 Pro, 7

Do you want to take a long screenshot Pixel 7, Pixel 7 Pro, Pixel 6, and Pixel 6 Pro devices? Google Pixel devices running stock Android 12 and later versions support the scrolling screenshot (Extended Screenshot) feature to capture multiple pages or screens. You can use the power button and volume down button on your Pixel devices to take a screenshot. We hope Google adds a new gesture to quickly capture screenshots like other devices, including Samsung (Palm swipe to capture), OnePlus (Three finger screenshots), etc. Here’s how to take a long screenshot Pixel 6, Pixel 6 Pro, Pixel 7 Pro, and Pixel 7.

Read More: How to Take a Screenshot on Android Phone (4 Ways)

How to Take a Scrolling Screenshot Pixel 7, Pixel 7 Pro, Pixel 6 Pro and Pixel 6

You must know any Google Pixel screenshot method to take Pixel 7 and Pixel 6 scrolling screenshot (Running Android 14).

How to Take Scrolling Screenshot Pixel 6 and Pixel 7 Series

Step 1: Open the page or screen you want to capture multiple screenshots (Ensure multiple pages on the screen).

Step 2: Press and hold the power and volume down buttons simultaneously to capture a screenshot. You can check out this guide to take screenshot methods on your Pixel devices.

How to Take a Scrolling Screenshot in Google Pixel 6 Pro and Pixel 6

Step 3: Tap on Capture More at the bottom right corner.

Step 4: Select the screen you want to take a scrolling screenshot and tap on Save at the top left corner.

Step 5: You can find taken long screenshots in your Pixel phone gallery (Screenshots folder).  

3 Methods to Take a Google Pixel Screenshot

Check out the three methods to capture screenshots on your Google Pixel devices.

Method 1: Take a Screenshot using the Power and Volume Down Key

Step 1: Open the screen on your Pixel.

Step 2: Press the power and volume down keys simultaneously to capture a screenshot.

Method 2: Take a Screenshot Using Recent Apps

Step 1: Open the Recent apps on your Pixel.

Step 2: Tap on Screenshot at the bottom to capture a screenshot of any recent app screen.

Method 3: Take a Screenshot using Google Assistant

Step 1: Open the page on your Pixel devices.

Make sure to set up your voice to use Google Assistant.

Step 2: Say Hey Google (OK Google) Take a screenshot.

You can see the captured screenshot at the top of the status bar.

Step 3: Now, directly share, edit, and delete screenshots on the status bar.

And that’s all. Which method do you use to screenshot your Google Pixel devices? Tell us in the comment box below.

Read Also:

How to Back Up Data on Samsung Galaxy Z Flip 4/Galaxy Z Flip 3/Galaxy Z Flip

Do you want to back up and restore your Samsung data? Here’s how to back up data on Samsung Galaxy Z Flip 4/Galaxy Z Flip 3/Galaxy Z Flip 5G using Google drive, Samsung Cloud, and the Smart switch feature. You can use Samsung smart switch to transfer data from an old phone or tablet, including photos, apps, contacts, and messages. Also, back up your data to an SD card or USB storage device. Make sure to remember your Samsung account or Google account ID and password to back up & restore your phone data if you lose your phone or factory reset it.

How Do I Backup my Samsung Flip 3?

How to Back Up Data on Samsung Galaxy Z Flip3
Check out the below given different methods to back up your data on your Samsung Galaxy Z Flip series.

How to Back Up Data Using Google Drive on Samsung Galaxy Z Flip – Best Way to Backup a Samsung Phone

Step 1: Swipe down the notification panel at the top and tap on the Settings icon.

Step 2: Scroll down and tap on Accounts and backup.

Step 3: Tap on Back up data in the Google drive section.

Step 4: Tap on the Back up now button.

It will backup photos & videos, apps, SMS messages, call history, and Google account data.

How to Back Up Everything on my Samsung Galaxy Z Flip using Samsung Cloud

Step 1: Go to Settings on your Samsung devices.

Step 2: Tap on Accounts and backup.

Step 3: Tap on Back up data under the Samsung cloud section.

Step 4: Log in with your Samsung account id and password.

Step 5: Select the options you want to back up and tap on Back up at the bottom.

Wait until the process of backing up data on your Samsung One UI devices finishes.

Step 6: Tap on Stop if you want to stop the baking up data.

Step 7: Tap on Done when all data is backed up.

How to Use Samsung Smart Switch to Back Up Data to SD Card or USB Storage

Step 1: Go to Phone settings.

Step 2: Tap on Accounts and backup.

Step 3: Tap on External storage transfer under the Smart switch section.

Step 4: You need to Allow the permissions here.

Step 5: To back up or restore, insert an SD card or connect a USB storage device. And that’s all.

How to Restore Data on Samsung Galaxy Z Flip

Settings > Accounts & backup > Restore data > Select the data you want to restore > Restore

Read Also:

Do you know any alternative method to back up and restore data on the Samsung Galaxy Z Flip3 device? Could you share it with us in the below comment box?

How to Limit Data Usage on Samsung Galaxy Z Flip3

Do you want to restrict mobile data usage on your Samsung Z Flip3/Samsung Z Fold3 5G? Here’s how to limit data usage on Samsung Galaxy Z Flip3 5G. You need to set data limit and data warning on your Samsung Galaxy One UI devices. Also, enable data saver mode that helps you to cut down your data usage be preventing apps from using data in the background on your Samsung Z Flip3/Samsung Z Fold3/Z Fold2 devices. You can individually disable app background data also to reduce data usage on Samsung Galaxy.

Read Also:                                                           

How to Reduce Data Usage on Samsung Z Flip3/Samsung Z Fold3 5G

How to Limit Data Usage on Samsung Galaxy Z Flip3 5G/Samsung Galaxy Z Fold3 5G
How to Limit Data Usage on Samsung Galaxy Z Flip3 5G

You can set a data limit to stop app using more data on your Samsung Galaxy One UI devices.

Step 1: Swipe down the notification panel at the top and tap on Settings icon.

Step 2: Tap on Connection.

Step 3: Tap on Data usage.

Step 4: Tap on Mobile data usage.

You can see the list of apps using mobile data on your Samsung device.

Step 5: Tap on Billing cycle and data warning.

Step 6: Tap on Data warning if you want to change it. It will warn you before reach the data limit.

Step 7: Toggle on Set data limit.

Mobile data will be turned off when the limit is reached.

Step 8: Tap on OK.

Step 9: Tap on Data limit.

Step 10: Enter the limit and set as GB/MB you want and tap on Set.  

How to Turn Off App Background Data on Galaxy Z Flip3/Z Fold3 5G

Check which app usage more data and stop app background data using below settings.

Step 1: Go to Phone settings.

Step 2: Tap on Connection.

Step 3: Tap on Data usage.

Step 4: Tap on Mobile data usage.

Step 5: Select the App usage more data.

Step 6: Toggle off Allow background data usage.

Alternative Way: Settings > Apps > Select the app > Mobile data > Toggle off Allow background data usage

How to Set Background Usage Limits on Samsung Galaxy Z Flip3/Samsung Galaxy Z Fold3 5G

You can limit battery usage for app that you don’t use often in your Samsung One UI 3.1. Add apps to sleeping apps (Run in the background only occasionally), deep sleeping apps (Never run in the background), and never sleeping apps.

Settings > Device care > Battery > Background usage limits > Toggle on Put unused apps to sleep

How to Enable Data Saver on Samsung Z Flip3 5G

Settings > Connections > Data usage > Data saver > Toggle on Turn on now

How to Enable Power Saving Mode on Galaxy Z Flip3/Galaxy Z Fold3 5G

When turning on power saving mode, you can see background network usage, syncing, and location checking will be limited. You can also set additional limits to save more power.

Settings > Device care > Battery > Toggle on Power saving mode

How to Enable Ultra Data Saving Mode on Samsung Galaxy Z Flip3

It will save and manage mobile date to restricting the usage of background data for apps on your Samsung One UI 3.1. Add up to 6 apps which can use cellular data while running in the background.

Settings > Connection > Data usage > Ultra data saving mode at the end of the page > Toggle on > Enable

And that’s all. Do you know any alternative methods to limit data usage on Samsung Galaxy Z Flip3? Share it with us in below comment box.

How to Use Gesture Navigation in OnePlus 11, 11R, 10 Pro, 10R, 10, 9 Pro

Do you want to change the system navigation bar buttons to full-screen gestures on your OnePlus phones? Here’s how to activate and use gesture navigation in OnePlus 11, 11R, 10 Pro, 10R, 10, 9 Pro, 9R, and 9. You can enable a 3-button navigation bar (Back, home, recent) or navigation gestures. Also, customize the navigation bar to be long or double press home, back, and recent buttons.

You can turn on or off other OnePlus full-screen gestures settings, including hide the gesture guide bar, vibrate on back navigation, switching to the previous app, or mistouch prevention. 

Check More:

How to Use Gesture Navigation in OnePlus 11, 11R, 10 Pro, 10R, 10

Step 1: Go to Settings.

Step 2: Scroll down and tap Additional Settings.

Step 3: Tap System navigation.

Step 4: Choose a Gestures.

Go Back: Swipe from the right or left edge to the middle of the screen.

Go Home: Swipe up from the bottom of the screen.

Switch Between Apps: Swipe up from the bottom, hold, then release.

How to Get Back 3-Button Navigation in OnePlus 11, 11R, 10 Pro, 10R, 10

Settings > Additional Settings > System Navigation > Choose a Buttons.

You can change the order of the 3-button layout for the back and recent buttons.

How to Enable Gesture Navigation in OnePlus 9 Pro, 9R, 9

How to Activate Gesture Navigation in OnePlus 9 Pro/OnePlus 9 5G
How to Activate Gesture Navigation in OnePlus 9 Pro

Step 1: Pull down the top notification panel and tap the Settings (Gear) icon.

Step 2: Scroll down and tap on Buttons & gestures.

Step 3: Tap on the Navigation bar & gestures.

Step 4: Choose the navigation bar from Back, Home, Recents, or Navigation gestures (We choose).

You can see a horizontal line at the bottom middle of the screen instead of three-button navigation on your device. Toggle on hide the bottom bar if you want to use full-screen gestures (Stock Android navigation gesture).

Back: Swipe inward from the left or right edge to return to the previous screen.

Home: Swipe up from the bottom edge of the screen.

Recent: Swipe up from the bottom edge of the screen and pause.

Switch to the previous app: Swipe left or right along the screen’s bottom edge, then release your finger.

How to Customize Navigation Bar (Three-button navigation) on OnePlus 9 Pro, 9R, 9

Ensure you enable 3 button navigation bar on your OnePlus 9 Pro/OnePlus 9 Oxygen OS.

Step 1: Go to Phone settings.

Step 2: Tap on Buttons & gestures.

Step 3: Tap on the Navigation bar & gestures.

Step 4: Select Back, Home, and Recent.

Step 5: Tap on Navigation bar customizations.

You can select a double-tap or long-press action for the home button, recent button, and back button settings. Also, enable swap buttons to swipe the order of recent and back buttons.

Step 6:  We select Long press action in the home button section.

Step 7: Choose from No action (By default)/Open or close menu/Search assistant/turn off screen/voice search/open shelf/open or close notification centre/open or close split screen. And that’s all.

Do you still have questions about activating gesture navigation in the OnePlus phones? Which navigation gesture do you use on your OnePlus device? Tell us in the comment box below.

Read Also:

How to Enable Hidden Space in OnePlus 9 Pro

Do you want to hide apps on OnePlus 9 Pro/OnePlus 9? Here’s how to enable hidden space on OnePlus 9 Pro. You can set a password (Pattern or Fingerprint) to access hidden space in your OnePlus 9 Pro device. You can hide your important apps from the app drawer so only you can access them using this feature. Unhide the app to remove particular apps from hidden space. Also, use app locker to lock apps using fingerprint on your OnePlus devices like OnePlus 9/OnePlus 9R/OnePlus Nord 2/OnePlus Nord/OnePlus Nord CE 5G.

Read Also:

How to Use Hidden Space in OnePlus 9 Pro/OnePlus 9 5G

How to Enable Hidden Space on OnePlus 9 Pro/OnePlus 9 5G
How to Enable Hidden Space on OnePlus 9 Pro

By default hide hidden space feature on your OnePlus device. You can access it using below given two methods.

How to Access Hidden Space OnePlus 9 Pro

Slide outwards with two fingers on the home screen to enter hidden space or slide to the right in the drawer to enter hidden space

How to Hide Apps on OnePlus 9 using Hidden Space

Step 1: Open the app drawer and swipe screen right side to access hidden space on your device.

Step 2: Tap on the + icon at the top right.

Step 3: Select Applications to hide.

Step 4: Tap on the Right arrow icon to apply it.

How to Enable Password for Hidden Space on OnePlus 9 Pro

Step 1: Open the app drawer and swipe screen right side to open the hidden space on your device.

Step 2: Tap on Three vertical dots (More) at the upper right.

You can see a list of hidden apps here.

Step 3: Tap on Enable password.

Step 4: Use the Pattern or PIN or touch the Fingerprint sensor or Face unlock you want to use to access hidden space.

Now, lock the hidden space in your device.

Step 5: Open the app drawer and swipe the screen right side to open the hidden space.

Step 6: Unlock your phone to use hidden space.

How to Disable Password on Hidden Space on OnePlus 9 Pro

Open the app drawer and swipe screen right side to access hidden space > Three vertical dots (More) > Disable password

How to Unhide App on Hidden Space on OnePlus 9 Pro

Step 1: Open the app drawer and swipe screen right side to access hidden space on your device.

Step 2: Long press the app icon and tap on Unhide.

You can find the app in the app drawer on your device. And that’s all.

Do you use the hidden space feature on your OnePlus 9 Pro? Which is your favorite OnePlus 9 Pro feature? Tell us in below comment box.