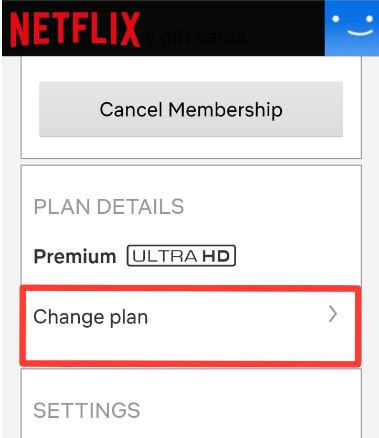
How to Delete Watch History on Netflix on Android

Want to delete Netflix viewing history on Android phone or tablet? Here’s how to delete Netflix history on Android. You can see a list of movies, series, or TV shows you have watched in your Android or iPhone devices. Also, hide all of your viewing activity on Netflix or hide titles from your activity on your phone. You’ll clear viewing history in Netflix using my activity page in your Android or iOS devices.

If you are hiding an episode, you will be given the option to hide the entire series on your phone. Once you hide a title from your viewing activity, it will no longer display as a title you have watched.

Read Also:

How to Delete Netflix History on Android phone or tablet

You can view and delete recently watched or hide viewing activity on Netflix Android using below given settings.

Step 1: Open Netflix app in your android and sign in with your id & password.

Step 2: Tap Thee horizontal lines (More) at the bottom right corner.
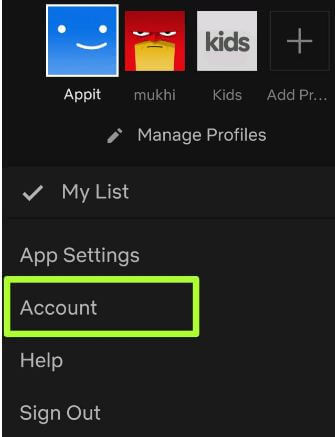
Open Netflix account on your android phone

Step 3: Tap Account.

Clear viewing history in Netflix

Step 4: Scroll down up to My Profile section and tap viewing activity.

You can see the activity list in your android phone or tablet such as movies, TV shows, and other entertainment.

Delete Netflix history on Android

Step 5: Tap icon from the right side to hide viewing activity (Show above screenshot).

Within 24 hours, select movies or TV shows will no longer appear in the Netflix service as a title you have watched and will no longer be used to make recommendations to you. To shown again deleted title, you play the title again.

How to delete Netflix history on Android

Step 6: Tap Hide all at the end of the page to hide your entire Netflix history on android.

You can see the pop-up screen: Are you sure?

Hide your entire Netflix history on android

Step 7: Tap Yes, hide all my viewing history.

Now all you’re watching Netflix history hide or will be removed from your viewing activity on android or iOS devices within 24 hours. Also clear continue watching on Netflix Android or iOS phone.

You’ll enjoy Netflix on PS4, Xbox, Apple TV, Smart TV, and smartphones and watch your favorite TV shows, movies, web series, comedy programs, and more.

And that’s all. We hope this makes it clear how to delete Netflix’s history on Android devices. If you have any kind of question, tell us in below comment box. Stay and connect with us for the latest updates. Don’t forget to share it with others.

How to Delete a Netflix Profile on Android, iPhone, PC or TV (2023)

Do you want to delete a Netflix profile of other user’s in your Netflix account? Here’s how to delete a Netflix profile on Android, iPhone (iOS 16), PC, or TV using manage profile settings. You can create a maximum of 5 profiles on Netflix when selecting a premium ultra HD plan on your Android or iPhone devices. Also, create a separate Netflix profile for kids or children or private accounts on your phone. You can watch online movies or TV shows and download videos on your Android or tablet. Follow the below-given step-by-step process to remove the Netflix profile on an Android phone.

How to Delete Profile on Netflix Android Phone or Tablet

You can remove Netflix profiles on Android by using Netflix manage profiles settings. Also, edit profiles on Netflix, such as changing the profile’s name and language, or delete it from your device.

How to Delete a Netflix Profile Android Phone or Tablet

Step 1: Open the Netflix mobile app on your device.

Tap the Profile icon you want to delete

Step 2: Tap the Profile icon at the top right corner.

Manage profiles in Netflix app android device

Step 3: Tap the Manage profiles.

Here you can see the list of created Netflix profiles on your Android devices.

Delete a Netflix profile on Android phone

Step 4: Tap on the Profile you want to remove.

How to delete a Netflix profile on Android

Step 5: Click Delete profile.

Note: Make sure the profile is not set as currently active. To delete the Netflix profile, please switch the profile. You can’t remove the main Netflix profile.

You can see this pop-up message on the screen: Are you sure you want to delete this profile? This profile’s history will be gone forever, and you won’t be able to reaccess it.

Remove profile on Netflix Android

Step 6: Delete profile.

Deleting a profile on Netflix will permanently delete viewing history, saved games, my list, and other Netflix history of this profile. You can easily create a Netflix profile and switch users on the Netflix app on Android devices.

How to Delete a Profile on Netflix PC/Laptop

Step 1: Open Netflix.com on your PC or Laptop and sign in to your Netflix account.

Step 2: Click Manage Profiles.

Manage profiles on Netflix PC

Step 3: Tap Any profile you want to delete.

How to Delete a Netflix Profile

Step 4: Scroll down and tap the Delete Profile.

How to Delete a Profile on Netflix PC

Step 5: Tap again on Delete Profile.

Removing a Netflix profile will be deleted this profile’s history from your device.

How to Delete a Netflix Profile on iPhone 

Step 1: Open the Netflix app on your Apple device.

Step 2: Tap the More at the bottom right corner.

Step 3: Select Manage Profiles.

How to Delete a Netflix Profile on iPhone

Step 4: Select the Profile you want to delete.

Step 5: Select Delete profile at the bottom.

How to Remove Netflix Profile on TV

Step 1: Open the Netflix app on your Smart TV.

Step 2: Tap on Menu at the top left.

Step 3: Tap the Profile icon at the top to view all Netflix profiles.

Step 4: Tap the Profile you want to remove.

Step 5: Click on Delete Profile at the bottom.

How to Change Netflix Profile Icon 

Step 1: Open the Netflix app on your phone.

Step 2: Tap the Profile icon at the upper right.

Step 3: Tap the Manage profiles.

Change Netflix Profile Icon on Android or iPhone

Step 4: Tap the Pencil icon of the profile you want to change nflx profile picture.

How to Change Netflix Profile Icon Android device

Step 5: Tap the Pencil icon of your profile picture.

Step 6: Choose the Netflix app icon from the list you want to set.

And that’s it. I hope this tutorial is helpful to delete a Netflix profile on Android phones or tablets. If you have any trouble, please tell us in the comment box below. Stay and connect with us for the latest updates.

Related:

How to stop Netflix data usage on Android

Netflix app is one of the most entertainment app for watching HD or UHD movies and TV shows in android or iOS devices. To enjoy all movies & shows, first of all need to subscribe Netflix in android or iOS phone. By default automatically turn on mobile data usage in Netflix Android device. So here’s the complete guide to stop Netflix data usage on Android phone.

You can reduce Netflix data usage on android under app settings. Just turn off automatic mobile data usage and automatically select save data that control data usage in Netflix app Android. Also change download video quality in Netflix to control data in your phone. Follow below given step by step process to stop Netflix data usage on android phone.

You May Like This:

How to limit mobile data usage on YouTube Android

How to set up Google home on Android

How to manage profiles on Netflix Android

How to stop Netflix data usage on Android devices

When you enjoy Netflix movies or TV show, automatically use cellular data in your android or iOS device. To reduce data usage in Netflix app, apply below given settings.

Step 1: Open Netflix app in your android device and sign in with your id & password

Open Netflix app on android devices

Step 2: Tap three horizontal lines (More) at bottom right corner

Netflix app settings in android phone

Step 3: Select App settings

Netflix usage mobile data in android

Step 4: Tap Mobile data usage under Video playback

Reduce Netflix data usage on android

By default turn on toggle automatic. Here you can see below given three options. To choose from below given options, first of all you’ll need to turn off automatic toggle.

Wi-Fi only: You’re Netflix use Wi-Fi only when surf or download the movies or TV shows in your phone.

Save data: When your turn off automatic, automatically select this save data option. So it will helpful to reduce Netflix data compare to automatic.

Maximum data: It will use maximum data in your device while watching movies or TV shows in your Netflix app.

How to stop Netflix data usage on Android phone

Step 5: Choose from Wi-Fi only or Save data to reduce mobile data on Netflix app android or iOS

Step 6: Tap OK

This turn off cellular data will useful to stop Netflix data usage on Android devices. You can also change download video quality in Netflix android to uses less storage.

Change download video quality in Netflix android smartphone

Open Netflix app > More at bottom right corner > App settings > Download video quality > Standard or High

Netflix automatically adjust the video quality based on internet connection you use.

Read Also:

How to reduce mobile data usage on Google Pixel

How to restrict data usage on Android 10

How to stop an app from using data on Pixel 3 and Pixel 3 XL

Change Netflix playback settings on android to limiting data usage

By default set auto in Netflix playback settings in your android device. You can choose low or medium data usage per screen to reduce data usage in Netflix android.

Change Netflix playback settings on android to limiting data usage

Open Netflix app > More > Account > My profile > Playback settings > Auto / Low /Medium / High

Medium screen is use standard quality up to 0.7 GB per hour that uses less data in your device.

And that’s all. We hope this makes it clear how to stop Netflix data usage on Android devices. If you have any kind of question, tell us in below comment box. Don’t forget to share with others.

How to set up Google Home on Android

The most developing Google gives an eye-opening development in the form of virtual assistant cum your best friend Google home is hiking in the international market. Google home makes your life easy by its function of speaker, your daily task recorder, appointment and schedule manager etc. So all you need to know is how to set up Google Home on android.

You are very lucky that you purchased a brand-new Google home, so now don’t worries it is very simple to Google home set up. Only by speaking “ok Google” you will be able to set reminders, enjoy music, control a Chromecast which is connected to a TV or guide you about your people’s phone-number. Apply below given complete process to set up Google home on android phone.

You May Like This:

Google Home accessories deals

How to set up Amazon Echo

How to manage profiles on Netflix Android

Google Home mini accessories deals

Best steps for How to set up Google home on Android devices

How to set up Google Home on android device

Check out below given step by step guide to Google home set up in android phone or tablet devices.

Step-1: Plug in your Google home to power supply

Plug the provided power cord into your base of Google home and adapter an outlet, after a very few minutes, will light up and start looking for your mobile phone. It’s always on when plugged in, for better result keep your phone nearby to it. The first step for how to set up Google home on android is very simple.

Step-2: Download Google home app from app store and open it from your phone

Install Google home app and Make sure that the network connection is perfectly available and Wi-Fi is connected between the Google home and your phone due to information passing to Google home from your phone this is how the second step of Google home set up.

Step-3: Sign in to your Google account

If you have not g-mail account with a gmail.com than make a new account, it is preferable that don’t allow e-mail notification for perfect result of install Google home app.

Step-4: For setup tap the icon which is in the upper right-hand corner

After the successful installation of Google home mini app and Google home set up previous steps  sign in and set the location of your assistant Google home for information about local weather and commute times which will you get by speaker of your Google home. For full understanding of how to set up Google home on android take a tutorial.

Step-5: Link your music services accounts

Google home set up supports 4 services(Google play music, Pandora, Spotify and YouTube) , free service of music accounts allowed you to listen themed stations or artists mix, so for most benefit you need a premium account of Google play music or Spotify.

Step-6: Set up your custom preferences

Tap the left hand menu button after that more settings which can allow you to use your Google home set up suitable to your life style after taping on “account preferences”, you get special optional features.

Step-7: Change your news and my day settings

Taping news and then customize according to your requirements and set the source of your news from your Google home setup. Taping my day allows you to change a day-briefing detail.

Step-8: Modify or change what Google home calls you

Scroll all the way down in your Google home app and go to “personal info” after that “nick name” and put what you want anything which you like.

Step-9: Enter your accurate commute locations

You want Google home set up to give you a precise commute times?? Choose “home and work locations” which is under the “personal info” and put your perfect address. Then ask “how long is my commute”.

Step-10: Add other home appliances

Google home is supportive with Philips hue light bulbs, Samsung smart things, nest thermostats as well as Chromecasts. Google home set up want a Chromecast compatible TV for TV controlling. Choose the devices icon in chrome cast in the upper right corner of the main screen and link it with the same Google account which was used in install Google home app. Now you are able to control your TV by Google home. Just say “ok Google” and your favorite program.

Step-11: Now your Google home is ready to use control it by voice and touch

Eager about what to ask? see in your Google Home app. tap menu button on the upper left and select “What can you do?” for other suggestions. To change the volume level, make a dialing motion on the top surface of your Google Home, or say, “OK Google, volume” and a number from 1 to 11.

Have fun talking with Google! That is how to set up Google home on android.

How to Use a Smart Lock in OnePlus 11 and OnePlus 11R

Do you want to unlock your OnePlus 11 5G or OnePlus 11R 5g using a smart lock? Here’s how to use a smart lock in OnePlus 11 and OnePlus 11R. OnePlus 11 smart lock settings include On-body detection, trusted places, and trusted devices. You can find smart lock settings in the security & privacy settings.

What is Smart Lock in OnePlus?

When you use any smart lock feature, you can unlock your OnePlus device while it’s on you (On-body detection), at specific places (Trusted places) that you trust, or near your connected devices (Trusted devices).

How to Set Up and Use Smart Lock in OnePlus 11 and OnePlus 11R 5G

How to Use a Smart Lock in OnePlus 11 and OnePlus 11R


You can enable smart lock in OnePlus using the below-given settings.

Step 1: Swipe down the notification panel from the top and tap the Settings gear icon.

Step 2: Find the Security and privacy and tap it.

Step 3: Scroll down and tap the More security settings in the more settings section.

Step 4: Tap the Smart lock in the device security section.

This OnePlus smart lock option includes the below-given security features to unlock your OnePlus device.

On-body detection:

This feature unlocks your phone while it’s on you. When you’re holding or carrying your device, it will automatically unlock your OnePlus phone.

Trusted Places:

Add mostly use location or places list you are regular visitors, so when you reach that place, your OnePlus phone automatically unlocks. Turn on GPS in the OnePlus 11 to access trusted places smart lock.

Trusted devices

Add a trusted Bluetooth device to keep your device unlocked when nearby. You can add the Bluetooth watch, car’s Bluetooth system, and other accessories.

How to Turn Off Smart Lock in OnePlus

Remove the lock screen security on your OnePlus device to temporarily turn off the smart lock.

And that’s it. I hope this tutorial helps you use a smart lock in the OnePlus 11 series. Tell us in the given settings if you have any questions. Stay and connect with us for the latest updates.

Read Also:

How to set up Amazon echo

It is immense pleasure that you purchased Amazon echo device. Now you have an opportunity to ask Alexa anything at anytime by that your Amazon echo becomes your personal voice assistant and makes your life very simple and technological. But, before that you have to make sure for How to set up Amazon echo.

Amazon echo gives you a fast respond to your voice commands and play your favorite music, told you audio books, inform about weather, news, and much more things. Having a built-in microphones, the Amazon Echo is made to hear your audio commands no matter where you are in the room or if there’s background noise or there’s another music playing. Are you ready to get started? Here’s the steps for How to set up Amazon echo so called Alexa enabled Amazon echo.

Check This:

Best Amazon Echo dot speakers 2019

Amazon Echo accessories list

11 best Smart speakers with voice assistant

Got a brand new Amazon echo??? Don’t worry we guide you How to set up Amazon echo

How to set up Amazon echo

It is recommended that place your Amazon echo device in central position at-least 8 inches away from walls for best performance.

Step-1: First of all download app of Alexa and sign in

With the free app of Alexa, you can set up your echo, set your alarms, favorite music, all the tasks, and more. The Alexa app is available on phones as well as tablets with Android version 5.0 or higher and iOS version 9.0 or higher.

For the downloading the Alexa app, go to the play store on your mobile device and search for “Alexa app” in search box then click download.

From browser go to https://Alexa.Amazon.in/ from Safari, Google Chrome, Mozilla Firefox, Microsoft Edge, or Internet Explorer (10 or higher) on your Wi-Fi enabled PC, that is How to set up Amazon echo step first.

Step-2: Now turn on your Amazon Echo

Second step of How to set up Amazon echo Plug-in the included power adapter in Alexa enabled Amazon Echo and then into a power outlet. The light will ring on Amazon Echo turns blue, and after that orange color.

Step-3: Connect your Amazon echo to a Wi-Fi network

Follow the instructions which are given in manual guide in the app to connect Amazon Echo to a Wi-Fi network. To know more, go to Connect Your Echo Device to Wi-Fi.

 If you’re Amazon Echo having a problem for connect to your Wi-Fi network, unplug it and after that plug the device into a power outlet to restart. If you still have problem, reset your Amazon Echo to its factory settings and set it up once more. To understand more, go to Reset Your Echo Device.

Step-4: Now talk to Alexa

Your Amazon echo is ready-to-use.

To get started, speak the “wake word” and then say naturally to Alexa. Your Echo device is ready to give you response to the wake word “Alexa” by default, you can update it at any time. To change the wake word in the Alexa app, go to the devices icon, select your device, and then select the wake word you want.

Step-5: Connect any other device to your Amazon echo (example- external speaker)

While Amazon Echo has a speaker, but you can connect it to your any external speakers with an audio cable which can sold separately or through Bluetooth. So after understanding set up Amazon echo you can connect smart home devices enjoy it.

These steps are very useful to you for completely how to set up Amazon echo.