How to Remove Apps on Pixel 3 and Pixel 3 XL

Want to delete unused apps on Google Pixel 3 and Pixel 3 XL? Here’s how to uninstall the app on Pixel 3 XL and Pixel 3. You’ll delete apps that unnecessary or installed for single use only in your device. These delete apps from Google Pixel 3 XL and Pixel 3 will free up space in your device and speed up your Pixel 3 performance also. You can’t remove preinstalled apps (system apps), but disable preinstalled apps on Pixel 3 XL, and other android devices.

You can disable the app also to hide the app from your Pixel 3 and Pixel 3 XL home screen and app drawer. If you want to use the app again, just enable the app so you don’t need to install the app again and again in your device. Uninstall the Pixel 3 app if you don’t want to use that app in the future.

Read Also:

How to Uninstall/Delete App on Google Pixel 3 XL and Pixel 3

There are several apps installed on our devices that unnecessary or sometimes use only. So we can disable or uninstall apps from Pixel 3 XL and Pixel 3 Pie devices.

1st Method: Uninstall apps from Pixel 3 and Pixel 3 XL

If you don’t want to use the installed app again, remove or uninstall it from your device using below given settings.

Step 1: Long press any app and move it left or right side of the screen

Here you can see remove and uninstall option in your Pixel 3 device home screen.

How to remove app on Pixel 3 Pie

Step 2: Move the app to Uninstall at the top right side of the screen.

Step 3: You can see the pop-up message on the screen: Do you want to uninstall this app?

Remove app on Pixel 3 XL Pie

Step 4: Tap OK.

Now app removed from your home screen and app drawer in your Google Pixel 3 and Pixel 3 XL.

2nd Method: Remove app on Pixel 3 and Pixel 3 XL

Step 1: Open the Play Store in your Pixel 3, 3 XL.

Step 2: Tap Three horizontal lines (Menu) at the upper left corner of the screen.

Step 3: Select My apps & games.

Step 4: Tap the Installed tab.

Step 5: Tap app you want to uninstall from your android Pie device.

Delete apps on Google Pixel 3 and Pixel 3 XL Pie

Step 6: Tap Uninstall.

You can see this message on the screen: Do you want to uninstall this app?

Step 7: Tap OK.

Now app uninstalled from your Google Pixel 3 and Pixel 3 XL Pie device. If you want to hide the app from the Pixel 3 home screen or app drawer, disable the app on Pixel 3 XL and Pixel 3 using the below-given settings.

Disable apps on Pixel 3 XL and Pixel 3

Step 1: Go to settings in your device.

Step 2: Tap Apps and notifications.

Step 3: Tap See all apps.

Step 4: Select the app you want to disable or remove apps on your home screen.

Disable apps on Pixel 3 XL and Pixel 3 Pie 9

Step 5: Tap Disable.

This pop-up message view on the screen: If you disable this app, android and other apps may no longer function as intended.

Step 6: Tap again Disable app to hide Pixel 3 app from app drawer and home screen.

And that’s all. I hope this little tip useful to remove the app on Pixel 3 and Pixel 3 XL. If you have any kind of trouble, tell us in below comment box. Stay and connect with us for the latest updates.

How to Change Screen Timeout on Android 10, 9 (Pie), 8.1 (Oreo)

Want to change the lock screen timeout on Android 9 Pie and Oreo 8.1? Here’s how to set screen timeout for lock screen on Android 9 Pie devices. By default set screen sleep time in your latest android phone or tablet devices. After complete screen timeout time, you’re device automatically locked. To make your phone screen stay longer, you need to increase the screen lock timeout. It will useful to save battery life on Android devices.

You can change lock screen timeout too short or long under display settings in your android Pie 9.0, Oreo 8.1 and Nougat 7.1.2 devices. But you can’t completely turn off sleep time in your devices. Follow the below-given step by step process to set screen timeout Android 9 Pie and Oreo 8.1 devices.

Read Also:

How to Set Screen Timeout on Android 9 Pie

You can adjust screen timeout and sleep time on your latest Android devices using below given settings.

Change Lock Screen Timeout on Android 10

Step 1: Go to settings in your latest android devices.

Step 2: Tap on Display.

Step 3: Tap on Advanced.

Step 4: Tap on Screen timeout.

Step 5: Choose from 15 seconds/30 seconds/1 min/2 min/5 min/10 min/30 min

For Android 9 Pie and 8.1 Oreo:

Step 1: Swipe down notification shade twice from the top of the screen.

Extend lock screen timeout on Android 9 Pie


Step 2: Tap Settings gear icon.

Android Pie display settings for sleep time

Step 3: Tap Display.

Change lock screen timeout android Pie device

Step 4: Tap Advanced.

Here you can see brightness level, Night light, Adaptive brightness, Sleep, Auto-rotate screen, Ambient display, device theme, and other options.

Set screen timeout Android 9

Step 5: Tap Sleep.

How to set screen timeout Android 9 Pie

Step 6: Choose sleep time from 15 seconds/30 seconds/1 min/2 min/5 min/10 min/30 min

Now after the completion time of inactivity, you’re android device screen is the lock. If you don’t want to lock the screen while charging your device, enable stay awake under developer options in your android Pie 9.0 and Oreo 8.1.

Disable Screen Timeout Android 9 Pie and 8.1 Oreo While Charging

Step 1: Go to settings in your android Pie & Oreo.

Step 2: Scroll down up to the end of the page and tap System.

Step 3: Tap Advanced.

Make sure turn on developer mode in your android Pie 9 and Oreo devices.

Step 4: Tap Developer options.

Here you can see stay awake option that by default turned off in your device.

Change screen timeout period on Android Pie 9

Step 5: Turn on toggle Stay awake.

Now your android device can’t screen timeout while charging.

I hope this little tip useful to set screen timeout Android 9 Pie. If you have any kind of trouble, tell us in below comment box. Stay and connect with us for latest updates. Don’t forget to share it with others.

How to Reset WhatsApp Notifications Settings on Android

Annoying by WhatsApp notifications not working on Android phone or tablet? Here’s how to reset notifications settings on WhatsApp Android devices. By default set conversation tones, message notifications, group notifications and call notifications in your WhatsApp account. You can set your favorite notification tone on WhatsApp you want using WhatsApp settings in Android or iPhone. In WhatsApp notifications settings, you can set WhatsApp notification sound, WhatsApp pop-up notification, high priority notification, and more. Also, change or turn off conservation tone on WhatsApp Android.

Read Also:

How to Reset WhatsApp Notifications Settings on Android device

Step 1: Open the WhatsApp app in your android devices.

Step 2: Tap Three vertical dots (More) at the upper right corner of the screen.

WhtasApp notifications settings on Android devices

Step 3: Choose Settings.

Here you can see the account, chats, notifications, and data and storage usage settings in your Android or iOS devices.

WhatsApp notifications settings on Android phone

Step 4: Tap Notifications.

In WhatsApp notification settings, you can change notification tone, high priority notifications, stop pop up notifications, set ringtone, and more.

Reset WhatsApp notifications settings

Step 5: Tap Three vertical dots (More) at the upper right corner of the screen.

How to reset WhatsApp notifications settings on Android

Step 6: Tap Reset notification settings.

You can see this pop-up message on the screen: Reset app notification settings, including custom notification settings for your chats?

Reset WhatsApp notifications settings on Android

Step 7: Tap Reset.

It will reset all WhatsApp notifications settings from your android device.

How to Mute Chat Notifications on WhatsApp Android: Individual contact

Step 1: Open the WhatsApp app in your android devices.

Step 2: Tap Contacts icon at the bottom right corner of the screen.

A list of contacts are view in your device.

Step 3: Tap Any contact you want to mute chat notifications.

Step 4: Tap Profile.

Mute chat notifications on WhatsApp Android smartphone

Step 5: Toggle on “Mute notifications”

Mute chat notifications on WhatsApp app android

Step 6: Choose from 8 hours/1 week/1 Year. Also, check the box if you show notifications on the screen when receiving messages.

Step 7: Tap OK.

How to Change Notification Sound on WhatsApp Android

Change Notification Sound on WhatsApp Android Smartphone

Open WhatsApp > Three vertical dots (More) at the top right corner > Settings > Notifications > Tap Notification tone under the Messages section > Browse ringtone > Select tone > Save

How to Change Group Notification Sound on WhatsApp Android

Reset notifications settings on WhatsApp Android

Open WhatsApp > Three vertical dots (More) at the top right corner > Settings > Notifications > Tap Notification tone under the Groups section > Browse ringtone > Select tone > Save

How to Turn Off Notification Tone/Conversation Tone on WhatsApp Android

How to Turn Off Conversation Tone on WhatsApp Android Devices

Open WhatsApp > Three vertical dots (More) at the top right corner > Settings > Notifications > Toggle off Conversation tones

It will disable sounds for incoming and outgoing messages.

And that’s it. Do you still have a question about reset WhatsApp notifications settings on Android devices? If you have any questions, tell us in below comment box. Stay and connect with us for the latest updates.

How to download offline Google Map on Android

Want to download and use Google Maps offline on android or iPhone devices? Here’s how to download offline Google Map on Android phone or tablet device. In some of the places where you can’t get the internet connection or slow internet speed in your device, so download and save Google Maps directions for offline view in your Smartphone.

By default Google Map save offline on your device internal storage. Also save Google Maps data on SD card if you’re device inserted SD card. If you don’t want to use mobile data while use Google Maps, turn on Wi-Fi only option under Google Map app settings. Follow below given step by step process to download offline Google Map on Android.

Don’t Miss This:

How to delete YouTube offline video Android

How to share live location on WhatsApp Android

How to fix Google Map voice not working Android

How to track lost android phone using Google Maps

How to download offline Google Map on Android phone or tablet

You’ll use Google Maps offline to get direction, see routes detail and search for locations you want to download route. You can get driving direction offline, but not walking direction, transit or bicycling. Check out below given steps to navigate with Google Maps offline.

Step 1: Open Google Map app in your android device

Make sure your device connected with internet.

Download and use Google Maps offline on android

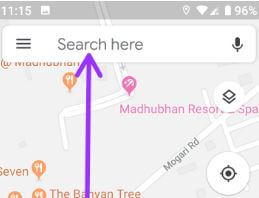
Step 2: Tap Search here and find the place you want to save offline map

Search place on Google Map Android

Step 3: Tap name you search from bottom of the screen

Google Map save offline

Step 4: Tap Three vertical lines at upper right corner of the screen

Use Google Maps offline on android

Step 5: Select download offline map

You can see this pop-up message of the screen: Download a map of this area?

Download offline Google Map on Android

Step 6:  Tap Download

Now wait until downloading offline maps in your android phone or tablet devices.

View downloaded Google Map on Android device

Step 1: Open Google Map app in your device

Step 2: Tap Three horizontal lines (More)

Step 3: Select offline maps

You can see list of downloaded maps.

How to download offline Google Map on Android

Step 4: Tap Google Map you want to view

You can view, rename, update map and delete it from your device. If you want to use offline map, but still use mobile data to other apps. Turn on Wi-Fi only in Google Map using below given settings.

Turn on Wi-Fi only on Google Maps to save battery & mobile data

Step 1: Open Google Map app in your android device

Step 2: Tap Three horizontal lines at upper right corner

Step 3: Turn on Wi-Fi only toggle in your device

And that’s it. We hope this makes it clear how to download offline Google Map on Android device. If you have any kind of trouble, tell us in below comment box. Stay and connect with us for latest updates.

How to control Amazon fire TV using Echo speaker

When you have a best streaming media device like Amazon Fire TV than you have to make sure that you have a perfect control of your Amazon fire TV. The control of your Amazon fire TV is very important, now you have opportunity to control your Amazon fire TV using Echo speaker. Controlling your fire TV using Echo speaker is an easy task after the steps of how to control Amazon fire TV using Echo speaker provided here.

Now the days are come when you can control your fire TV by only your voice without touching your TV’s remote control. Only you have Amazon Echo speaker like Amazon Echo, Echo dot. The best Alexa is in support for control Amazon fire TV. Here are the steps for how to control Amazon fire TV using Echo speaker.

You May Like This:

How to set up Amazon Echo dot

How to change Alexa wake word on Android device

How to use Alexa to control lights and devices

Steps for How to control Amazon fire TV using Echo speaker

How to control Amazon fire TV using Echo speaker

Now the fire TV is connected very easily with the Amazon Echo speakers, for example you have one Echo dot in your drawing room, you can watch your favorite programme only by saying Alexa, watch (show name). But only one fire TV is connected with the one Echo speaker. The other possibilities are that if you have a more than one fire TV than you must have an Alexa app for connecting more than one fire TV.

First of all go to the Alexa app than select ‘music, videos &books’ after that choose your fire TV and then check the boxes of Echo or Echos that you want to control it. Controlling fire TV is works on all the generations of fire TV stick and fire TV and all the generations of Echo speaker.

The other Alexa fire TV commands are also given by only voice through Amazon Echo speakers, some are the examples are as under.

Alexa, watch (movie name)

Alexa, pause

Alexa, fast forward ( ) minutes

Alexa, rewind ( ) seconds

Alexa next/previous episodes

Alexa, show me movies with (film-star name)

Alexa, open Netflix

Alexa, show me popular show on app etc.

Once you have synced all access to an absolute wealth of new Alexa voice commands. So by that you have relaxed and you can watch your favorite programme by seats on your couch by the steps which are given above for how to control Amazon fire TV using Echo speaker.

How to Locate a Lost Android Phone Using Find my Android Phone/Google Maps

Do you want to track a cell phone location free Google Maps or using Find my Android phone? Here’s how to track or locate my phone using Google Maps or cell phone locator. Using this new Google Maps setting, you can see the previous location of your Android phone or tablet by entering the date and location history on Google maps. Using the find my device app, you’ll also find your lost or stolen mobile phone number. It will help you locate your device remotely and keep your data safe if the device is lost. Make sure to turn on the Wifi or mobile data and GPS to use this feature. If you’re a Samsung device, you can use find my device Samsung or Samsung find my mobile to track lost Samsung Galaxy devices.

Don’t Miss: How to Find Lost Android Phone

How to Track a Phone Using Google Maps

Accidentally drop your Android phone somewhere? Check out below given complete process to find my lost phone using Google Maps or Google Find my phone.

Track Lost Android phones using Google Maps or Find my phone Google

You can view the device location history on your phone using the below-given setting.

Step 1: Open the Maps app on your Android phone or tablet.

Profile icon on your Google Map Android


Step 2: Tap on the Profile icon in the upper right corner.

How to Locate a Lost Android Phone Using Google Maps App


Step 3: Tap on Your Timeline.

You can see different tabs like day, trips, insights, places, cities, and world.

How do I Track a Cell Phone Using Google Maps

Step 4: Tap on the Tab (By default Day) you want to check your lost phone location.

Use Google map to track your lost Android phone location

Step 5: Tap on Today to view the calendar.

Step 6: Select the Date to view the location.

How to Track a Lost Android phones using Google Maps

Step 7: You can see the maps of that day (Place visits and time) you lost your Android device.

How to Find My Lost Android phone using Google Find my device Website

Step 1: Go to Settings on your Android devices.

Security settings on your Android Phones

Step 2: Scroll down and tap on Security.

Locate your lost Android phone using find my device


Step 3: Tap on find my device.

Make sure to turn on location on your phone.

Use Google Find my device app on Android

Step 4: Toggle on Use find my device.

If disabled, enable find my device on your Android devices. To find your lost device location, turn on GPS in your device using the settings below.

Find your lost device location if turn on GPS on Android

Settings > Location > Toggle on Use location

Now track and locate lost Android devices remotely.

First, download the Find my device app or use Android device manager on your PC or Laptop to locate lost phone. Open the Find my device app on your device. Now sign in with your lost phone Google account. Here you’ll see your device’s location if you activate GPS. You can see below given three options on your phone.

How to Find My Lost Android using Google Find my device

Play Sound:

When the location of your device is turned on, it will ring for 5 minutes, even if it is silent.

Secure device:

Use find my device feature to locate the lost Android phone

Lock your phone with a password, pattern, or PIN to protect your data. You can add a lock screen message and mobile number. After adding a detail, tap on the lock. So anyone who finds your lost phone Google will reach you using details.

Erase device:

You will no longer be able to locate it. It will erase all data from your device.

How to Track Lost Phone using IMEI Number – Track phone using IMEI Online Free

How to Track Lost Android Phone using IMEI Number

You can track your lost Android phone using an IMEI number (15 digits) through a nearby police station. Police used this IMEI number to find your lost phone location. Make sure to save or note down your phone IMEI number. To find your Android phone IMEI number, go to Settings > About phone > IMEI, or you can find IMEI on your phone box. Is it possible to track IMEI number through Google earth?

Frequently Asked Questions:

Can you Track an Android phone if lost?

Yes, you can track your lost Android phone and tablet using Google find my device app for your device and the Find my device web for computers or laptops. Make sure the location is turned on to locate phone Google.

How Do you Track Mobile Number Location when switched off or offline?

How Do you Track Mobile Number Location when switched off

You can track your lost phone location using Google location history. It will be useful to find where you go with your Android device. Ensure your phone is connected to the internet before switching off and logging in with your Google account. Go to Settings > Location > Location services > Google location history > Manage history.

Can you Track an Android phone through Google?

Yes, you can play sound, lock, or erase your phone data using your Google account if linked with your lost phone. Sign in with your Google account to another phone or PC using the find my device app and track your device if the location is turned on.

Can I Find my Phone Location by Number?

No, you can’t find your phone location by a number on your Android devices. You can use third-party apps (Spy apps) or phone services to track your lost phone.

And that’s all. We hope this clarifies how to track a lost Android phone using Google Maps. Stay and connect with us for the latest updates. If you have any trouble, please tell us in below comment box.

Related: